
In Crimson Desert, many weapons, armour pieces, and equipment can be found in each region, which can give you special abilities. These equipment pieces contain Abyss Cores, which grant special abilities and powers to your equipment. These cores can be removed and used for other equipment pieces as well. In this guide, we will show you the list of all the unique gear locations we have found so far.
All Unique Weapon Locations
You can collect unique weapons with strong modifiers and special abilities. These weapons are usually earned by defeating bosses or finishing certain quests, and unlike regular gear, they cannot be upgraded using duplicate copies.
Hwando
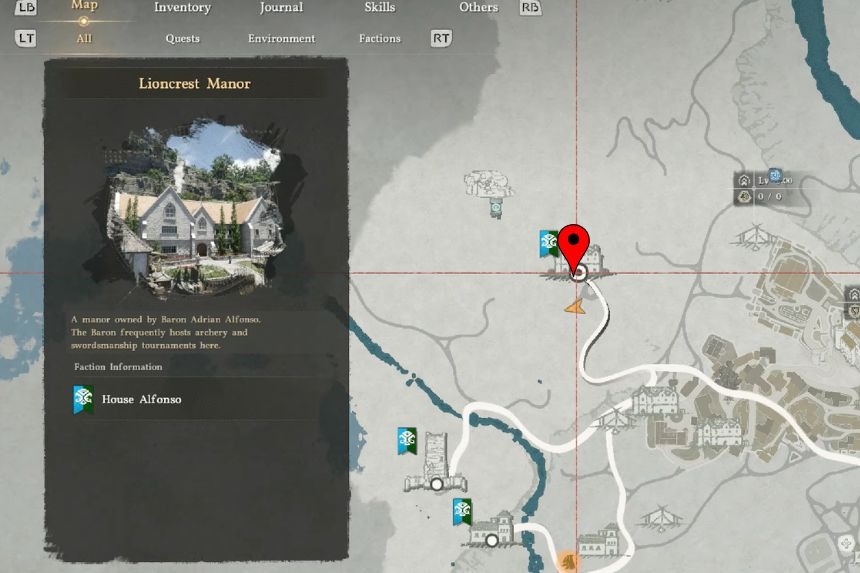
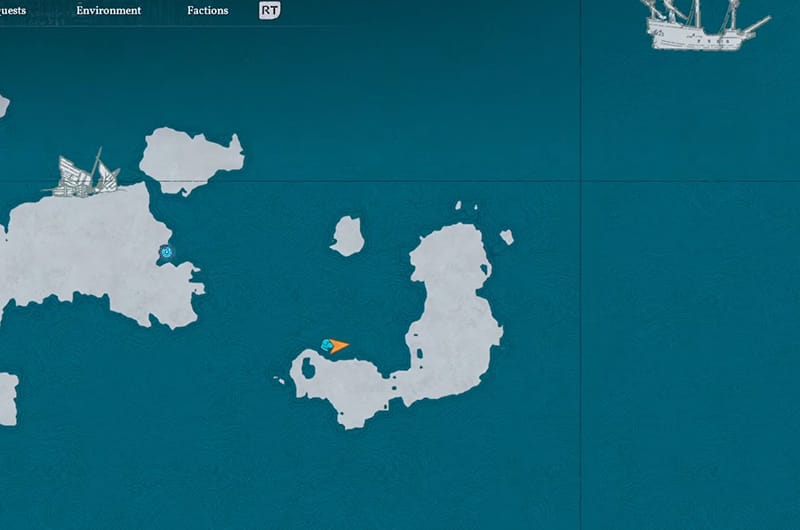
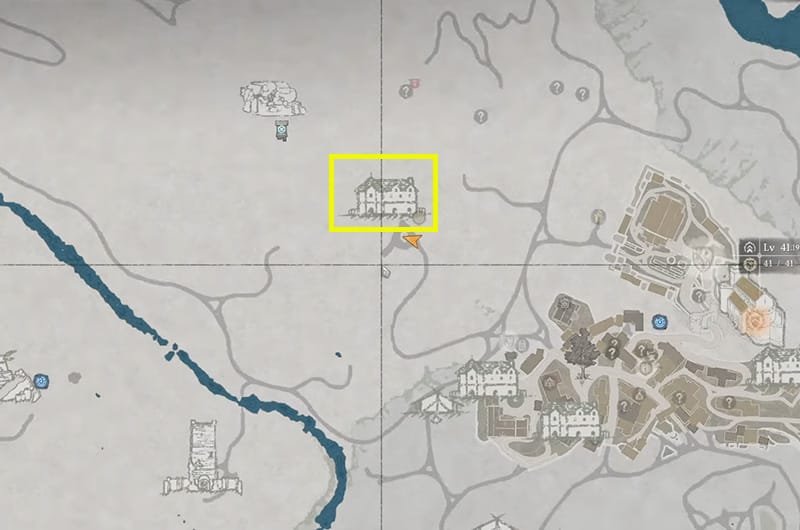
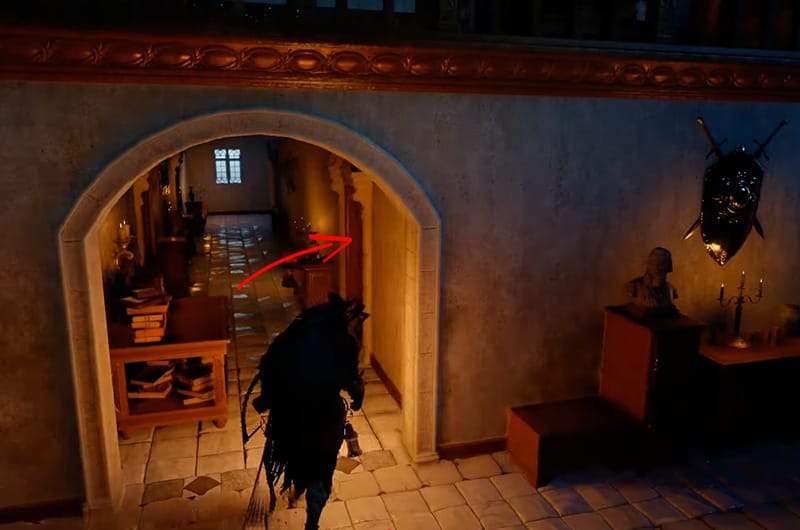
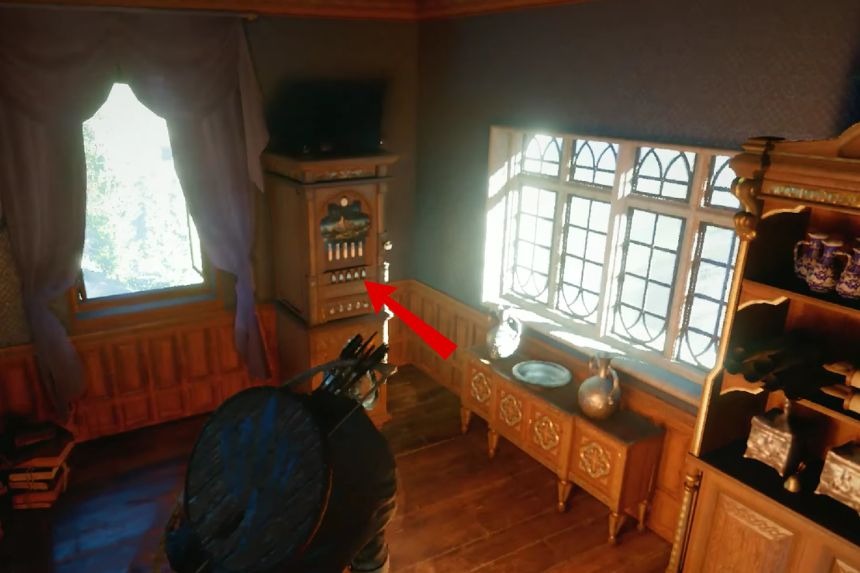
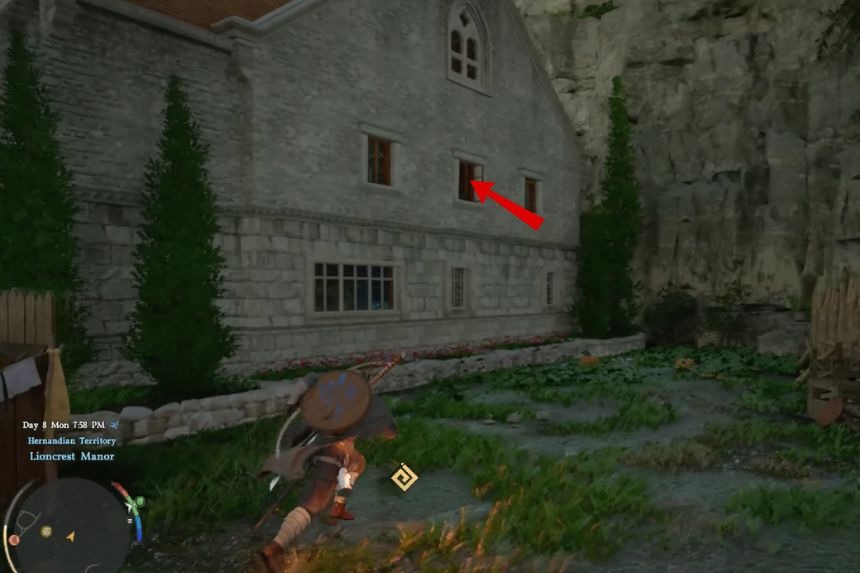
The Hwando is a special two-handed sword located in a side building near Lioncrest Manor. To get there, you need to go to the Back Alley Shop and purchase the key from there for 30 coins. After that, go to Lioncrest Manor, which is located northwest of the town. When you arrive at Lioncrest, you will notice that there are a lot of guards in the area.
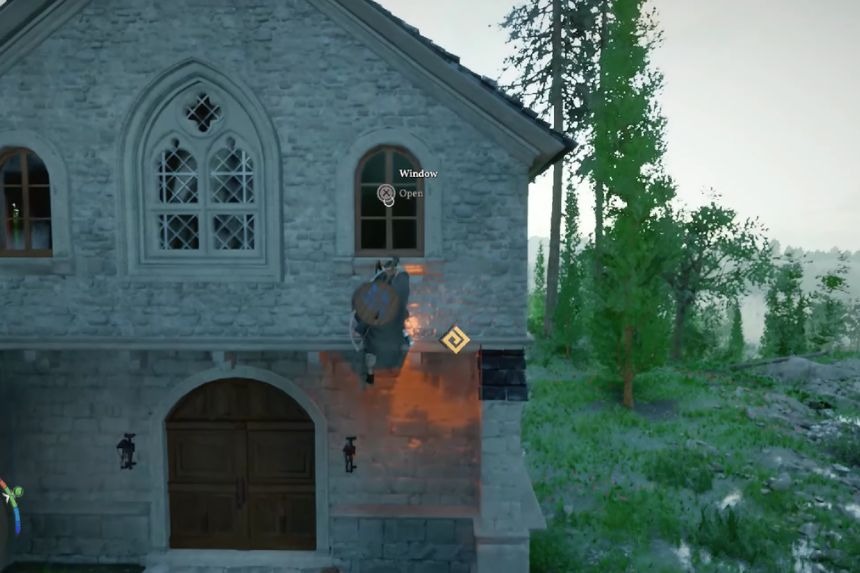
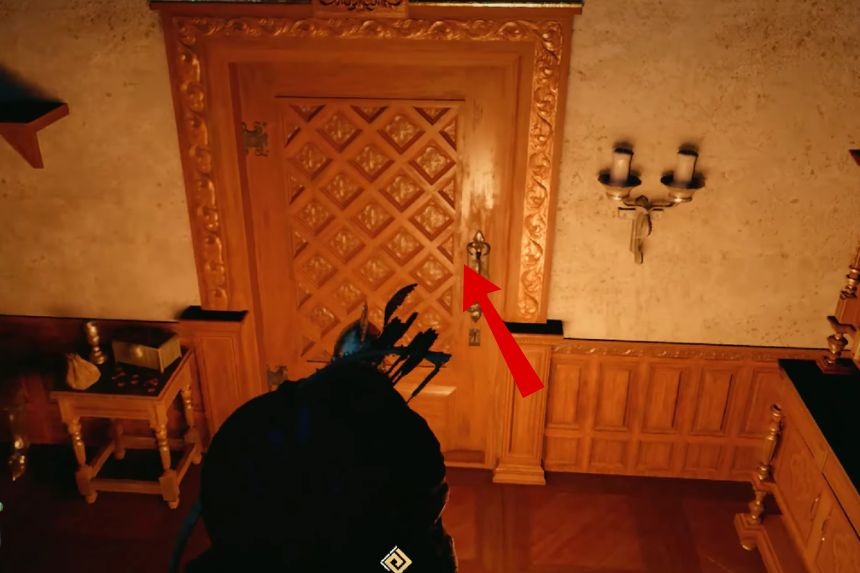
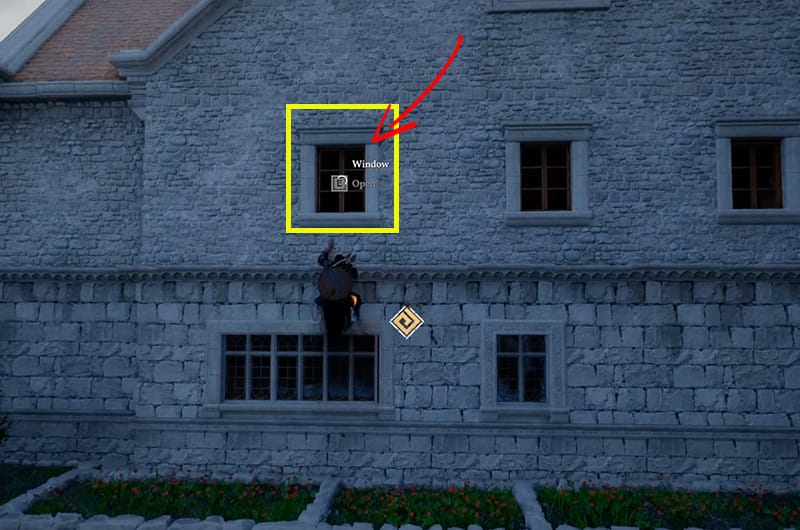
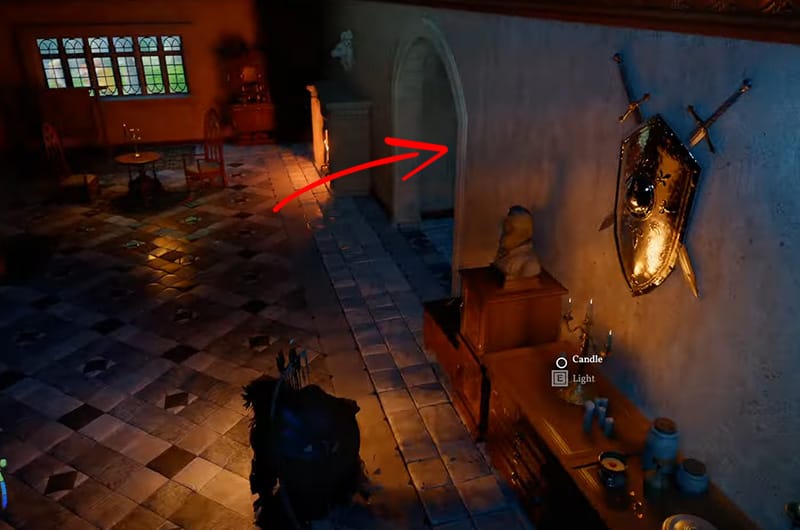
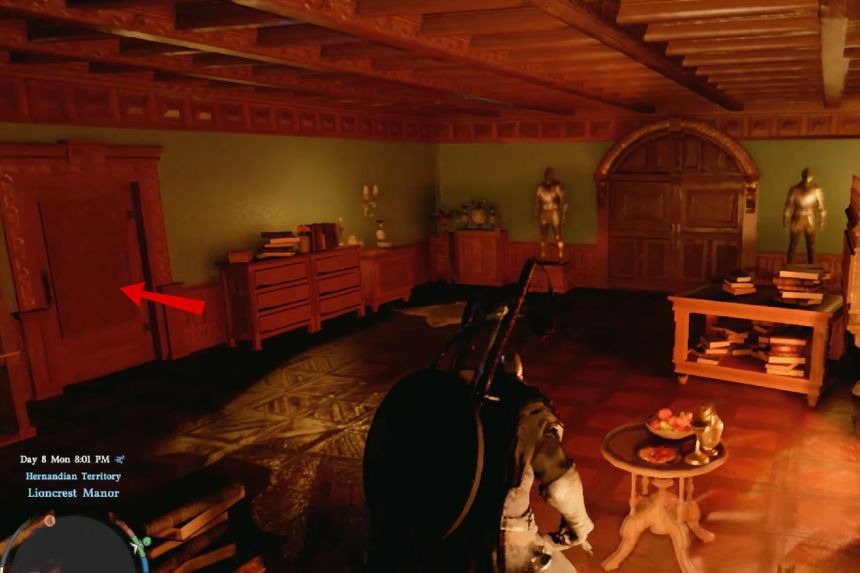
Move towards the western side of the house. There, you will find a closed window without any glass. You can climb up the wall to get to the window, and you will get the option to open the window and go inside. When you go inside, move towards the second floor. There, you will find a door that is locked. Just go through the door, and you will use the key to open it.
| Attack | 19 |
| Critical Rate | Lv 1 |
| Attack Speed | – |
| Refinement | 1/10 |
| Sells for | 15.39 |
Mining Knuckledrill
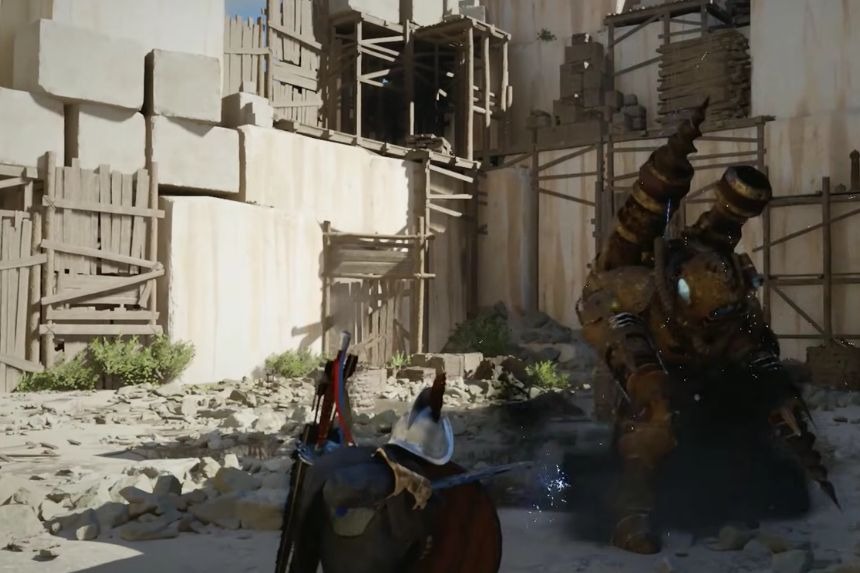
The Stolen Quarry quest is given through House Roberts, and the boss fight can be difficult. After defeating the Marni’s Excavation boss, you will receive the Mining Knuckledrill as your reward.
| Attack | 15 |
| Critical Rate | – |
| Mining Mastery | 10% Chance of additional 01 |
| Refinement | 2/10 |
| Sells for | 1.57 |
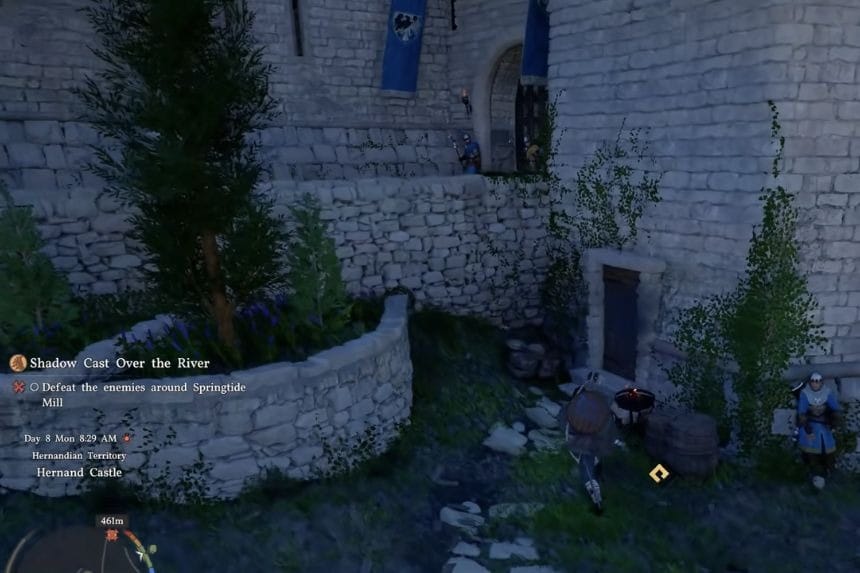
Legionary’s Gladius
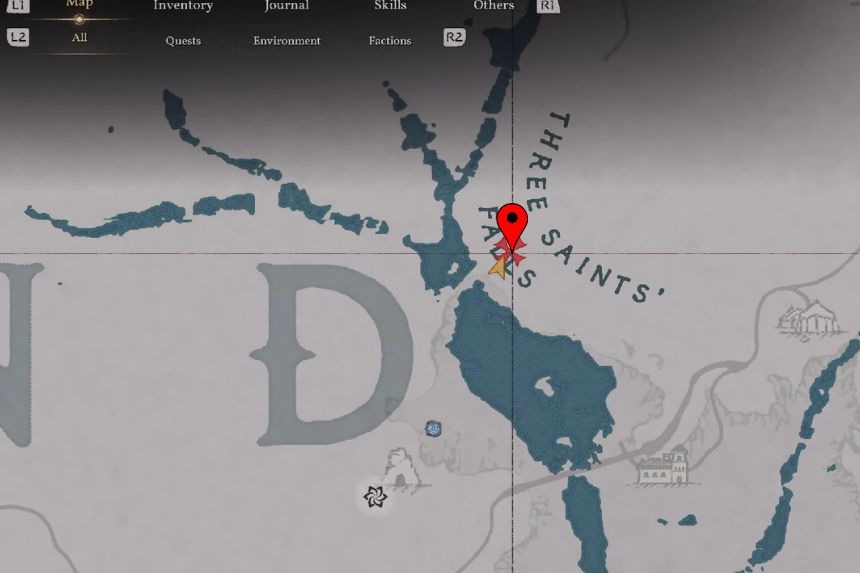
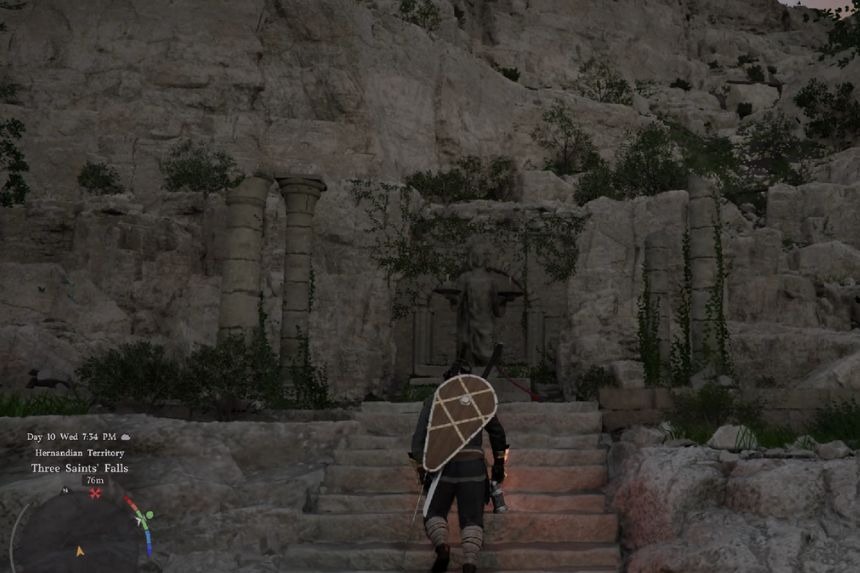
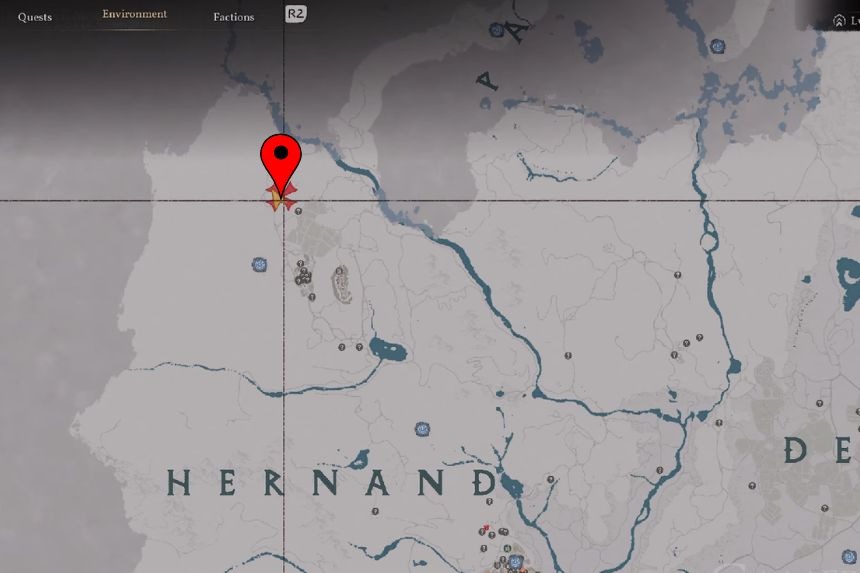
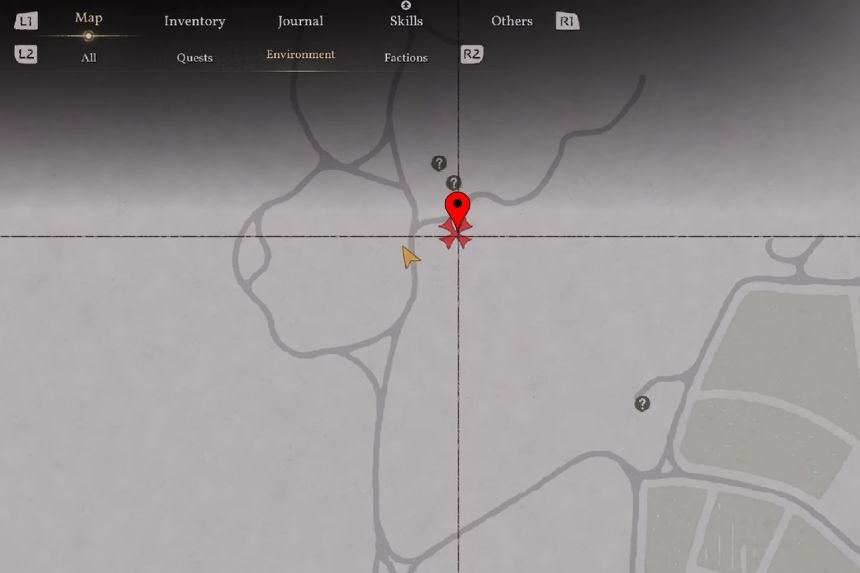
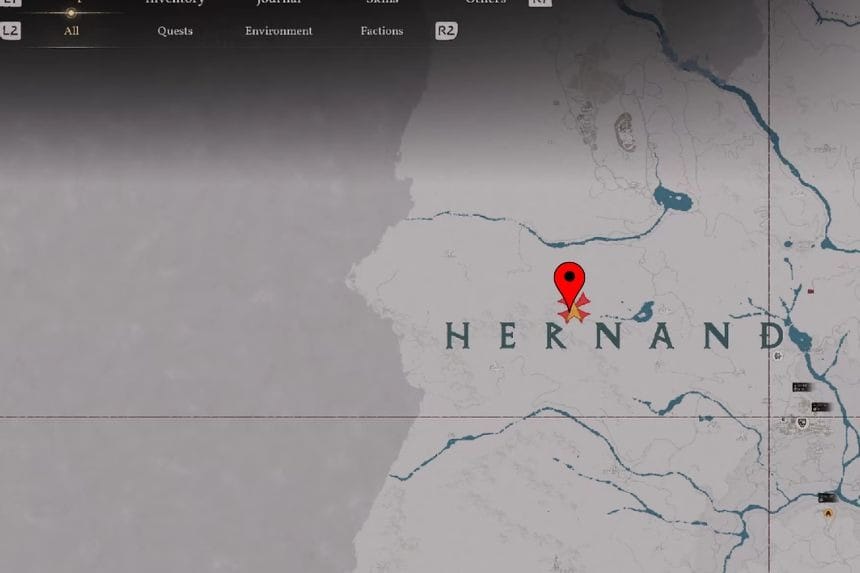
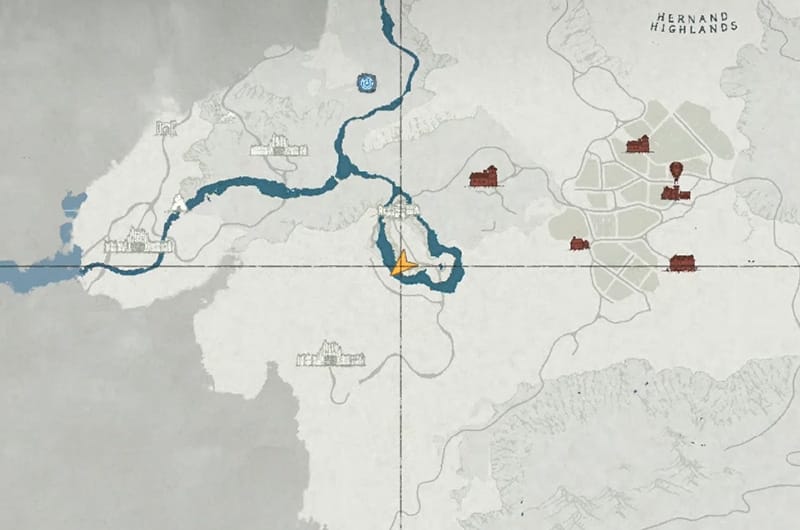
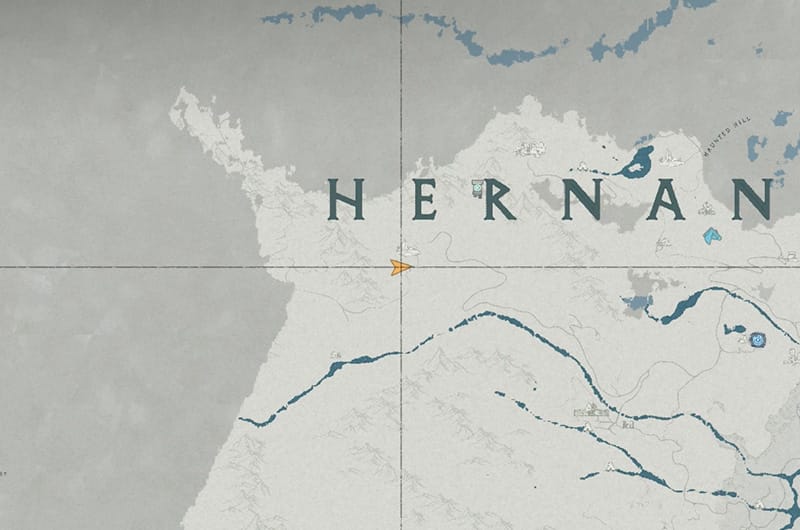
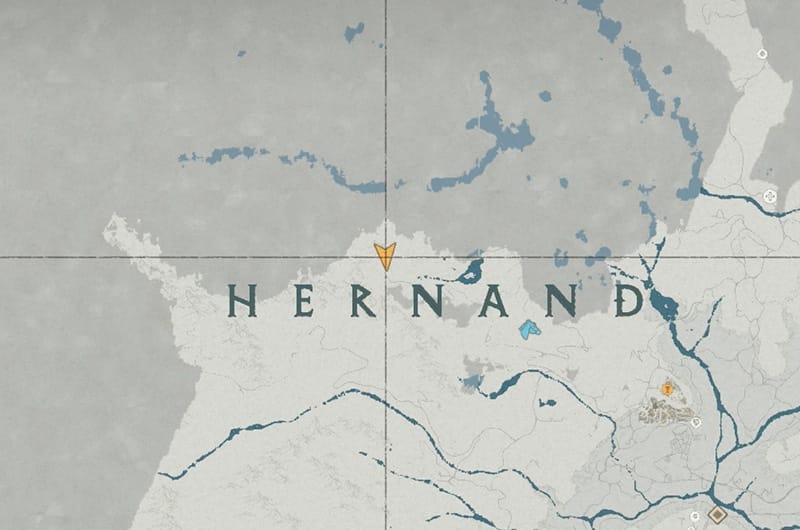
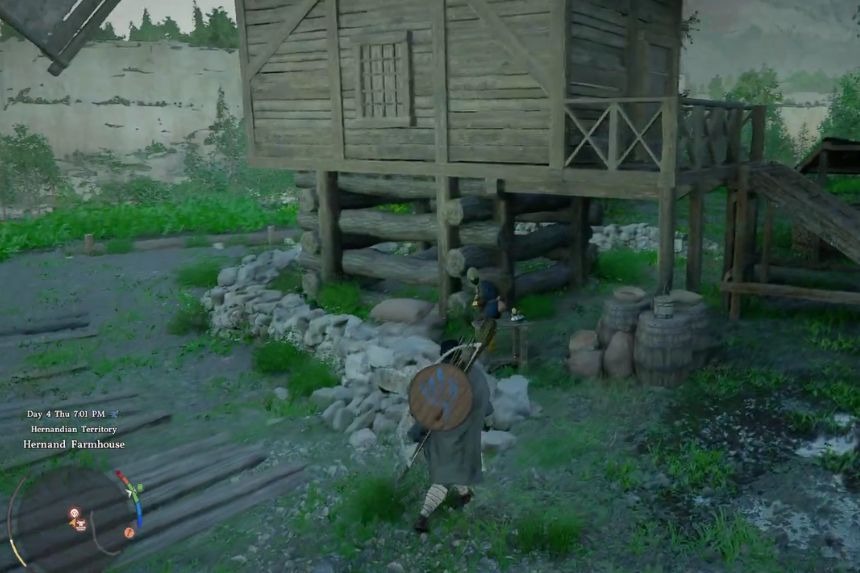
To get the Legionary’s Gladius sword, go north of Hernand Castle until you reach a large bridge. From there, go along the top of the cliffs near the base of Three Saints’ Falls. Moving along the right side of the cliffs, you will find a Statue of Justice. Interact with it to light both candles that it is holding. After lighting both candles, a gate will open. Go through it, open a treasure chest inside, and collect your reward.
| Attack | 12 |
| Critical Rate | – |
| Attack Speed | Lv 1 |
| Refinement | 1/10 |
| Sells for | 2.45 |
Volono Sword
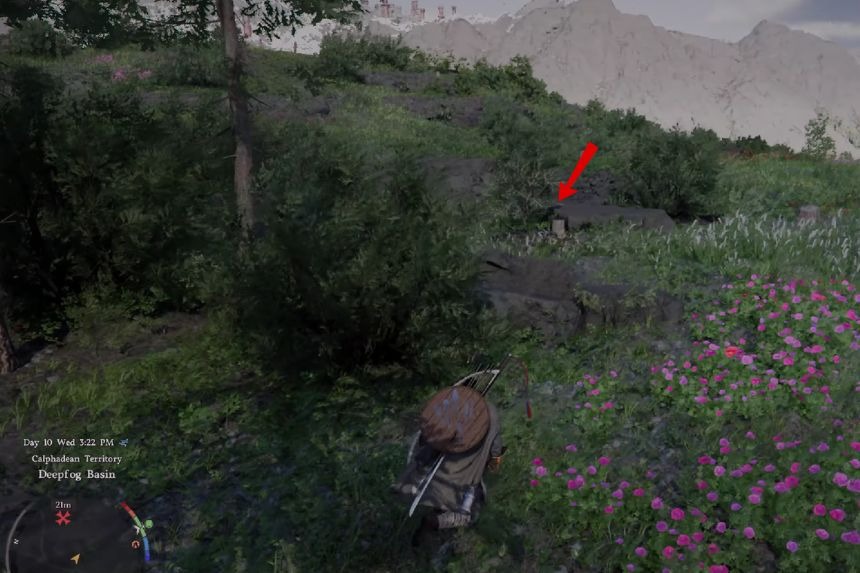
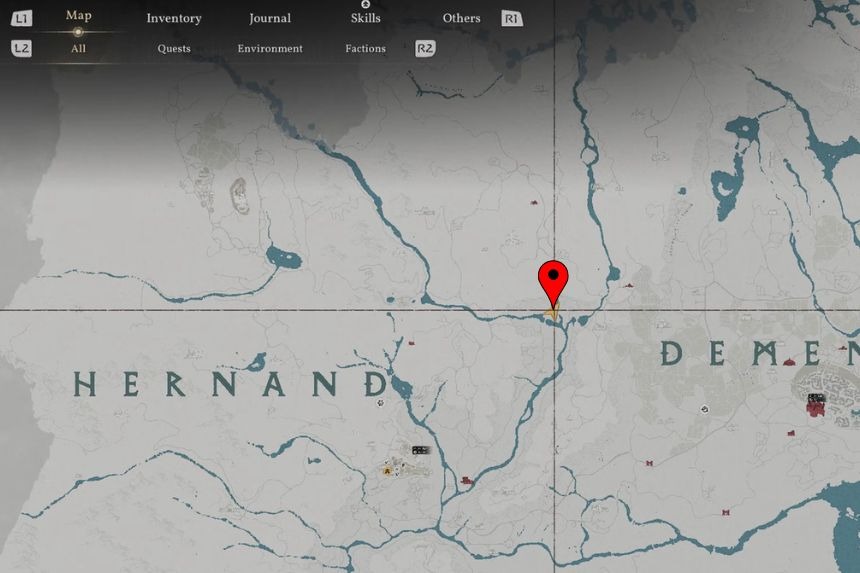
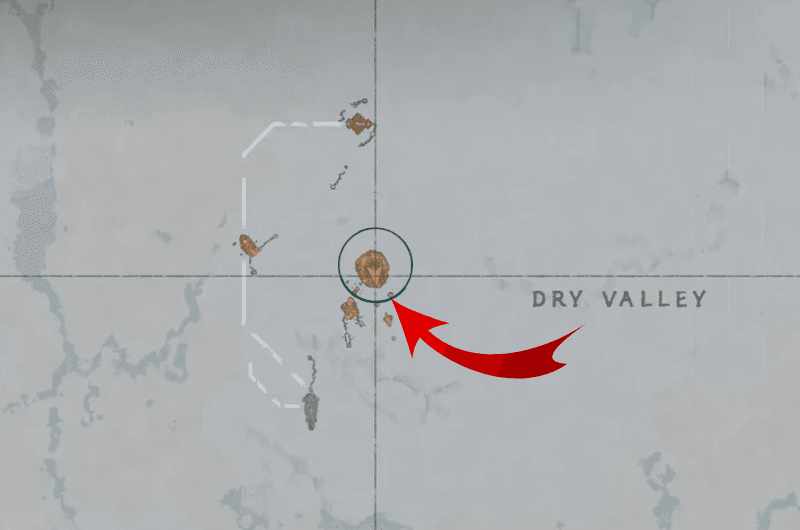
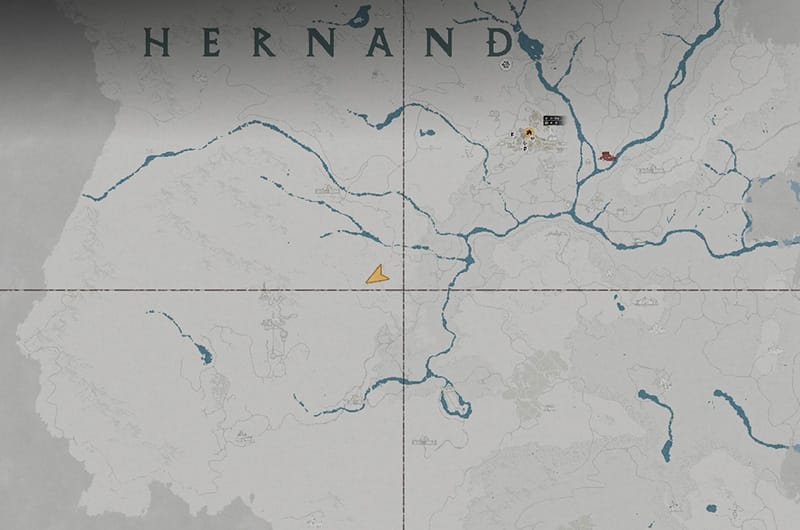
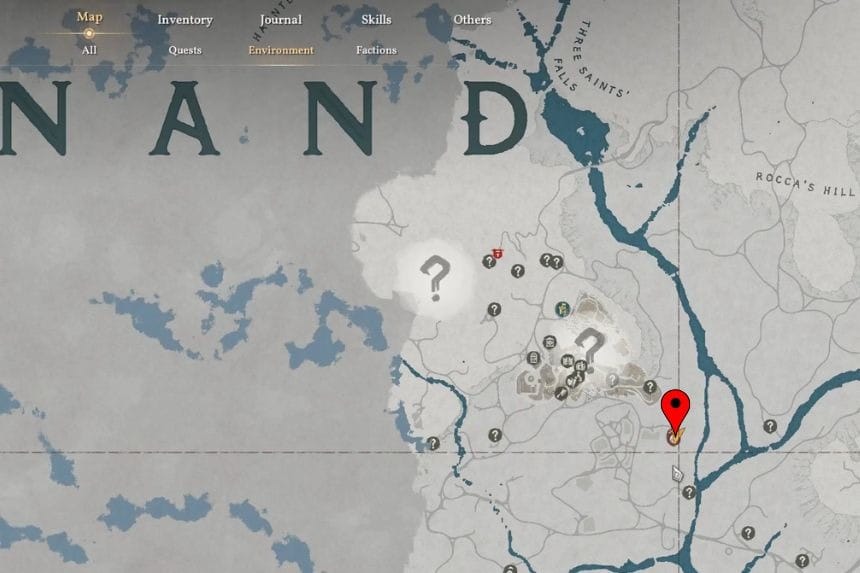
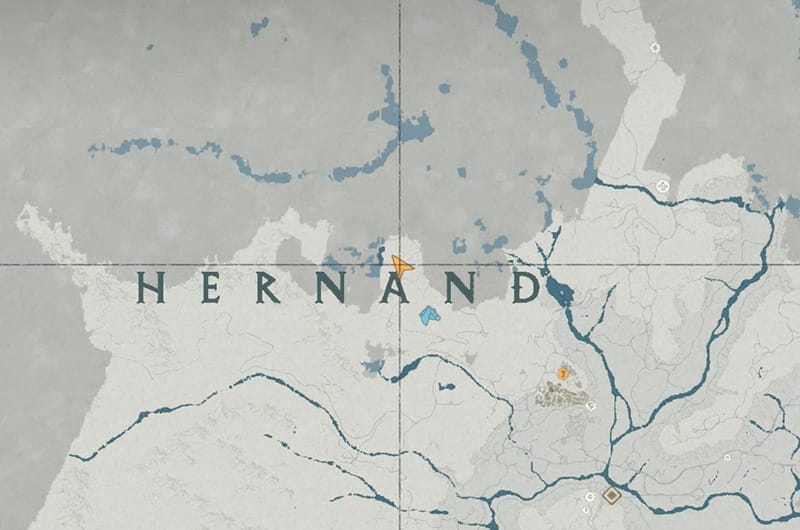
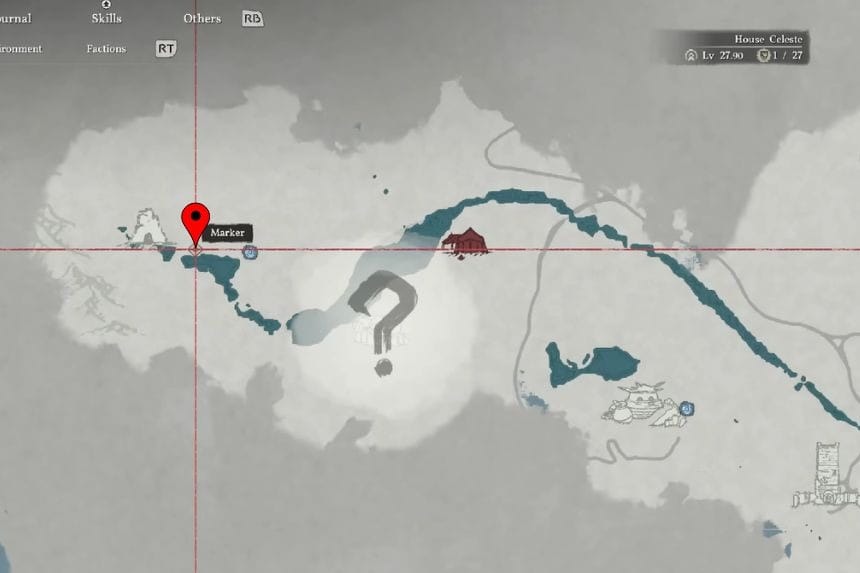
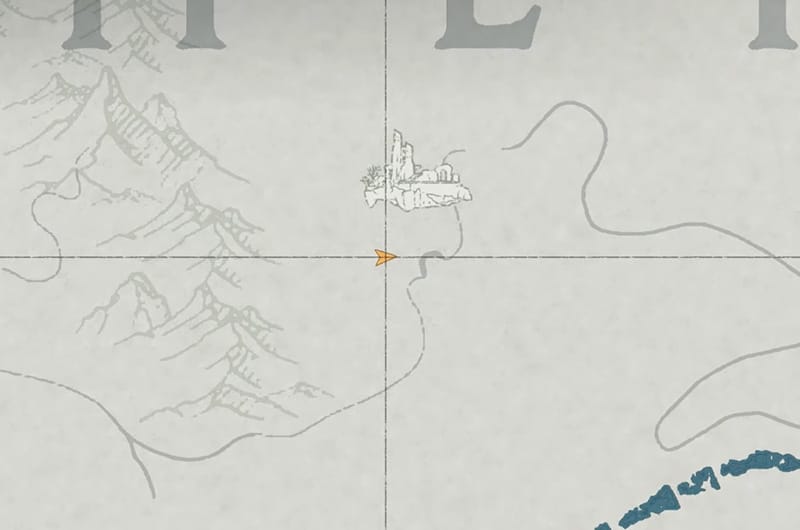
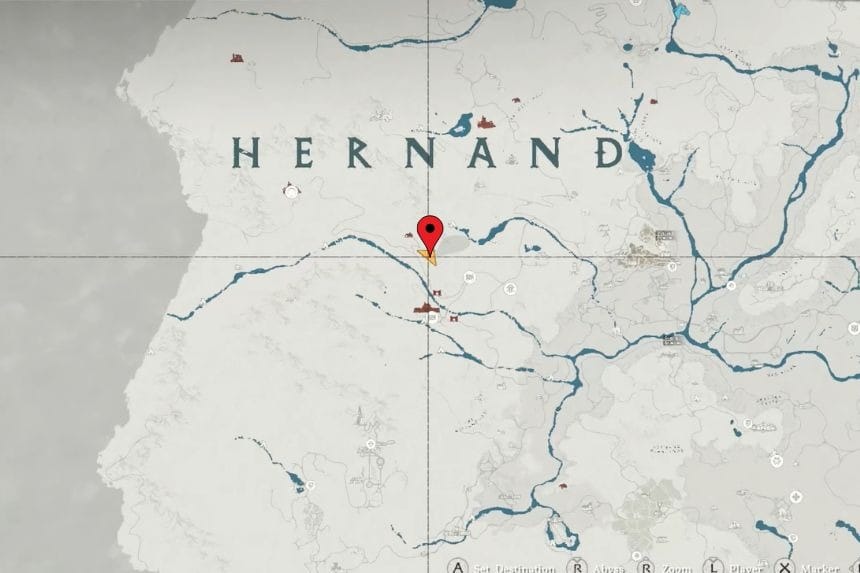
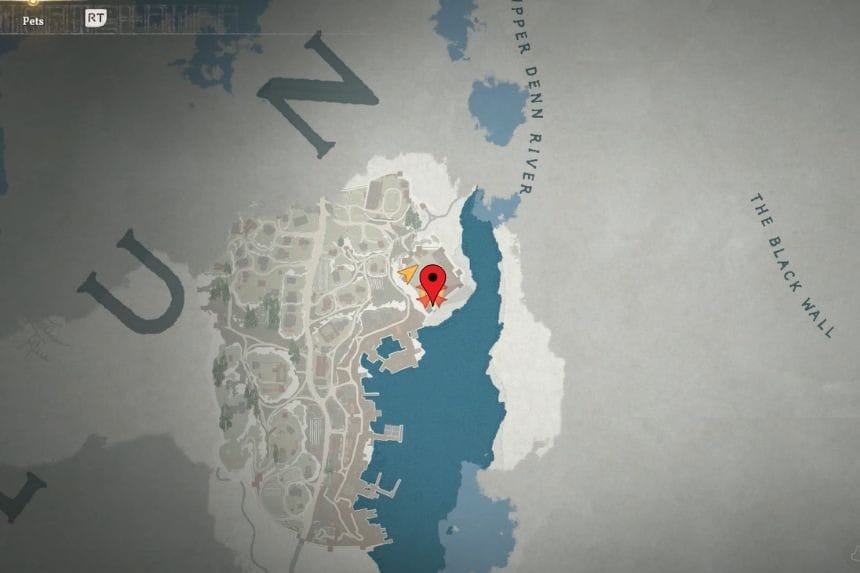
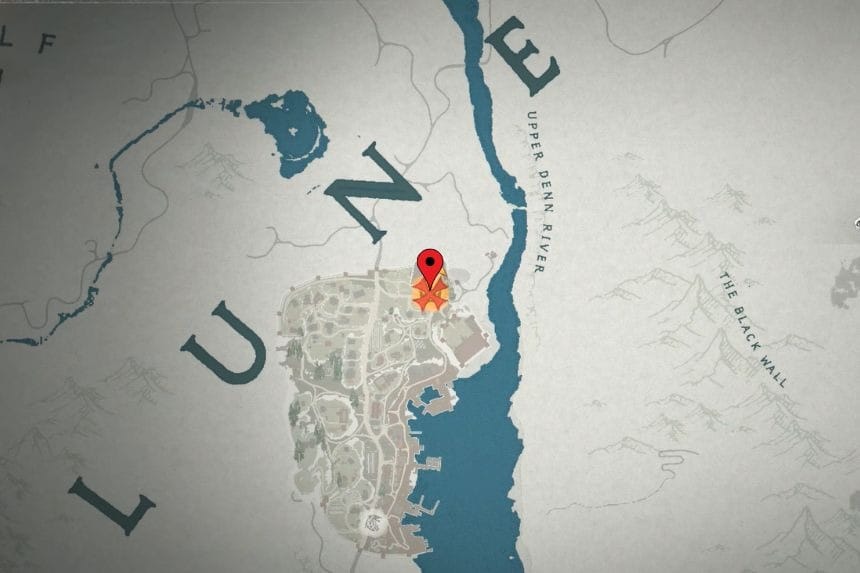
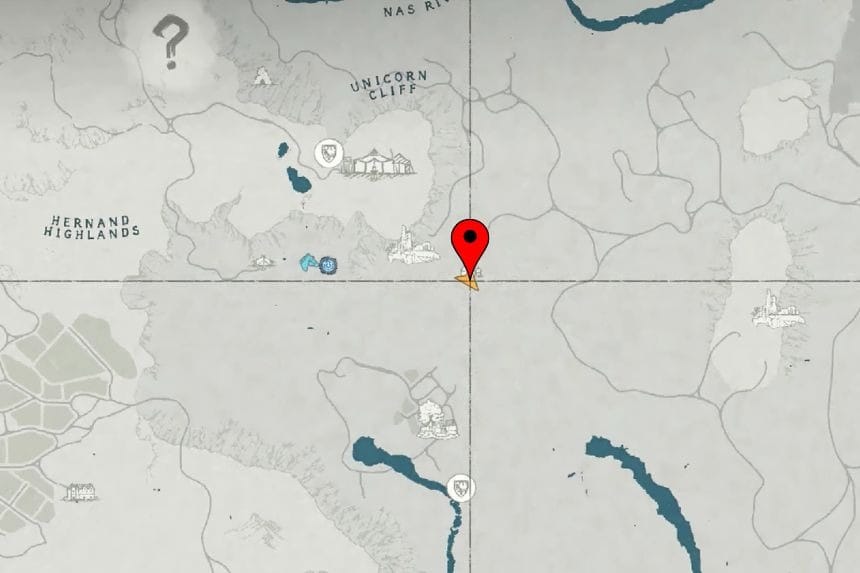
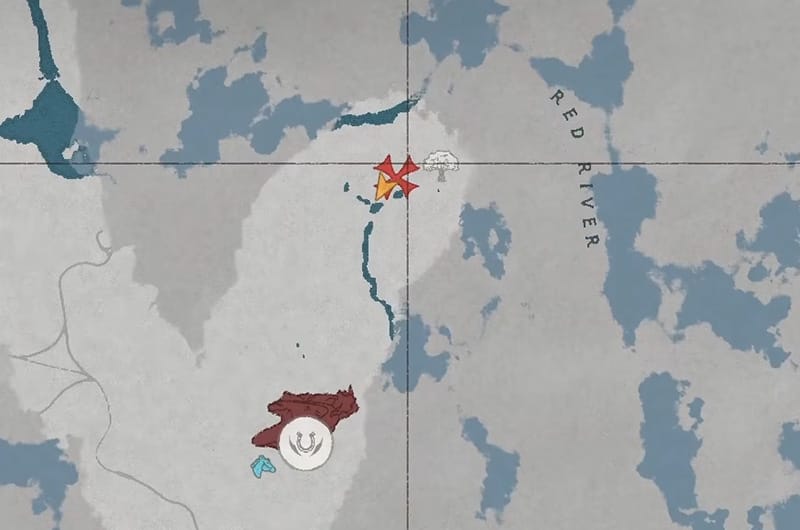
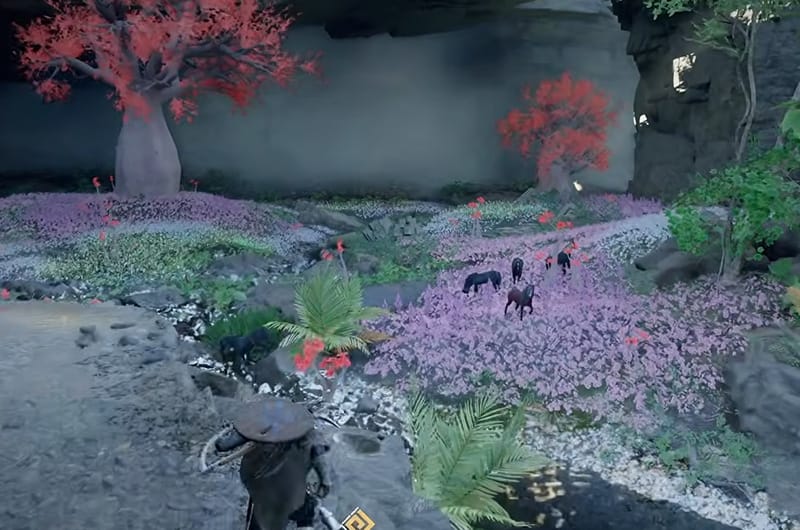
To get the Volono Sword, go to the location marked on the map above. You will find a camp in front of you. Take a right turn towards the flower bed to find a tree stump near a small water pond. On the tree stump, you will find the Volono Sword.
| Attack | 16 |
| Critical Rate | – |
| Attack Speed | Lv 1 |
| Refinement | 3/10 |
| Sells for | 2.28 |
Sorcerer’s Staff
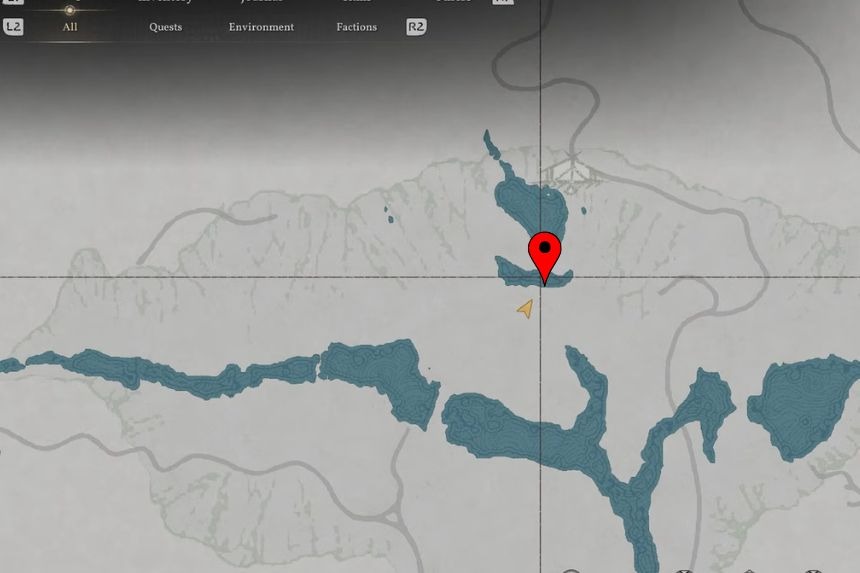
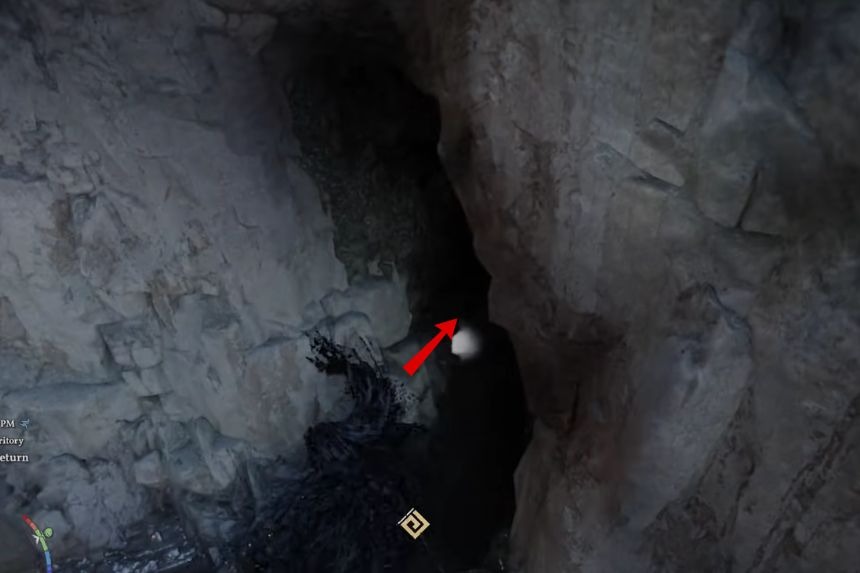
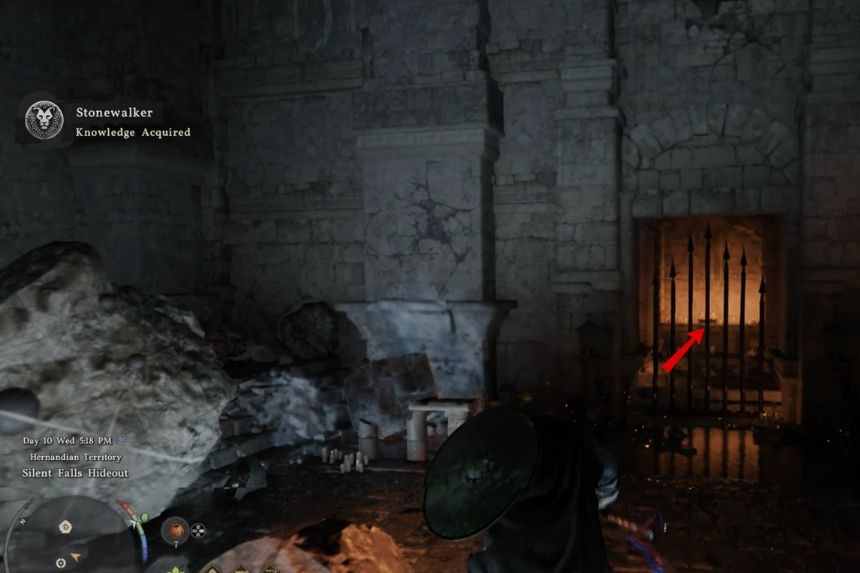
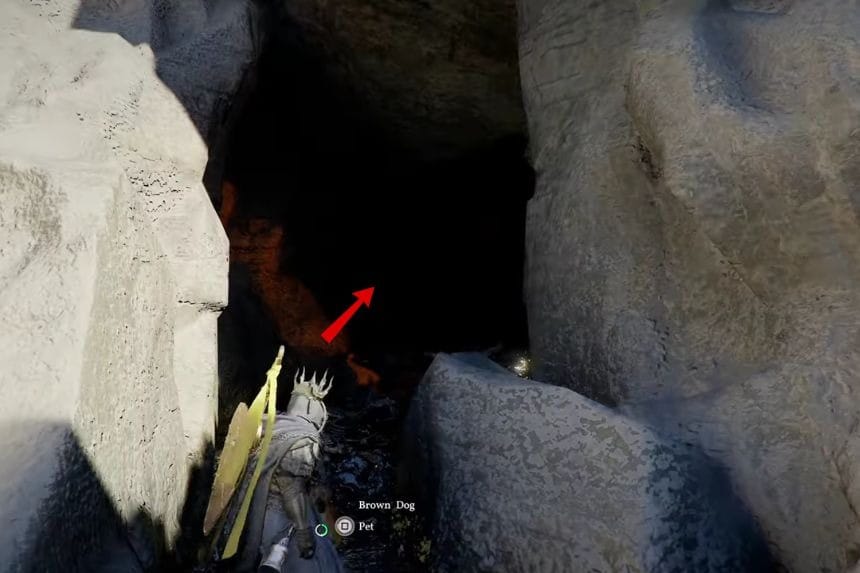
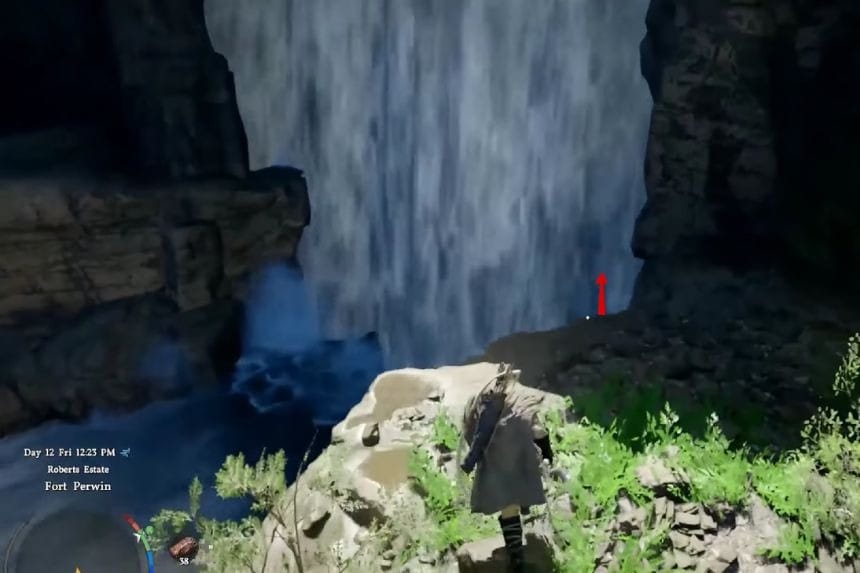
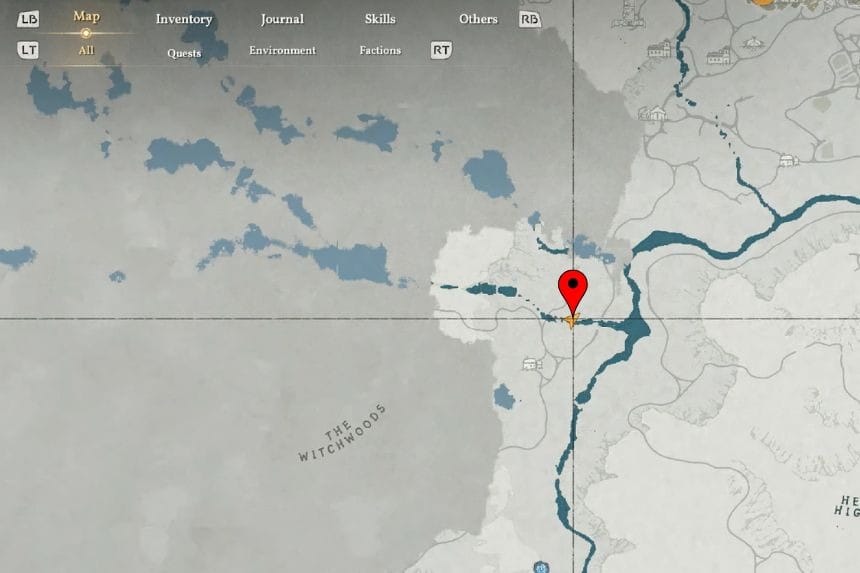
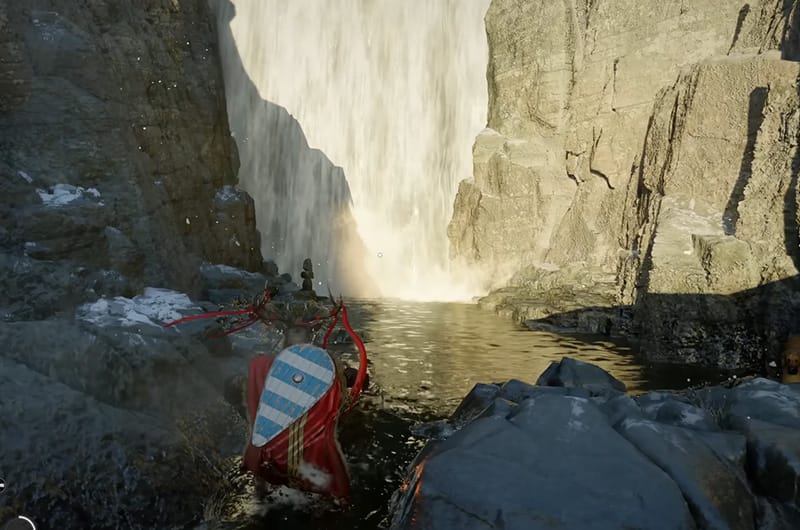
You will find a waterfall where the two rivers are joining with eachother. When you reach the waterfall, jump down to find a cave on the right side. Enter the cave and defeat the Grave Walker. After defeating the Grave Walker, light two lamps on the closed door so that you can enter the area and collect the staff.
| Attack | 18 |
|---|---|
| Critical Rate | Lv 1 |
| Attack Speed | Lv 1 |
| Refinement | 3/10 |
| Sells for | 9.81 |
Hollow Visage (Katana)
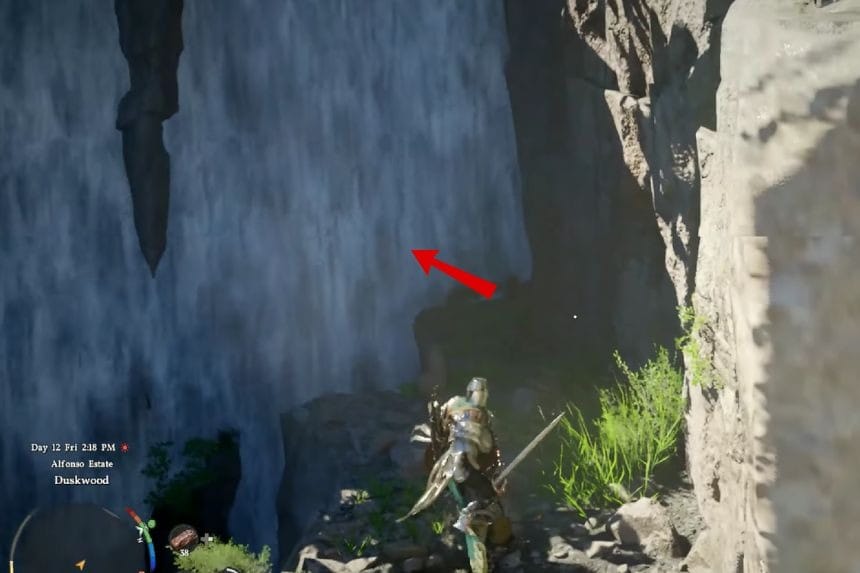
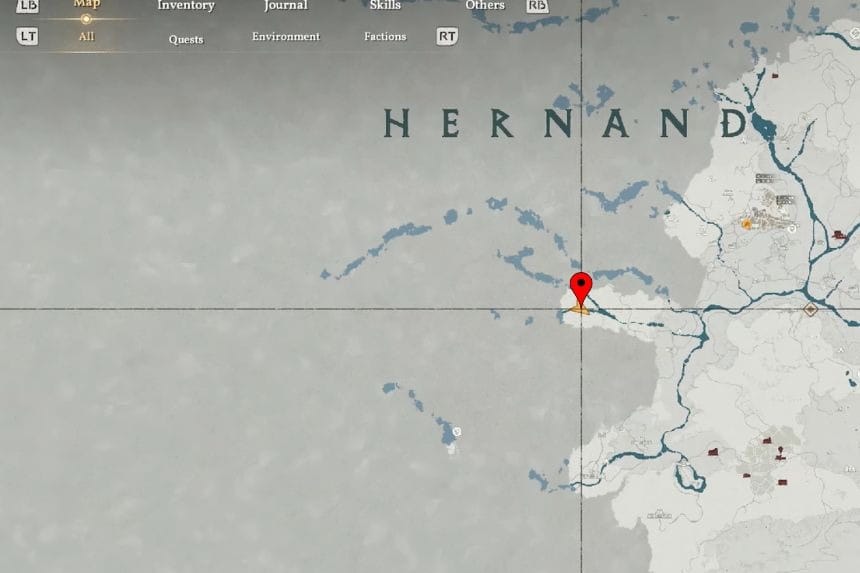
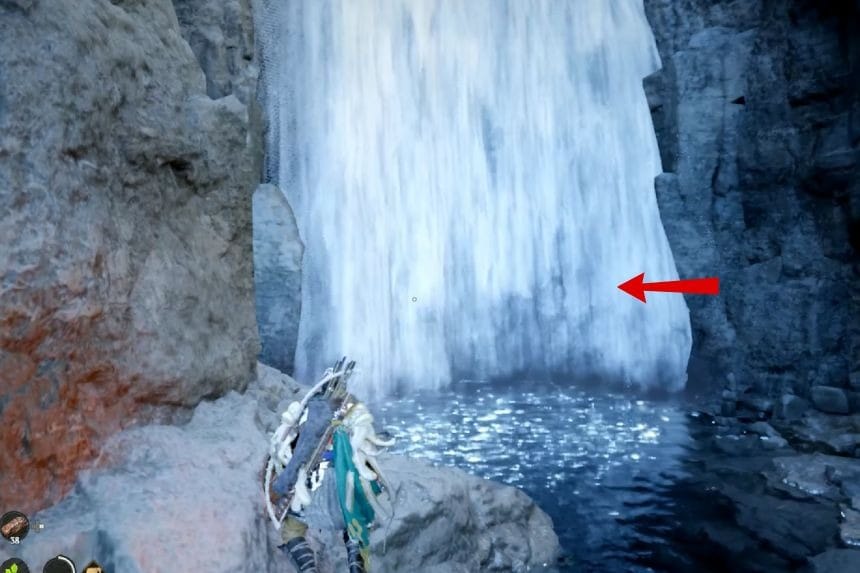
Go to the Abyss Nexus, near Sanctum of Temperance, and teleport. Then, go south towards the river. You can’t go straight because of the enemy village, so go right and then down. Go to the waterfall on the right side. Use your forward stab skill to go through to the hidden cave by going to the ledge next to the waterfall. Inside, you will find Hollow Visage.
| Attack | 15 |
|---|---|
| Critical Rate | Lv 1 |
| Attack Speed | Lv 2 |
| Refinement | 2/10 |
| Sells for | 8.86 |
Wolfs Fang
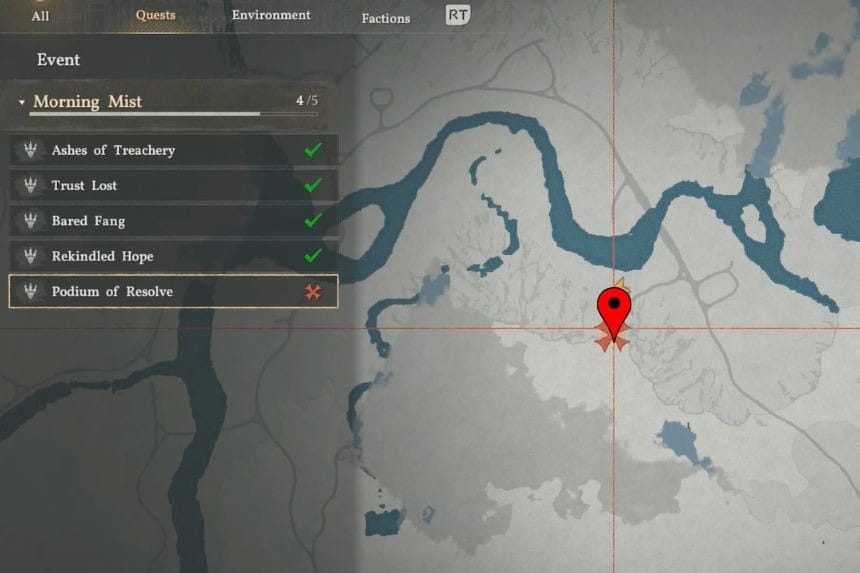

The Wolf’s Fang sword can be obtained as a reward for completing the Podium of Resolve main quest during Chapter 7. It is a one handed weapon with a Critical Rate 1, +4.0% damage to mighty foes, and Attack Speed 1.
Vessel of Dark Pursuit
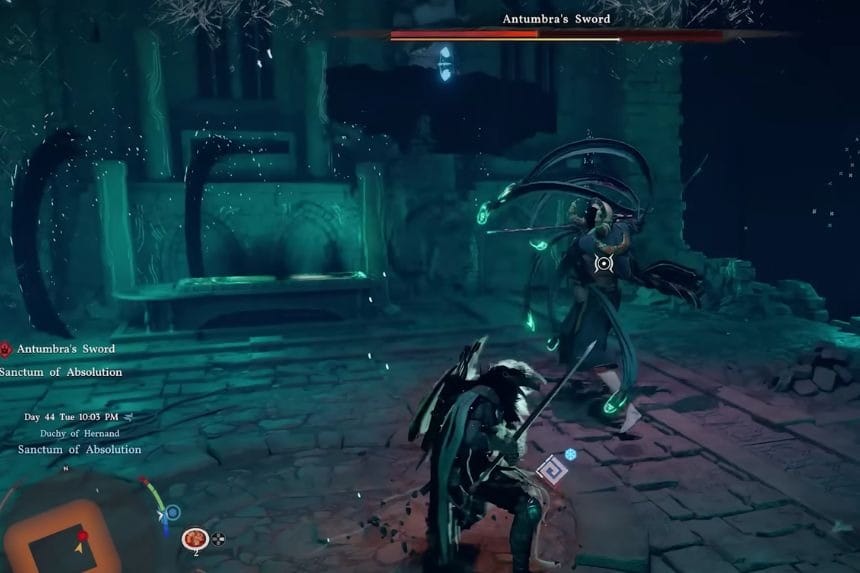
You will get this in the Sanctum of Absolution in Chapter 5, after defeating the boss in this area. It is a two-handed sword, rank 4, and comes equipped with Wound of Darkness, which will send out a projectile wave whenever you use “Turning Slash.”
Sword of the Lord
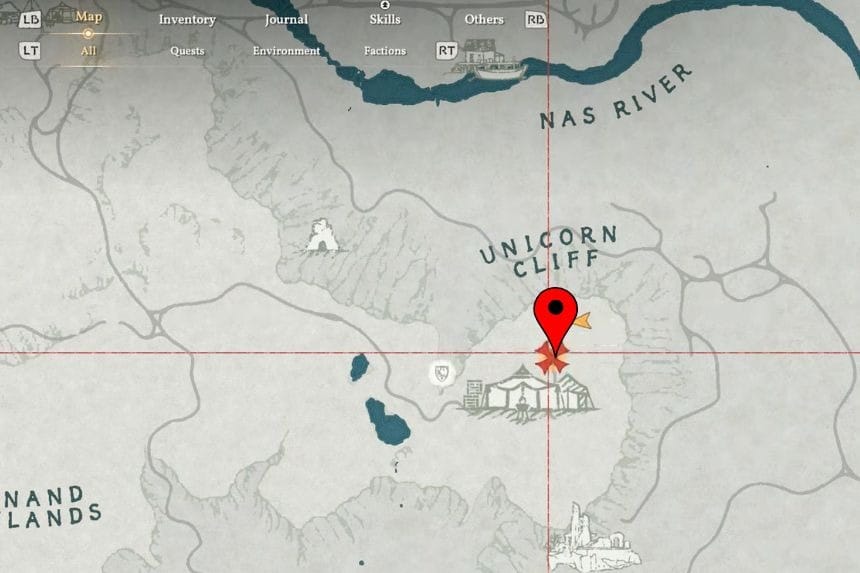

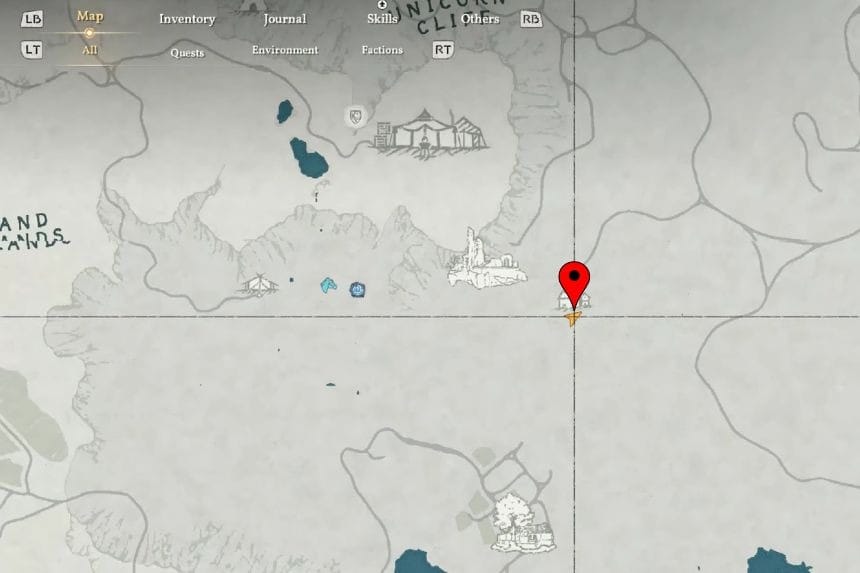
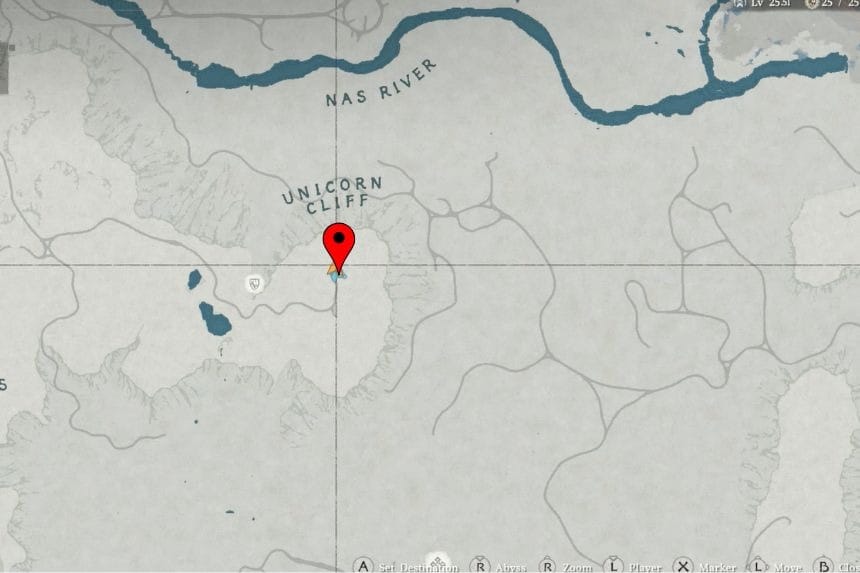
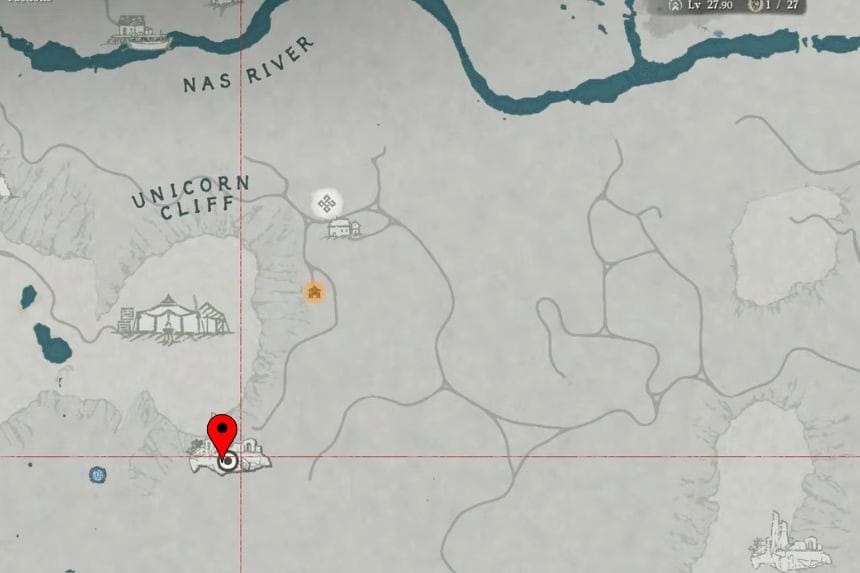
You get the Sword of the Lord by defeating Kailok, the Hornsplitter, during Crimson Desert Chapter 2, as part of The End of Greed main story quest. To reach him, keep following the main quest until you arrive at the Goldleaf Guildhouse in Unicorn Cliff, where the final fight takes place.
You get the Sword of the Lord by defeating Kailok, the Hornsplitter, during Crimson Desert Chapter 2, as part of The End of Greed main story quest. To reach him, keep following the main quest until you arrive at the Goldleaf Guildhouse in Unicorn Cliff, where the final fight takes place.
| Attack | 13 |
|---|---|
| Critical Rate | – |
| Attack Speed | Lv 2 |
| Refinement | 1/10 |
| Sells for | 11.06 |
Goblin Kings Treasure Dagger
The Goblin King’s Treasure Dagger can be found in a chest hidden underneath Mudridge Cabin. Check below the cabin carefully, open the chest, and collect the dagger.
| Attack | 14 |
|---|---|
| Critical Rate | Lv 5 |
| Attack Speed | Lv 0 |
| Refinement | 1/10 |
| Sells for | 3.59 |
| Additional | 10 % chance to skin additional hide |
Ring of Earth
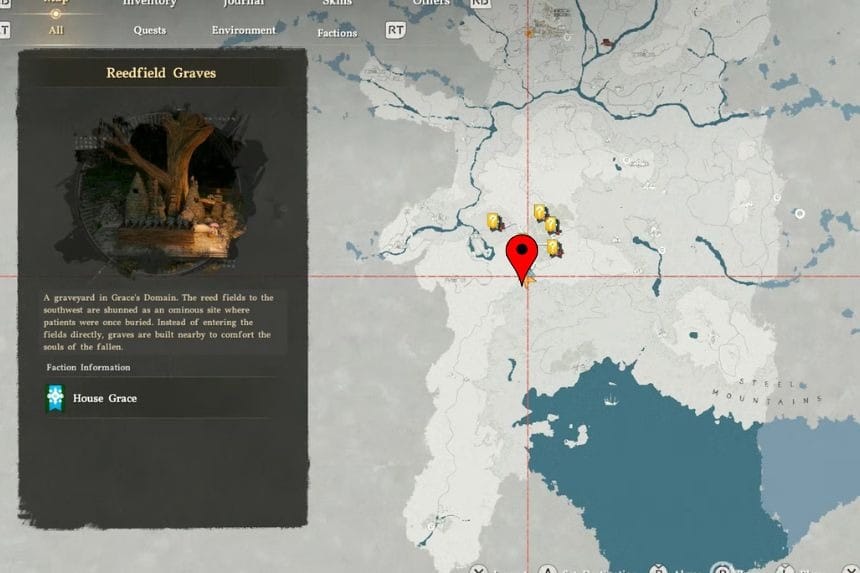
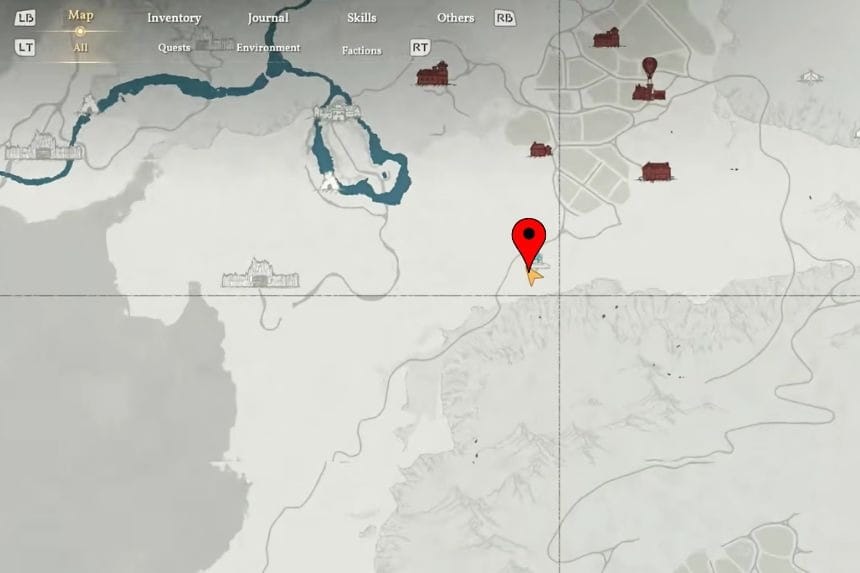
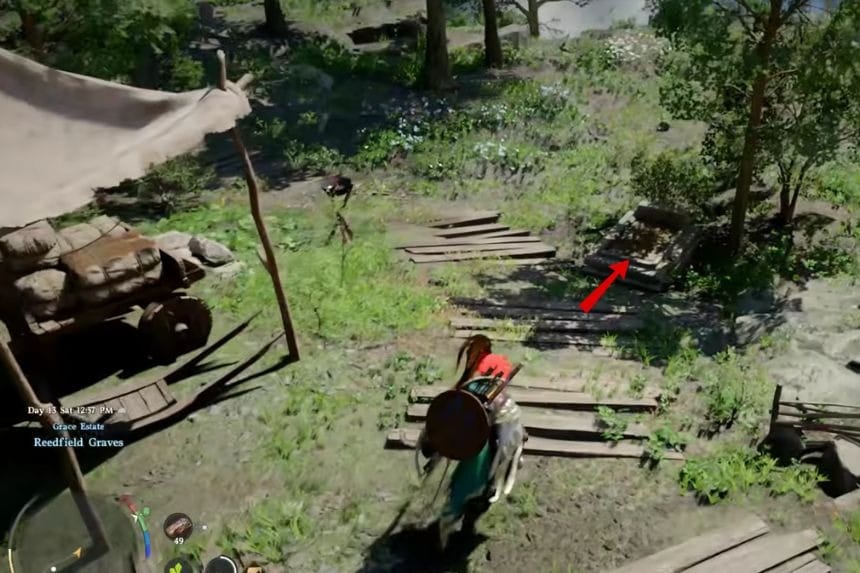
You can find the Ring of Earth in a grave at Reedfield Graves. Search the graves carefully and interact with the correct spot to collect the ring of earth.
| Attack | 18 |
|---|---|
| Critical Rate | Lv 1 |
| Attack Speed | Lv 0 |
| Refinement | 3/10 |
| Sells for | 3.69 |
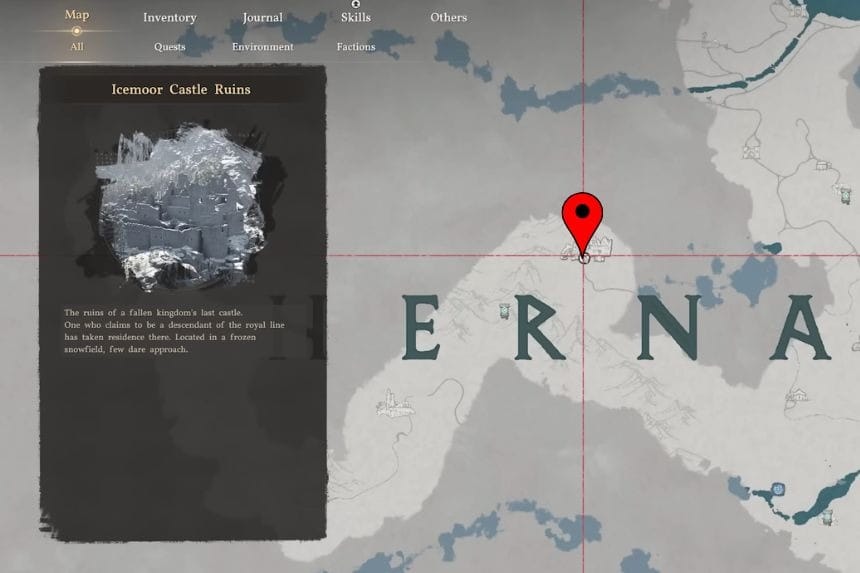
Fallen Kingdom’s Rapier
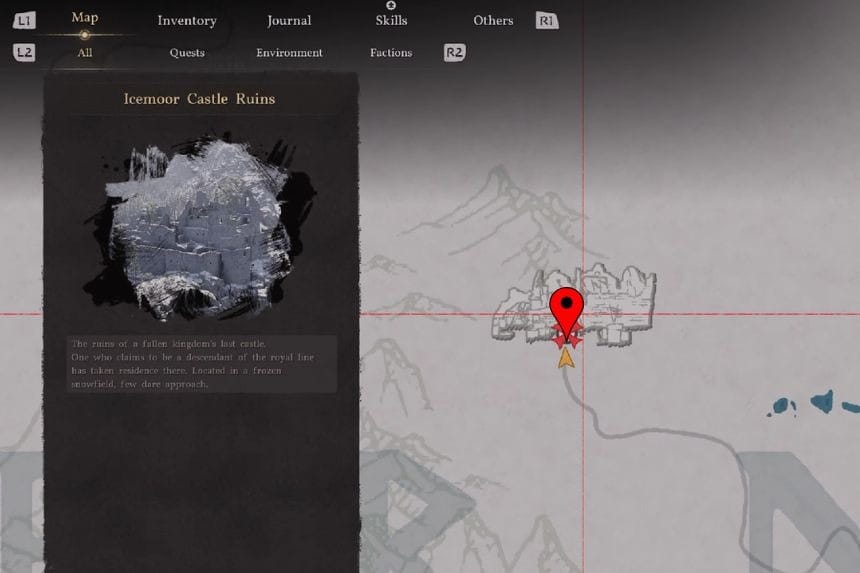
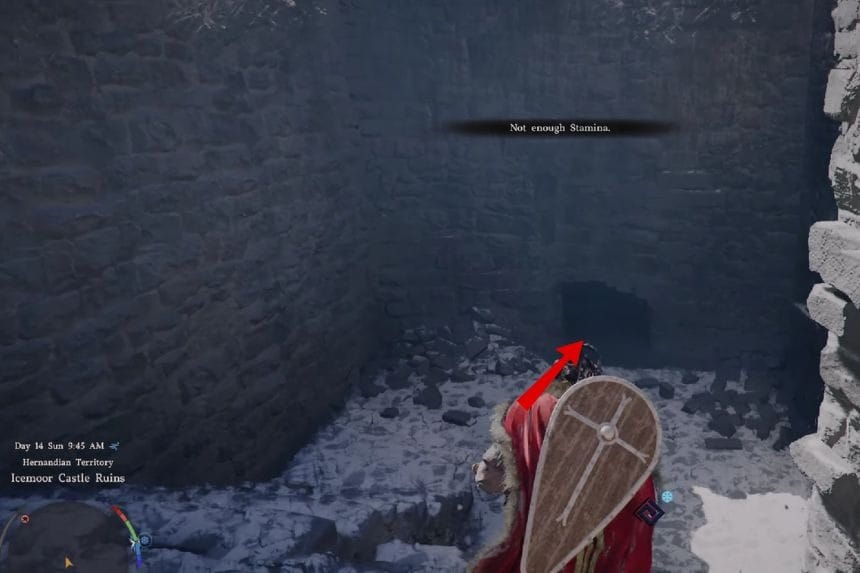
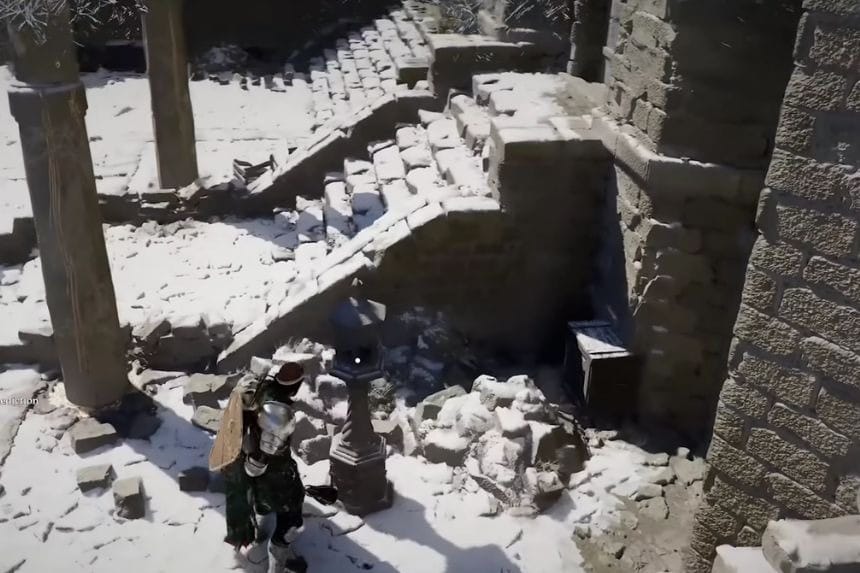
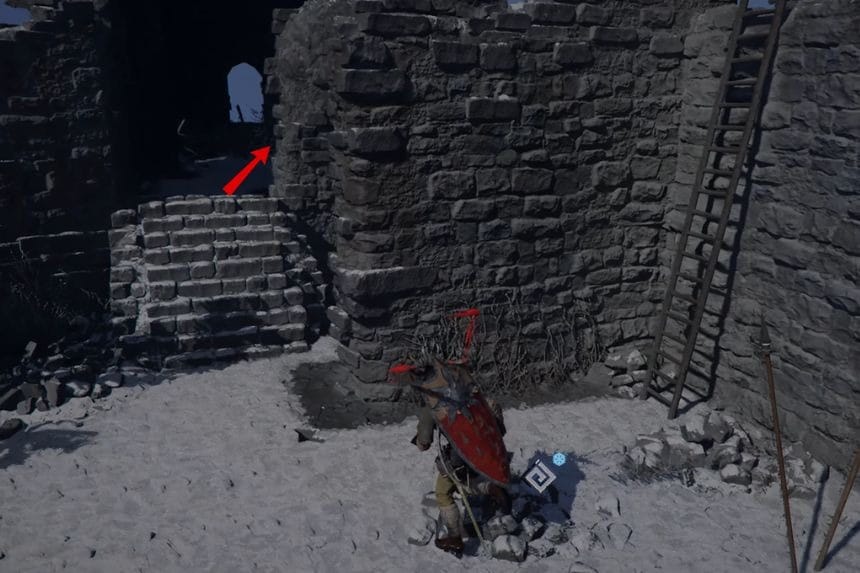
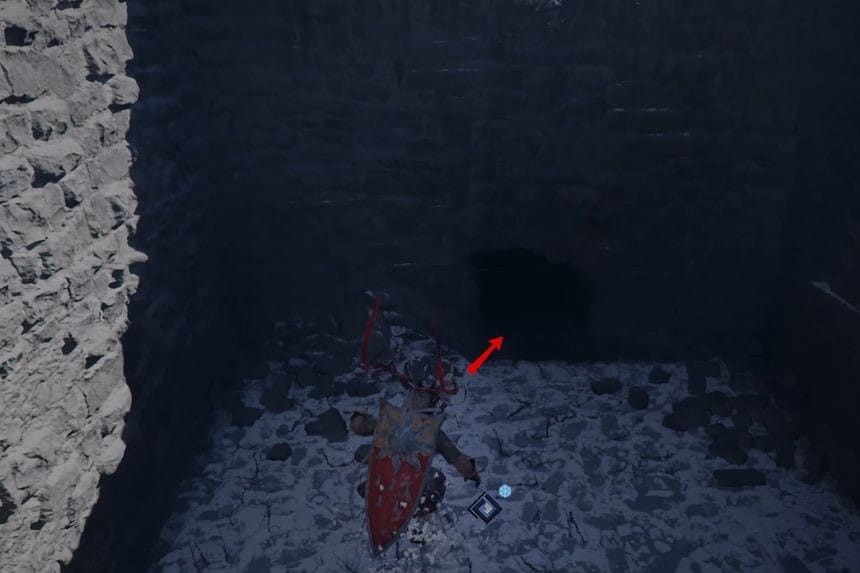
The Icemoor Castle Ruins are located in Hernand. Start by going towards the top level. Once at the top, turn right and find the staircase going down. Follow the stairs and look nearby for a small cave entrance blocked by wooden planks. Break the planks with your weapon, then go inside the cave. Near the chest, check the left side beside a barrel, where you will find the Fallen Kingdom’s Rapier.
| Attack | 17 |
|---|---|
| Critical Rate | – |
| Attack Speed | Lv 2 |
| Refinement | 5/10 |
| Sells for | 20.58 |
Tammaso Guard Dagger-Tipped Spear and Sydmon Spear
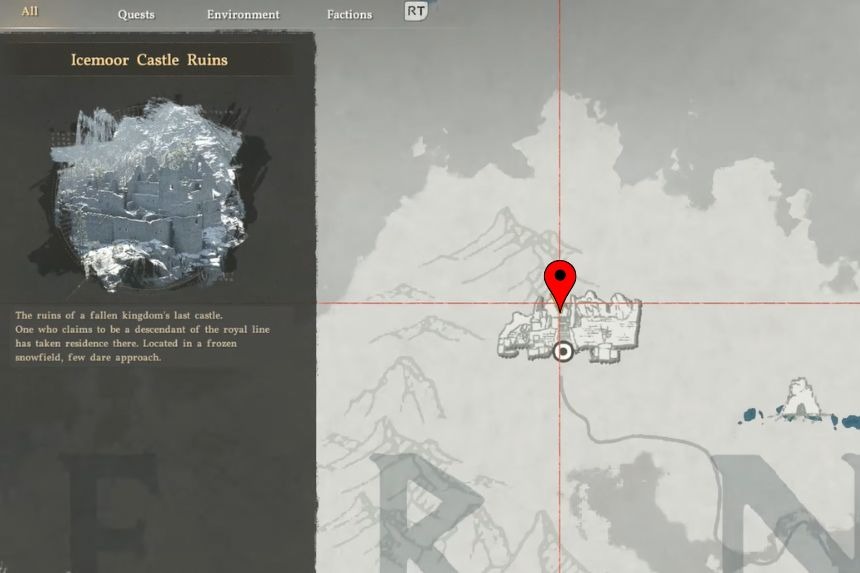
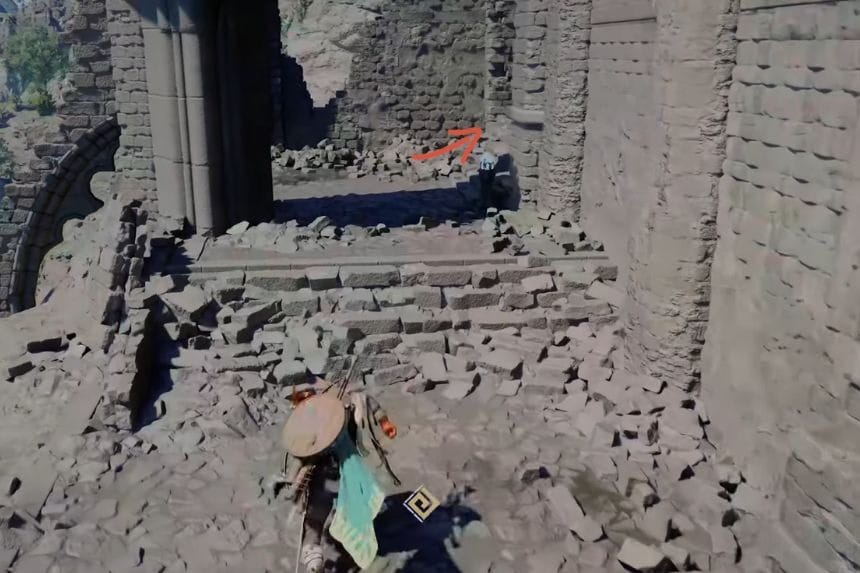
To get the Tammaso Guard Dagger-Tipped Spear and Sydmon Spear, you’ll need to go to the Icemoor Castle once again. Once you’re at the marked location, go right, and inside the ruins. There, you’ll get Tammaso Guard Dagger-Tipped Spear stuck on the left wall. The Sydmon Spear too, can be found stuck on the wall there.
Tammaso Guard Dagger-Tipped Spear Stats
| Attack | 16 |
|---|---|
| Critical Rate | Lv 1 |
| Attack Speed | Lv 1 |
| Refinement | 2/10 |
| Sells for | 2.88 |
Sydmon Spear
| Attack | 17 |
|---|---|
| Critical Rate | – |
| Attack Speed | Lv 1 |
| Refinement | 2/10 |
| Sells for | 2.88 |
Kylus Dagger
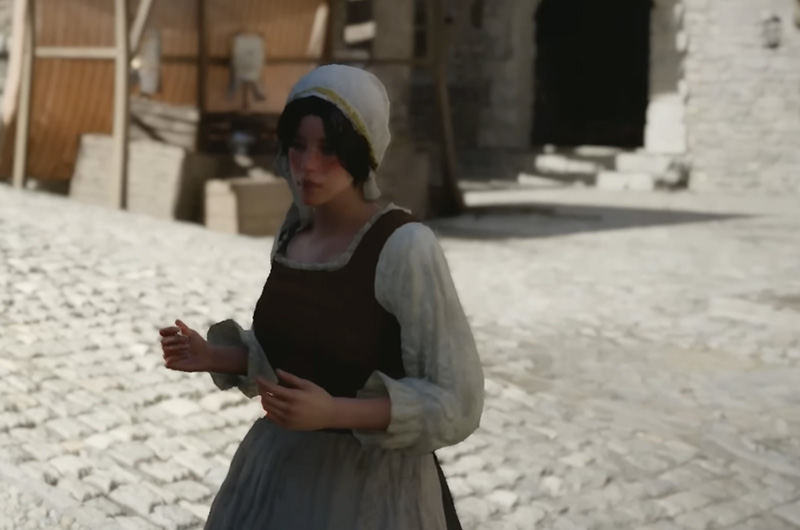
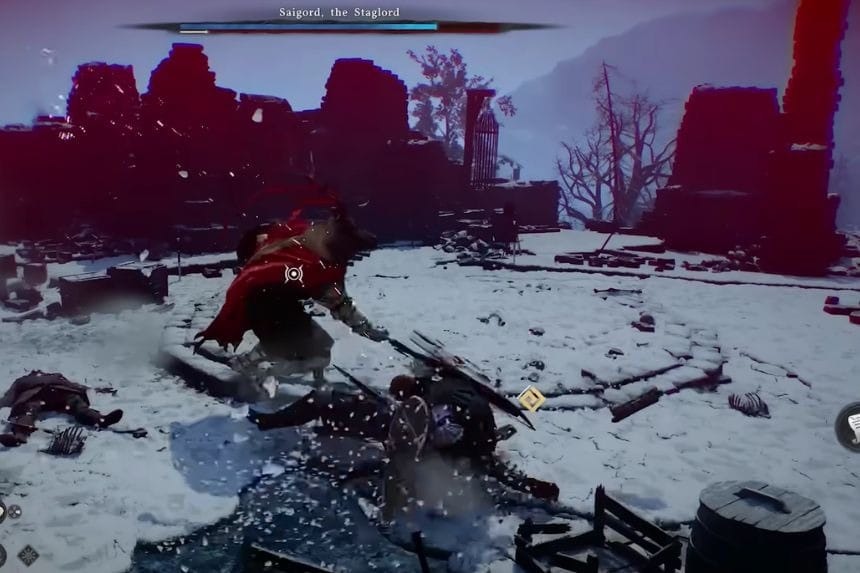
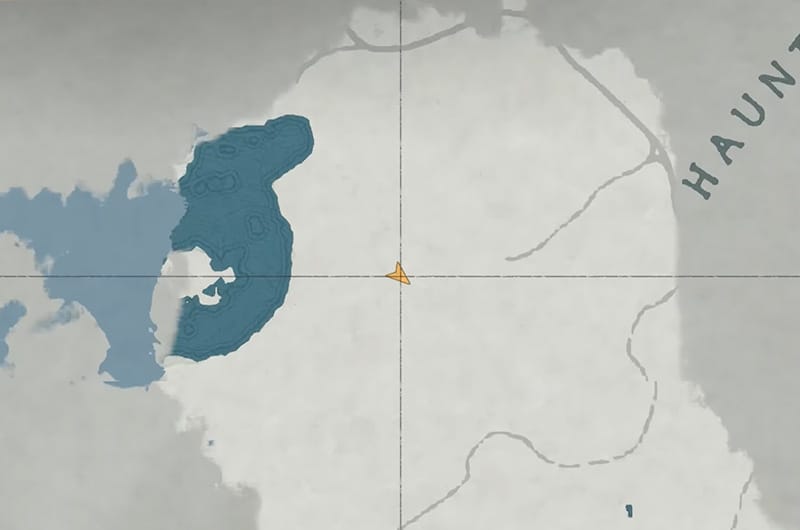
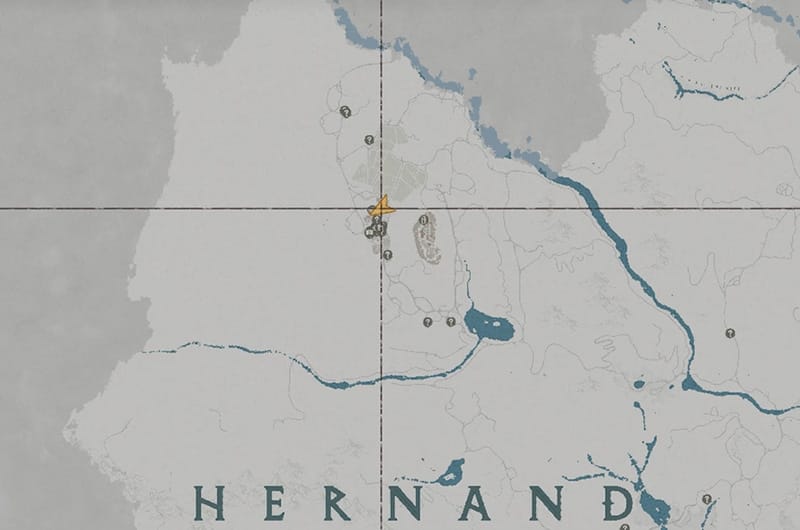
Kylus Dagger is given to you by a women in Hernand in the same general area where you defeated the Staglord boss.
| Attack | 16 |
| Critical Rate | Lv 5 |
| Attack Speed | Lv 1 |
| Refinement | 3/10 |
| Sells for | 3.34 |
Survivor’s Solitude
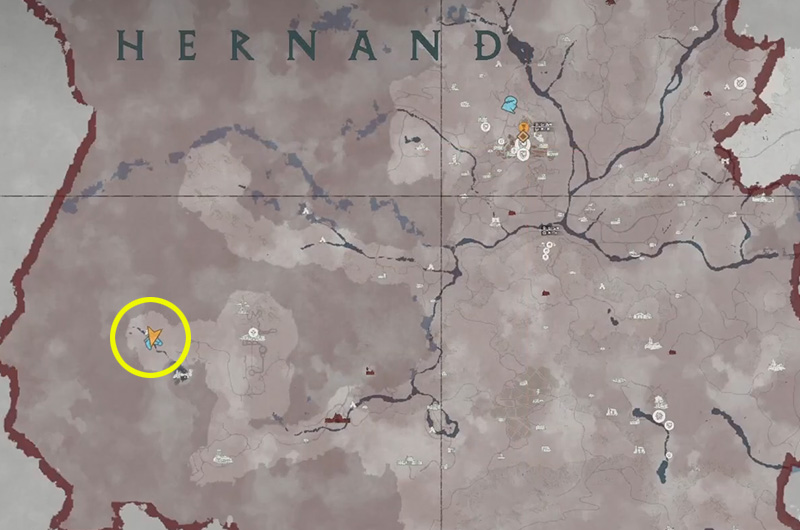
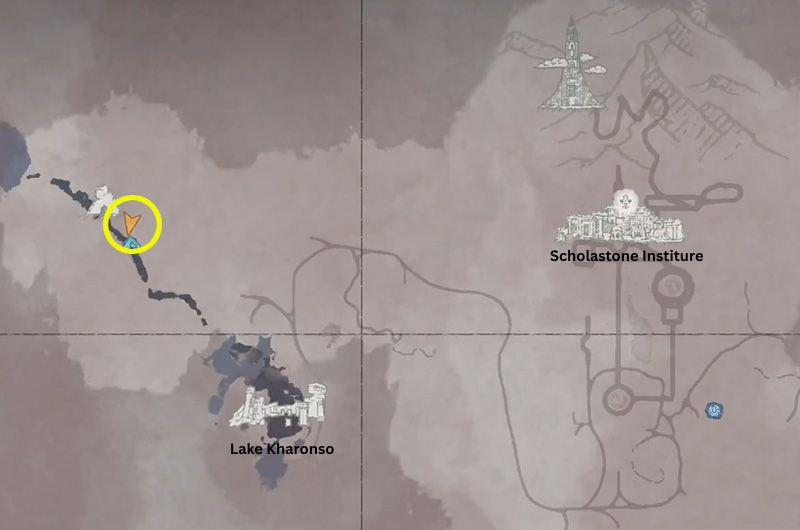
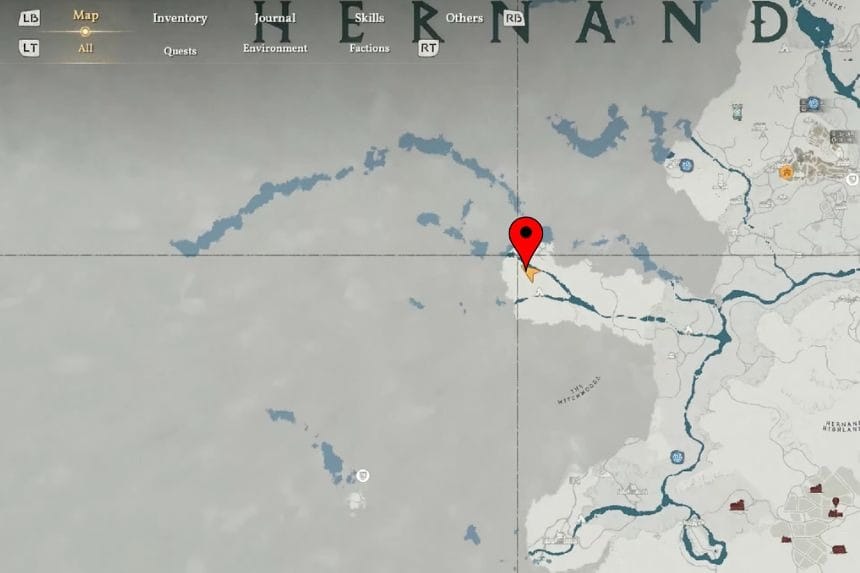
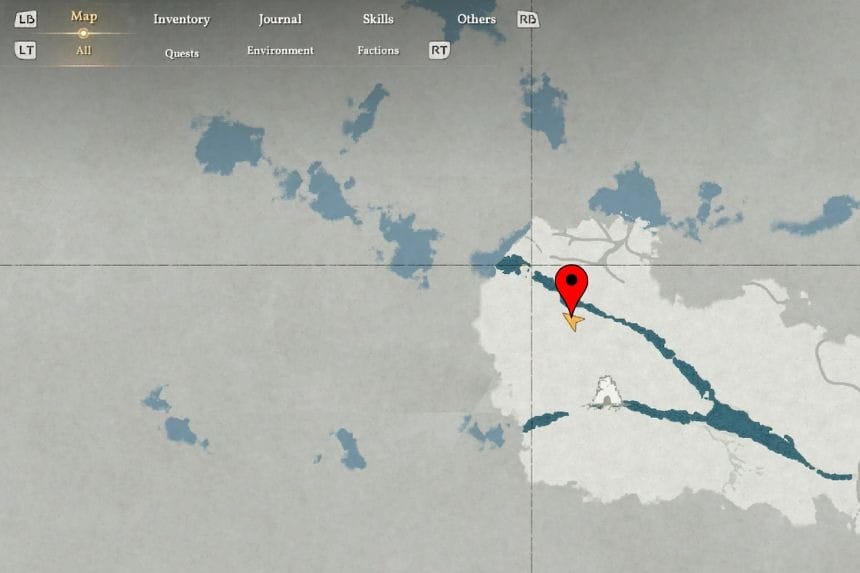
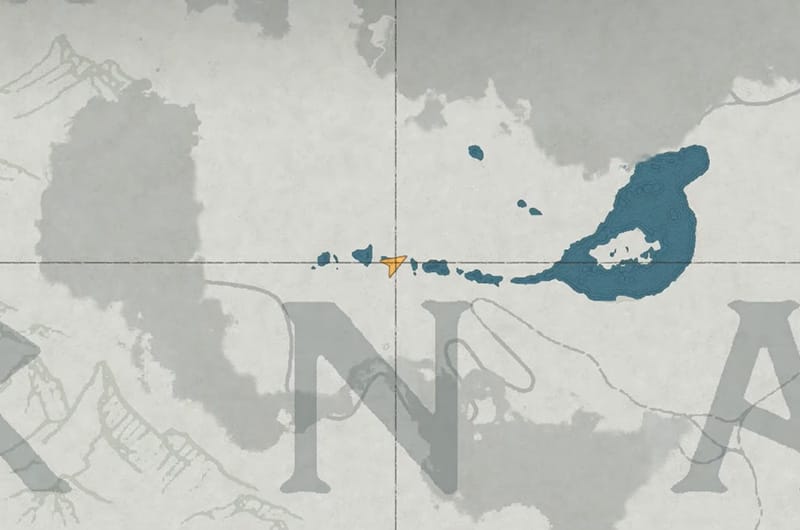
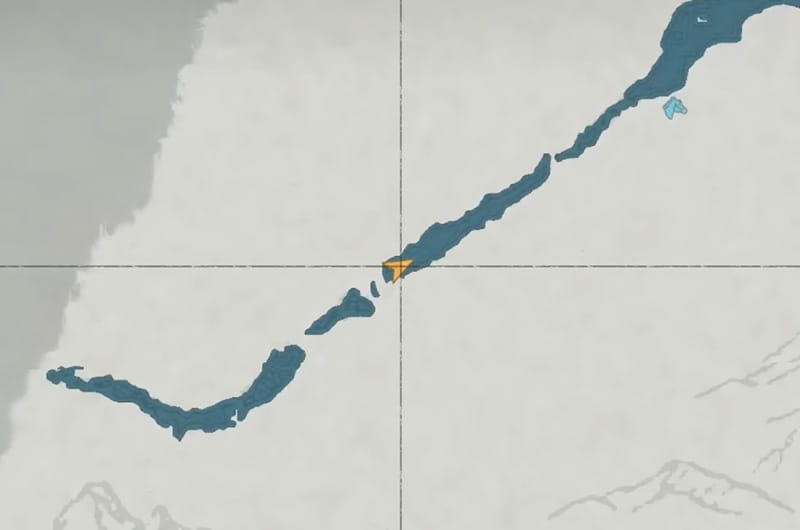
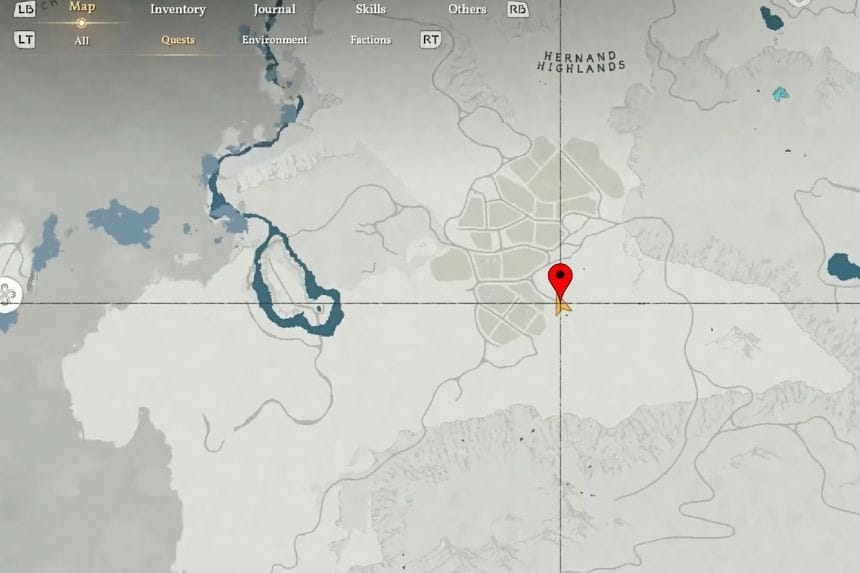
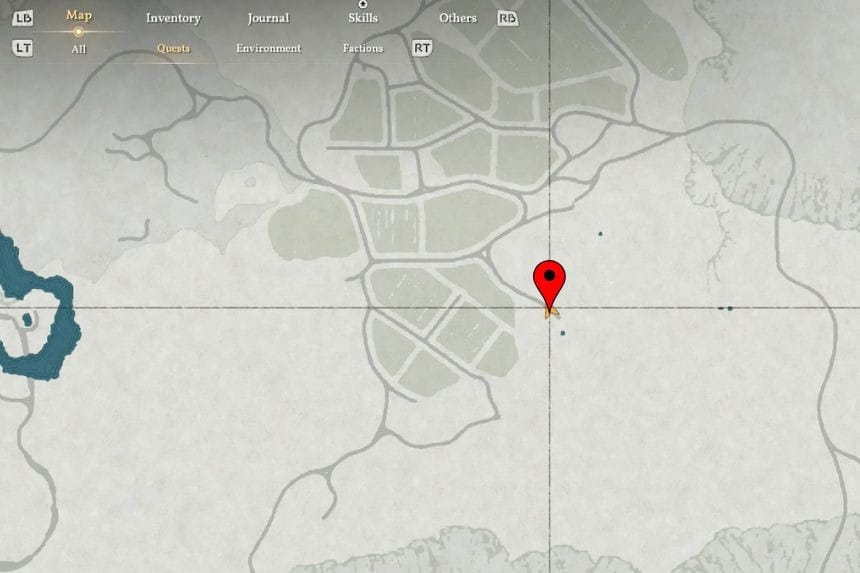
You get the Survivor’s Solitude from a chest hidden behind a waterfall that appears if you follow Lake Kharonso. The waerfall is exactly east from the Scholastone Institute as shown in the map above. To get to the waterfall, go to Lake Kharonso and follow the river up. Once you reach the location, climb up to the waterfall and perform a charged stab on the waterfall, which will allow you to get to the other side. Loot the chest to get the Survivor’s Solitude.
| Attack | 17 |
|---|---|
| Critical Rate | Lv 1 |
| Attack Speed | Lv 1 |
| Refinement | 2/10 |
| Sells for | 9.86 |
Fated Shadow
Fated Shadow is considered one of the best weapons in the game, if not the best. It’s a one-handed sword that’s part of the main quest, but can easily be missed if you do not pay attention or know where to look. The sword becomes available once you reach Chapter 9.
After the fight with the Goyen boss, go to the back of the arena and go up the stairs. You will find a cave with a room, go in and claim the Fated Shadow in the corner.
| Attack | 25 |
|---|---|
| Critical Rate | – |
| Attack Speed | – |
| Refinement | – |
| Sells for | – |
The Golden Sword
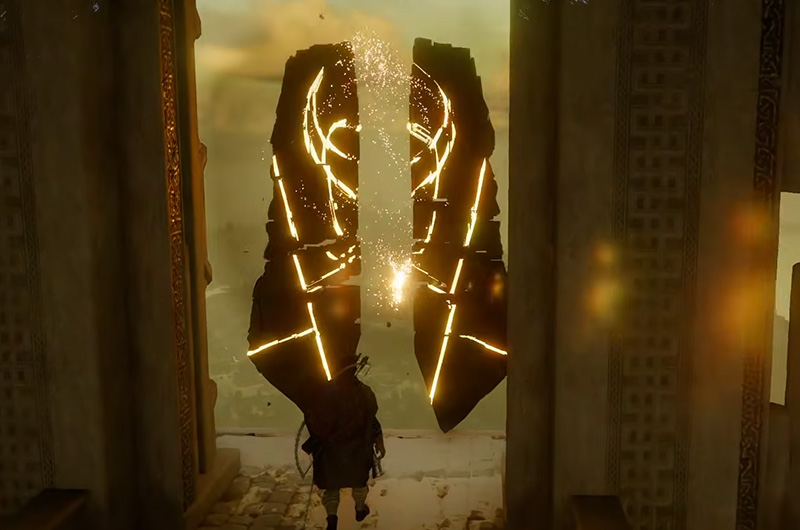
To get The Golden Sword complete the Spire of the Stars in Chapter 4 main quest. After completing the Spire of the Stars and entering the Abyss, go through all the Abyss puzzles and when you are finally at the Vault of Vengence, solve the last puzzle and you can get The Golden Sword.
| Attack | 16 |
|---|---|
| Critical Rate | – |
| Attack Speed | Lv 1 |
| Refinement | 3/10 |
| Sells for | 39.96 |
Groves Thorn
Complete the Demenissian Delegation quest in Chapter 5 by defeating the Kearush, The Slayer and you will get the Grove Thorn as reward.
| Attack | 167 |
|---|---|
| Attack Speed | Lv 1 |
| Refinement | 3/10 |
| Sells for | 5.42 |
| Spirit Siphon | Lv 1 |
Acorn Mace


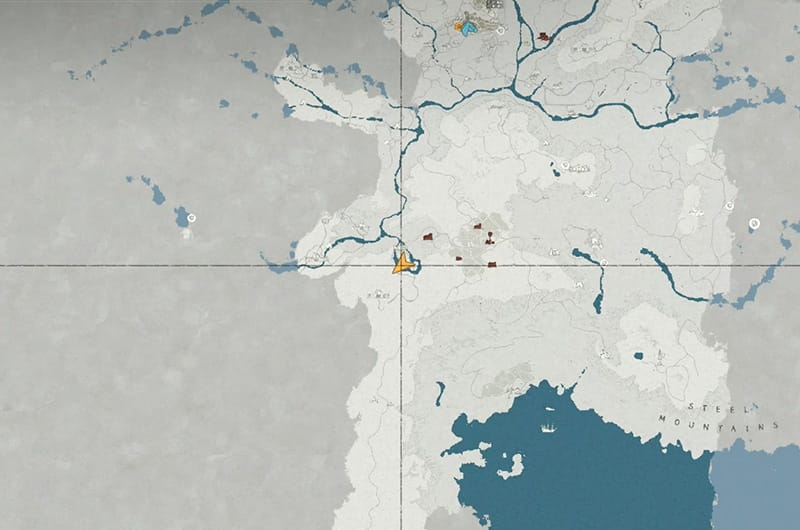
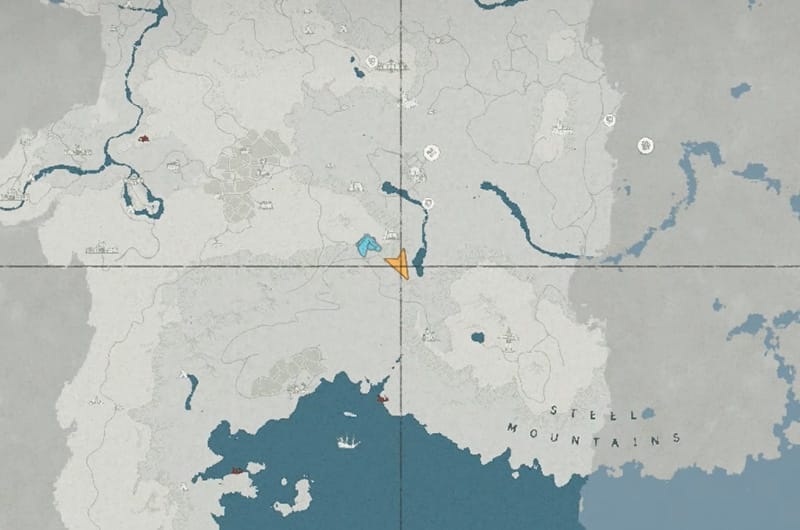
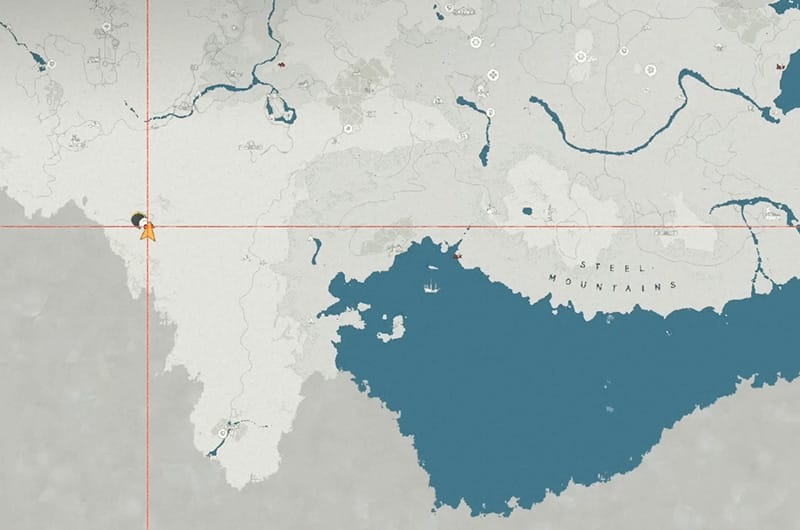
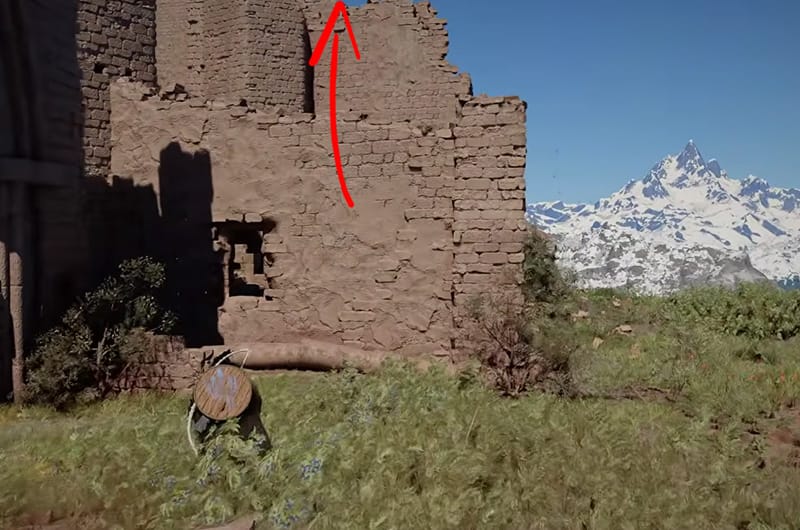
To find the Acorn Mace, go to the Demenissian Ruins, North of the Steel Mountains and besides the Willow River. The Acorn Mace is on top of the ruins. Climb the ruins and you can find the weapon lying there.
| Attack | 17 |
|---|---|
| Critical Rate | Lvl 0 |
| Attack Speed | Lv 0 |
| Refinement | 2/10 |
| Sells for | 2.65 |
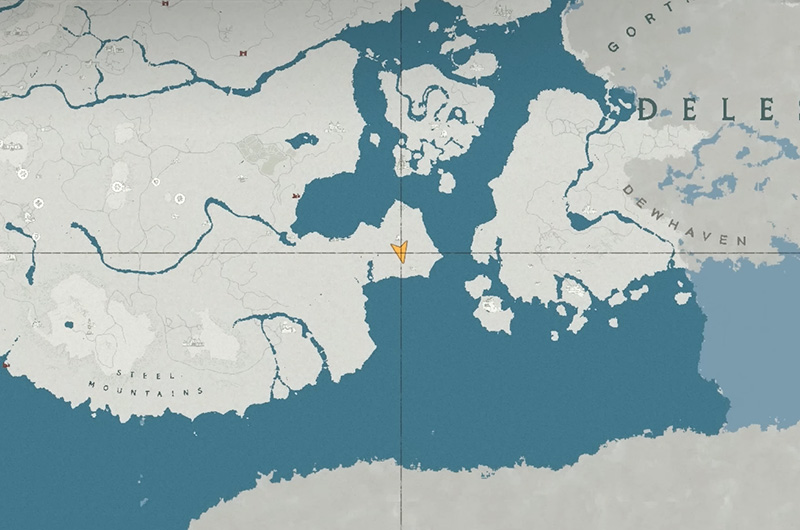
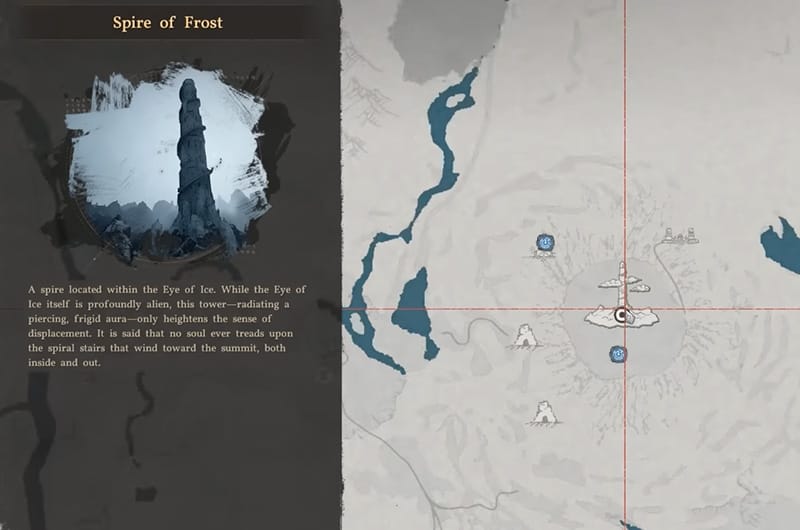
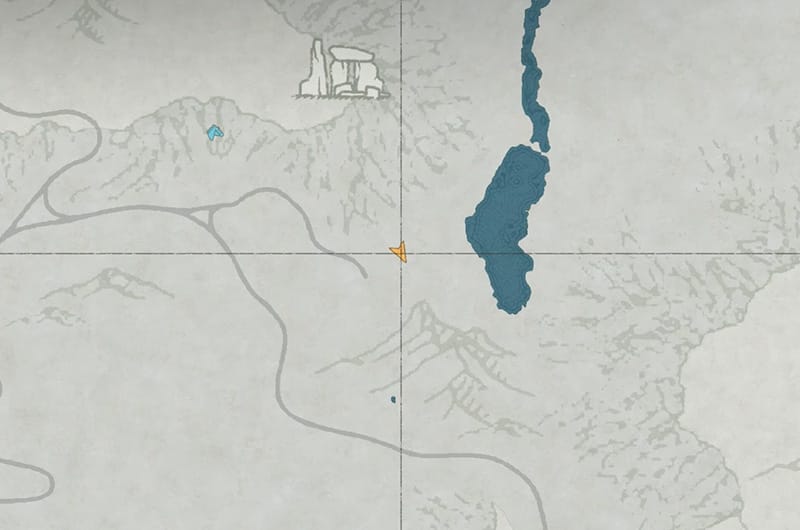
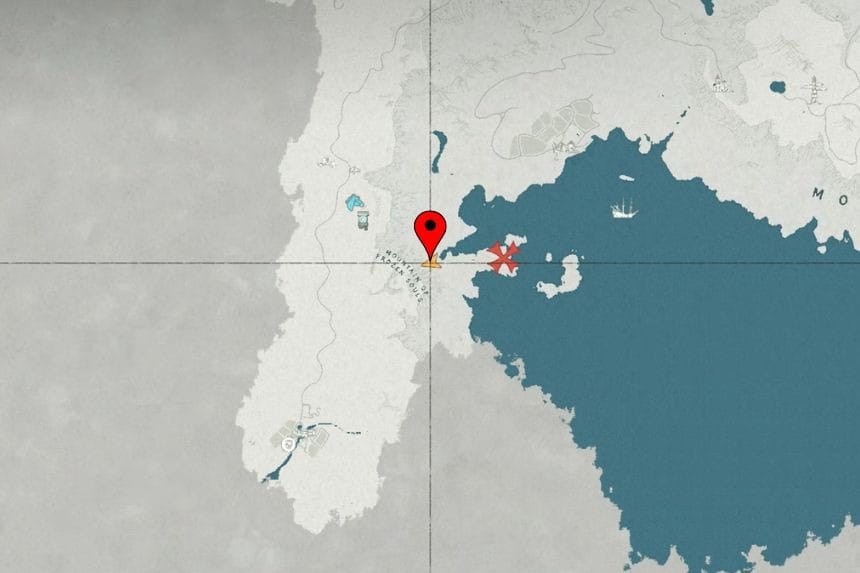
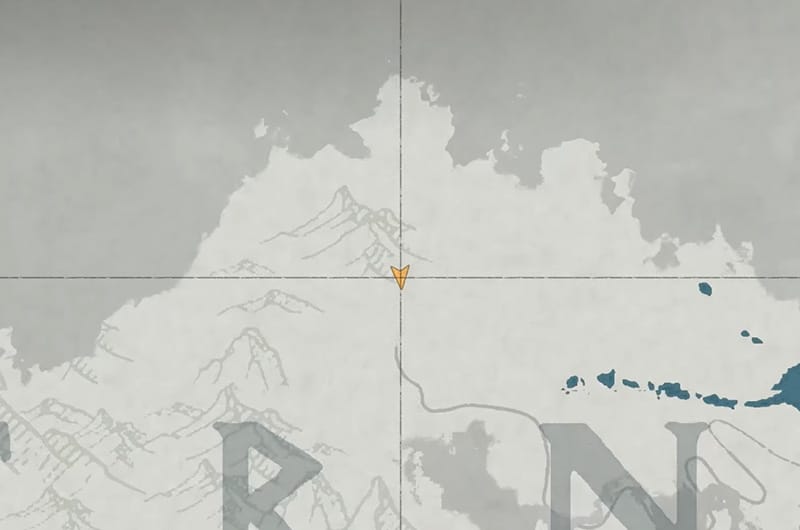
Soul Spear
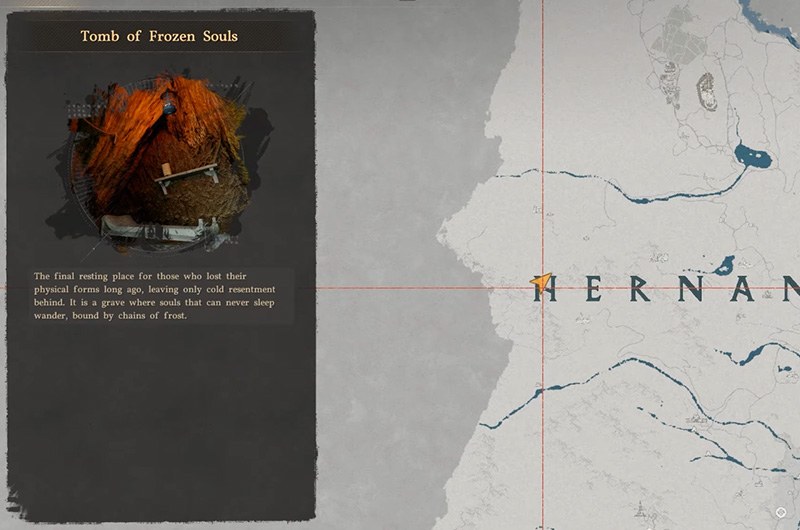
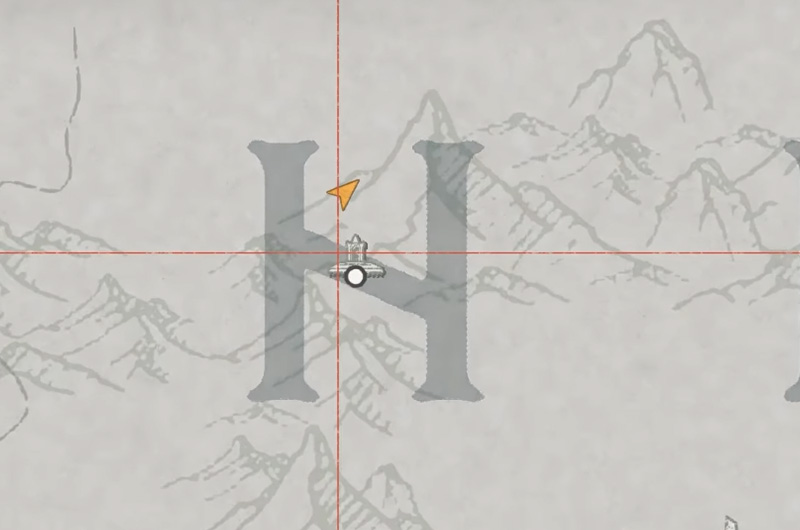
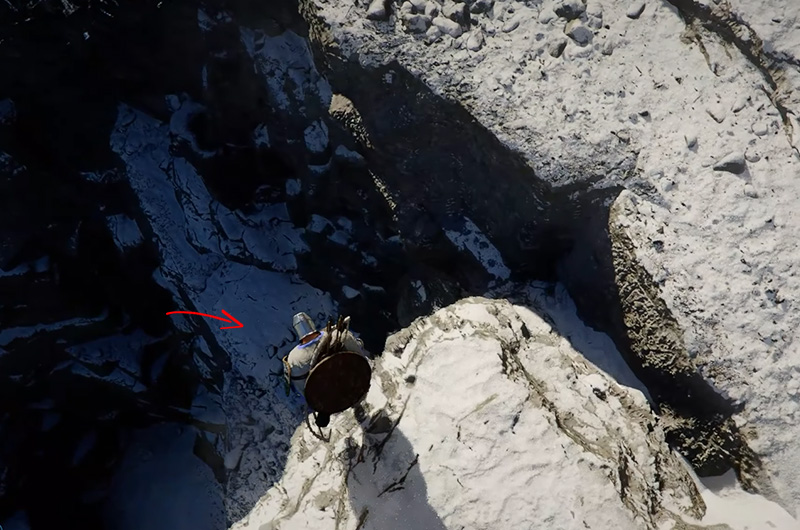
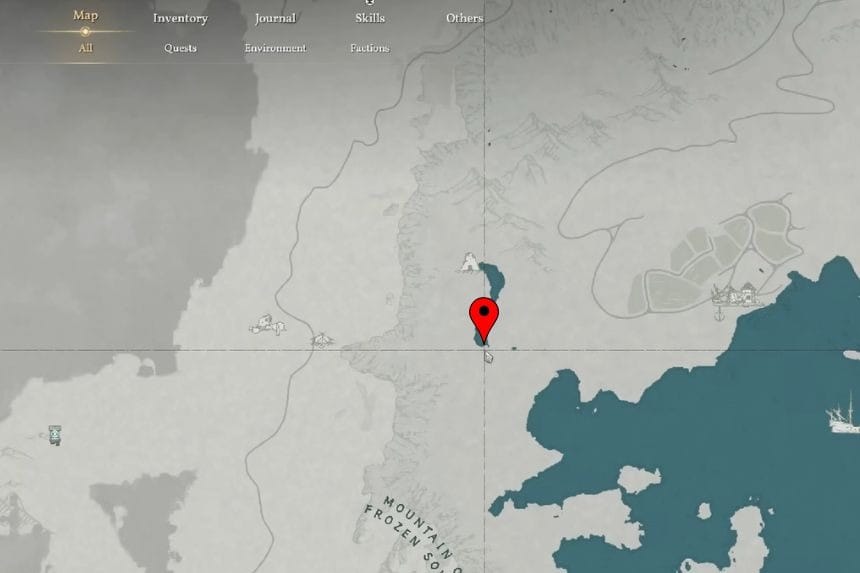
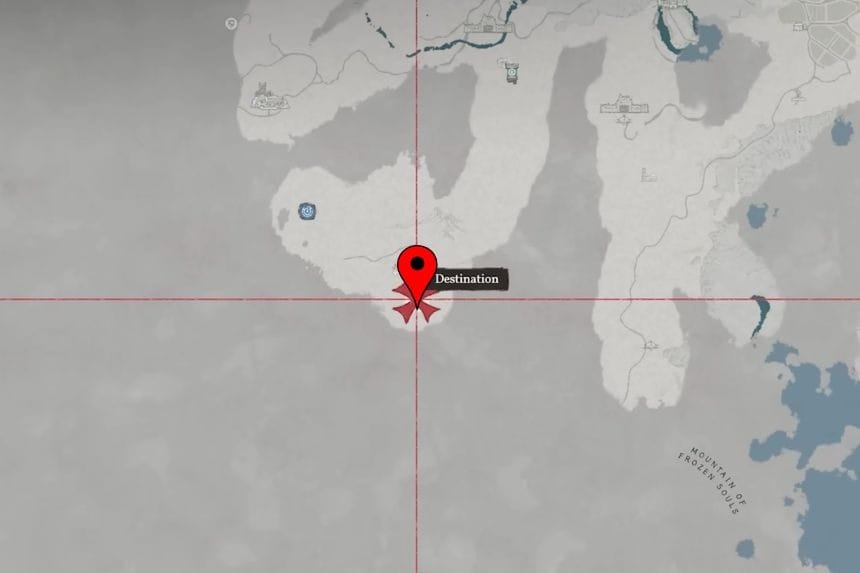
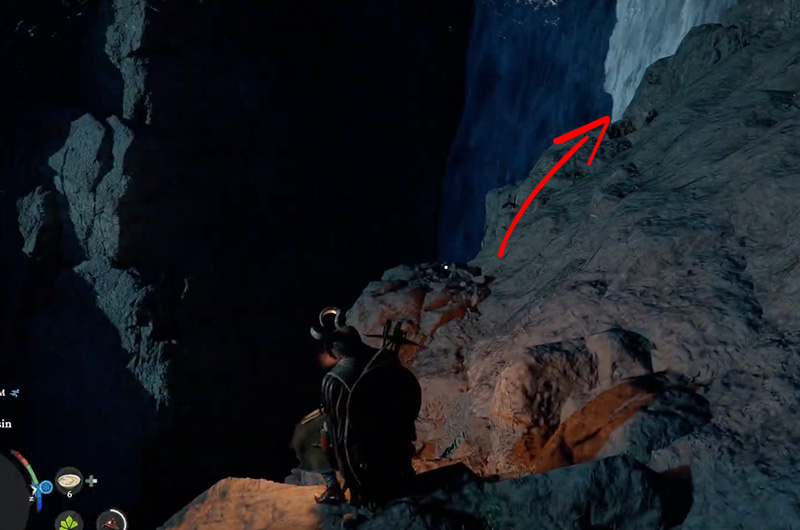
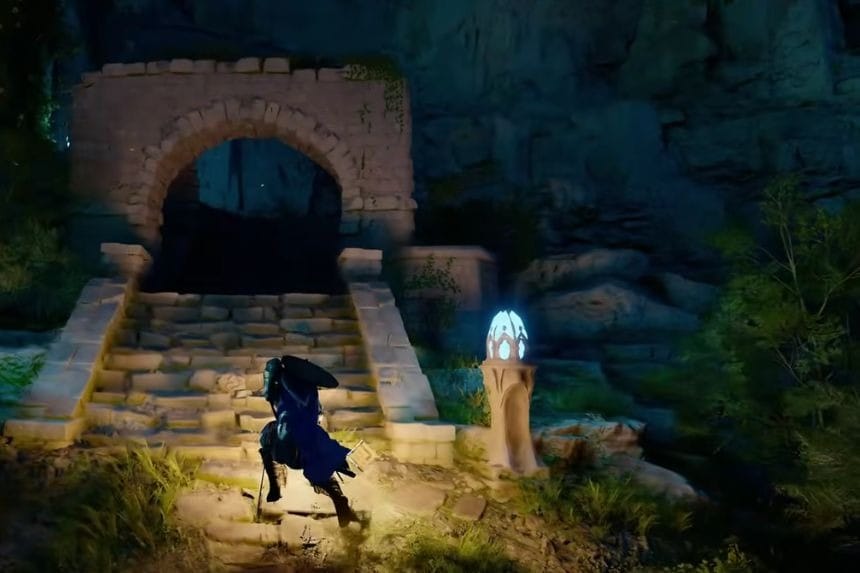
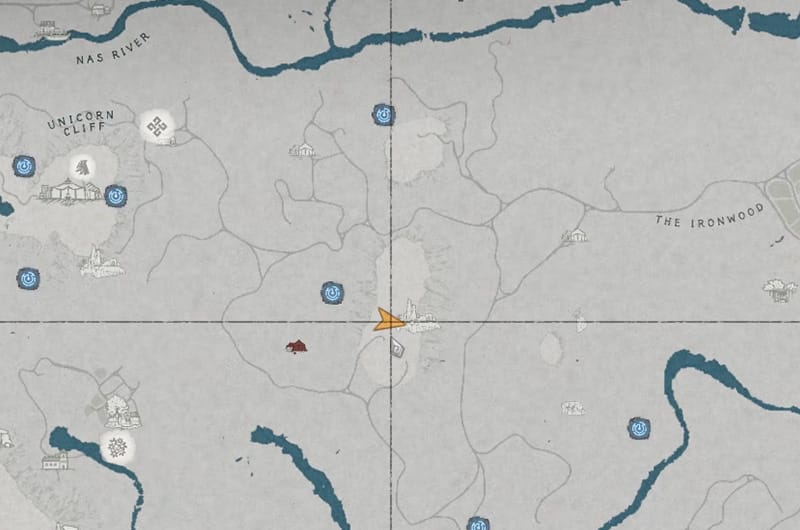
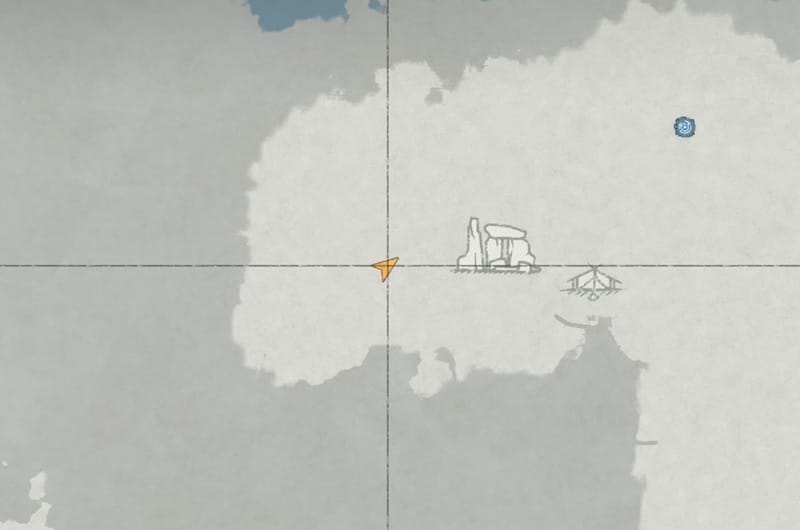
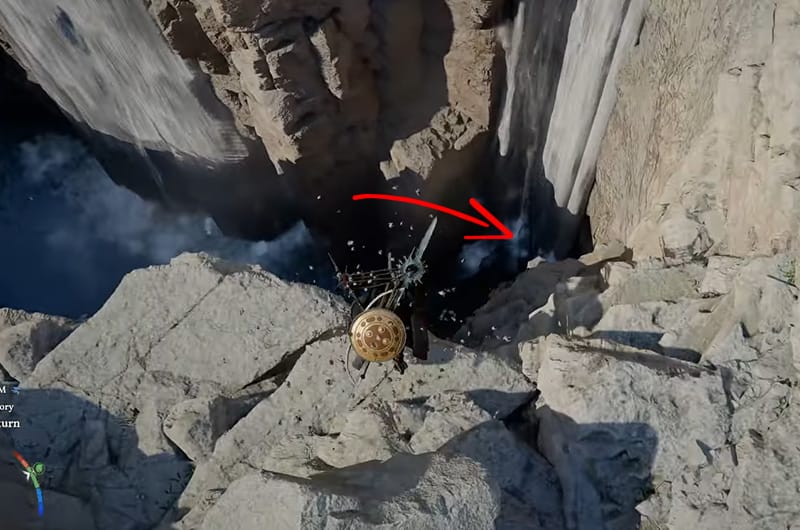
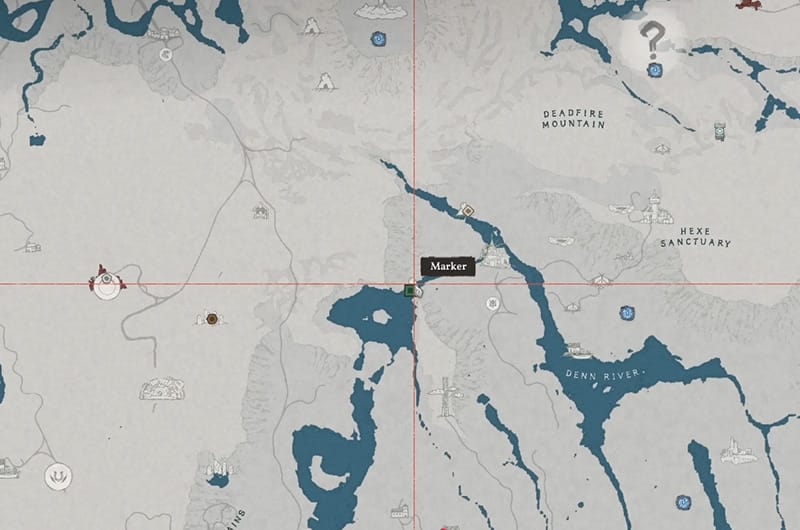
To get the Soul Spear, go to the Tomb of Frozen Souls as shown in the map above. Once you get to the location, walk to the edge of the cliff. You will be able to see a ledge below. Jump on the ledge and turn around to see the entrace. Go in and walk straight until you come to the centre of the mountain with a deep fall.
At this point you need to jump and use glide to find the nearest platform. The third ledge directly in front of you as shown in the last iamge has the Soul Spear. Do note that this is a very tough area with a large number of powerful enemies.
| Attack | 27 |
|---|---|
| Critical Rate | – |
| Attack Speed | – |
| Refinement | – |
| Sells for | 4.94 |
Elite Vanguard Spear

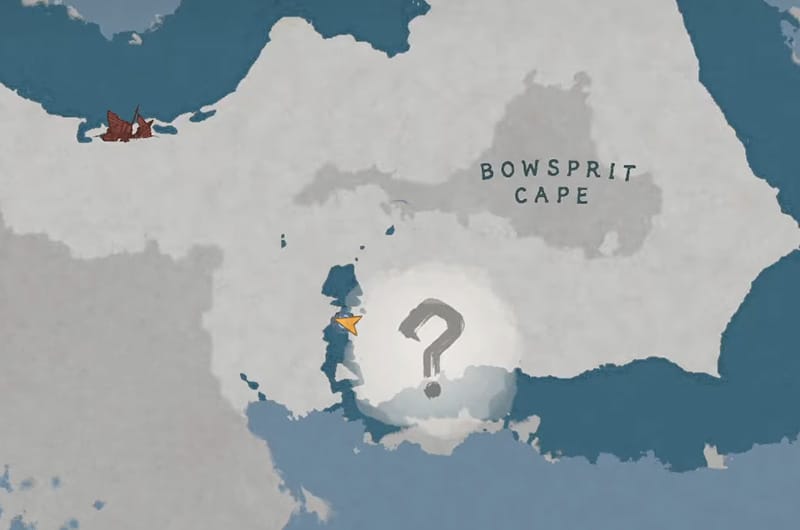
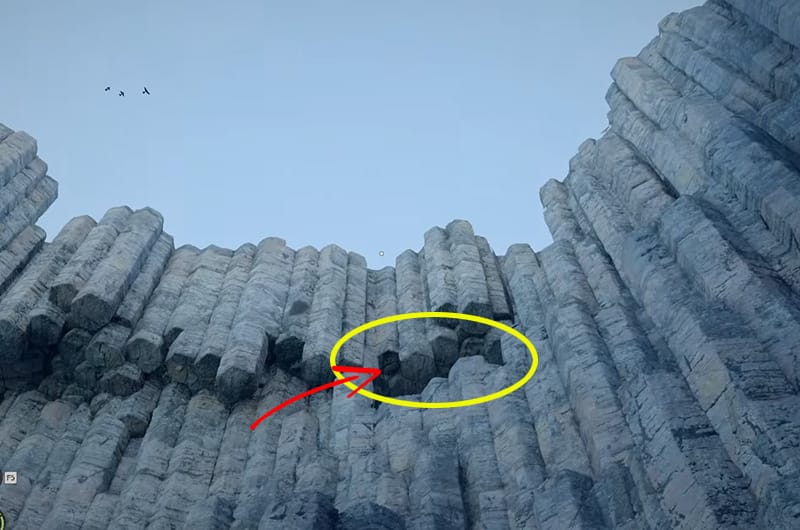
Go to the Abyss Nexus slightly below Bowsprit Cape and start climbing towards the cave in the mountain as shown in the image above. At the end of the cave, you will find a chest that contains the Elite Vanguard Spear.
| Attack | 19 |
|---|---|
| Critical Rate | Lv 1 |
| Attack Speed | Lv 3 |
| Refinement | 3/10 |
| Sells for | 17.01 |
Sior Blaster
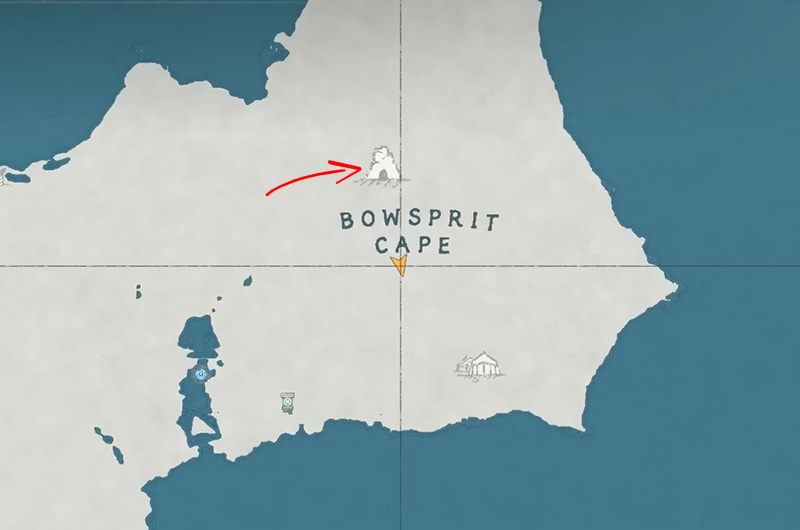
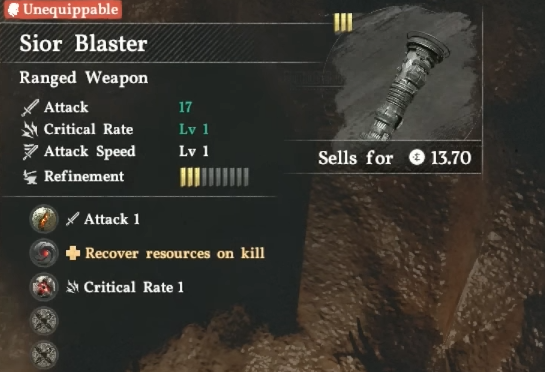
Go to the Bowspirit Cape as shown in the above map and there is a cave in the narrow valley below. Glide to the valley and flllow it until you come upon the cave. Inside the cave, there is a chest with the Sior Blaster gun.
Tauria Curved Sword
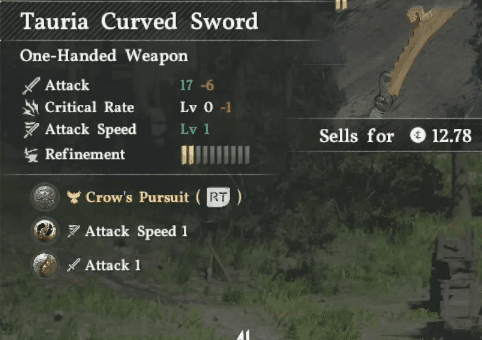
You get the Tauria Curved Sword as a reward for defeating The Crowcaller boss at the end of chapter 5.
Righteous Verdict
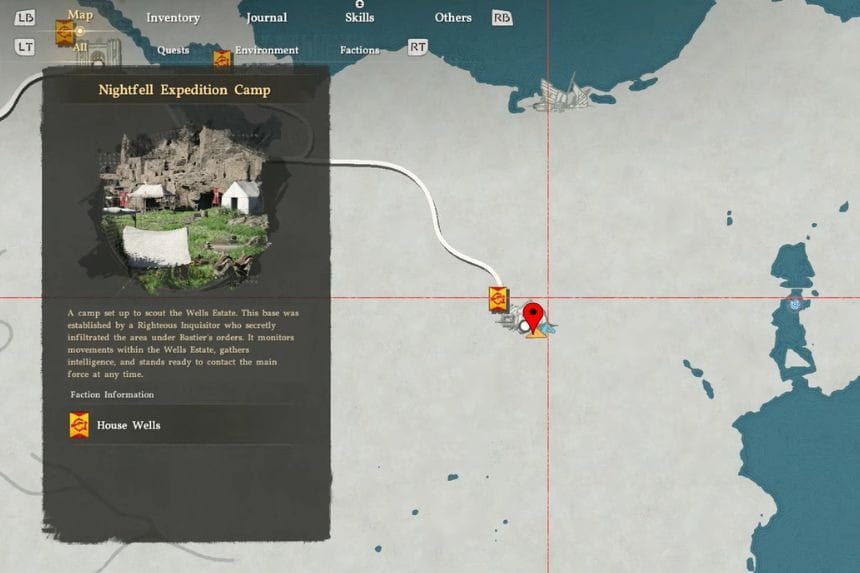
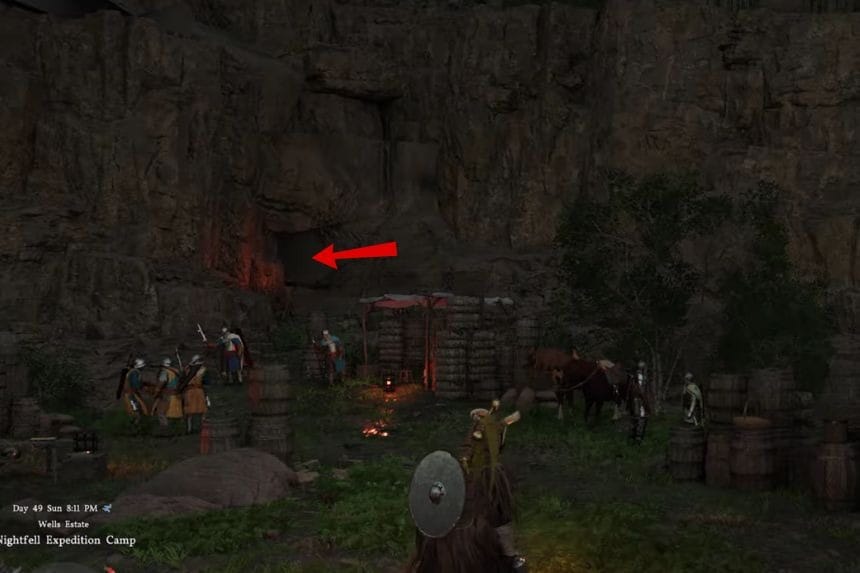
Righteous Verdict is located inside Demeniss Ancestors Ruins. To get there, you must go inside the cave entrance near Nightfell Expedition Camp, and then follow the path inside to get to the ruins.
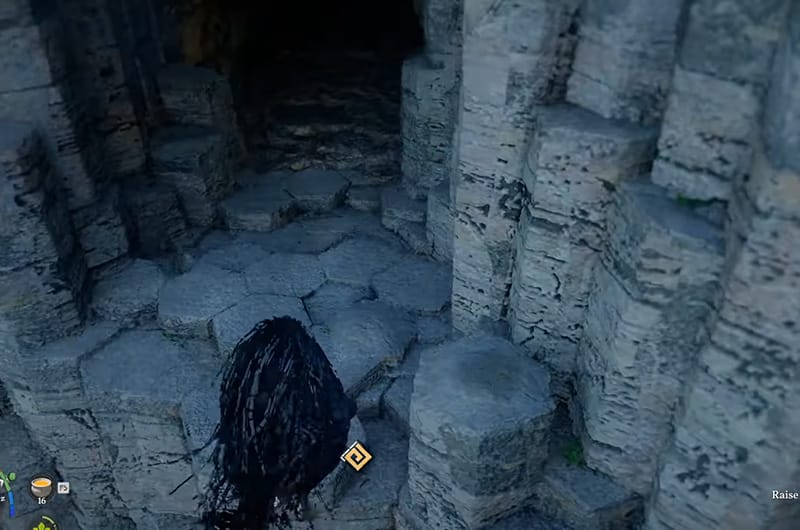
Go to Nightfell Expedition Camp, which is located in the south of Demeniss. Then look for a cave entrance in the mountain. Enter the cave and follow the narrow path forward until you reach a staircase. After climbing the stairs, you will reach the entrance to the ruins. Just walk up to the closed door.
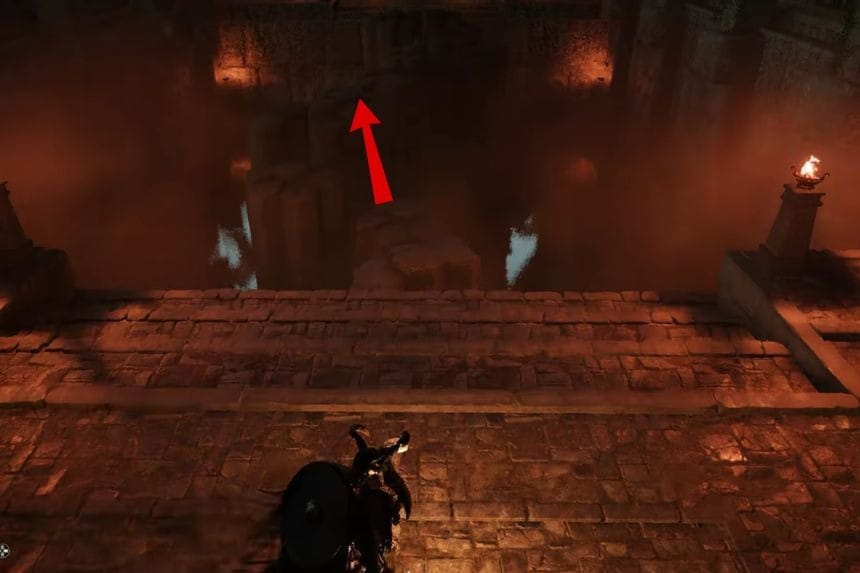
Inside the ruins, you will see a series of stone pillars leading across a gap. Carefully jump from pillar to pillar to cross the gap. Upon crossing the gap, the next door will open, and you will enter the room. At the far end of the room, Righteous Verdict will be stuck in the floor. Simply interact with it to pull it out.
| Attack | 23 |
|---|---|
| Critical Rate | Lvl 3 |
| Attack Speed | Lvl 2 |
| Refinement | 4/10 |
| Sells for | 21.15 |
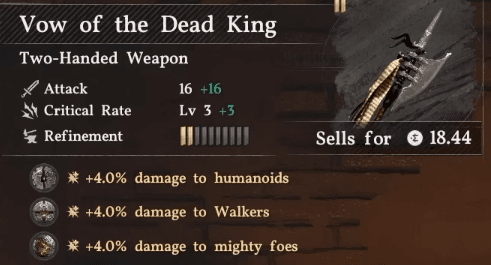
Vow of the Dead King


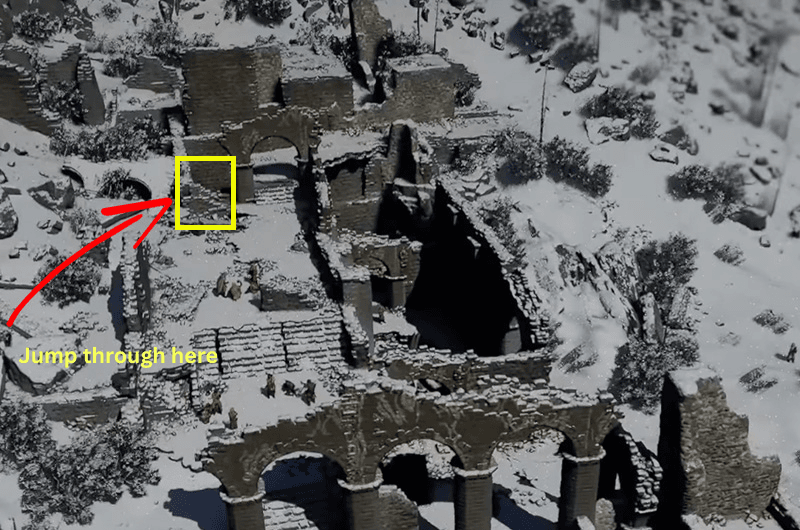
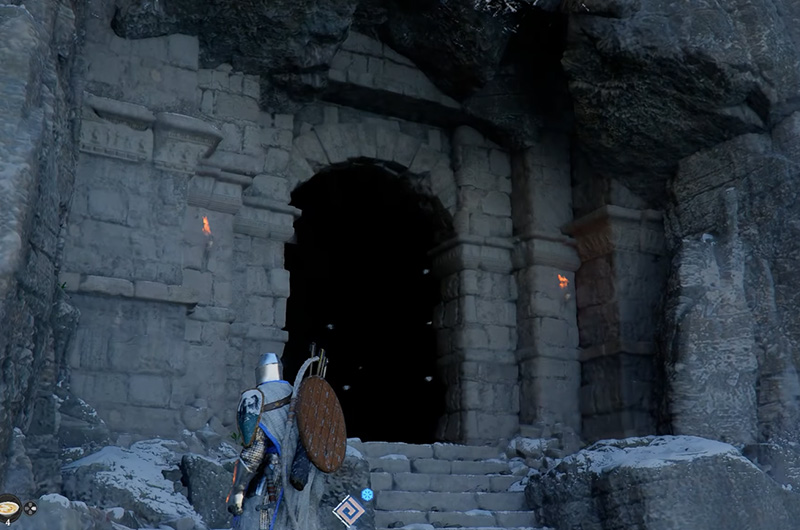
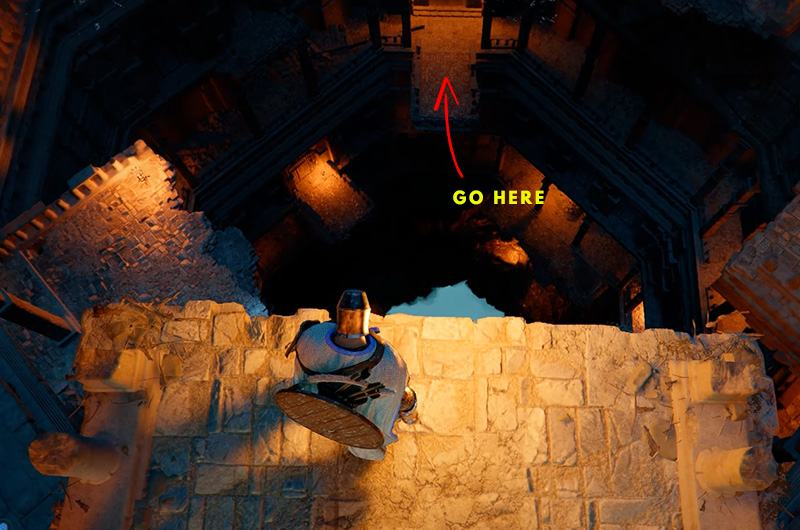
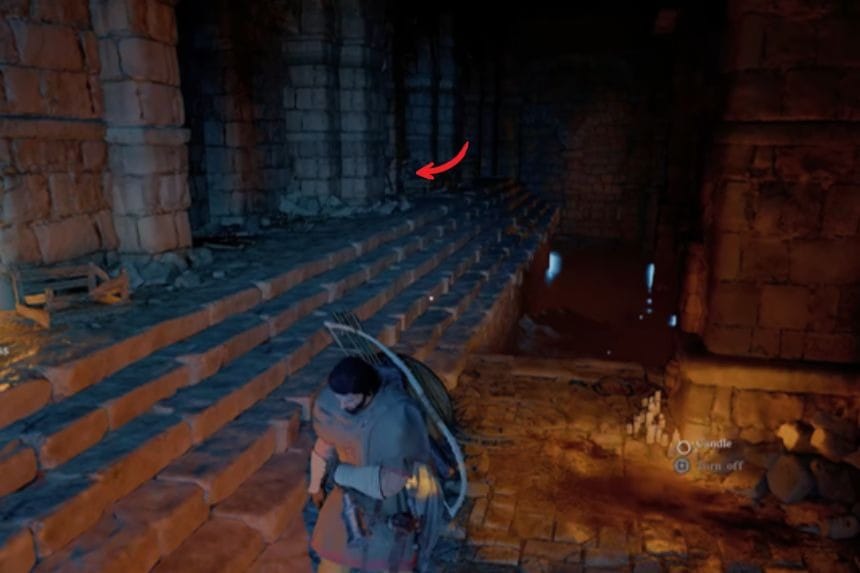
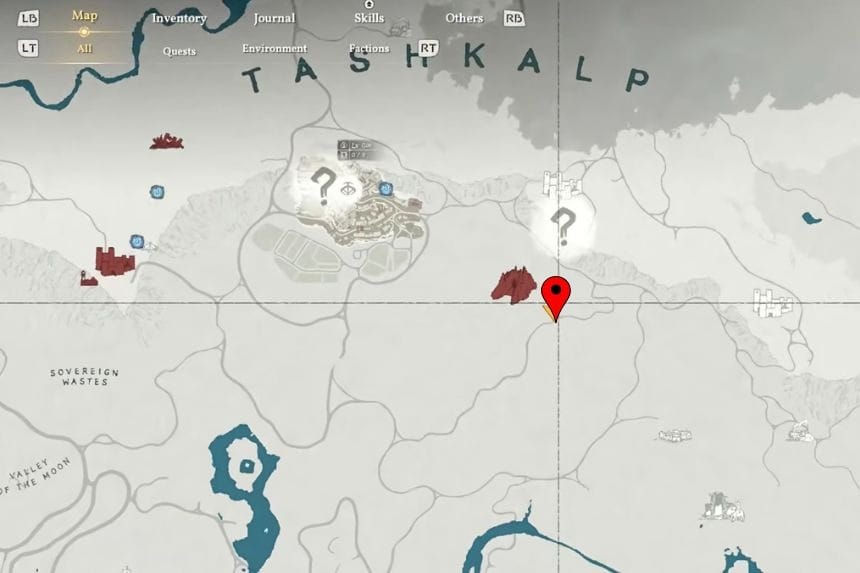
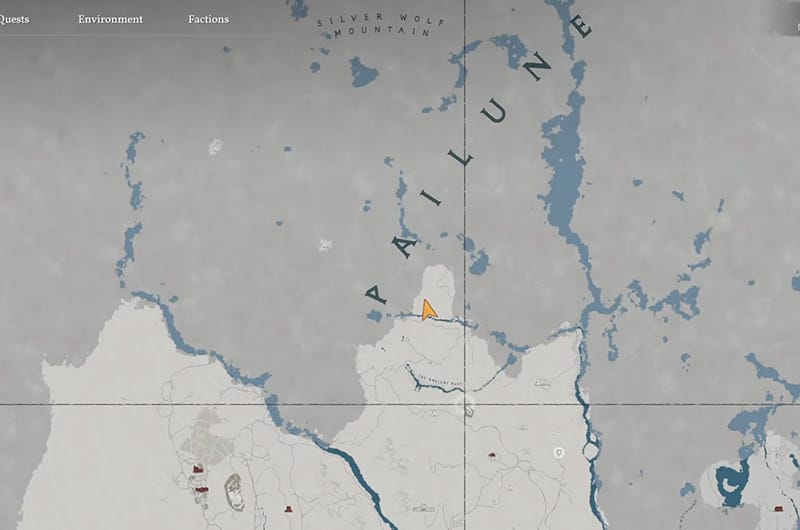
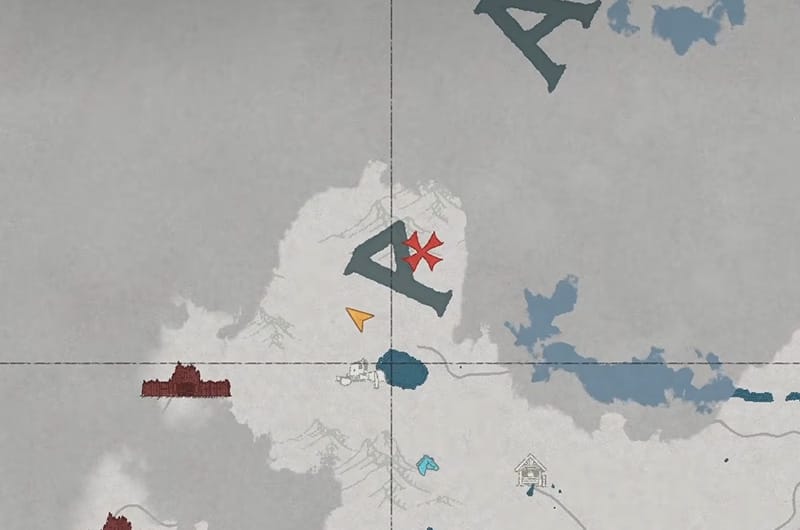
To get the Vow of the Dead King, you need to go to the Frostveiled Castle Ruins, which is right next to the A in Pailune. This is one of the tougher areas of the game with a lot of enemies and platforming puzzles. Go to the second archway and right next to it is a flight of stairs as shown in the image above.
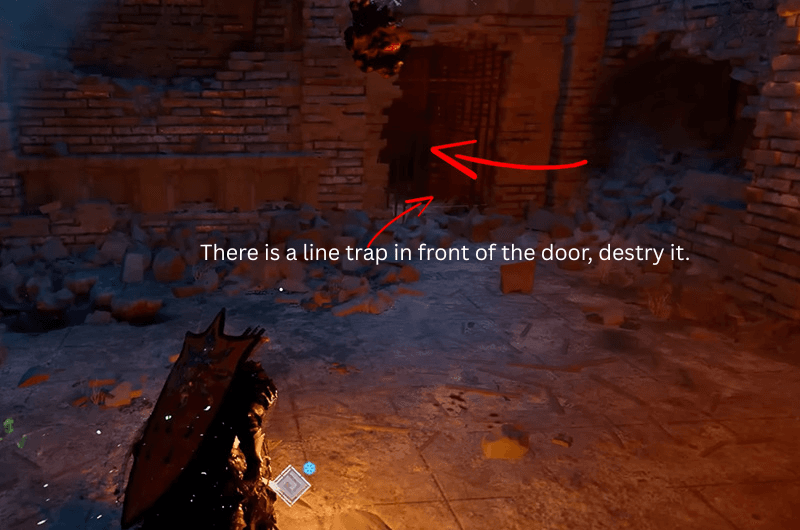
Make you way past the jumping puzzles and then you will face some stone tenticles like enemies, dispose them with the Foreced Palm and head through the doow shown in the last image. There is a line by the door that you need to break before going ahead. Now, go ahead and light the flame to open the puzzle room and collect your reward.
Hound Greatsword
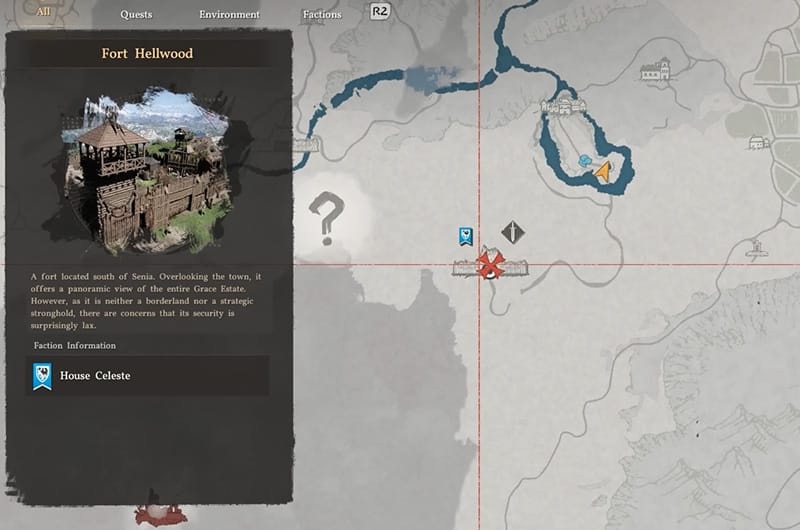
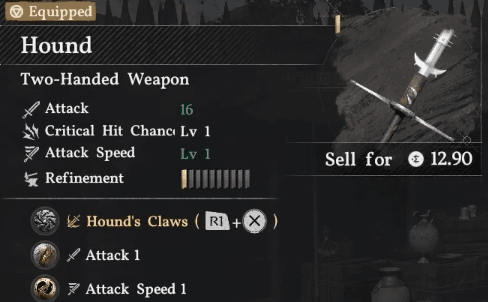
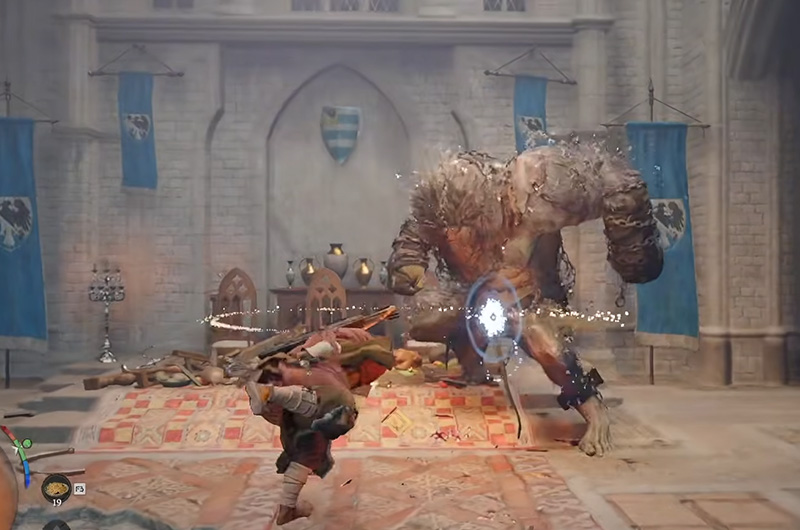
To get this weapon, you need to be in Chapter 4 of the game, more accurate when you go to the Church of Hernand. Here, you will find an NPC, who will give you the quest “The Village of Saint Senia.” Keep following the quest objectives and it will take you to Fort Hellwood. You will fight a new boss here in the arena who drops the Hound Greatsword.
Frozen Anguish Longsword

To get the Frozen Anguish Greatsword, you need to do to the frozen regions of Demeniss. But, before you go prepare yourself. Kill a bear and collect it’s cloak for Level 5 Ice Resistance and then go to Hernand Inn and buy the Satisfying Meat Soup from Dahlia, which gives Level 4 Ice Resistance and +520 Health.

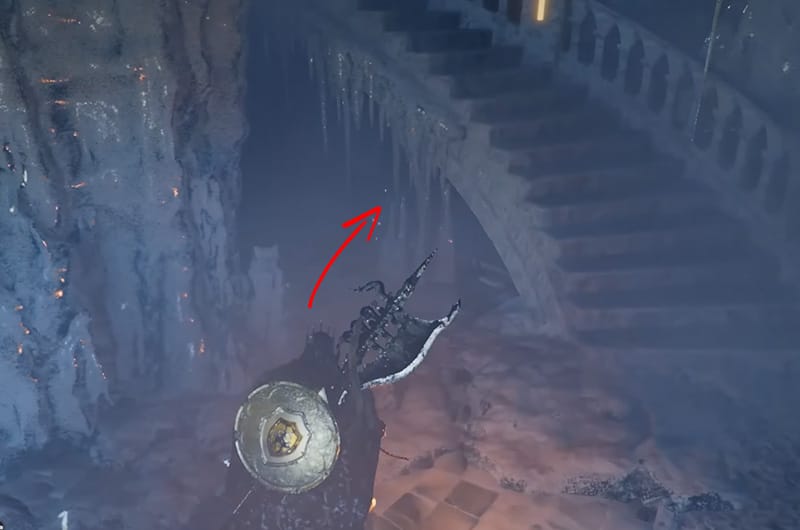
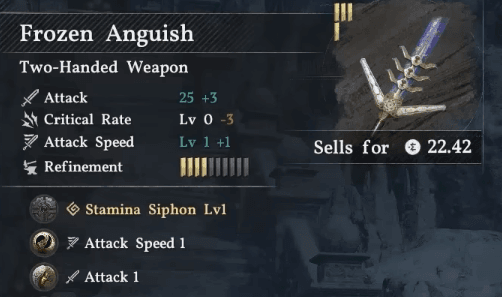
As you make your way inside you will notice, the Brazier is covered with ice and the door is shut, destroy it with fire elemental and then light it, which will open the door. As soon as you enter, there are stairs going up, look below the stairs to find a chest with the Frozen Anguish Longsword. The sword also comes with 2 additional slots, which makes it one of the best weapons in early game.
Darkbringer Sword
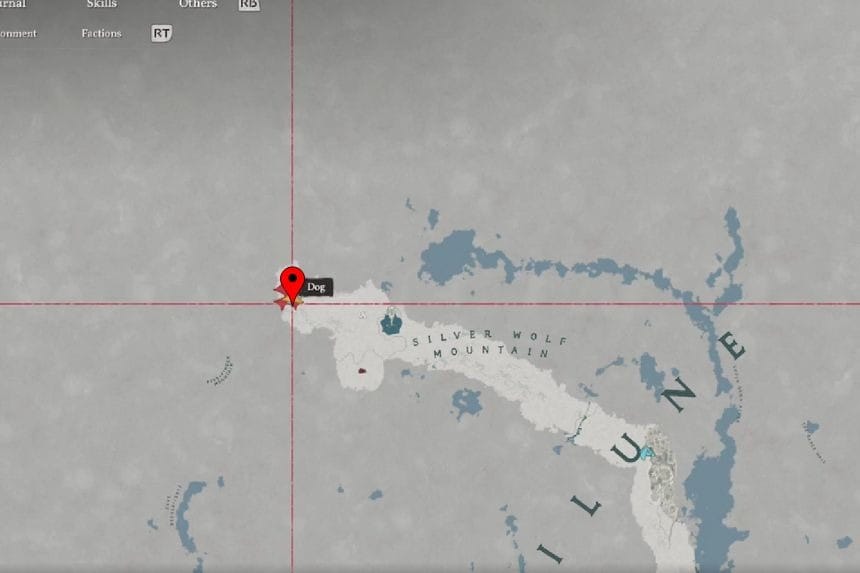
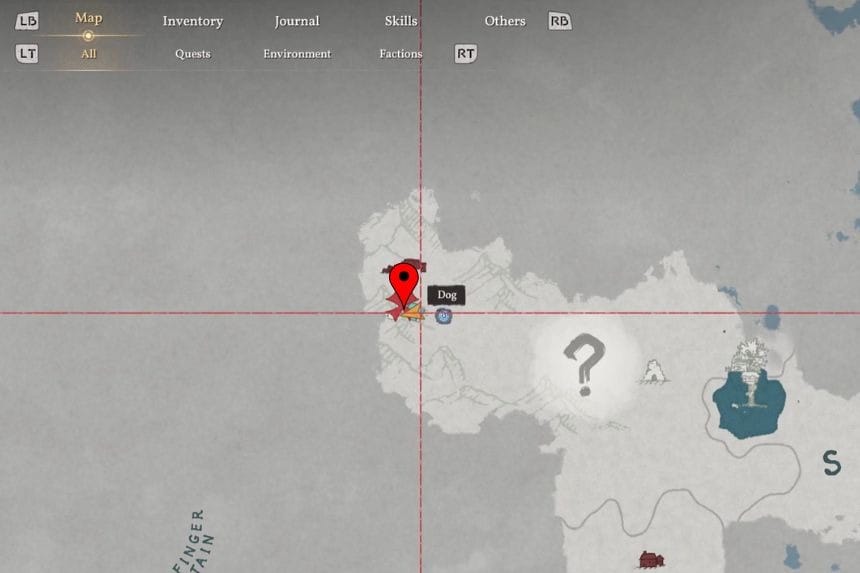
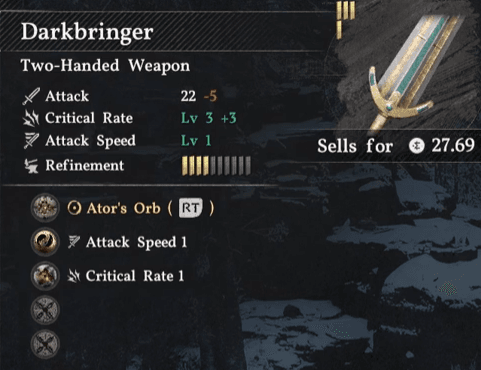
The Darkbringer is found in the north of Silver Wolf Mountain near White Wastes Sanctuary. You will find a very big human skeleton in the cave-like structure in the mountains. Inside the skeleton skull you will find the Darkdringer sword.
Spada Sword
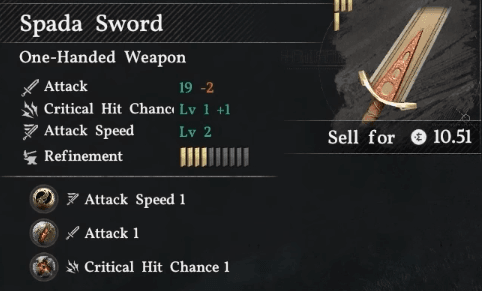
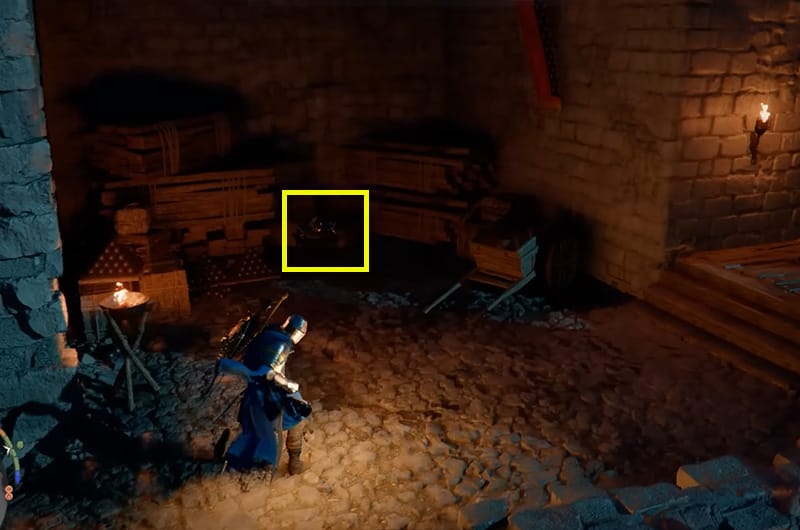
To ge the Drale Shield, you have to progress until about Chapter 7 in the game when you reach the centra part of Demeniss. Here, you will be able to unlock the quest Letter of Silence, which takes you to a fight with a new boss (Tristan, The Flame Knight) in the Flame Knight’s Castle. After the fight, look in the area that has a few target dummies. One of the boxes there has the Spade Sword.
Melted Ambition

To get the Melted Ambition, you’ll need to defeat the boss Miran during Chapter 7. Melted Ambition is a one-handed weapon that increases your Attack Speed level to 2.
Acria Sword

You can collect the Acria Sword by finding it within Stellen Manor, in Halden’s hidden room. You can enter Halden’s room once you capture him, since his hideout is within Stellen Manor above Drake’s Vault Gorge. Halden’s hideout contains a strongbox puzzle lock. You need to solve this lock first.
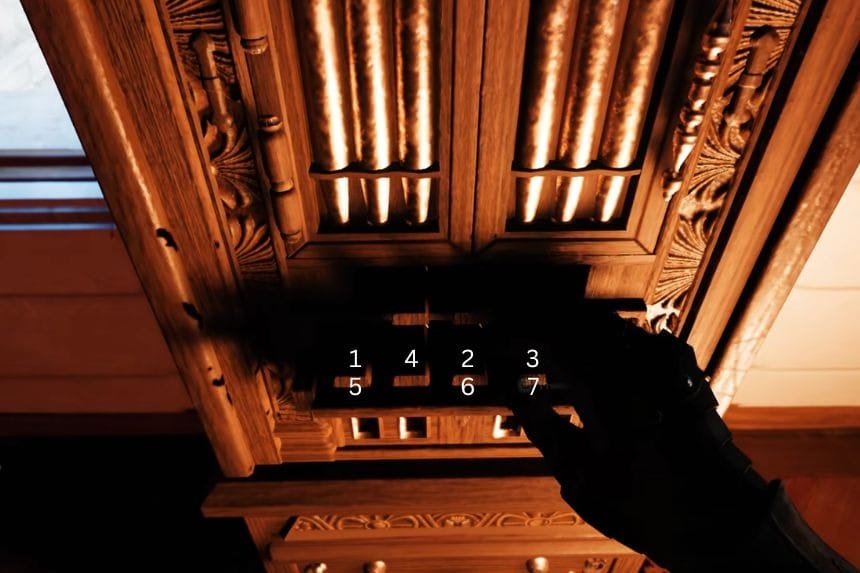
Use the following combination to unlock the lock:
- Bottom row, first
- Bottom row, third
- Bottom row, fourth
- Bottom row, second
- Bottom row, first
- Bottom row, third
- Bottom row, fourth
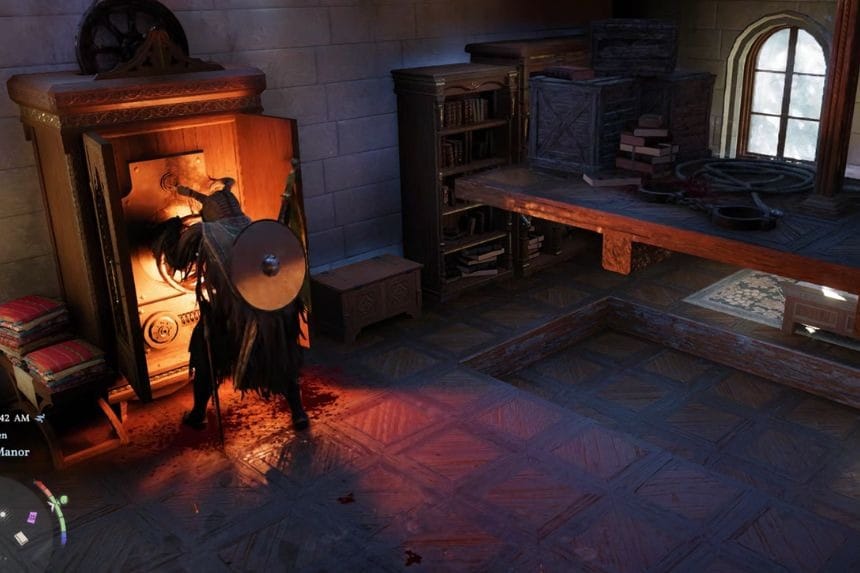
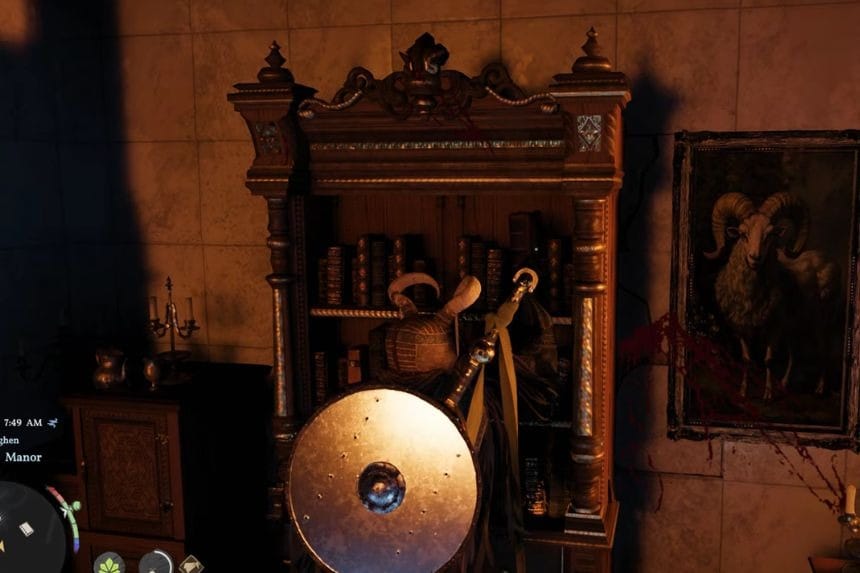
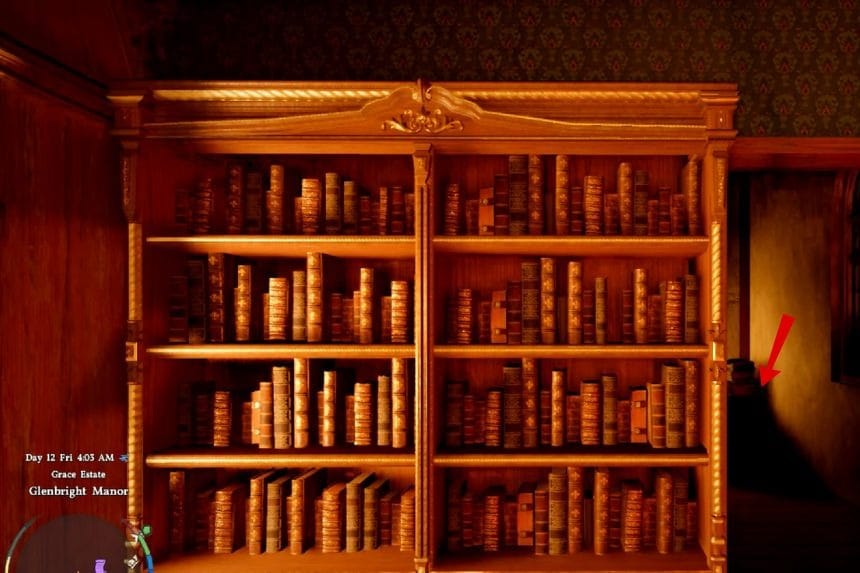
After you have opened the strongbox, you will find an item. Now rotate a wheel inside the wardrobe to lower a table and collect the book on it. Then, you need to go downstairs and interact with the bookshelf. You need to put the book you obtained earlier within the bookshelf to trigger a hidden mechanism. This mechanism will open the bookshelf, which contains a secret door at the back. You need to go through the hidden door. You will find the Acria Sword at the back of the secret room.
| Attack | 19 |
|---|---|
| Critical Rate | Lvl 2 |
| Attack Speed | Lvl 0 |
| Refinement | 4/10 |
| Sells for | 10.97 |
All Unique Shield Locations
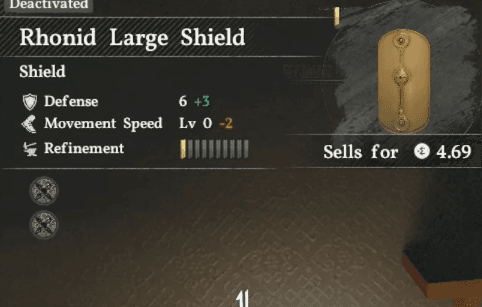
Rhonid Large Shield
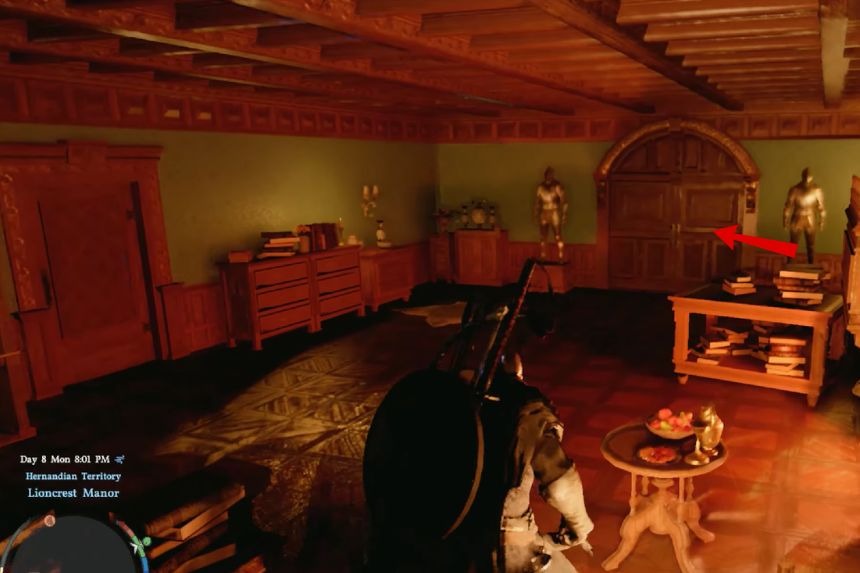
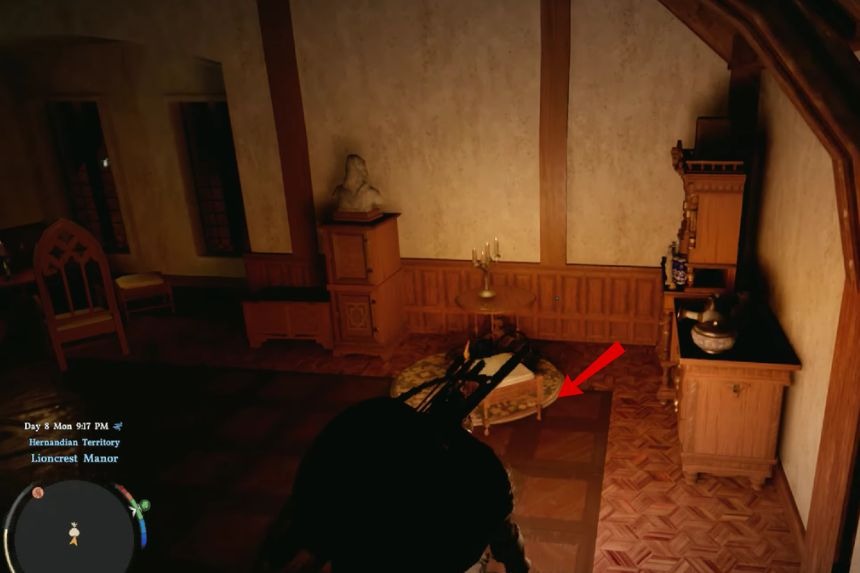
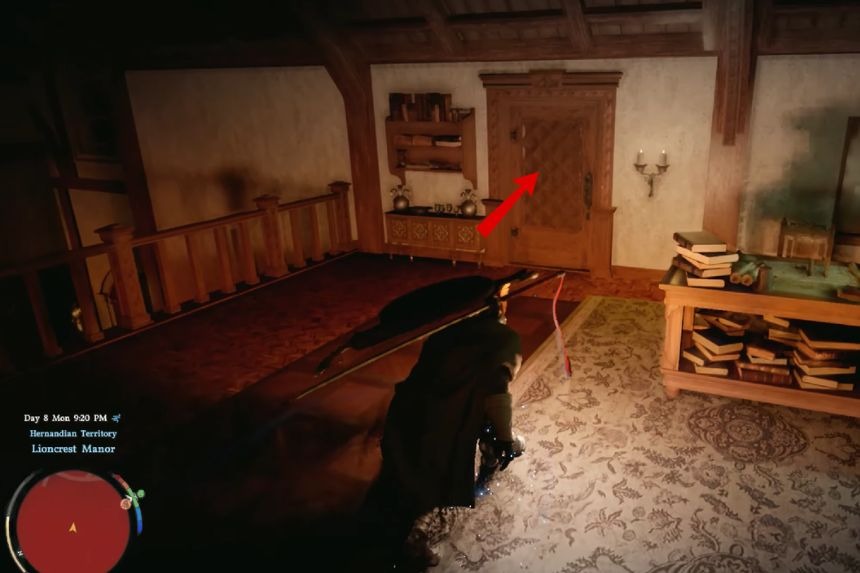
In the Lioncrest Manor, enter the building from the middle of the window. Once inside, open the big door in front of you. Then move forward to steal a key near a tea table. Now, on the left side you will unlock the door with the key to find Rhonid large shield.
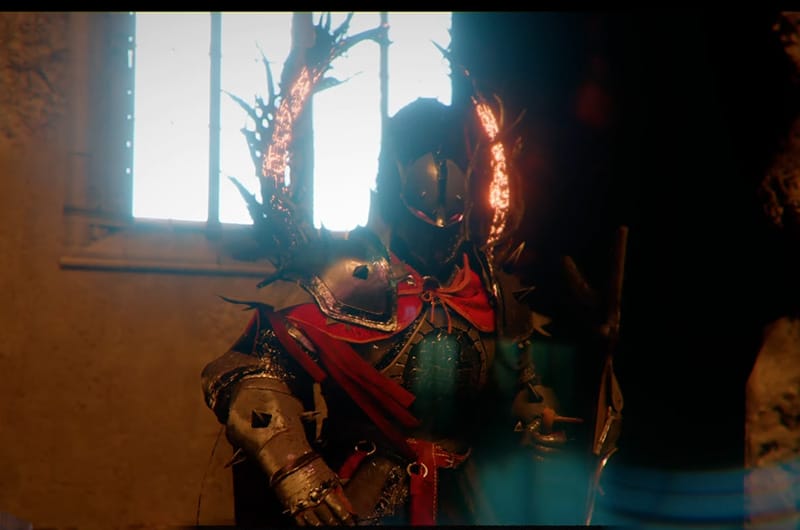
Stag Lord’s Shield
You earn this by completing the House Circus quest line and defeating the Stag Lord. This begins in Chapter 4 in the Hernand region.
Mirror of Night Shield

To get the Mirror of Night Shield, you’ll need to go to the Sanctum of Atonement. When you arrive at the location, you’ll find two lanterns on either side of the sanctum. Turn on the flame for both sides then go inside the small building beside the right lantern. Inside, you’ll find a chest with the Mirror of Night Shield.
Shield of Betrayal
The Shield of Betrayal is a boss fight reward for beating the Cassius Morten Boss at the end of Chapter 6.
| Defense | 6 |
|---|---|
| Attack Speed | Lv 0 |
| Refinement | 1/10 |
| Sells for | 5.63 |
| Slots | Damage Reduction 1.0Guard Stamina Cost -3.0% |
Shield of Conviction
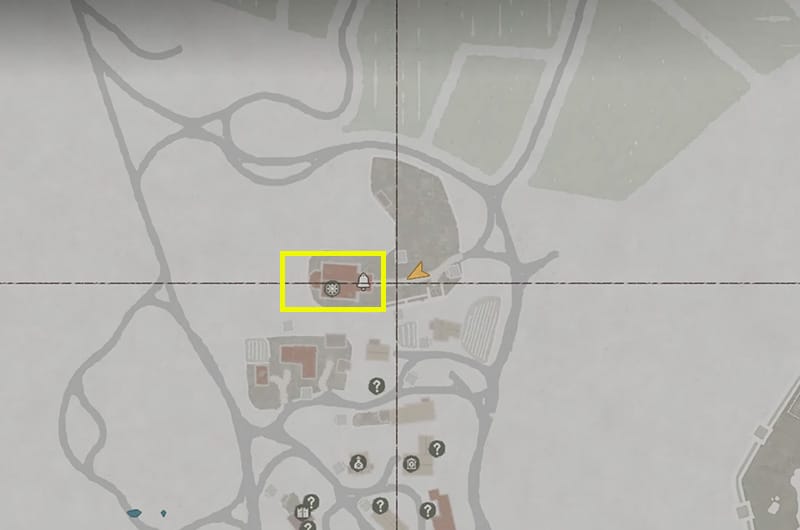
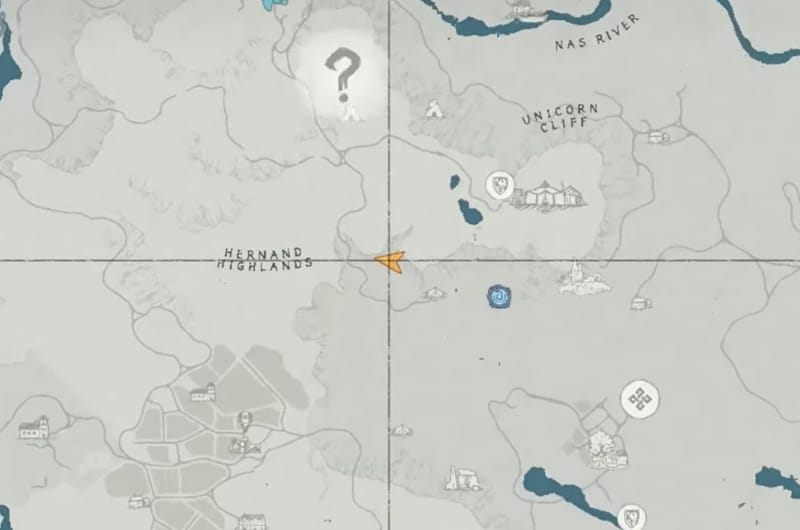
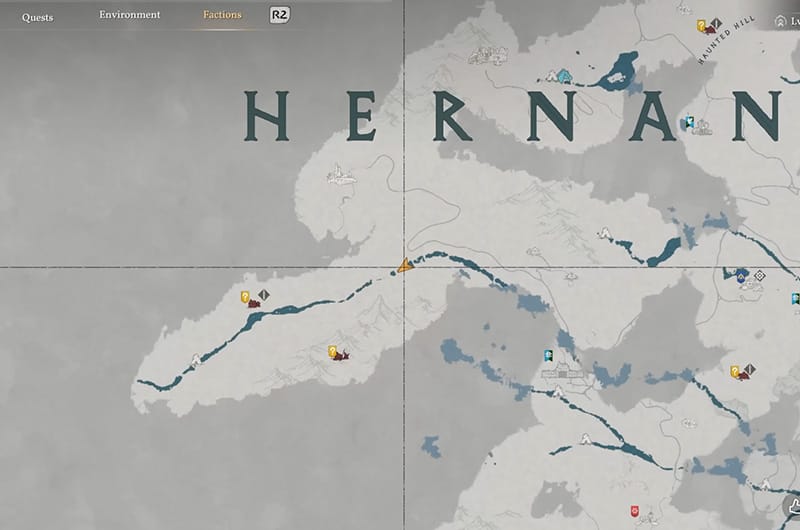
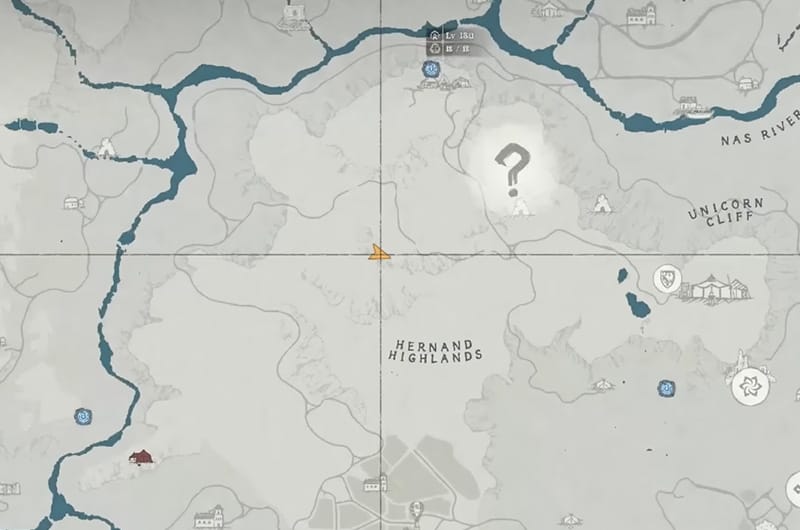
To get the Shield of Conviction, you need to go to the North of Hernand to the location marked on the map. There is a building at the location also marked on the map called the Church of Calphade. Use the walls on the side to climb and get in through the broken window or you can simply use force punch three times and then glide to climb through the window. Inside, you will find a chest that has the Shield of Conviction.
Shield of Sacrifice
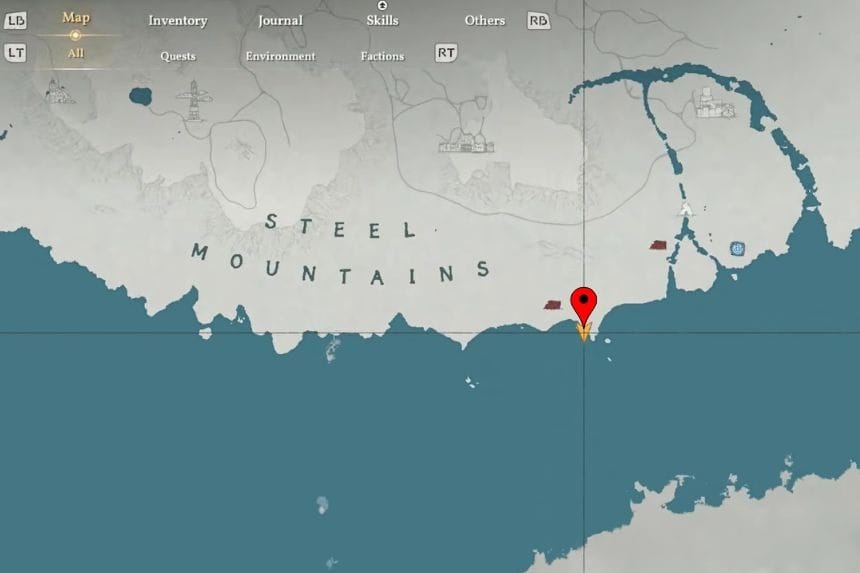
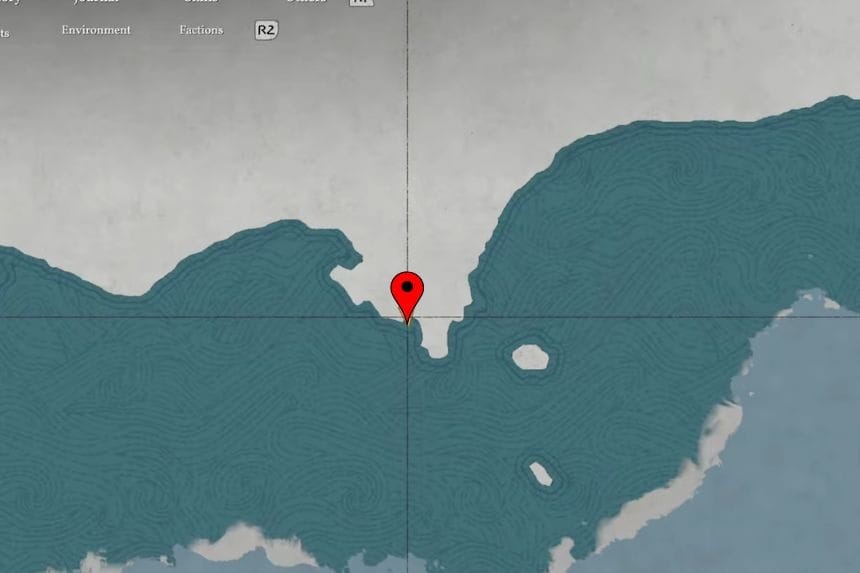
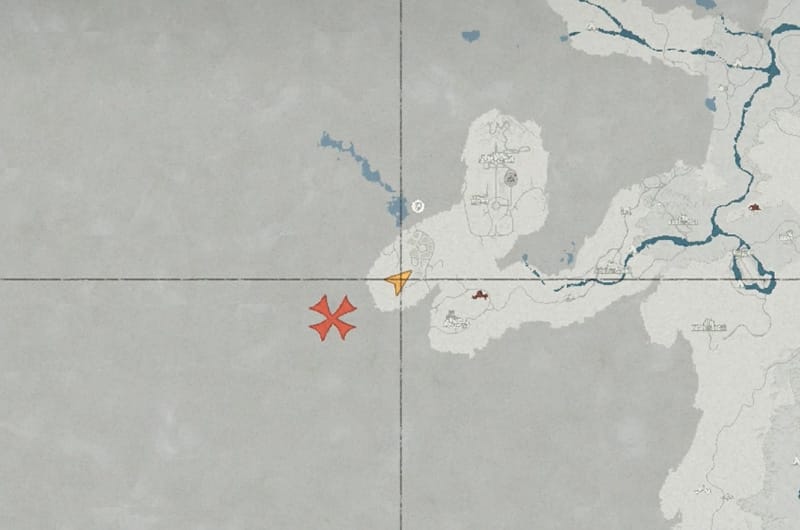
Shield of Sacrifice is located inside an unmarked sea cave, which is located southeast of the Abandoned Seaside Cabin. This cave is not marked on the map, so you must observe the shoreline to find this cave. Enter the cave to find a chest containing the Shield of Sacrifice on the right side.
| Defense | 17 |
|---|---|
| Attack Speed | Lvl 0 |
| Refinement | 4/10 |
| Sells for | 6.91 |
| Additional | Guard Stamina Cost -3.0% |
| Defense | 17 |
|---|---|
| Attack Speed | Lvl 0 |
| Refinement | 4/10 |
| Sells for | 6.91 |
| Additional | Guard Stamina Cost -3.0% |
Lifsoth Large Shield


To get the Lifsoth Large Shield, head South of Hernand to the Witchwoods. Close to it is the Witch’s House as marked on the map. Once at the house, climb the rocks on the right and jump into the balcony. Open the door and inside the room you will find chest that has the Lifsoth Large Shield.
Staglord’s Shield

You can get the weapon by defeating the Staglord boss during Lord Amidst the Ruins Quest. The shield is a reward for defeating the boss.
| Defense | 6 |
|---|---|
| Attack Speed | Lvl 2 |
| Movement Speed | Lv 0 |
| Refinement | 2/10 |
| Sells for | 7.70 |
| Abyss Gear | Fortification IAegis I |
Tardik Shield
To get the Tardik Shield, go to the location marked on the map above. You will find a camp in front of you. Take a right turn towards the flower bed to find a tree stump near a small water pond. On the tree stump, you will find the Tardik Shield.
| Defense | 6 |
|---|---|
| Attack Speed | Lv 0 |
| Movement Speed | Lv 2 |
| Refinement | 3/10 |
| Sells for | 4.96 |
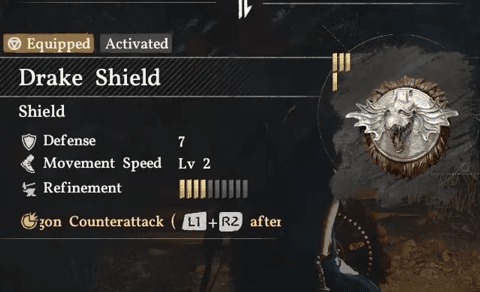
Drake Shield
To ge the Drale Shield, you have to progress until about Chapter 7 in the game when you reach the centra part of Demeniss. Here, you will be able to unlock the quest Letter of Silence, which takes you to a fight with a new boss (Tristan, The Flame Knight) in the Flame Knight’s Castle.
Once you have defeated Tristan, wait for the new objective to appear which will be to retive the gear of Flame Knight. Climb up the wall in front and you will get the Drale Shield in a corner. The shiled comes with an ability called the Dragon Encounter Attack, activated with L1 + R2.
All Unique Armor Locations
You can earn unique armour by completing certain quests or solving puzzles. These armour pieces cannot be upgraded using duplicate copies, so you will need other materials if you want to improve them.
Rhonid Large Shield & Brass Warden Plate Gloves
In the Lioncrest Manor, enter the building from the middle of the window. Once inside, open the big door in front of you. Then move forward to steal a key near a tea table. Now, on the left side you will unlock the door with the key to find Rhonid large shield.
From that room, go downstairs and open the first room on the hallway on the right side to find another chest near the bed which contains the Brass warden plate gloves.
Helm of Ignition

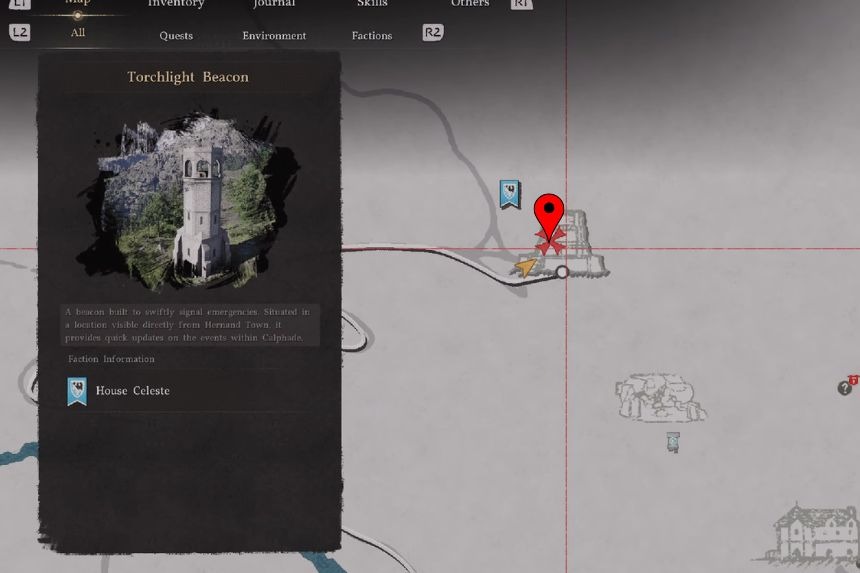
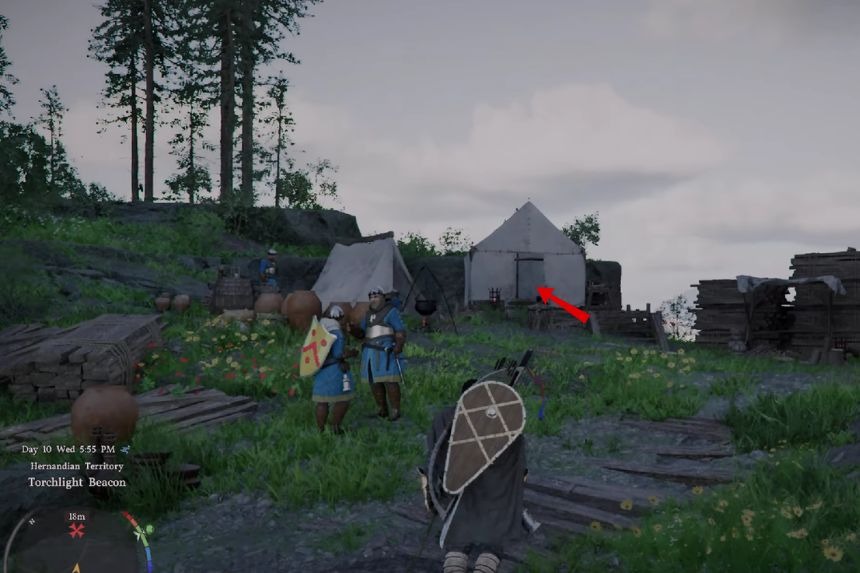
Go towards the south of Hernand, inside the Torchlight Beacon. There will be a white tent. Inside the white tent, you will find the Helm of Ignition on a bedside table.
Bolton Plate Armour and Ceremonial Guard Cloak
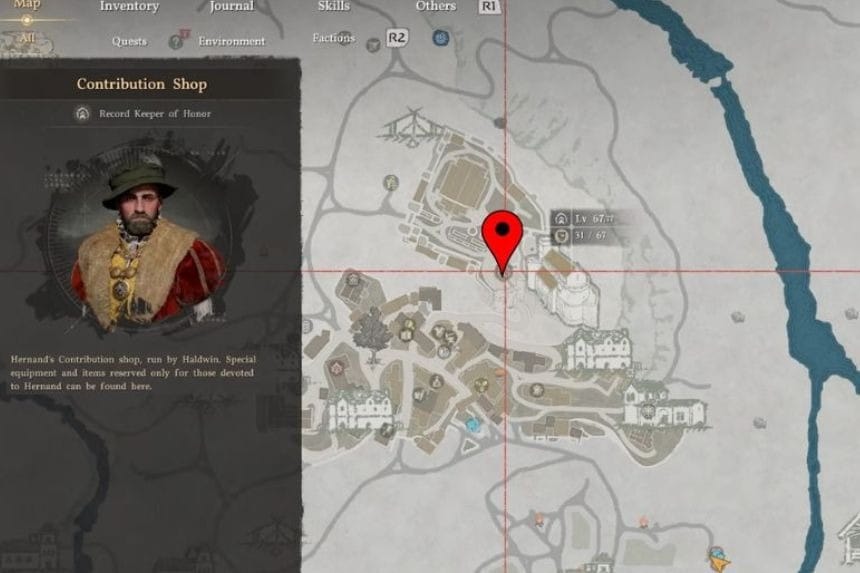
Once your contribution is on a higher level, go to the Hernand contribution vendor inside the city. The vendor is inside the building on the right after entering the main gate. From this vendor, you can buy the Bolton Plate Armour and Ceremonial Guard Cloak.
Hernandian Banquet Cloak
To acquire the Hernandian banquet cloak in the game, you’ll need to complete the Goldleaf Merchant Guild quest, and get it as a reward.
Duskfang Leather Cloak

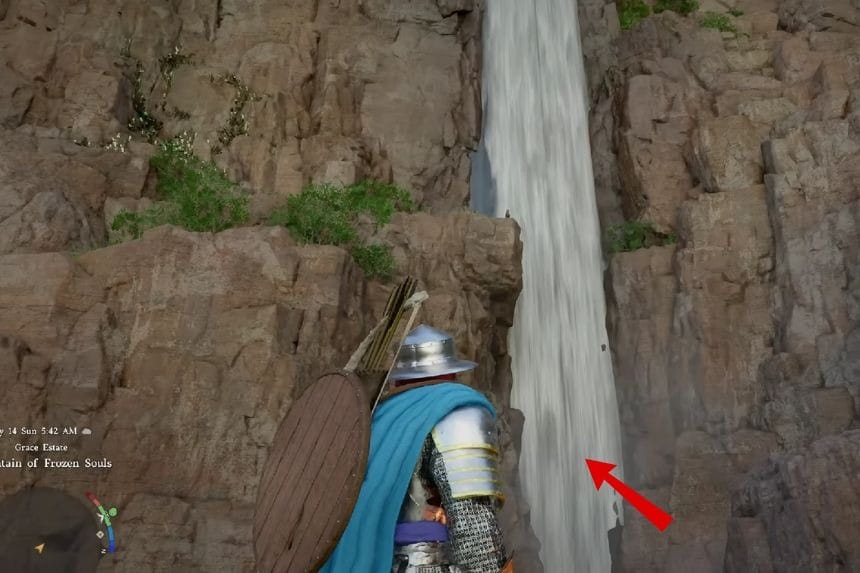
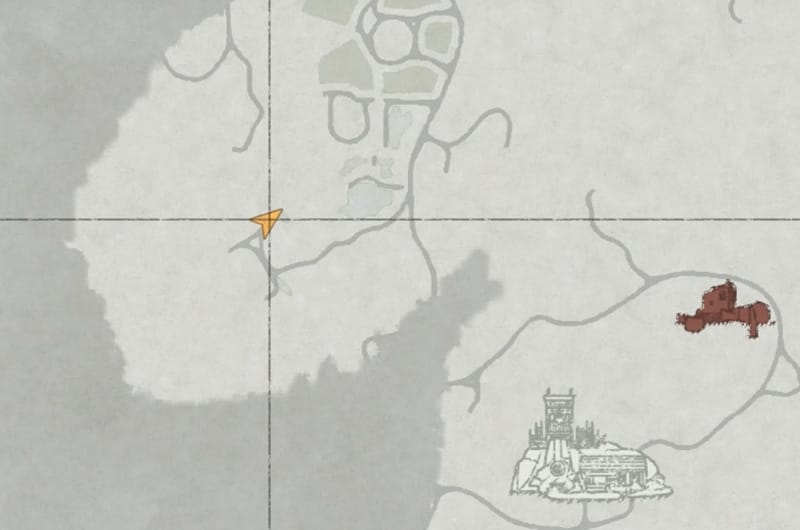
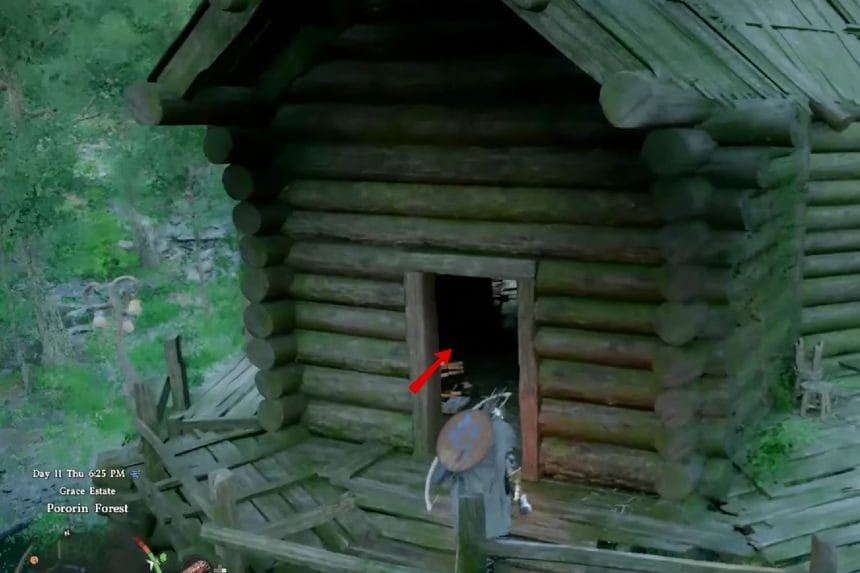
To acquire the Duskfang leather cloak, you’ll need to go to Grace estate. There, you’ll find the cloak inside a small cave high up on the mountains. There’s a wooden gate at the cave’s entrance and you’ll need to break it using an axe. Inside, you’ll find a treasure chest with the Duskfang Leather cloak.
Duskfang Leather Armor


To get the Duskfang Leather Armor, you’ll need to go to the Pollengarth Apiary. Once you reach the marked location, you’ll find a waterfall there. Go behind the waterfall and it will take you to a cave where the Duskfang Leather armor can be found inside a treasure chest. There are multiple chests in the cave, which you loot for additional items.
Caner Armour Set
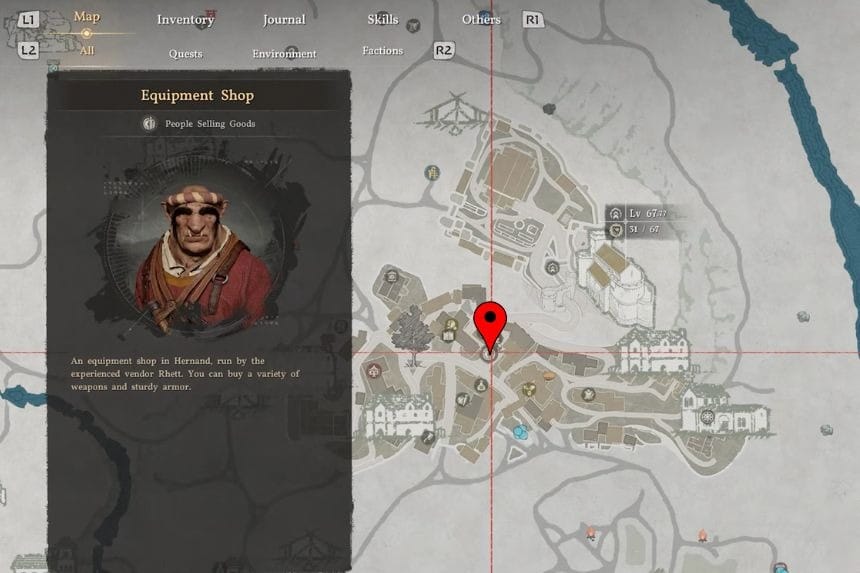
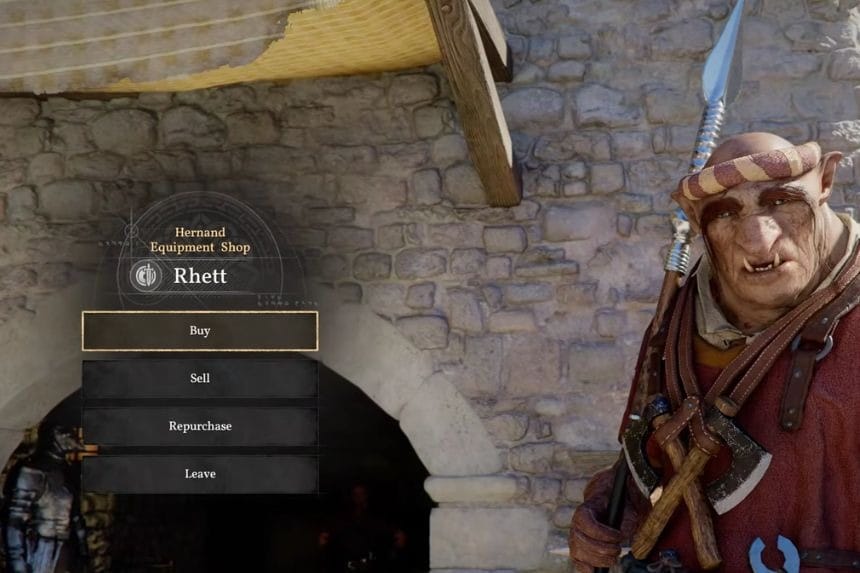
Progress the main story until you beat Matias in Hernand Square. After this, you can unlock the Caner armor set in Rhett’s shop.
Jackals Leather Helm, Armor, and Cloak
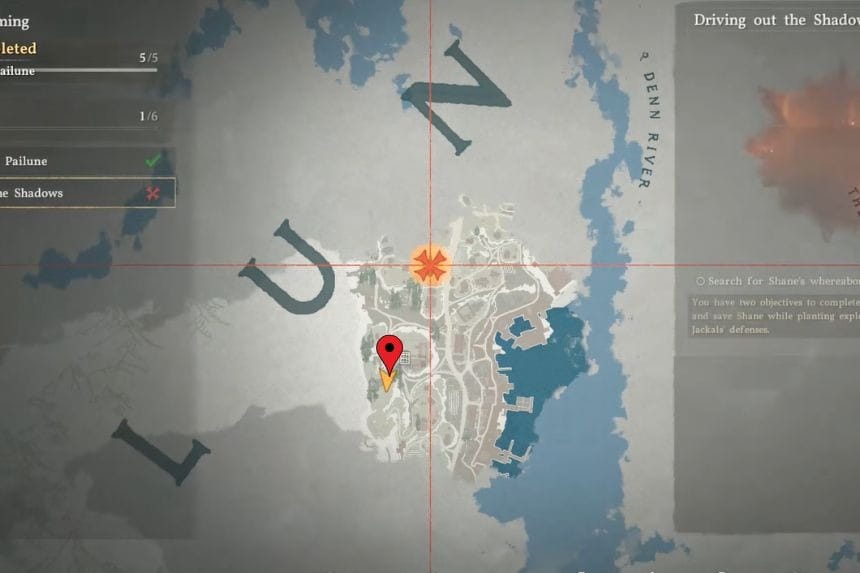
The Jackal’s Leather Helm, Armor, and Cloak are obtained as rewards after you’ve completed the Shadow Over Pauline quest in Chapter 7. The cloak helps you with better defense, Jackal disguise, and also gives you Ice Resistance level 3. The armor, too, offers defense and Jackal disguise along with Lightning Resistance level 1. Finally, the Helm offers you defense, Jackal disguise, and Movement Speed level 1 +1.
Odex Protector’s Plate Boots
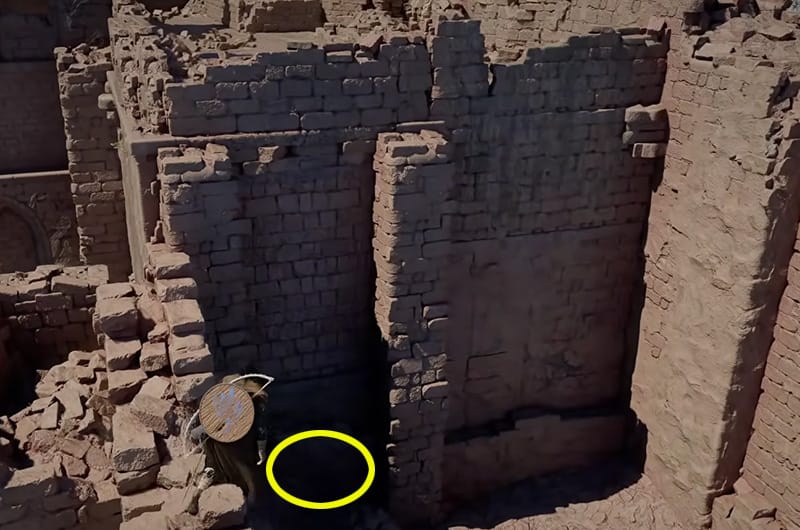
In the Sanctum of Temperance, go up the stairs and into the ruins. There is a small hole in the wall, and if you jump through it and crouch, you can find the Odex Protector’s Plate Boots.
Sunset Reed Set
Sunset Reed Leather Cloak
To find the Sunset Reed Leather cloak, you’ll need to go to the Castlewood ruins. When you go to the ruins, you’ll see that there’s a lantern on either side of the gate. You’ll need to turn on the fire for both in order to open the gate and get to the chest containing the Sunset Reed cloak.
Sunset Reed Cloth Boots
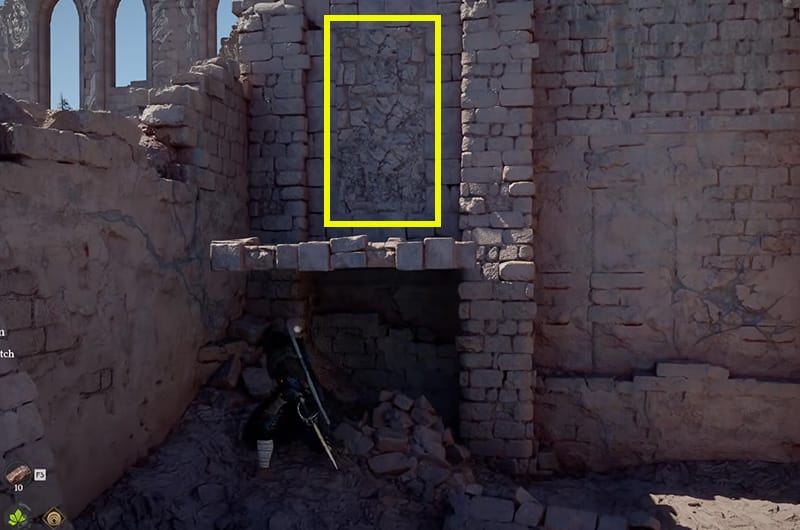
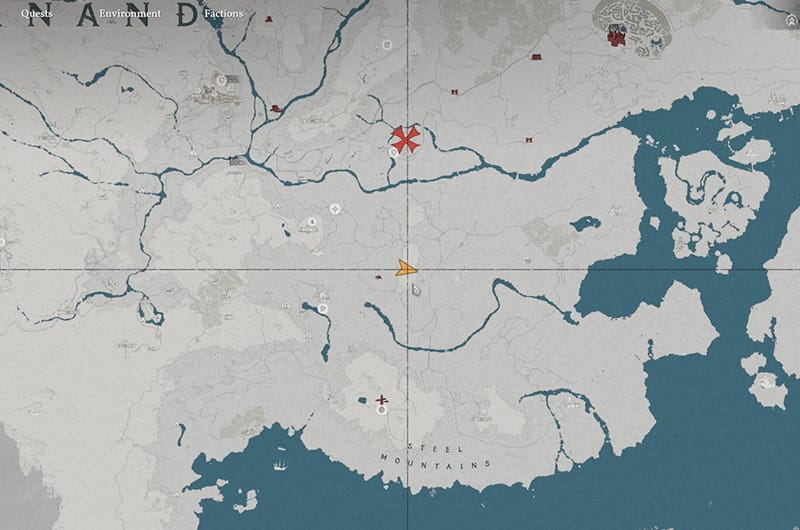
Go to the Sanctum of Absolution, which is West from the Steel Mountains. Climb to the top of the buildings as shown in the above image and jump on the pressure plate marked with a circle above. This will bring down the wall and reveal a noticible pattern. Use the forced palm on the pattern which will flip you inside the building. The chest is up ahead with the Sunset Reed Cloth Boots.
| Attack | 12 |
|---|---|
| Defense | 5 |
| Attack Speed | Lv 0 |
| Movement Speed | Lv 2 |
| Refinement | 2/10 |
| Sells for | 4.79 |
| Slots | Defense 3Movement Speed 1 |
Sunset Reed Leather Armour
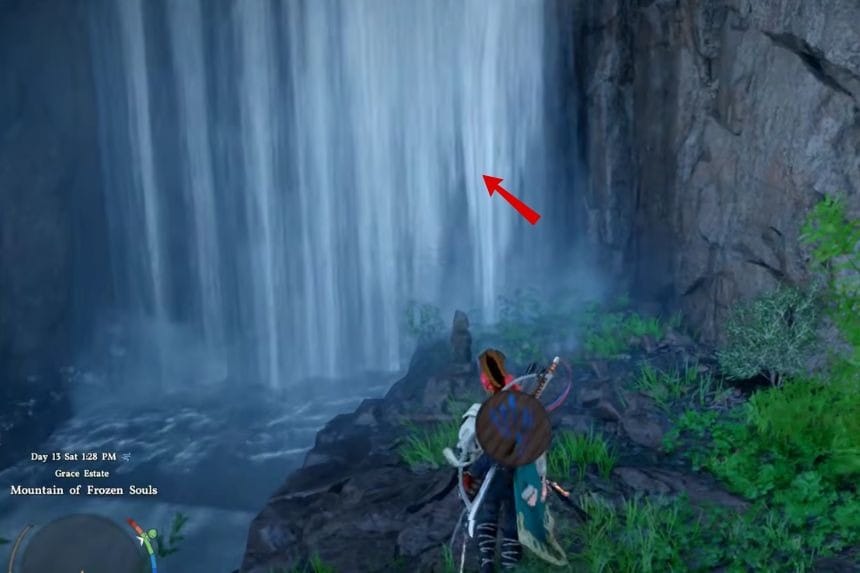
You can get the Sunset Reed Leather Armor inside the Echoing Waves Cave, which is hidden behind a waterfall in the Mountain of Frozen Souls area. Go through the waterfall, enter the cave, and search inside to find the armor.
Sunset Reed Cloth Gloves
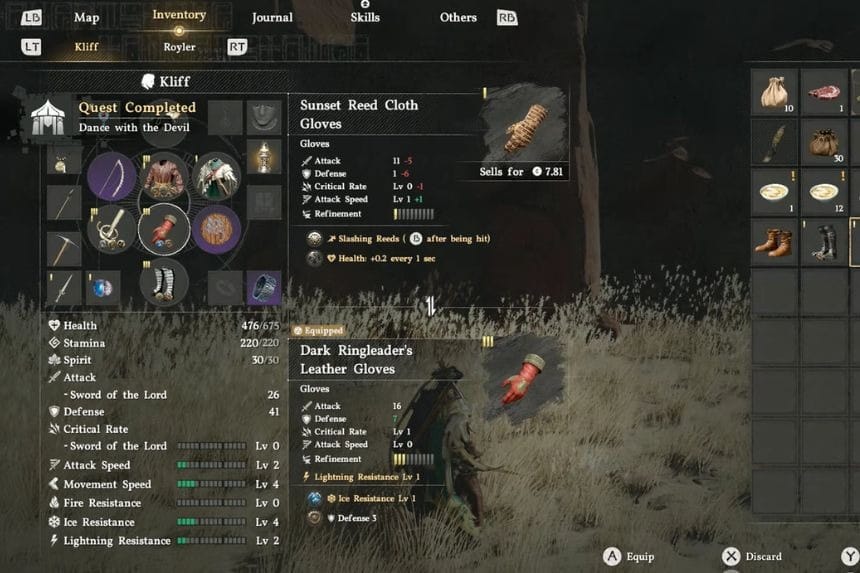
You can find the Sunset Reed Leather Armor inside Echoing Waves Cave, hidden behind a waterfall in the Mountain of Frozen Souls area. Pass through the waterfall, enter the cave, and look around inside to collect the armor.
Scholastone Uniform

For the Scholastone uniform, you’ll need to complete The Price of Knowledge quest during chapter 4, and get the uniform as a reward. For the remaining outfit, you’ll need to go to the Scholastone Institute and buy it from the merchant there. Check the maps for the location of the Scholastone Institute.
Helm of Knowledge
The Helm of Knowledge, too, can be found inside the Scholastone Institute. Take the staircase you’ll find on the left and go to the second floor. There, on the right side, you’ll find shelves filled with books, and just in front of the shelves are two stone benches; the Helm of Knowledge can be found on one of the stone benches.
Duskfang Leather Gloves

You can get the Duskfang Leather Gloves from a chest inside the Castlewood Ruins. Head into the ruins, look around for the chest, and open it to collect the gloves. Born the vines and light the lamp to open the door.
Reindeer Cloak
To get the Reindeer cloak, you’ll need to make your way to the small village found near the institute. Go to the marked location and you’ll find a cave to your right. Go inside the cave and you’ll find the treasure chest containing the Reindeer cloak.
Dark Ringleader’s Set
Dark Ringleader’s Cloth Cloak

You can find the Dark Ringleaders ‘ Cloak inside the Echoing Tunnel, hidden behind the waterfall. Go through the waterfall to reach the tunnel, then search inside to find the cloak.
Dark Ringleader’s Gloves

You can get the Dark Ringleaders’ Gloves inside Cloudmist Cave, which is hidden behind a waterfall. Go through the waterfall to enter the cave, then search inside to find the gloves.
Dark Ringleader’s Helm

You can find the Dark Ringleaders Helm inside Shadowheart Grotto, which is hidden behind a waterfall. Go through the waterfall, enter the grotto, and look around inside to collect the helm.
Dark Ringleader’s Cloth Armour
You can get the Dark Ringleaders Cloth Armour inside Blade Cavern, hidden behind a waterfall. Pass through the waterfall to enter the cave, then search inside to find the armour.
St. Hallsius Outfit

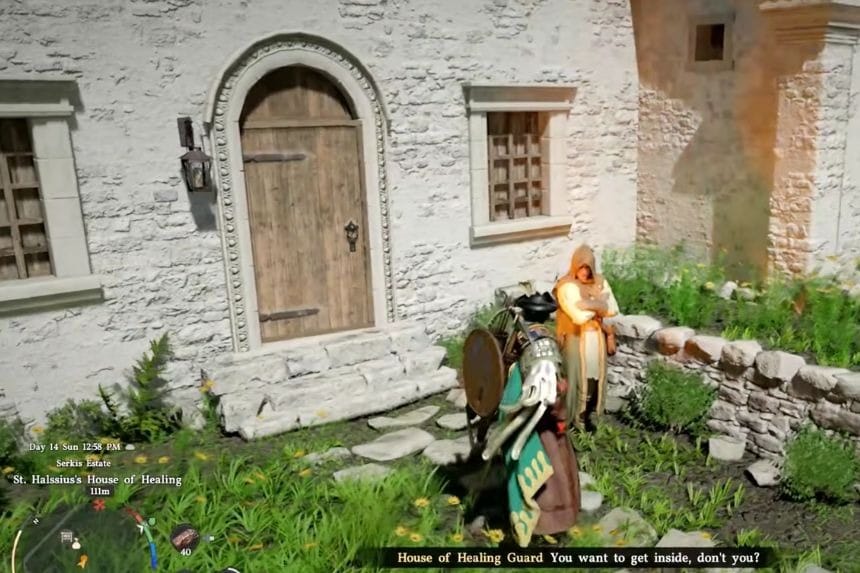
Head to the right side of the House of Healing walls, where you will find a guard standing in front of a door. When you approach him, he will start talking to Kliff and mention that he knows what you are looking for. Speak with him, and he will offer to sell you the Halssius Outfit for 10 Silver Coins.
Blackwing Set
Blackwing Leather Boots
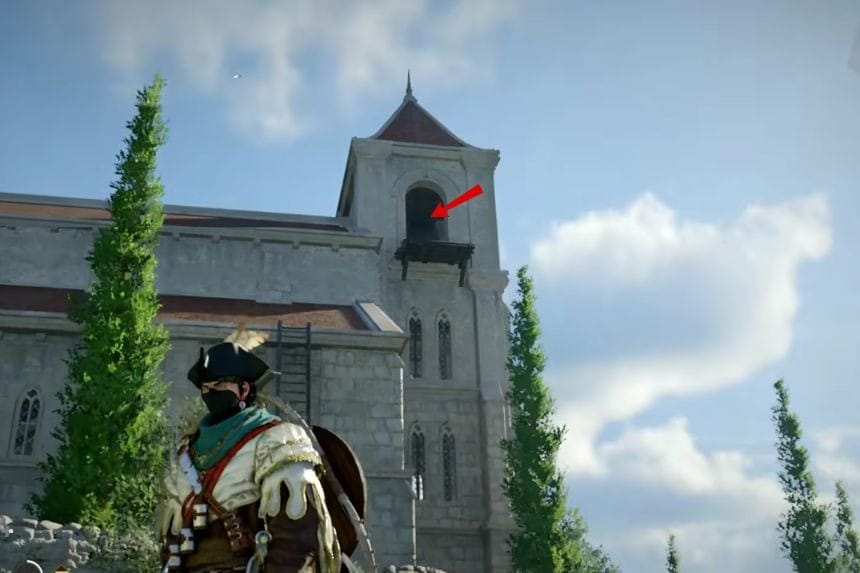
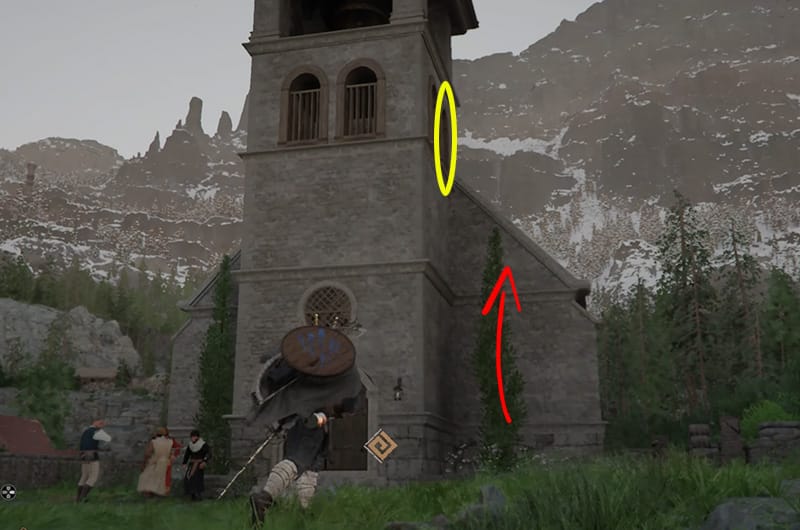
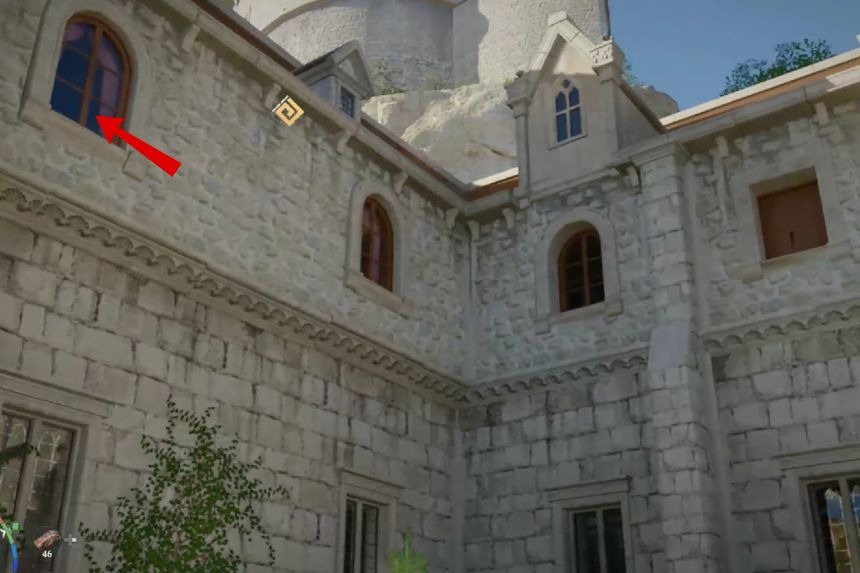
When you reach St. Halssius’s House of Healing near the beginning of Chapter 3, go inside the grounds and look to the left for the tall church building with prisoner cells inside. Climb above the entrance and make your way to the top floor of the tower. There, use a blinding flash to reveal a faint leaf symbol on the floor. Once it appears, crouch and use force palm on that spot to open a hidden floor below, where you will find the chest containing the boots.
Blackwing Leather Gloves
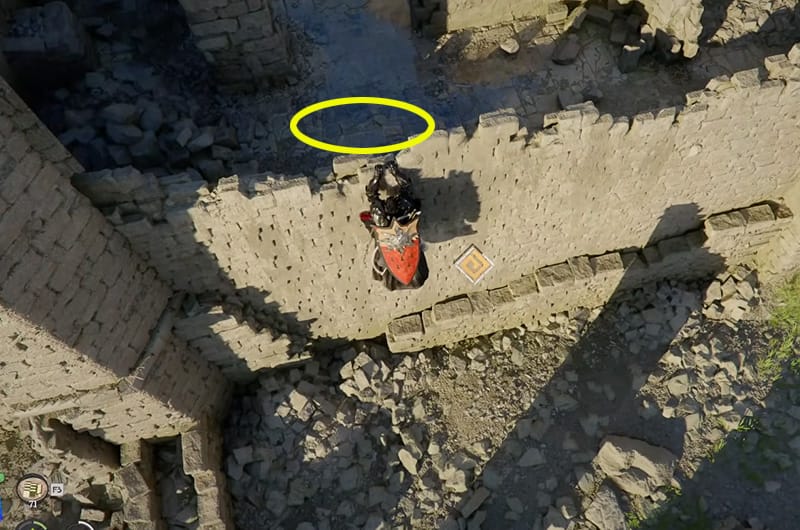
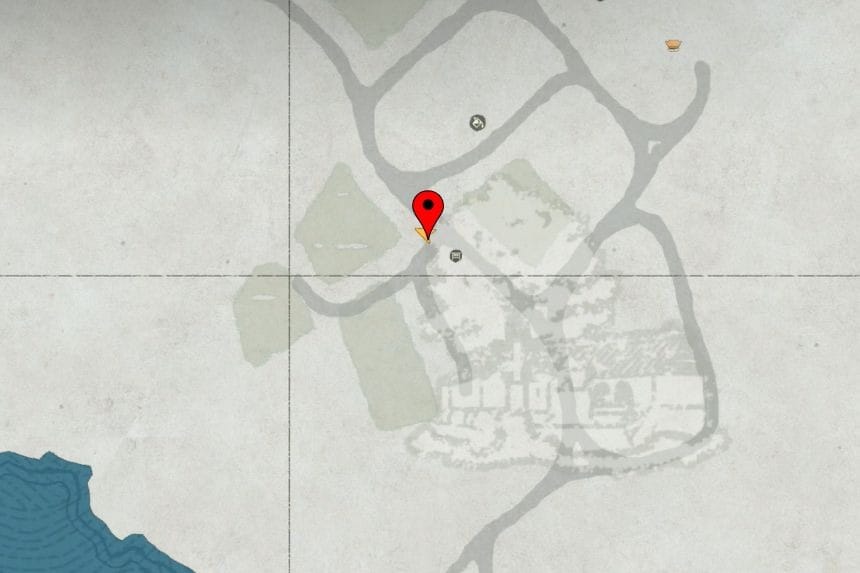
The Blackwing Leather Gloves are at the ruins next to the Sanctum of Penitence. Go to the Sanctum and you will notice the ruins. Climb up the walls of the ruins and break the roof in the area marked in the above image. It will create a hole in the roof and you will fall down. There is a chest there that has the gloves.
Blackwing Leather Cloak
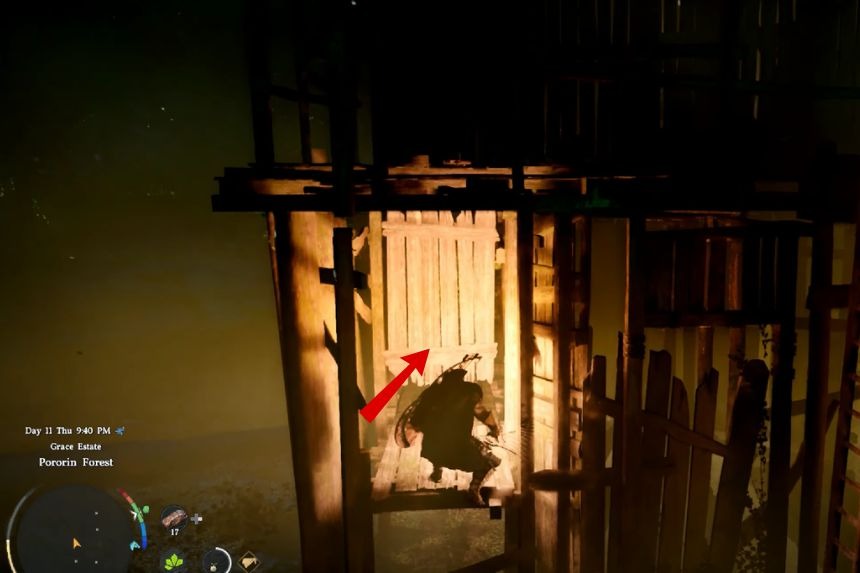
To get the Blackwing Leather Cloak, you’ll need to go to the Pororin Village. Once you reach the marked location, you’ll find a sort of barn on the right side. Go to the right side of the barn-like structure, and you’ll find a small area enclosed with wooden planks. Break the wooden planks to reveal the area where you’ll find the treasure chest containing the Blackwing Leather cloak.
Blackwing Mask and Blackwing Leather Armor

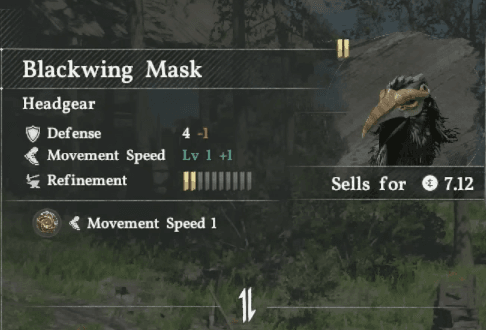
You get the Blackwing Mask and Blackwing Leather Armor as a reward for defeating The Crowcaller boss at the end of chapter 5.
Beekeeper Suit
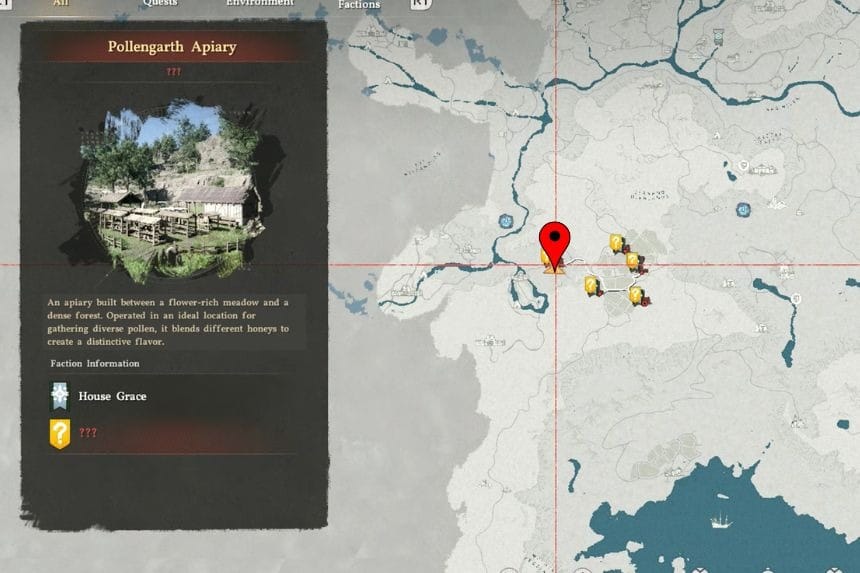
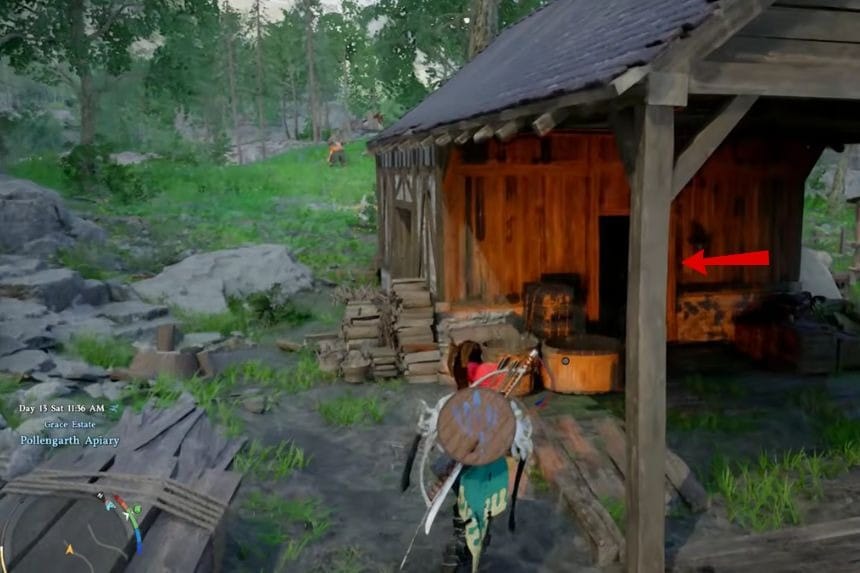
You can find the Beekeeping Suit at the Pollengrath Apiary in the House of Grace area. Head to the apiary, search the wooden house area carefully, and collect the suit there.
Pirate King Hat
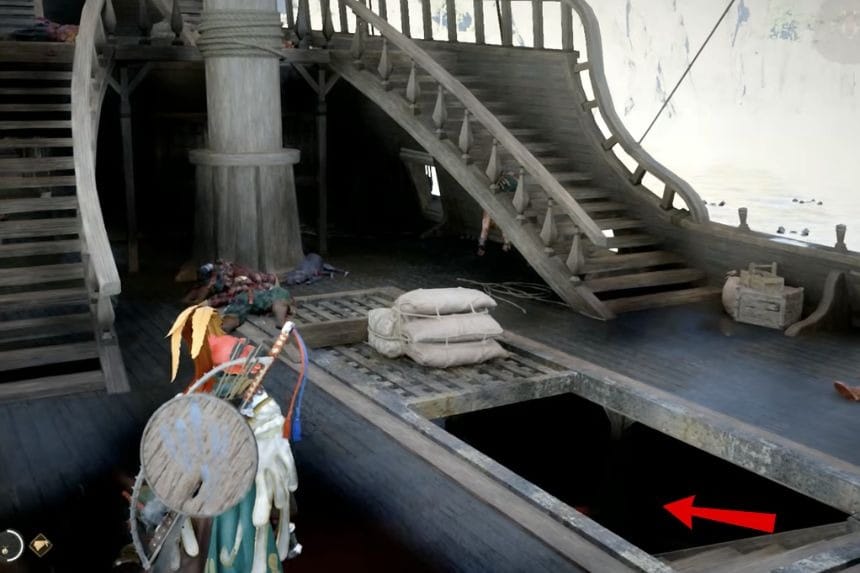
You can find the Pirate King Hat inside the pirate ship Singing Catfish. Explore the ship carefully and check inside to collect the hat.
Camouflage & Disguise Cloak


You can buy the Disguise Cloak and Camouflage from the back alley shop vendor. Visit the shop and check the vendor’s inventory to purchase both items.
Plate Gloves of Shadows
The Plate Gloves of Shadows are found in Everfrost Cave which is located in the far west of the map. Go to the marked location and you’ll find the cave entrance. Follow the the straight path inside the cave and you’ll come across a treasure chest containing the Plate Gloves of Shadows.
Plate Armor of Shadows


To find the Plate Armor of Shadows, travel Northwest of Hernand as shown in the above map. There is a cave there with a chest. Go to the cave and light the flame, which will open the barrier. Loot the treasure chest to get the armor.
Fermen Plate Helm

The Fermen Plate Helm too, can be found in the Sanctum of Atonement. Simply head over to the marked location and it’ll take you towards some ruins. The plate can be found on the right, on top of the rubble.
Fallen Kingdom Set
Plate Boots of Fallen Kingdom

To get the Plate Boots of Fallen Kingdom, you’ll need to go behind the waterfall in the Nighttorm cave. Inside, you’ll find a treasure chest with the Plate Boots of Fallen Kingdom inside it.
Leather Armor of the Fallen Kingdom
Like most of the Fallen Kingdom armors, the Leather Armor of the Fallen Kingdom can also be found behind a waterfall. To get to the other side of the waterfall use the charged stab with your weapon. Once to the other side, follow the cave and at the end there is a chest that has the armor.
| Defense | 7 |
|---|---|
| Attack Speed | – |
| Movement Speed | Lv 0 |
| Refinement | 2/10 |
| Sells for | 9.04 |
| Lightning Resistance | Lv 1 |
| Additional | 10% Silver GainStamina Regen +2%Swim Speed Multiplier 2.0% |
Plate Gloves of the Fallen Kingdom
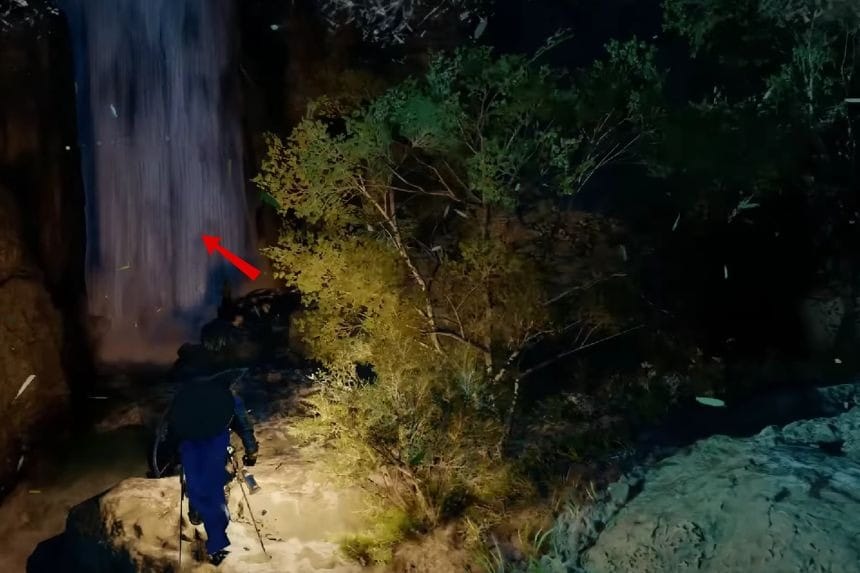
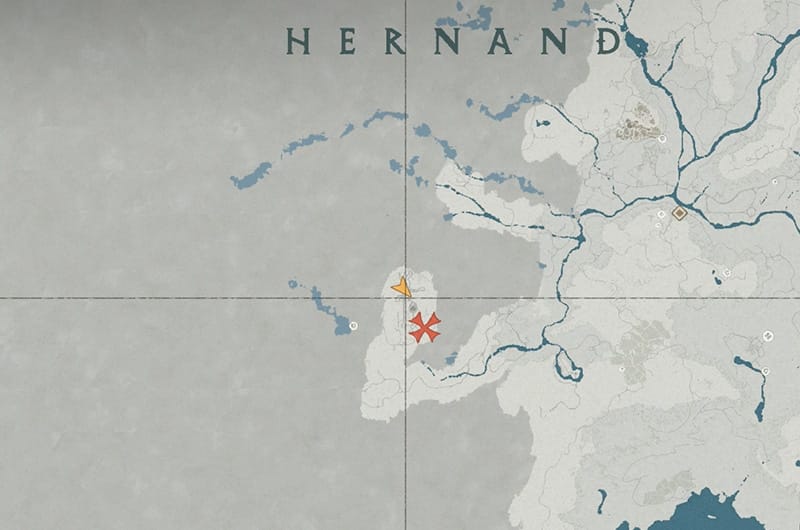
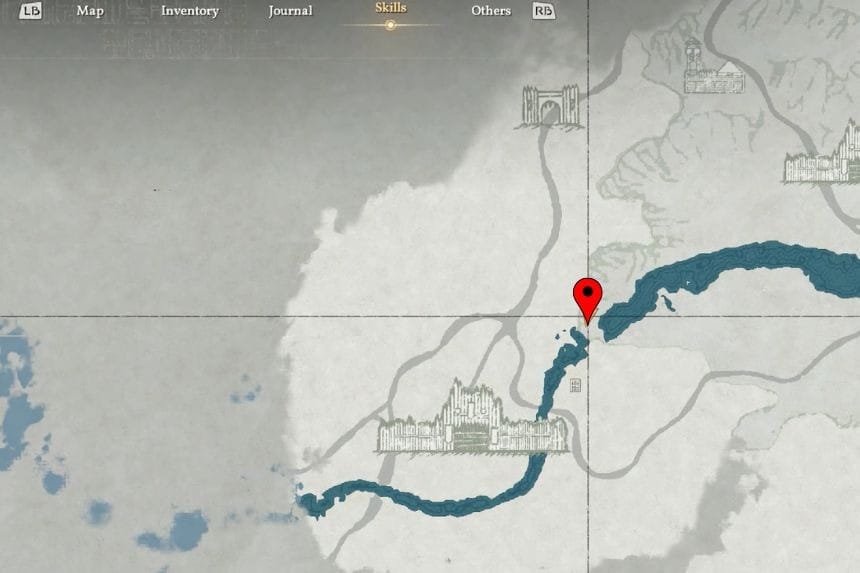
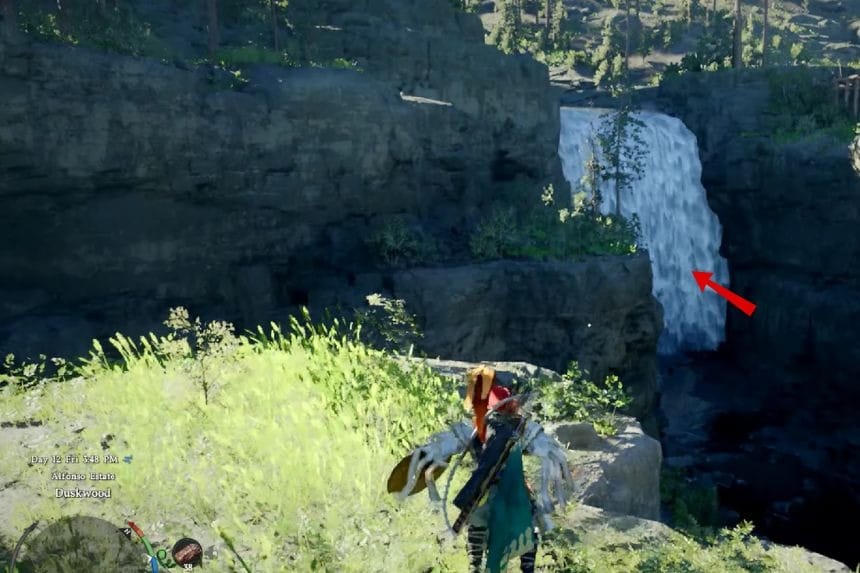
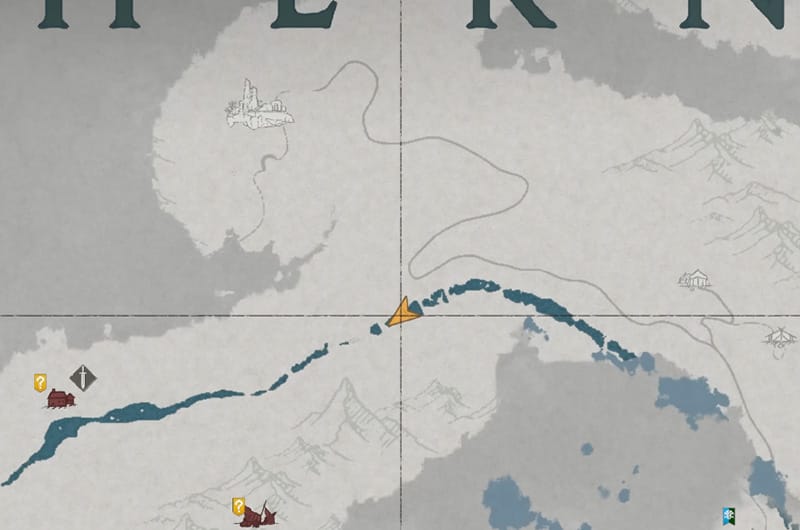
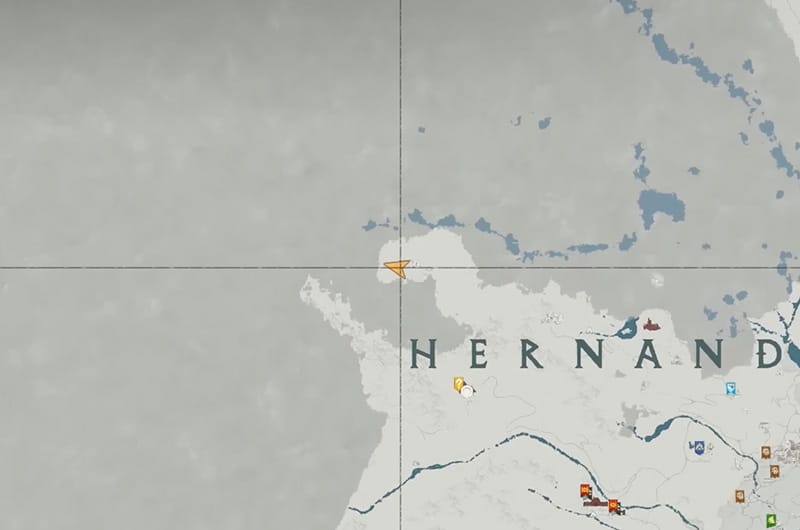
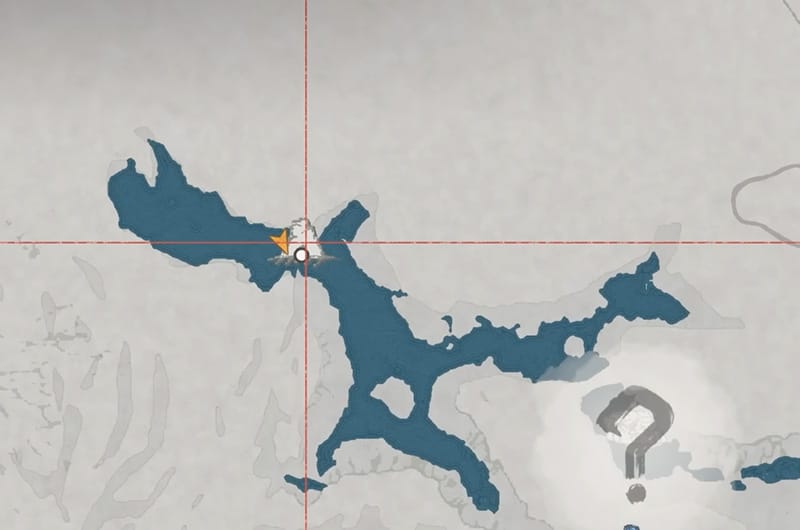
Head to Hernand and travel west along the river until you reach the next Abyss Nexus. Then, look up at the waterfall and climb until you reach the ledge near it. You need to use your forward stab skill while you’re standing in front of the waterfall. This will push you into the hidden area behind the waterfall. You will find some loot, including Plate Gloves of the Falling Kingdom.
Leather Helm of the Fallen Kingdom
To get this, you must enter the Sanctum of Benediction, which is located southwest of Icemoor Castle Ruins, and light the lantern on the statue to open the hidden door. Inside, you will find this in the chest.
Leather Cloak of the Fallen Kingdom
To get the Leather Cloak of the Fallen Kingdom, you’ll need to go to the Icemoor Castle Ruins. Head over to the marked location and you’ll find a secret passage on the lower left side. The entrance is blocked with wooden planks so you’ll need to break it, and once you go inside, you’ll find the treasure chest containing the Leather Cloak of the Fallen Kingdom towards the left.
Grace Plate Helm
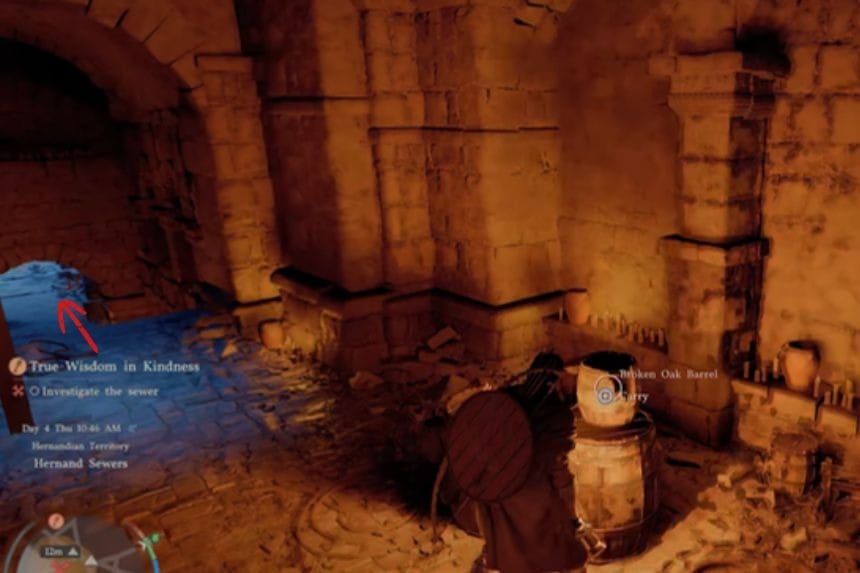
To get the Grace Plate Helm, you’ll need to go down the Hernand sewer and investigate. You’ll come across some barrels and in front of it, you’ll find an entrance leading to a different area. There, on the left side, you’ll find the treasure chest containing the Grace Plate Helm.
Goldlight Plate Gloves
The Goldlight Plate Gloves are inside a small cave near the Hyena Den. Be sure to check the rocky area, as it is very easy to miss the small cave.
| Attack | 19 |
|---|---|
| Defense | 7 |
| Refinement | 4/10 |
| Sells for | 8.21 |
Alpha Wolf Helm

To get the Alpha Wolf Helm, you’ll need to complete the Secrets Hidden in the Dark quest where you’ll need to investigate the cave in order to complete the quest. Once that’s done, you’ll need to go towards the exterior of the cave, and follow the right path until you come across the Sanctum of Deliverance ruins. Jump to the top there and you’ll come across the treasure chest containing the Alpha Wolf Helm.
Scorchflame Plate Cloak


You will find a waterfall where the two rivers are joining with eachother. When you reach the waterfall, jump down to find a cave on the right side. Enter the cave and defeat the Grave Walker. After defeating the Grave Walker, light two lamps on the closed door so that you can enter the area and collect the staff.
| Defense | 2 |
|---|---|
| Refinement | 2/10 |
| Sells for | 7.95 |
| Fire Resistance | Lv 3 |
Wolf Tracker Helm

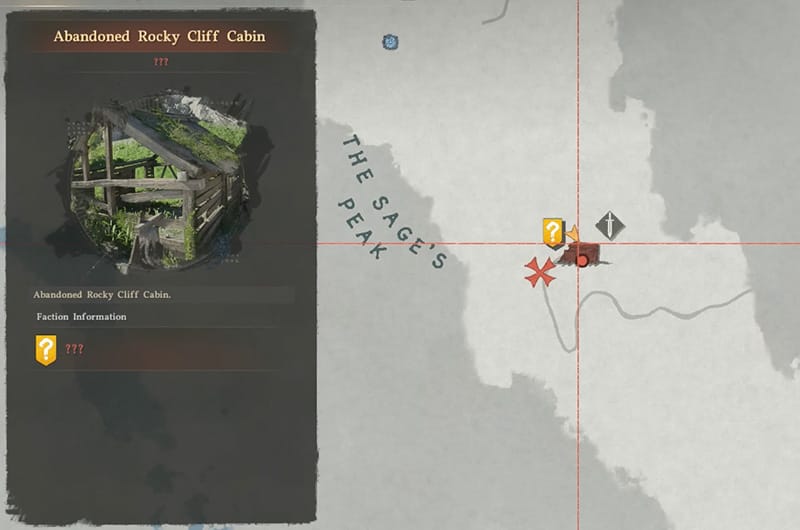
You can find the Wold Tracker Help at the Anandoned Rocky Cliff Cabin. When you go to the location, you will find Bandits around the cabin. Inside, on the floor, you can pick the item.
| Defense | 2 |
|---|---|
| Additional | Wolf Tracer Disguise / Track Prey |
| Sells for | 14.13 |
Plate Cloak of Shadows

To get the Plate Cloak of Shadows, go near the Hoenmark Ruins. The roof of the building at the location has a weird rectangular pattern that is easily recognizable. Use Force Palm unlocked at the skill tree to flip the roof. You will fall inside and there chest there contains the cloak.
| Defense | 3 |
|---|---|
| Refinement | 3/10 |
| Fire Resistance | Lv 7 |
| Sells for | 8.29 |
Plate Boots of Shadows

Since this requires you to go behind a waterfall, ensure that you have unlocked stab skill in the Skill Tree. Go to the location on the map and charge stab the waterfall to get to the other side. You will find a chest there with the Plate Boots of Shadows.
| Attack | 16 |
|---|---|
| Defense | 7 |
| Movement Speed | Lv 0 |
| Refinement | 3/10 |
| Sells for | 6.21 |
| Additional | 10.0% Skill EXP GainClimb Speed Multiplier 2.0% |
Scorchflame Plate Gloves

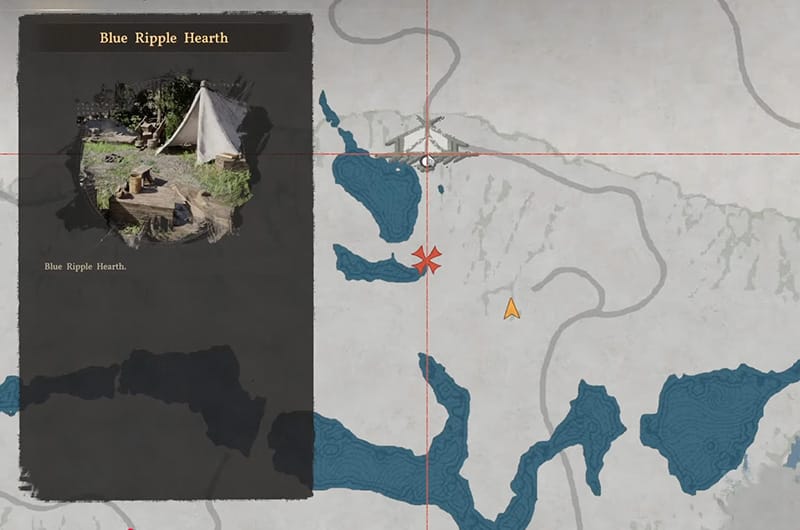
To get the Scorchflame Plate Gloves, ensure that you have unlocked the Stab skill from the skill tree so you can pass through the waterfall. Go to the Blue Ripple Hearth and close to that there is a waterfall. Jump off the cliff and go to the waterfall. Use the charged Stab move on the waterfall to pass throguh. Inside the cave, there is a chest that contains the Scorchflame Plate Gloves.
| Attack | 14 |
|---|---|
| Defense | 6 |
| Movement Speed | – |
| Refinement | 2/10 |
| Sells for | 11.89 |
| Additional | Volcanic Eruption (Imbue Fire)Spirit: +0.1 every 1 sec |
Plate Helm of the Shadows / Plate Gloves of the Shadows

To get the Helm of the Shadows, you need to complete all the main quests/story of Chapter 6, which unlocks the boss fight with Hoenmark Ruins boss. Once at the location, light all the flames to initate the fight. A heads up, this is an increadbly hard boss fight.

Dark Marksman’s Plate Cloak


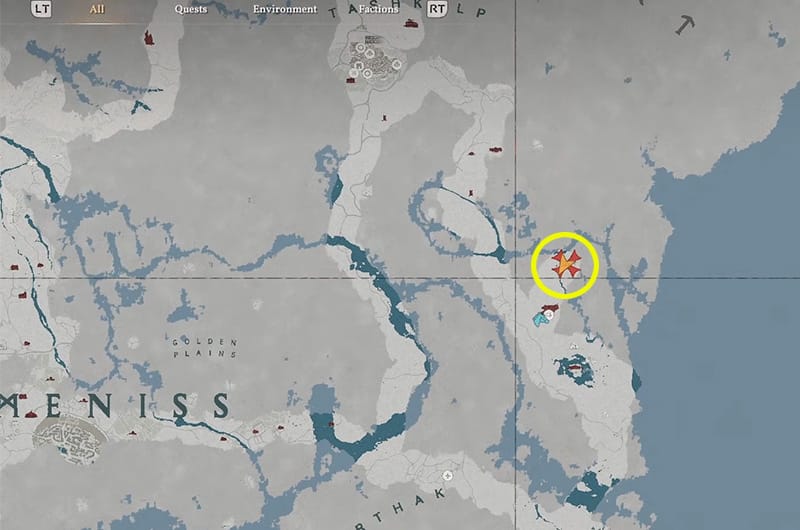
Go to the Demeniss region and East from the Golden Plains as shown on the two maps above. When you arrive at the location, you will notice a waterfall. If this is your first time, you need to unlock the Stab skill at the Skill Tree and use the charged stab to strike the waterfall to get through to the other side. Once on the other side, follow the cave tunnel until the end. Loot the chest and you will get the Dark Marksman’s Plate Cloak.
| Defense | 3 |
|---|---|
| Refinement | 3/10 |
| Fire Resistance | Lv 3 |
| Sells for | 11.61 |
Icewing Plate Helm


To get the Icewing Plate Helm, ensure that you have first unlocked the Focused Force Palm at the Skill Tree as you will need this skill to access the treasure chest. Go to the location on the map and you’ll notice a cave. Head inside and the path is blocked by a rock. Use the Foreced Focus Palm to blast the rock and clear the way. Loot the chest inside to get the Icewing Plate Helm.
| Defense | 7 |
|---|---|
| Refinement | 2/10 |
| Sells for | 3.60 |
Witters Plate Helm


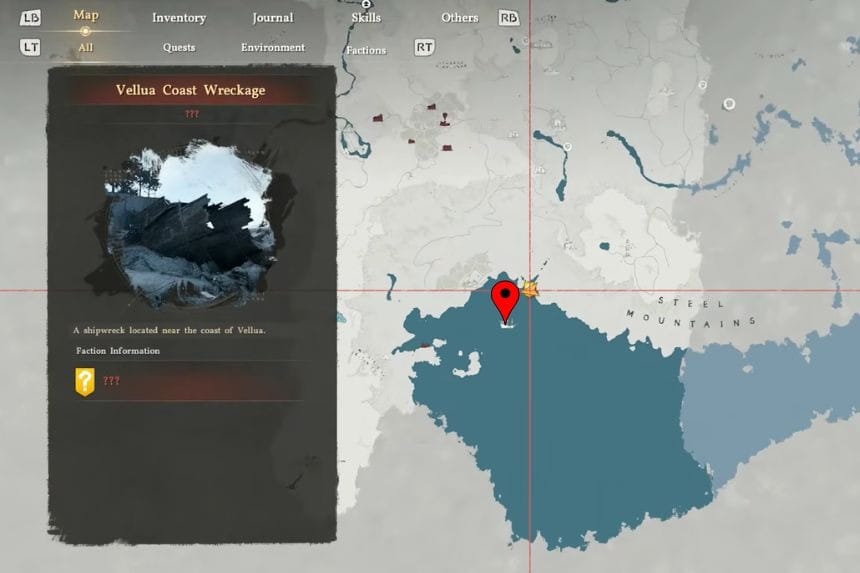
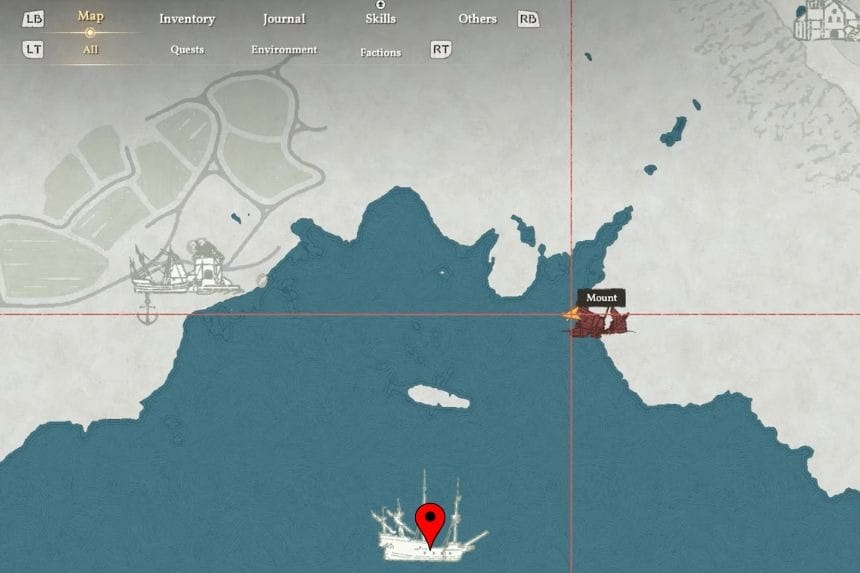
To get the Witters Plate Helm, go towards the sea below the Steel Mountains. You will also notice a pirate boat in the sea. Beyond the ship, there is an island with a few ship wrecks. Go to the back of the shipwreck in the above image. You will find many pirates there, kill them all and loot the entire area. In one of the golden piles, you will find the Witters Plate Helm.
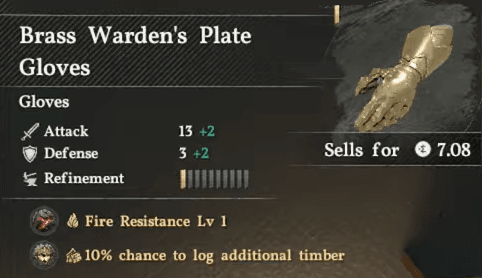
Brass Warden’s Plate Gloves

Brass Warden’s Plate Gloves can be found at the center of Hernand in the Lioncrest Manor. Go to the exact location on the map and head towards the right side of the Manore. There is a window that isn’t shut. Get into the building through the window and make your way to the bottom floor. Once there, look to the left for a passge that leads to multiple rooms. The first room on the right has a chest that contains the gloves.
Circuit Hijacking Helm
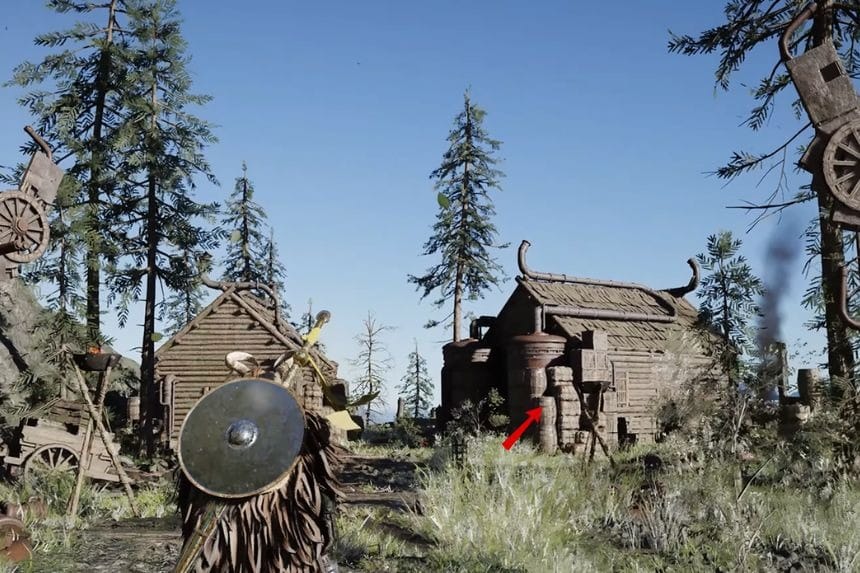
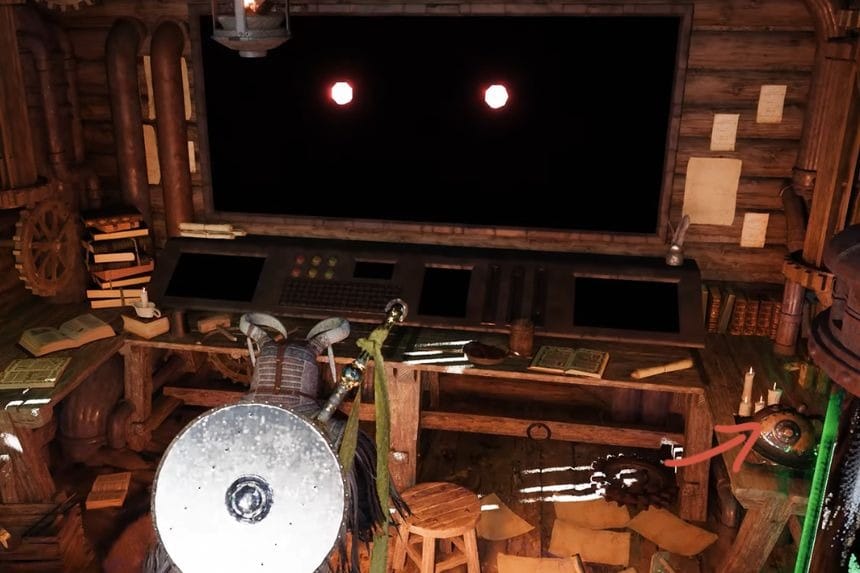
To get the Circuit Hijacking Helm, you’ll need to go to the Clockwork Cabin in Hernand. Simply go inside the cabin and search for the Helm, which can be found placed on the desk on the right side of the cabin. It helps you with Daze Immunity and Circuit Hijack, but you won’t be able to sell it.
Bear Hyde Cloak

The Bear Hyde Cloak is pretty easy to get once you find a bear. All you need to do is kill the bear and skin it to get the Cloak. While the bear hide offers a meger 3 defense, it’s level 5 ice resistance makes it great for colder region.
| Defense | 3 |
|---|---|
| Ice Resistance | Lv 5 |
| Refinement | – |
| Additional | Bear Disguise |
| Sells for | 4.91 |
Frostcursed Armor Set
Frostcursed Plate Armor

To get the Frostcursed Plate Armor, you have to go in the Mistshard Cave hidden behind a waterfall. By this point, you should know how to enter a waterfall, if not, you need to unlock and use the Stab skill at the waterfall to go to the other side. You also need to have unlocked forced palm to blast the rock blocking the way of the cave. Once inside the cave, go to the end and unlock the chest to find the armor.
| Defense | 14 |
|---|---|
| Movement Speed | Lv 2 |
| Ice Resistance | Lv 7 |
| Sells for | 18.72 |
Frostcursed Plate Boot
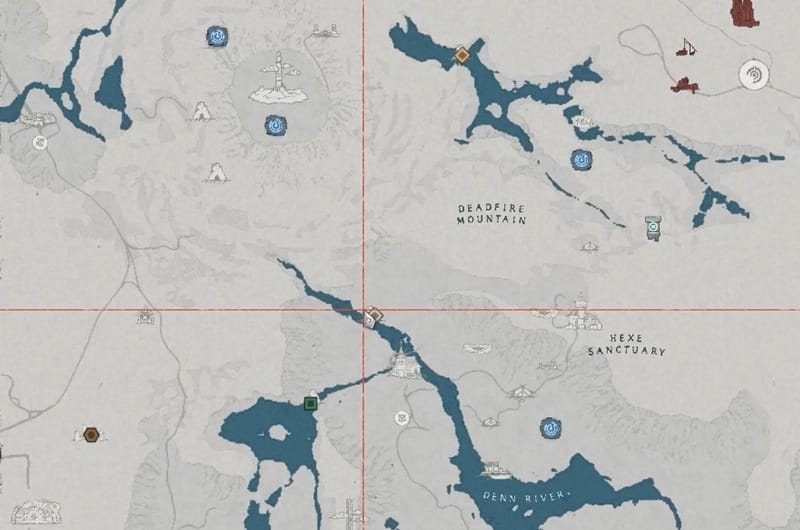
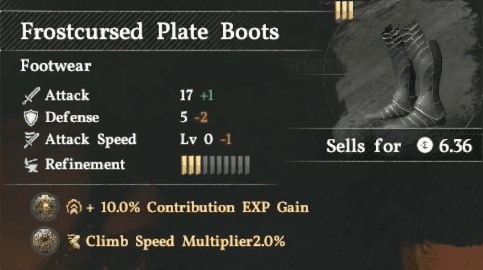
Go to the Well of Tragedy Grotto, which is a little south fromwhere you got the Frostcursed Plate Armor. Go through the waterfall by using the Stab skill and loot the chest.
Frostcursed Plate Gloves
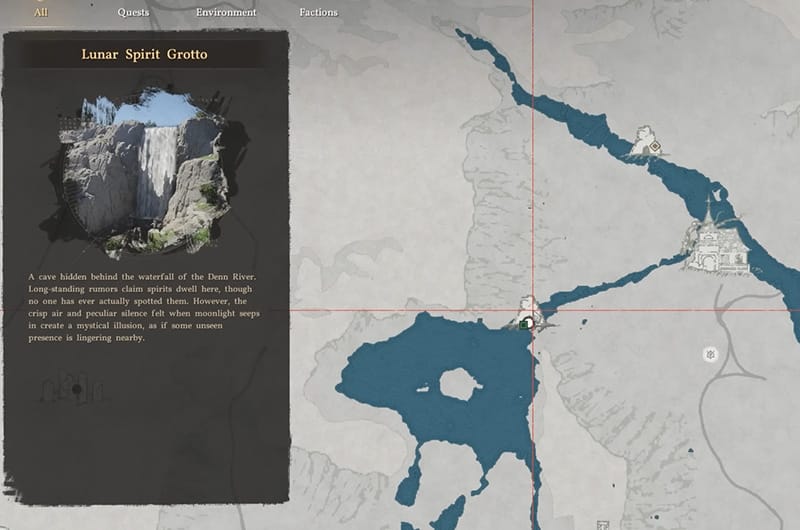
To get the gloves, again you do not have to venture too far from where you got the Frostcursed Plate Boot. Go to the Lunar Spirit Grotto and pass the waterfall using the Stab skill. Insides, there is a chest that has the Frostcursed Plate Gloves.
| Attack | 17 |
|---|---|
| Defense | 5 |
| Refinement | 3/10 |
| Sells for | 5.41 |
| Additional | Ice Resistance Lv 1Damage Reduction 1.0 |
Frostcursed Plate Helm
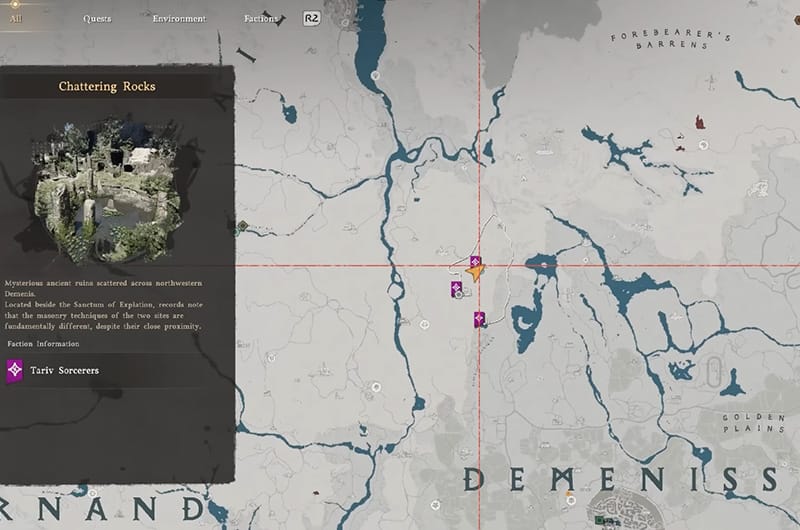
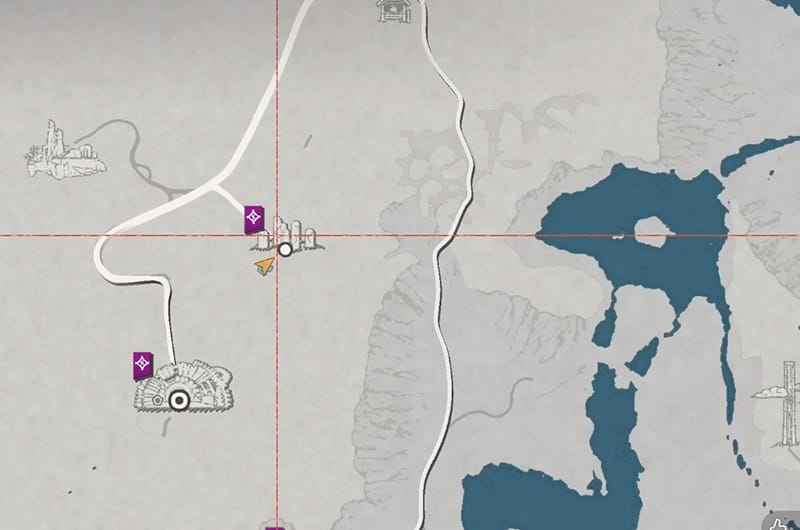

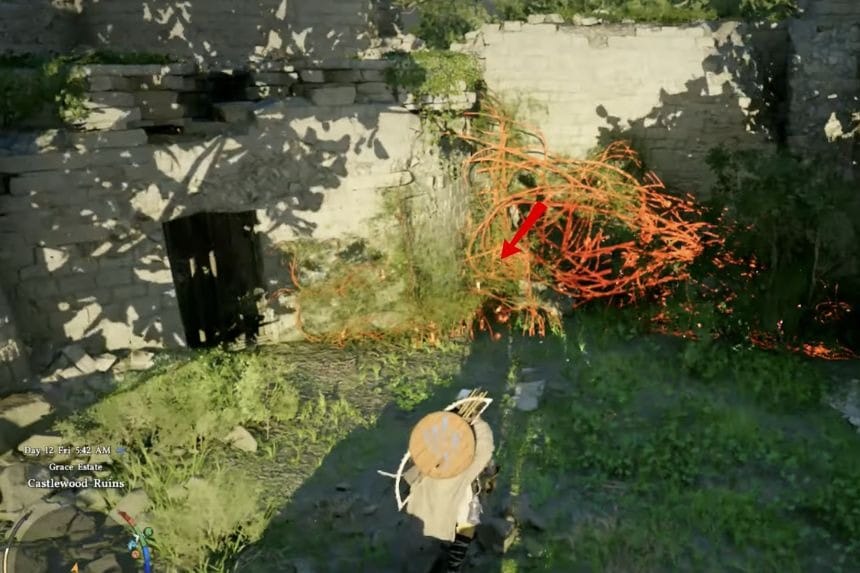
For the next piece – The Helm – you need to go to the Chattering Rocks. Once you arrive at the location, you will notice some vegetation marked in the above image, use the sword glint to burn it and it will reveal a patch that leads to a chest with the Frostcursed Plate Helm.
| Defense | 5 |
|---|---|
| Refinement | 1/10 |
| Sells for | 5.08 |
| Additional | Daze Immunity |
| Slot | Health: +0.2 every 1 sec |
Frostcursed Plate Cloak
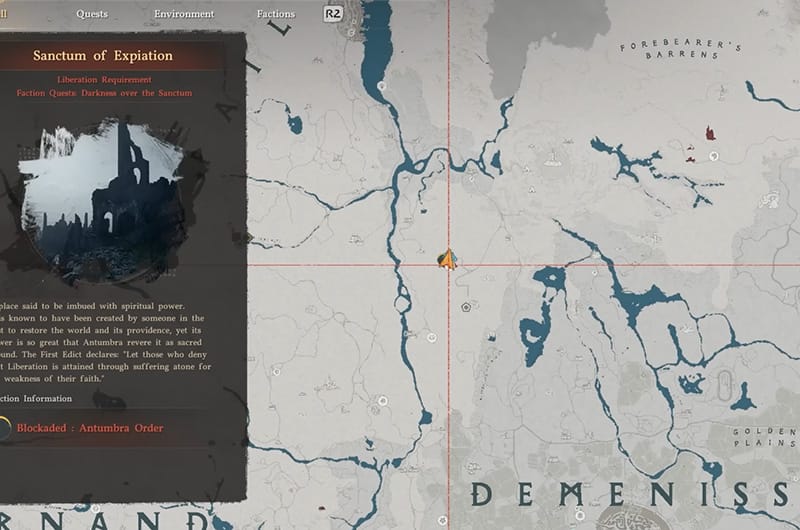
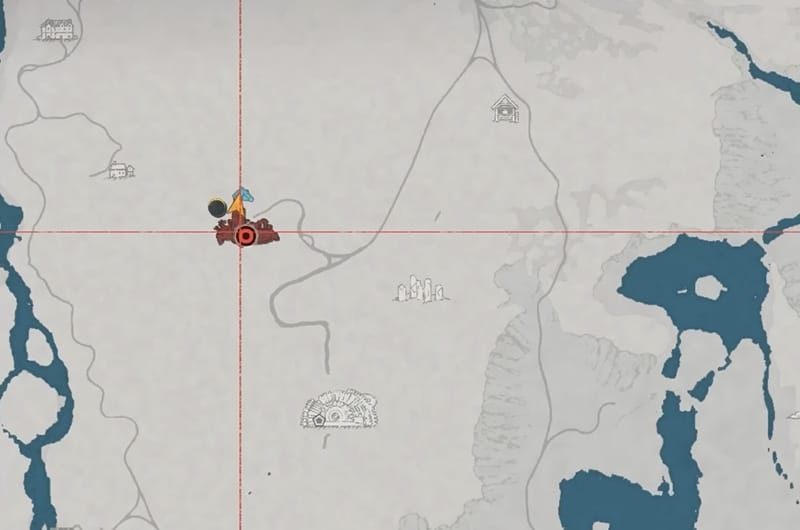
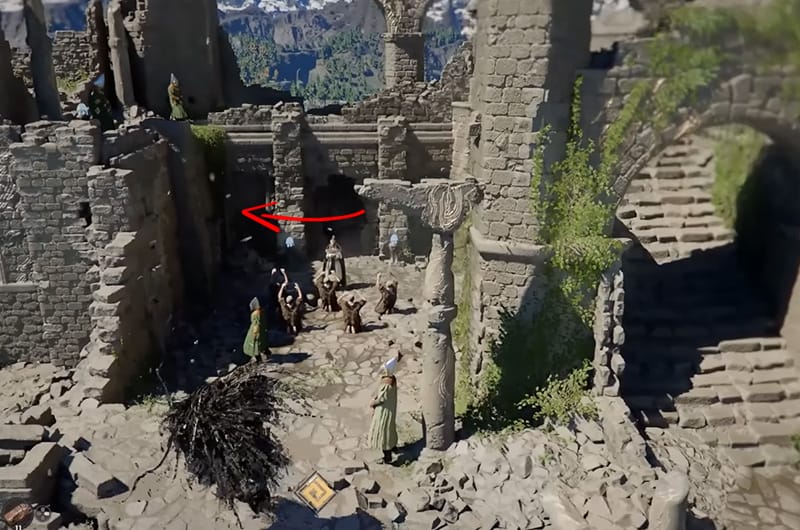
You can get the clock at the Sanctum of Expiation. When you are at the sanctum, look for the place where some guys are praying, and go left from there and go through a crouchable tunnel and at the end you will find the cloak.
| Defense | 3 |
|---|---|
| Ice Resistance | Lv 5 |
| Sells for | 4.42 |
Reins of Open Sky

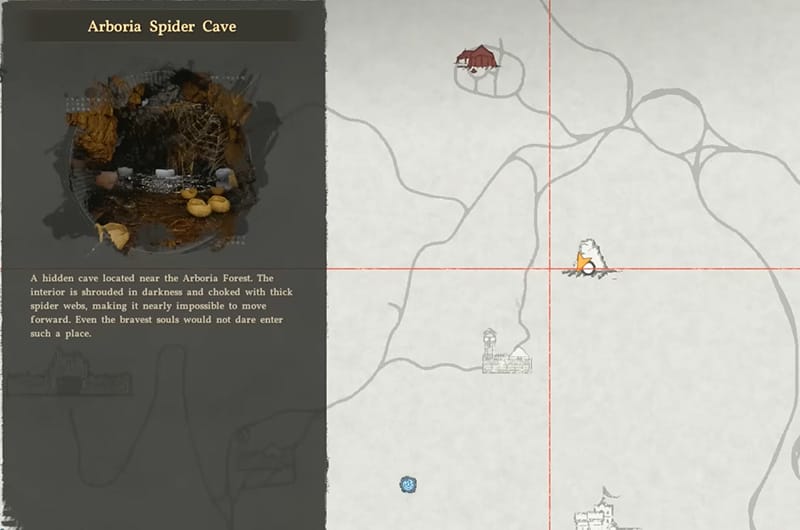
Go to the Arboria Spider Cave and follow the cave until you reach the end, destroy all the Cocoons and a new path will open, inside you will find a chest with the gloves.
| Attack | 11 |
|---|---|
| Defense | Lv 3 |
| Critical Rate | Lv 1 |
| Additional | Increase Grip |
| Sells for | 13.95 |
Hungering Fang Leather Cloak and Boots
To get the Hungering Fang Leather Cloak and Boots, you’ll need to defeat the Ludvig whilst completing the Lonely Jackals quest in Chapter 7. The Boots offer you Lightning Resistance level 1 and the Cloak helps you get Lightning Resistance level 3.
Pailunes Signet, Solas Plate Armor, Boots and Ignir
Pailune’s Signet, Solas Plate Armor, Boots, and Ignir weapon are the final rewards you receive once you’ve completed Chapter 7 and defeated the final boss. The Solas Boots increases your Attack to 18, the Armor increases it to 13, and Ignir increases it to 24 +16. The Pailunese Signet helps you gain Critical Rate level 1 +1.
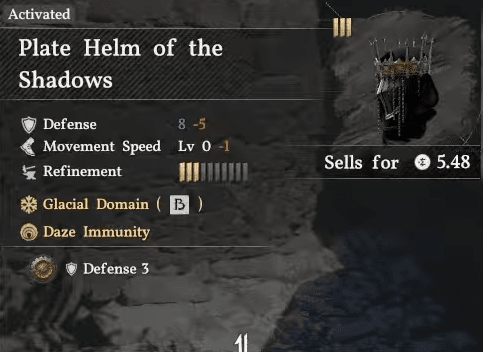
Plate Helm of Cursed Soul
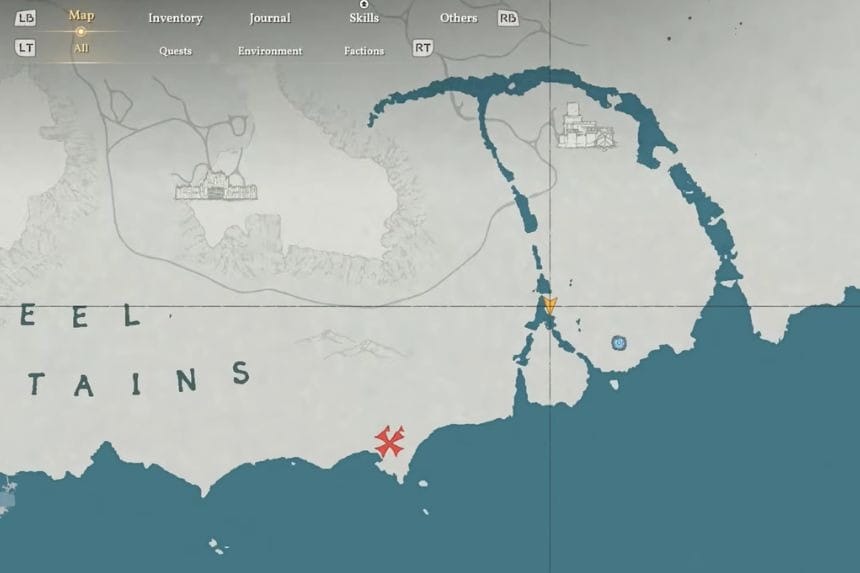
Plate Helm of Cursed Soul is located inside Windrift Cave, which is located behind a waterfall. To get there, you must go inside the waterfall by using a stab, and then you will get to the cave.
| Defense | 8 |
|---|---|
| Refinement | 3/10 |
| Sells for | 5.48 |
| Additional | Daze Immunity |
Accessories
In Crimson Desert, there are four types of accessories. Accessories are a good way to increase your stats because you can equip several of them at the same time. You can wear up to six accessories in total: rings, earrings, one necklace, and one cloak.
Oath of Darkness Earrings
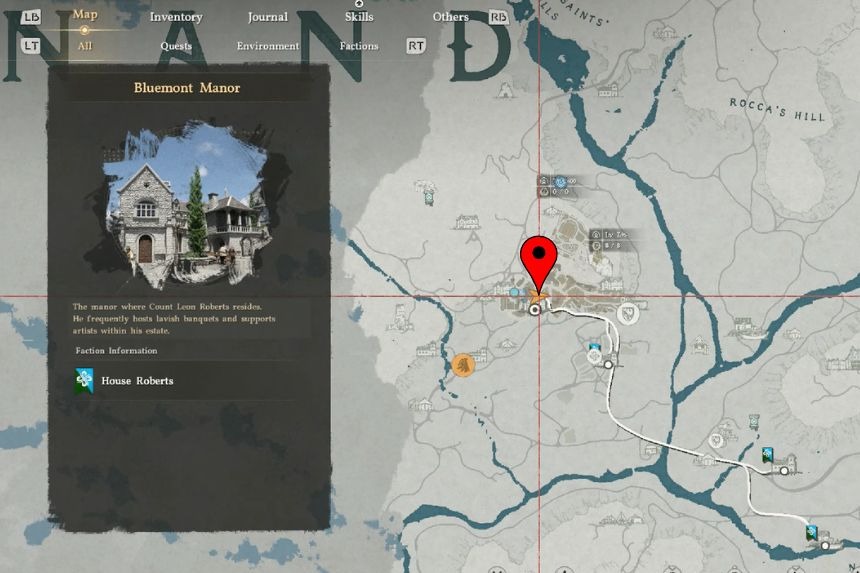
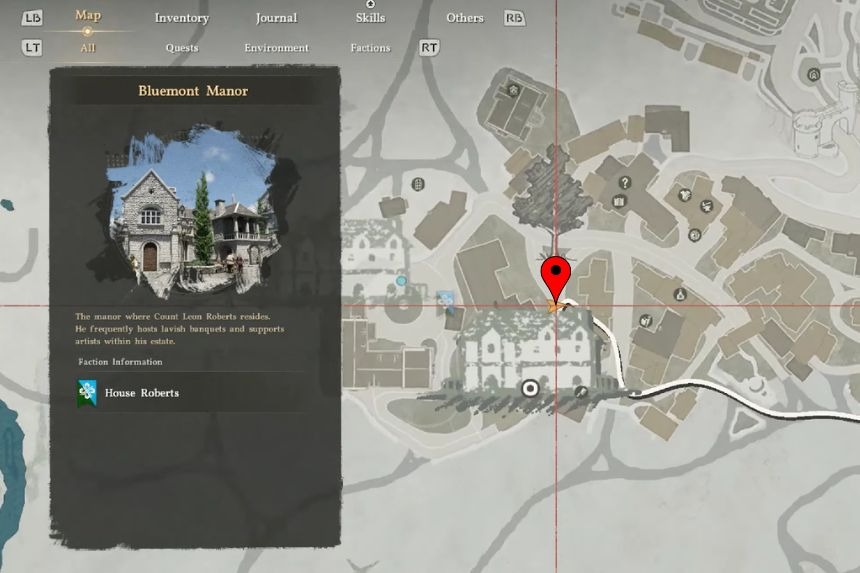
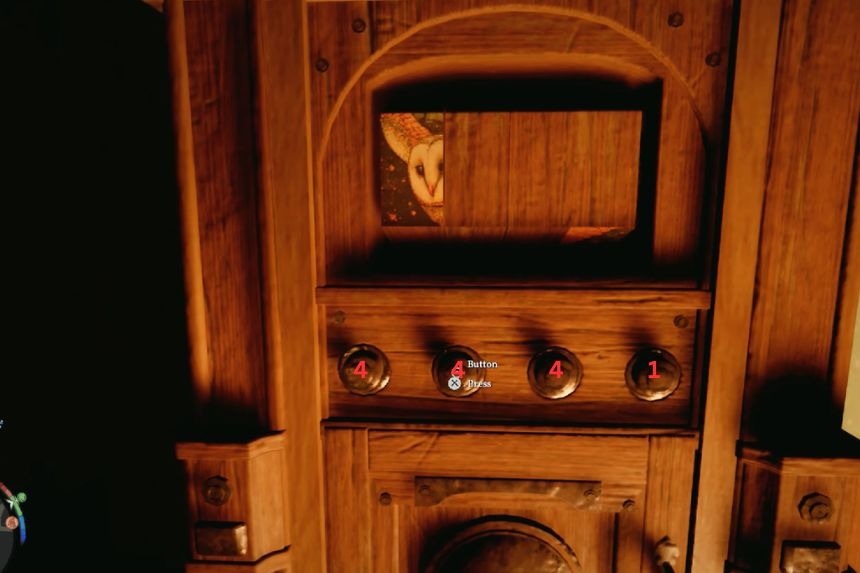
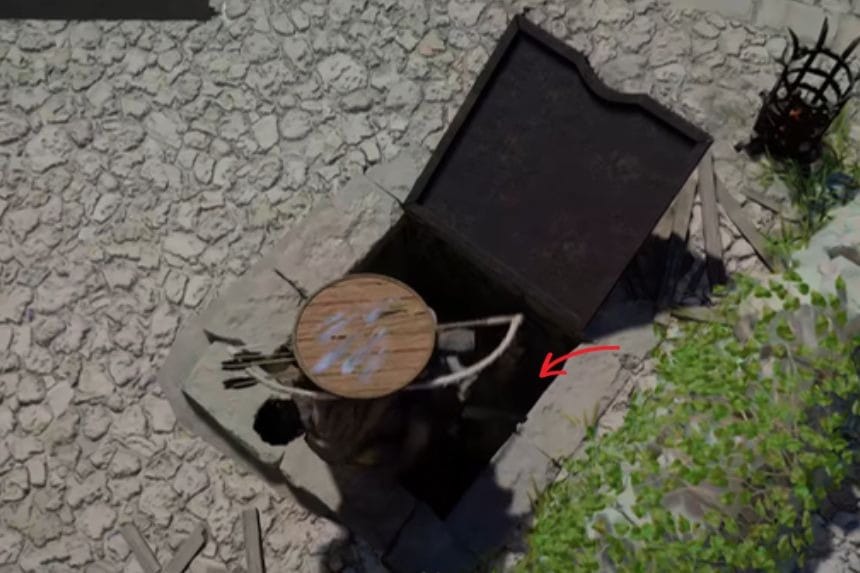
The Oath of Darkness Earrings can be collected from a locked box in Bluemont Banner. To unlock the strongbox, you have to solve a picture puzzle of a small owl. There are four buttons in the puzzle, and each one changes a section of the hexagonal prism. You have to make all the sections of the picture line up so that it looks complete. First, press the first button four times, the second button four times, the third button four times, and the fourth button once. After that, the picture of the owl should be in line, and the strongbox will be unlocked.
Finely crafted gold necklace
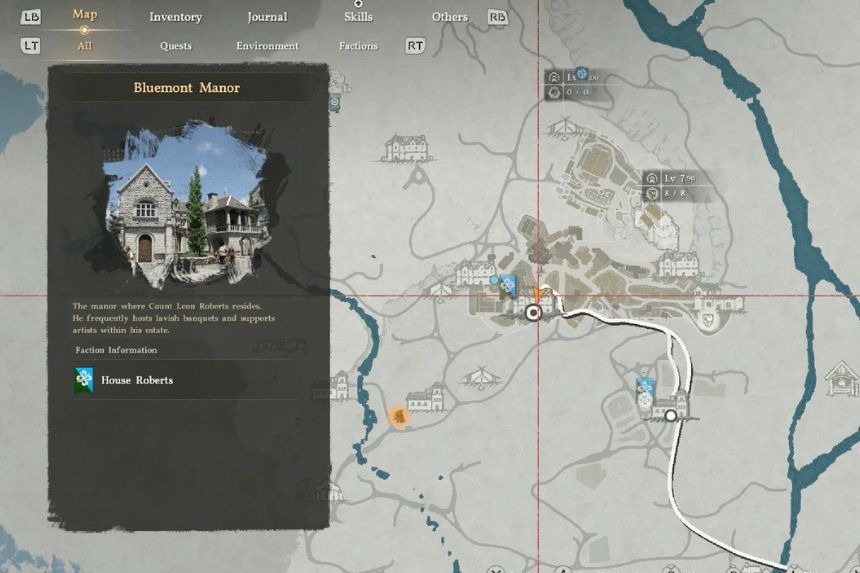
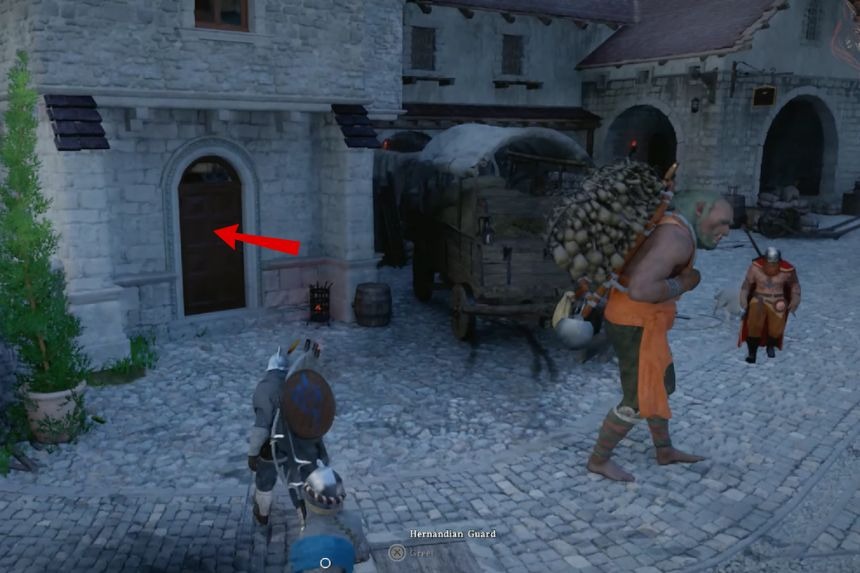
You will get the finely crafted gold necklace by opening the strong box inside the Bluemont Manor. You will enter the Manor by going to the left side of the front door and climb onto the balcony. You will find windows where you can get inside and follow the hallway into the next room. The strong box will be near the door.
To open the strongbox, start by adjusting the 5 cylinder from left to right. First, raise every cylinder as high as it can go. Once all of them are raised, start to lower them by lowering the first cylinder 5 times, the second cylinder 2 times, the third cylinder 4 times, the fourth cylinder 3 times, and the fifth cylinder 5 times. After setting the cylinders correctly, press the buttons on the right side, then turn it to the right. This will unlock the strong box and you can collect the treasure.
Saint’s necklace
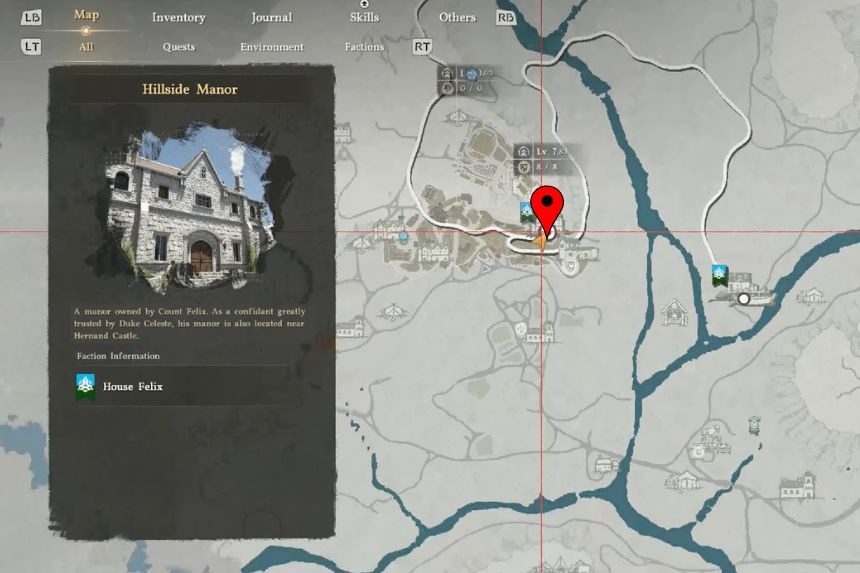
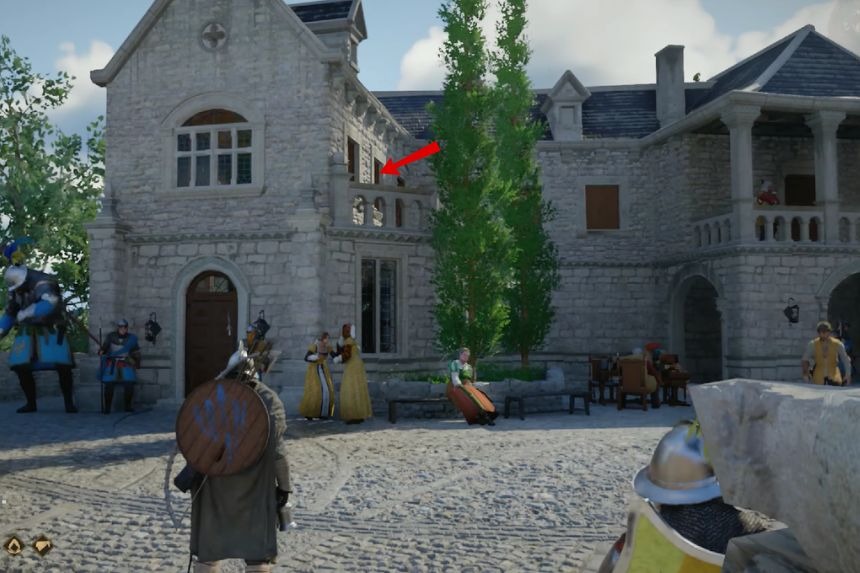
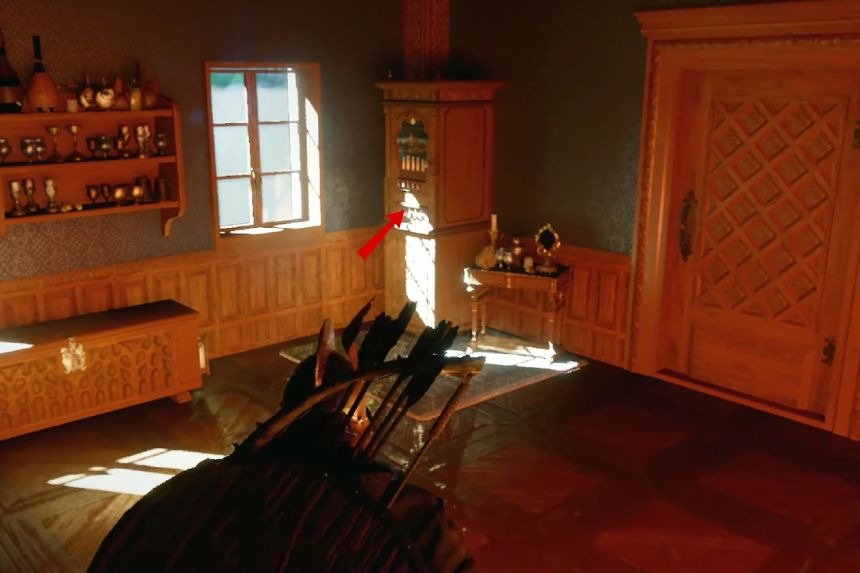
You can find the Saint’s necklace inside a strong box in the Hillside Manor just southeast of the Hernand Castle. When you reach the manor, go to the left side of the main entrance and climb up the wall to enter from a window. Open that window and climb inside to find the strong box on the far side of the room, away from the door.
To open the strong box, adjust the pipe cylinders from left to right by lowering the first cylinder 2 times, the second cylinder 2 times, the third cylinder 3 times, the fourth cylinder 4 times, and the fifth cylinder 5 times. Once the cylinders are in the correct position, press the buttons on the right side and then turn it to the right to unlock the strong box and get the treasure.
Finely crafted gold earrings
To get the finely crafted gold earrings, go to the Lioncrest Manor. Go towards the back side of the manor, near the fence, to enter the building from the middle window. When you enter the building, open the door on the left side, near the bookshelf, to find a painting puzzle.
To solve this puzzle, you need to rotate each of the nine painting pieces until they line up correctly and create a full picture. Keep turning each fragment one by one until the image looks complete, as shown in the picture above. After you solve the puzzle, the strong box will open, and you will get the finely crafted gold earrings.
Flower Petal Earrings

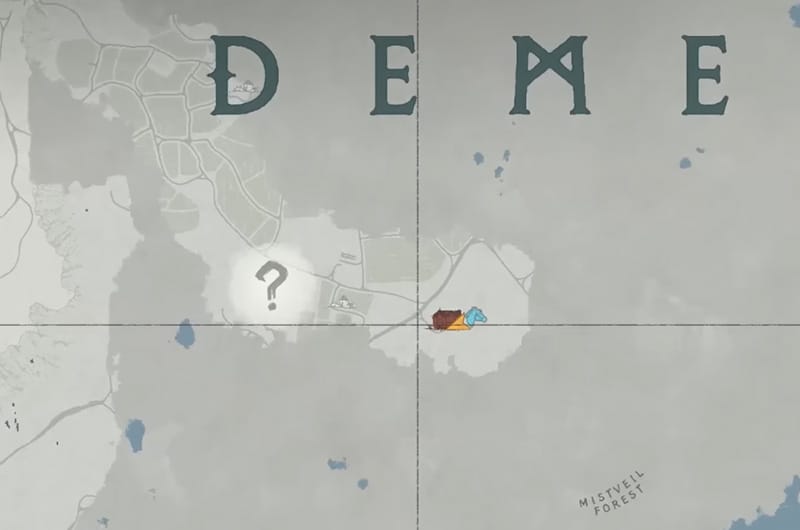
You can get the Flower Petal Earring by opening a lockbox inside Mudridge Cabin, which is located near Porrorin Forest.
Witch’s Earring
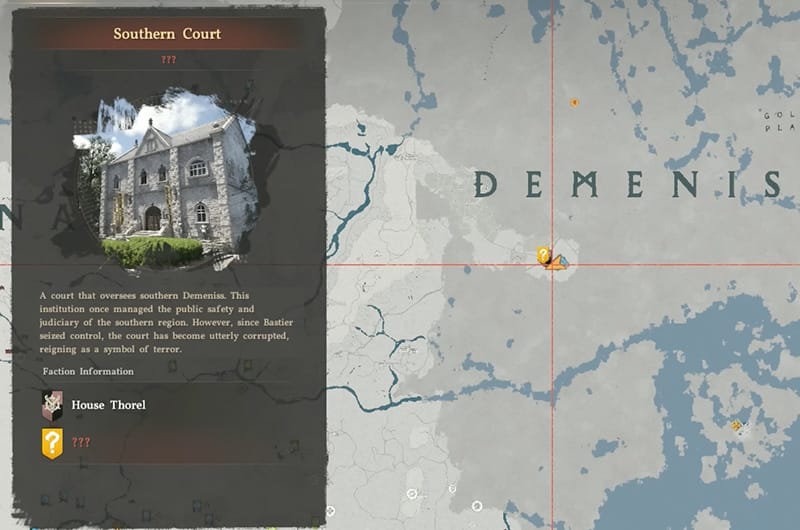
To find the Witch’s Earring, go to the Southern Court and head to the rear of the house. On the second floor, the left window is open, you can use it to enter the building. Once inside, exit the room and you will immediately come face to face with two guards. Take care of the guards and head to the left froom from the dining table. Inside the room, there is a strongbox with the Witch’s Earrings.
| Defense | 3 |
|---|---|
| Movement Speed | Lv 1 |
| Refinement | 4/10 |
| Health | +0.2 every 1 second |
| Sells for | 16.48 |
Ancient Earring

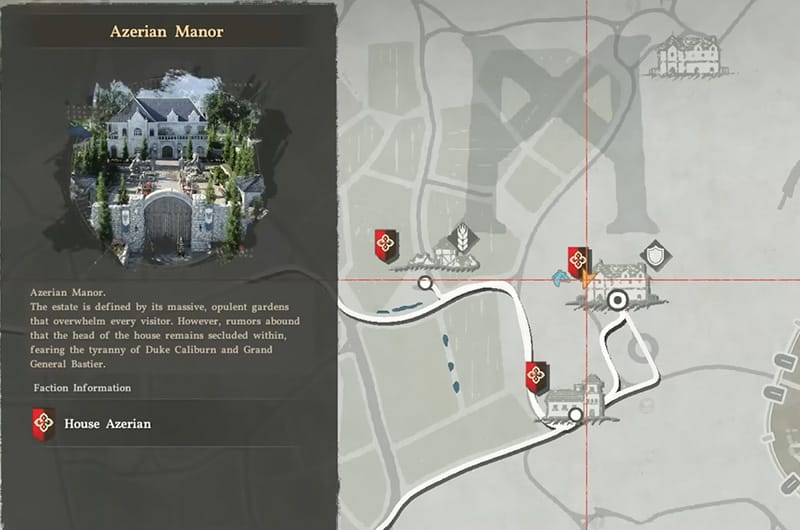
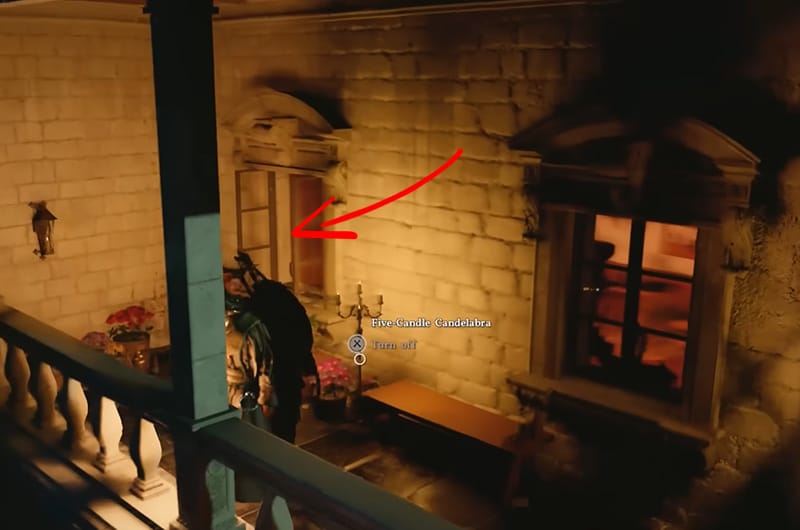

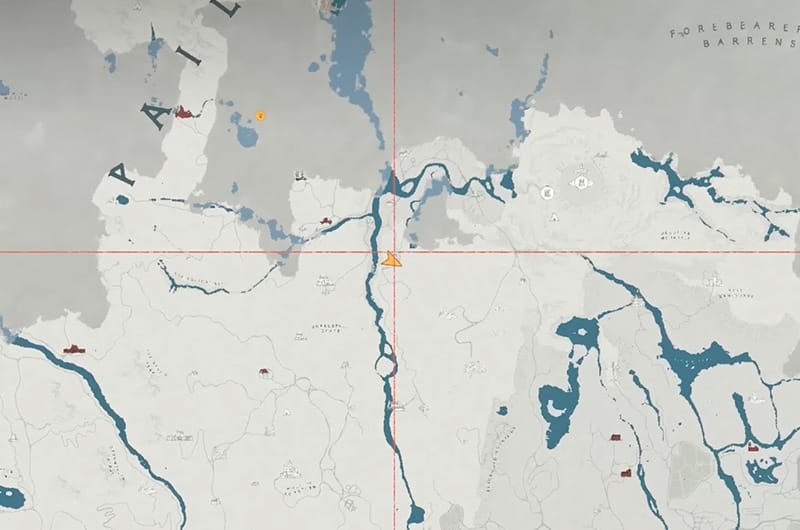
To get the Ancient Earring, you need to solve a puzzle at the Azerian Manor. Go to the location on the map and use the window to enter the house. Exit the room and you will notice a painting on the opposite wall. Press the wall to reveal a hidden room.
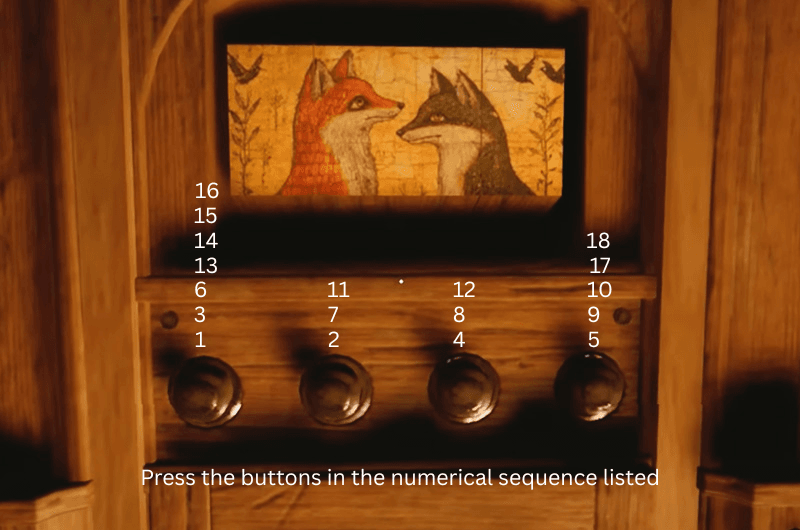
Interact with the strongbox in the room and it will reveal a puzzle. The puzzle requires 18 steps to solve. The above images shows the order in which you need to press the button to solve the puzzle and get the reward.
| Defense | 2 |
|---|---|
| Movement Speed | Lv 1 |
| Refinement | 3/10 |
| Health | +0.2 every 1 second |
| Sells for | 9.37 |
Finely Crafted Gold Ring
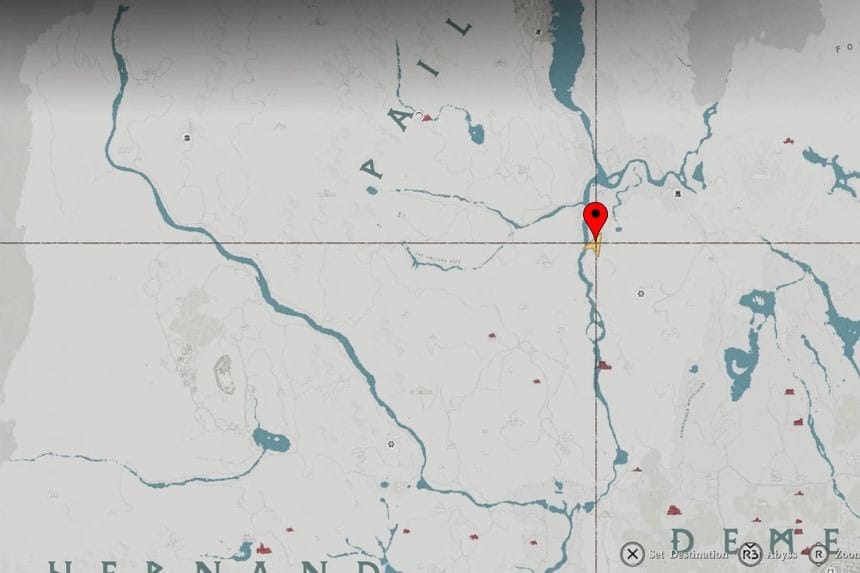
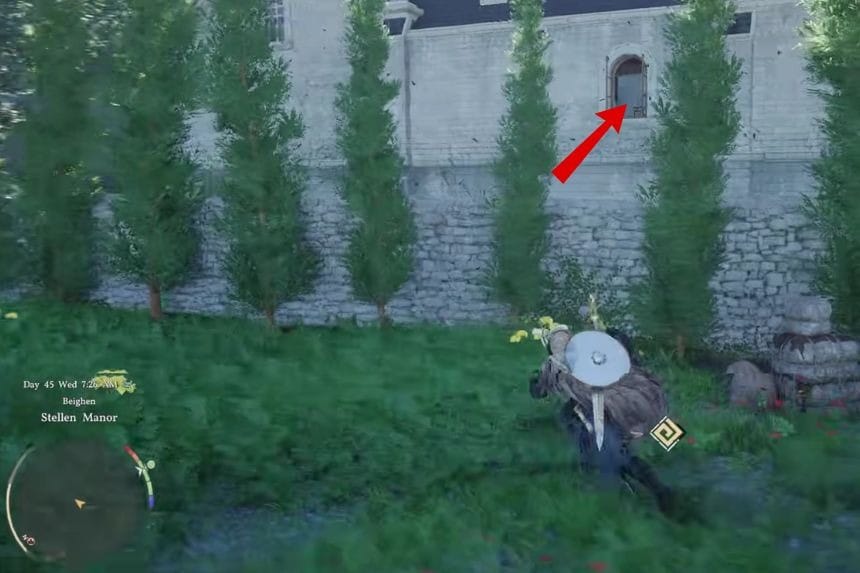
To get the Finely Crafted Gold Ring, you need to go to the Stellen Manor and loot a strongbox. If you have been playing the game for a while now, you will know that entry into most manors are via one of the windows that’s left open.

The above map, shows the exact location you need to be and the window that will be open. Get in through the window and loot the strongbox to get the gold ring.
| Attack | 1 |
|---|---|
| Attack Speed | Lv 1 |
| Refinement | 2/10 |
| Sells for | 3.92 |
White Horns Earring

White Horns Earrings can be found in a safe lockbox in Delysia Castle. The location of the lockbox is behind the false fireplace.
| Defense | 2 |
|---|---|
| Movement Speed | Lvl 1 |
| Refinement | 4/10 |
| Sells for | 16.48 |
| Additional | Health: +0.2 every 1 sec |
Pudtrid Touch
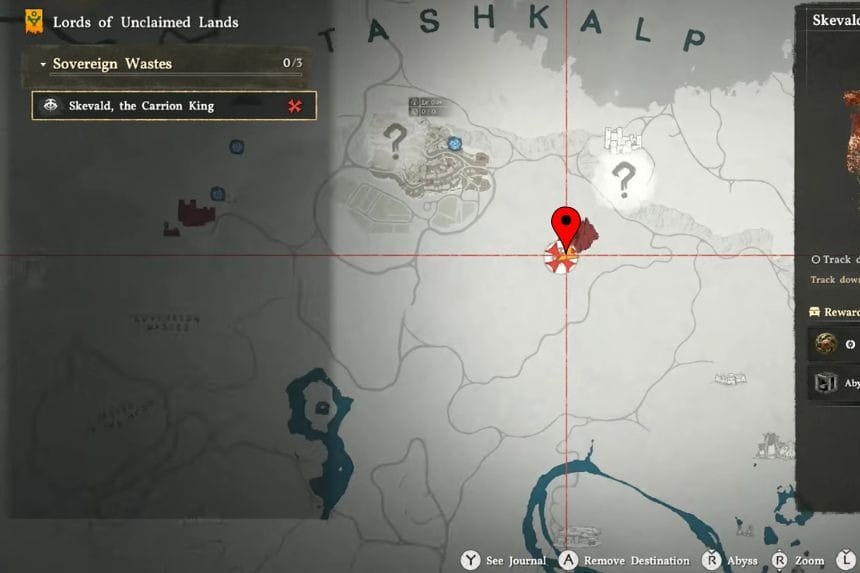
To get Putrid Touch, you must defeat Skevald the Carrion King. Once you have defeated the boss, the weapon drops as a reward.
| Equipped on | Gloves |
|---|---|
| Sells for | 7.52 |
Mount
Each mount travels differently, with some made for land and others only able to fly. They can also help during battles, and as they level up, each mount learns its own set of skills.
Royler
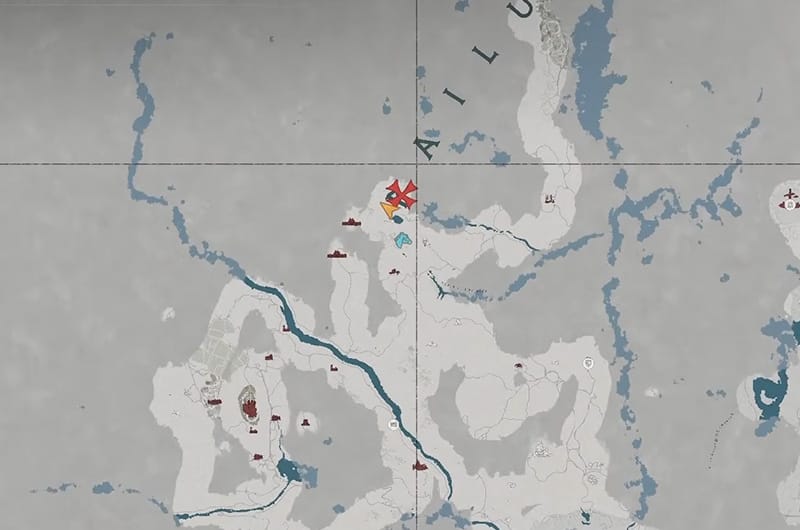
You can find Royler near the lake beside Snowgrass Shelter. Head south in Pailune till you reach the lake and the shelter nearby. Roaming around the open plains there, you will find Royler. Once you find it, approach carefully and try to ride and tame it through the minigame.
Cloudcart Blueprint
You can find the Cloudcart blueprint in the secret basement of Glenbright Manor. Explore the manor carefully, locate the hidden basement entrance, and search inside to collect the blueprint.
Rokade


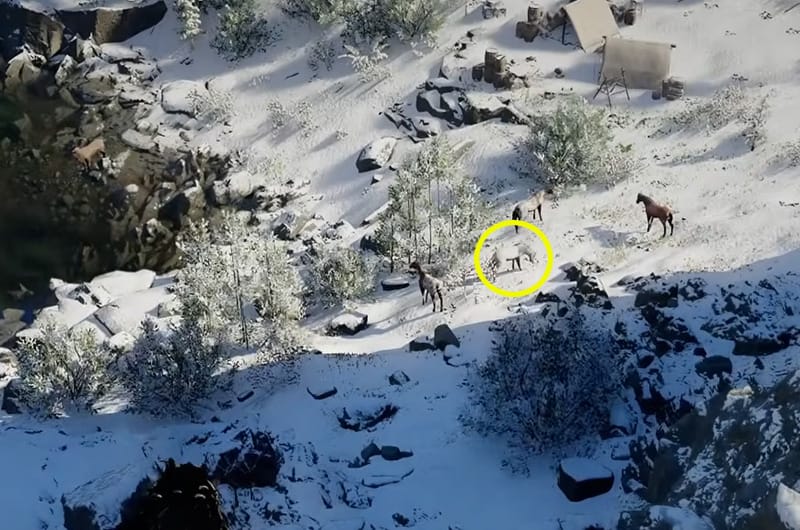
To find Rokade, you need to travel to the South of the map, near the Steel Mountains. Check out the above map for guidance. The location has bandits and they will interfere as you try to tame the horse, so be aware of that. Rokade is a black horse and quite feisty. If the horse does not spawn for you in the first try, go do some quest far away and return to the location.
Camora
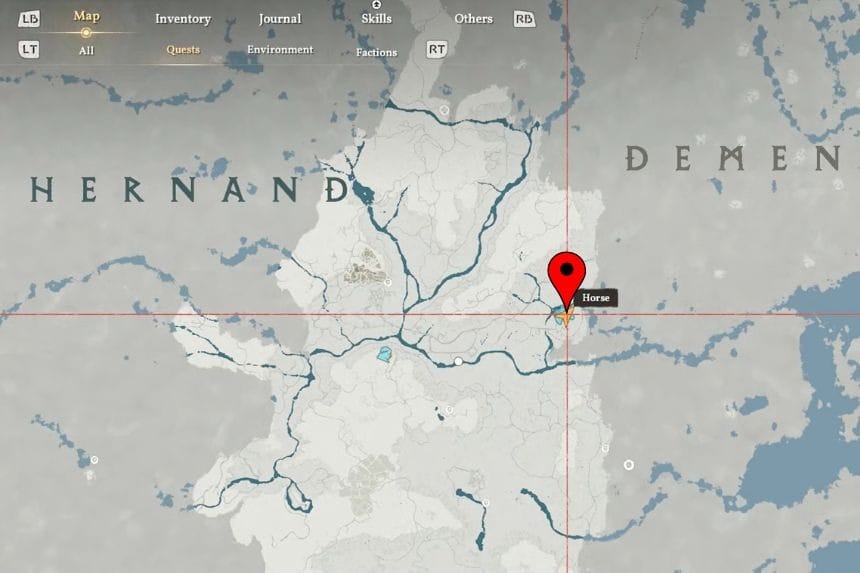
For this horse, you need to go far East from Hernand, past Demeniss to Northeast of Demeniss. The horse is a reddish brown color and easy to distinguish from the other black horses.
Miscellaneous
Miscellaneous materials can come from different sources. You can get some by expanding your camp, while others can be picked up from defeated enemies or bought directly from a Provisioner’s Shop.
Poison Arrow
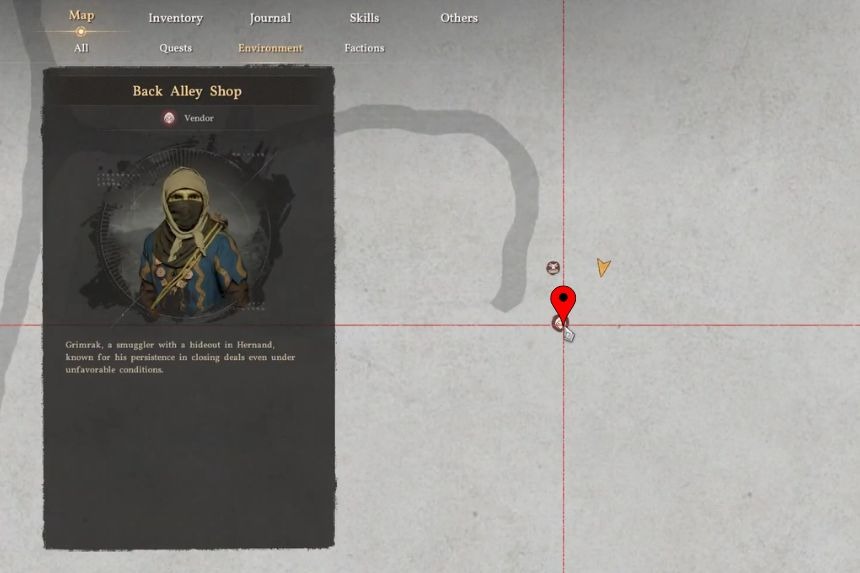
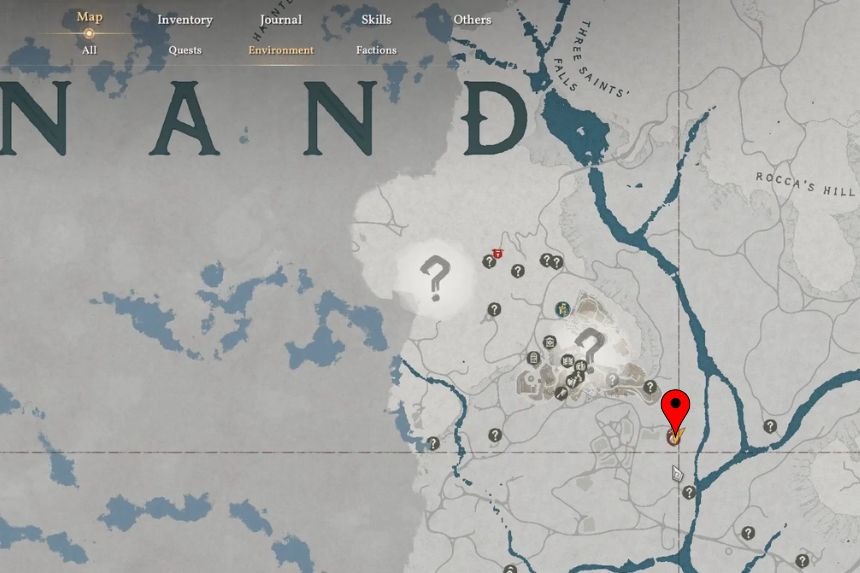
You can get the Poison Arrows from the Back Alley Shop, which is located just south of the main town area.
All Unique Weapons & Gear Locations in Crimson Desert (Part 2)
Since this article has become extensively long, we have created it in parts, to go thorugh more weapons, armor, and shield in the game, please follow the below link.
All Unique Weapons & Gear Locations
1 Comment
Hwando is 2-handed