
Crimson Desert strongboxes are unique treasure chests located at various castles, manor houses, forts, and secret locations. They can only be unlocked by solving a puzzle, and solving it rewards you with rare and powerful items like unique weapons, rings, and crafting recipes. In this guide, we will show you all the known strongbox locations along with solutions to help you open them easily as you explore the world.
All Strongbox locations and puzzle solutions
Strongboxes are special high-level treasure chests that hold rare and valuable rewards, including unique weapons and useful crafting recipes. Some players have noted that the solutions to the puzzles seem to change in different playthroughs. So our puzzle solution might not work for you. And since taking the items from the strongbox is stealing, it is recommended to wear a mask before entering the area and move out of the area as soon as possible after collecting the rewards. Below is the list of all the strongboxes that we have found till now.
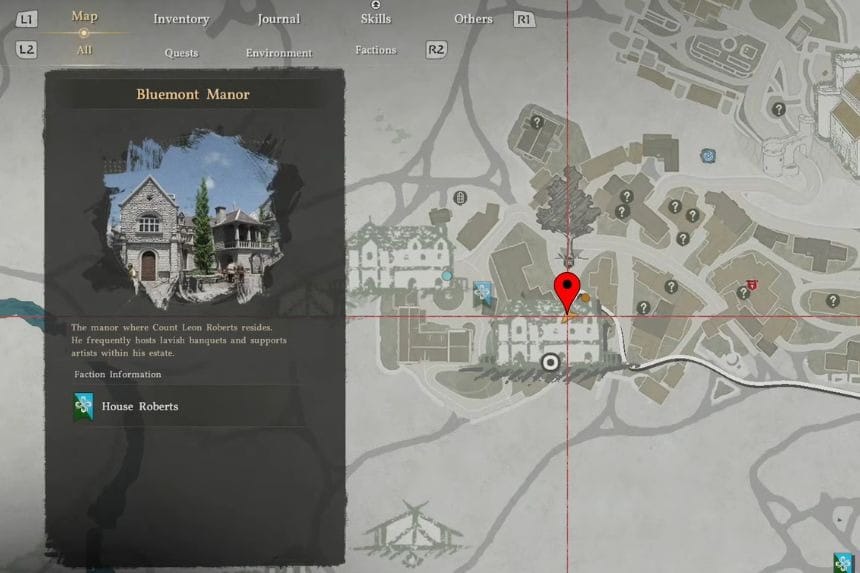
Bluemont Manor 1

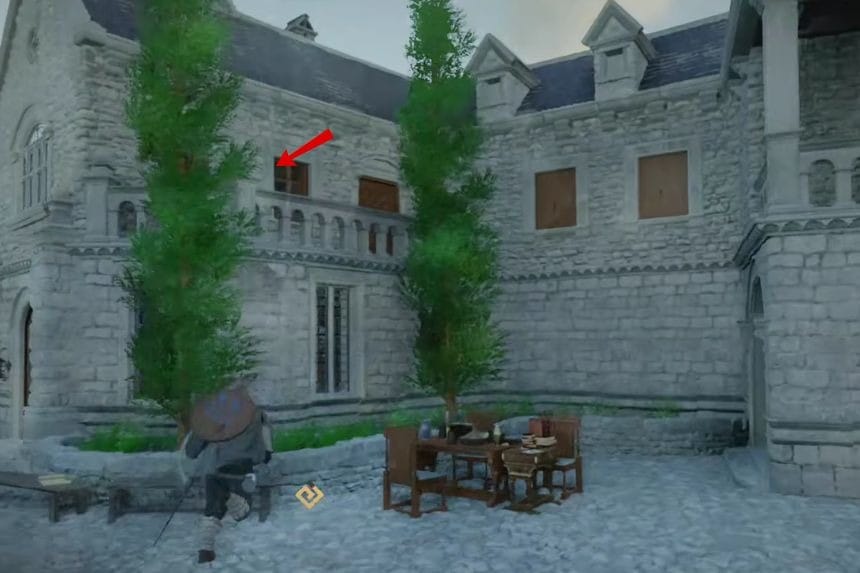
You can get into the southern house of Bluemont Manor by climbing up the outer walls and slipping in through a second-floor window. You will also later gain proper access to the manor after completing some side quests for the Roberts family.
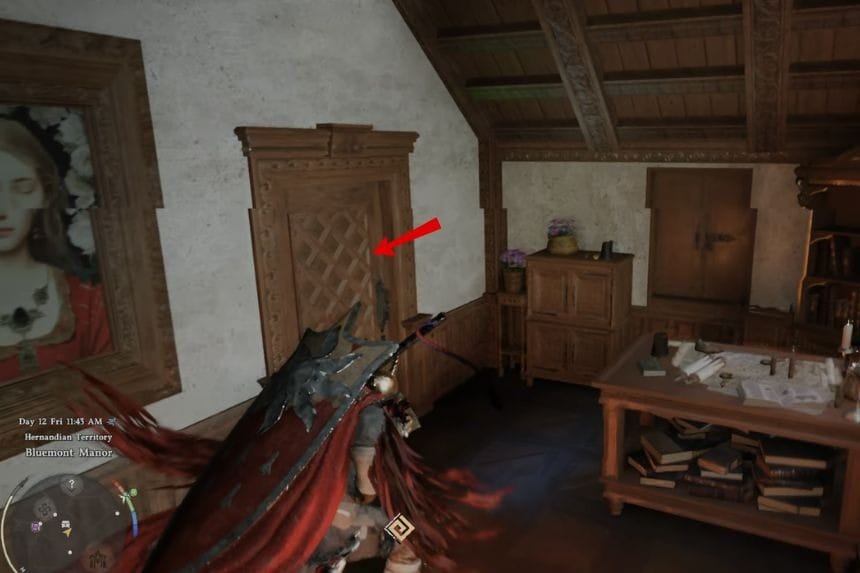
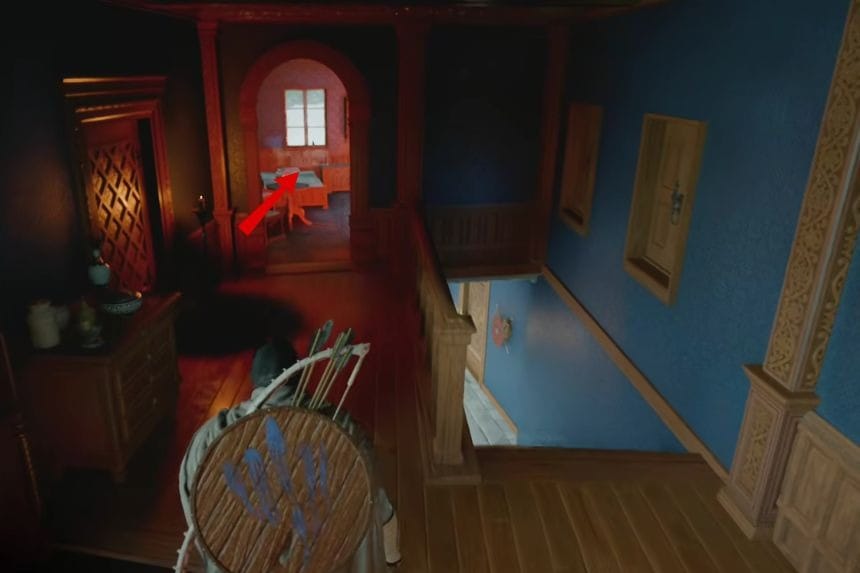
Head inside the house, and on your right, you’ll see a staircase going up. Upon reaching the top of the staircase, turn left and head toward the door at the end of the hall. The puzzle for the strongbox is located in this room, but keep in mind that entrance into this room may vary depending on the time of day, so if the door isn’t available, try coming back later.
Bluemont Manor 1 Puzzle Solution
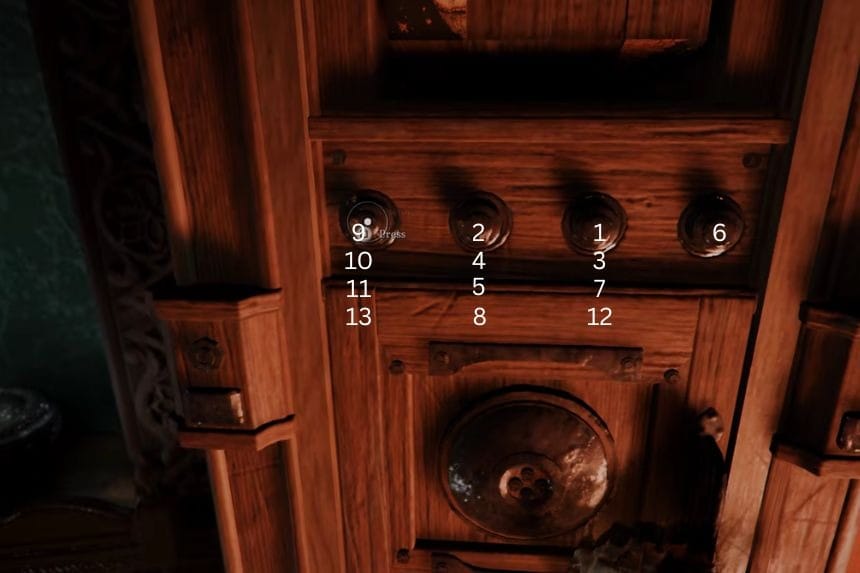
First, activate the button located on your right. Click on it several times until the wing icon shows up on your right side. Next, return to the first controller. This is the controller that rotates all three sections simultaneously. Rotate it clockwise or anticlockwise until the head of the owl appears in the front position. Now, all you need to do is rotate the centre two sections. Next, rotate the second controller from the left. You will need to rotate it clockwise or anticlockwise until the second part of the head of the owl becomes aligned. Once that’s done, the owl shape will start to come together.
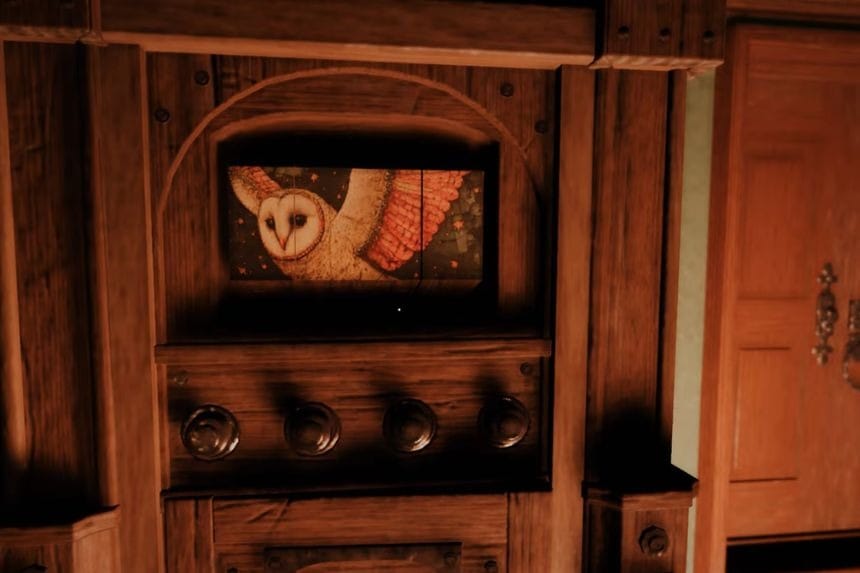
Lastly, rotate the third controller. This controller changes only the last section, which means that the puzzle is now complete. Just align all the sections, and you will have an image of the owl formation, and the strongbox will open. In this strongbox, you will find the Oath of Darkness, a unique and valuable earring that offers good defence, giving you +2 Defence and HP regeneration.
Bluemont Manor 2

You can get into the southern house of Bluemont Manor by climbing up the outer walls and slipping in through a second-floor window. Later on, you’ll also be able to enter the manor properly by completing a few side quests for House Roberts, which gives you official access.
Once you enter the manor, head inside and go up the stairs. Move around the upper area, and you’ll find another puzzle. Each pin is a different size, and each one needs to be rotated a specific amount. You can rotate them little by little.
Bluemont Manor 2 Puzzle Solution
Start with the smallest pins on the left and right. Both of these need about five rotations each. After adjusting them, you’ll notice parts of the mechanism start to move slightly. Next, move to the largest pin; it only needs two rotations. Then take the next biggest one and rotate it three times. Finally, the remaining pin should be rotated four times.
Once all the pins are lined up, press the button. After that, you’ll see an option to “turn right”. Go ahead and use it. This will unlock the mechanism, allowing you to open the box. After that, grab the item inside to receive a finely crafted gold necklace.
Lioncrest Manor
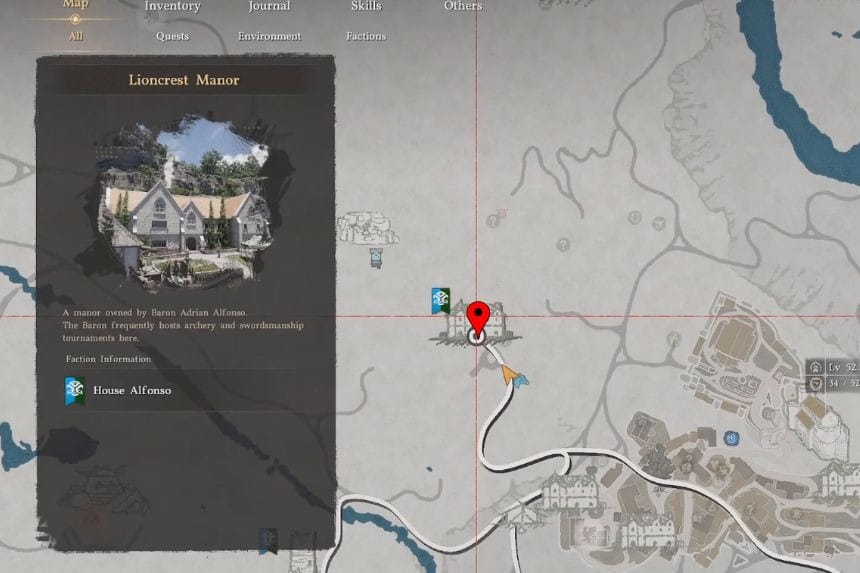

You can get into Lioncrest Manor by climbing up the outside of the building and going in through a second-floor window. You’ll also visit this place naturally during the side quest Bruna’s Request, which gives you proper access to the manor.
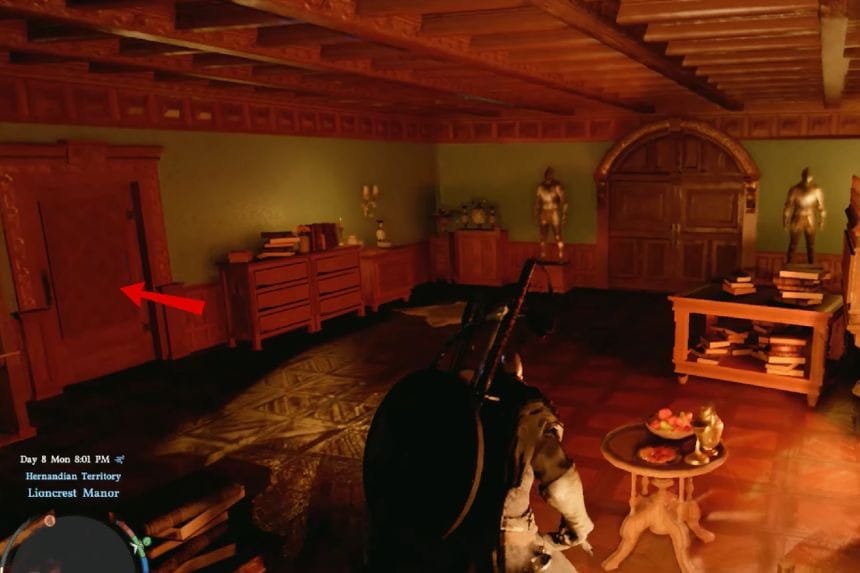
The strongbox you’re looking for is on the second floor, inside one of the eastern rooms. If you’re not doing the quest yet, you can still reach it by climbing up the wall and entering through that same second-floor window. Head over to the strongbox and interact with it to start the puzzle. Once it opens, you’ll see several pieces that you can rotate and adjust.
Lioncrest Manor Puzzle Solution
Start with the top piece. Select it, rotate it into the correct position, and then release it. After that, move on to the next piece and rotate it to the left until it looks properly aligned. Keep going piece by piece, rotating each one until it fits. Some pieces might need one or two extra turns, so don’t worry if it doesn’t look right at first, just keep adjusting until everything lines up.
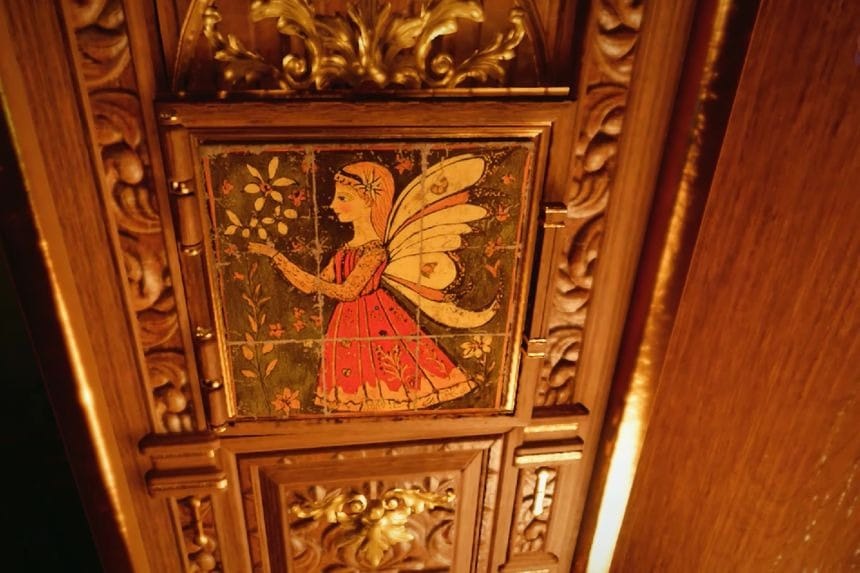
As you work through the puzzle, it should slowly come together. The last few pieces are straightforward, so just make small adjustments until everything is in the correct position. Once all the parts are aligned, the strongbox will unlock. Inside, you’ll find a small box. Open it to get an engraved gold earring.
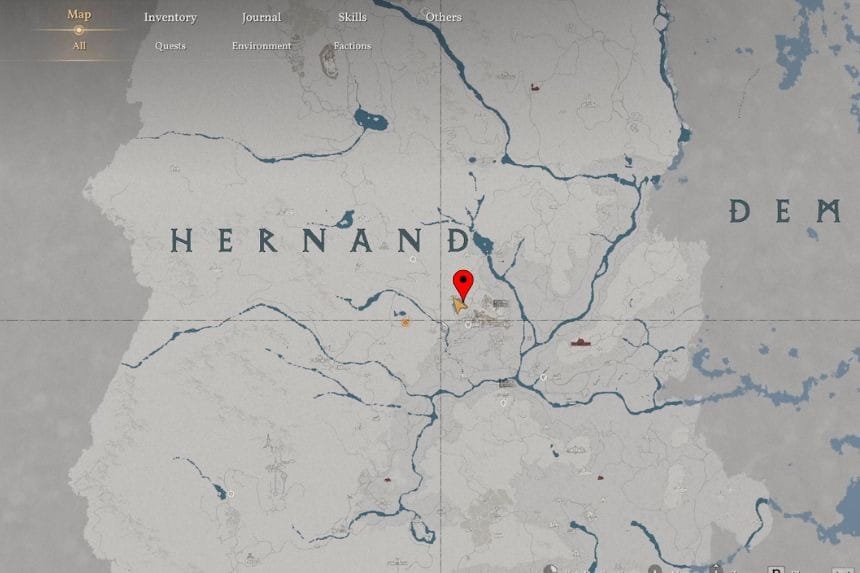
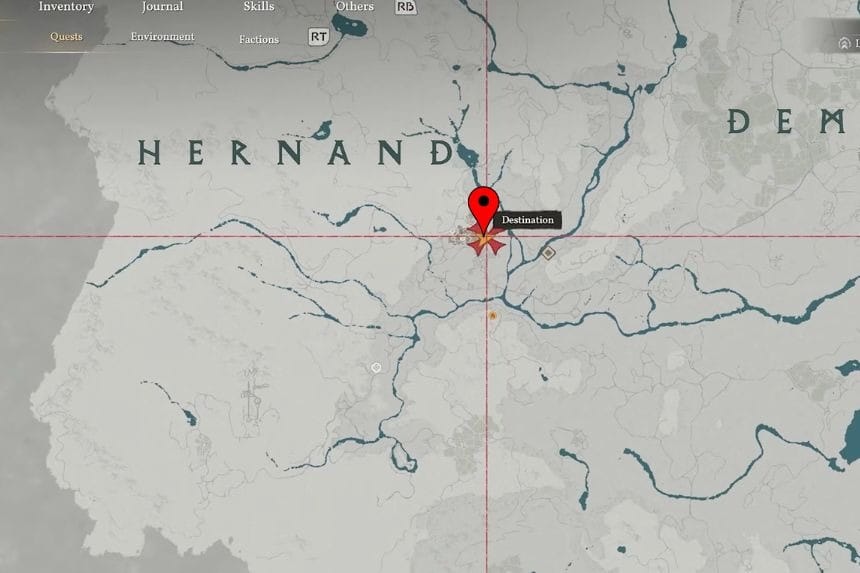
Hernand Castle
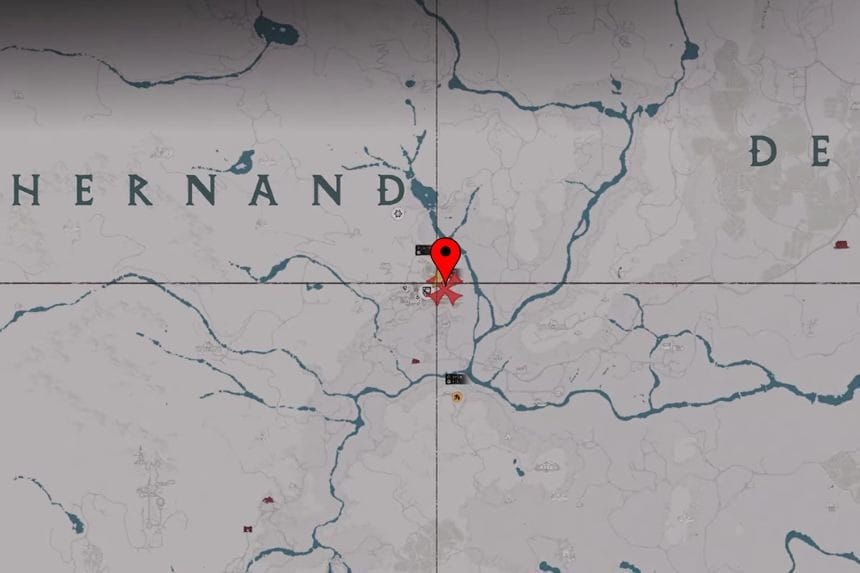
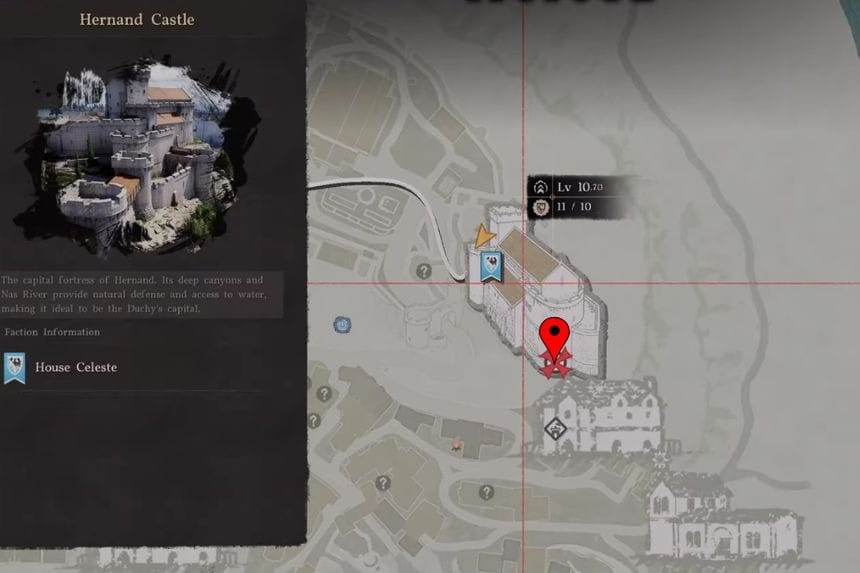
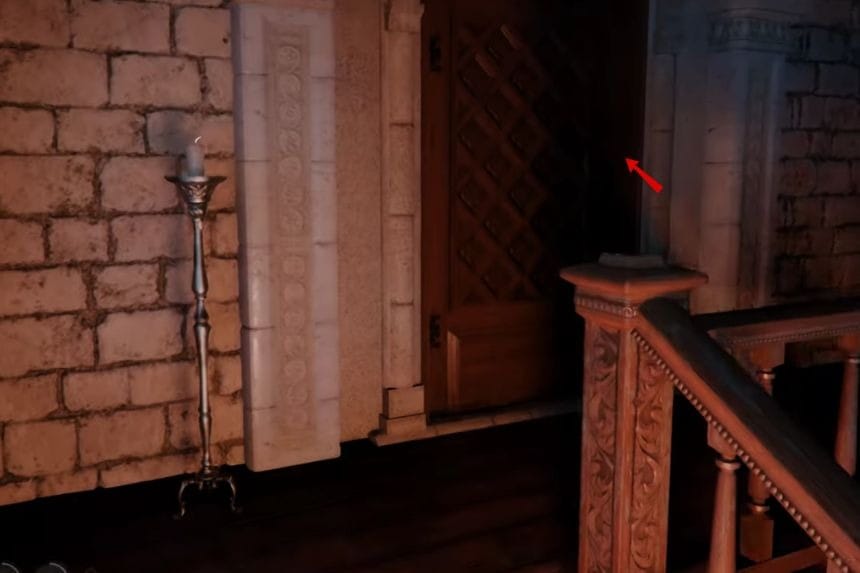
You’ll find this strongbox inside a locked room on the top floor of Hernand Castle. To open the door, you’ll need a key. You can either steal one or simply buy it from the Back Alley Shop.
As for getting into the castle itself, you’ll need to wear the Hernandian Attire. This outfit is given to you as a reward from an earlier main quest called “Actions Speak Louder Than Words.” Once you have it equipped, you’ll be able to enter the castle without any trouble.
Hernand Castle Puzzle Solution
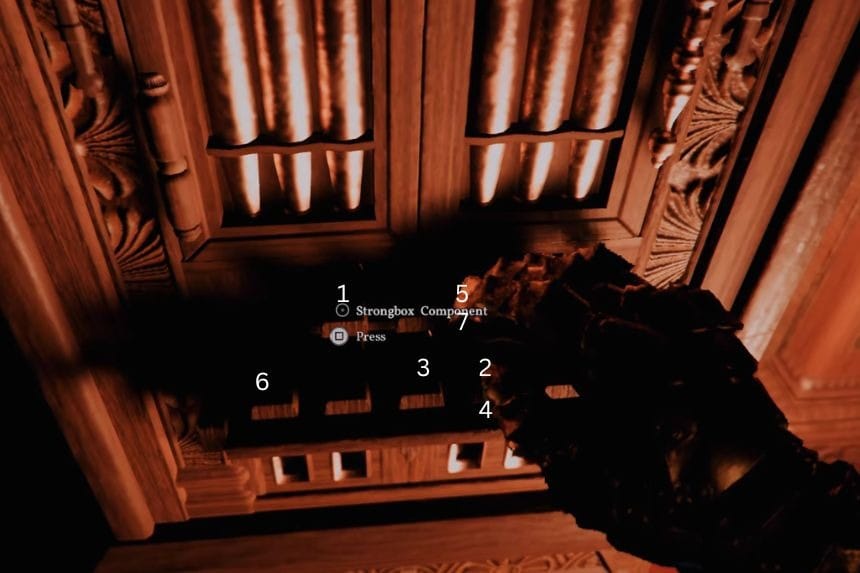
On the side of the box, there’s a device you can interact with. Use it to play a short tune. This tune is actually the clue you need to solve the puzzle. The strongbox has two layers of keys:
- A top row with 3 keys
- A bottom row with 5 keys
To unlock it, you need to press the keys in the correct order based on the tune. The correct sequence is:
- Top row – first key
- Bottom row – fourth key
- Bottom row – third key
- Bottom row – fourth key
- Top row – third key
- Bottom row – first key
- Top row – third key again
Enter this sequence correctly, and the strongbox will unlock. Inside, you’ll find a valuable item. The reward is a crafting manual for a Lavish Meal.
Hillside Manor
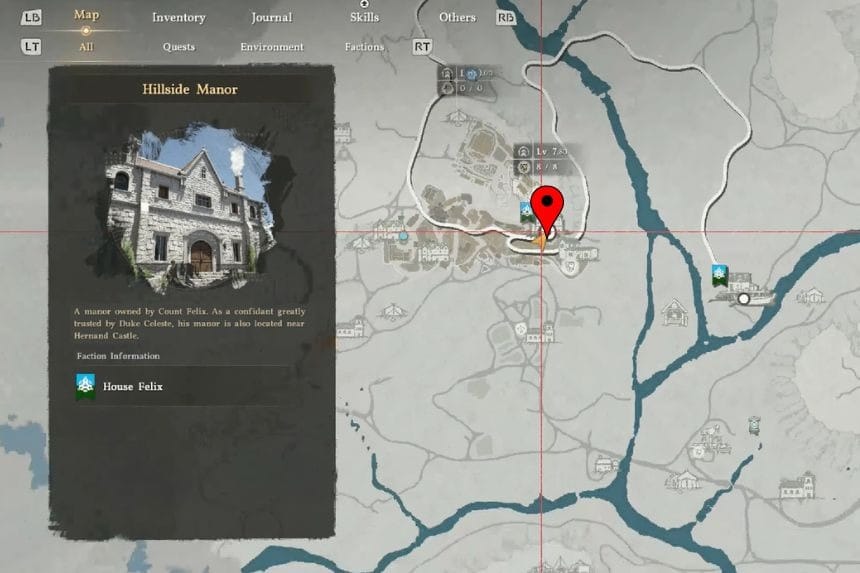
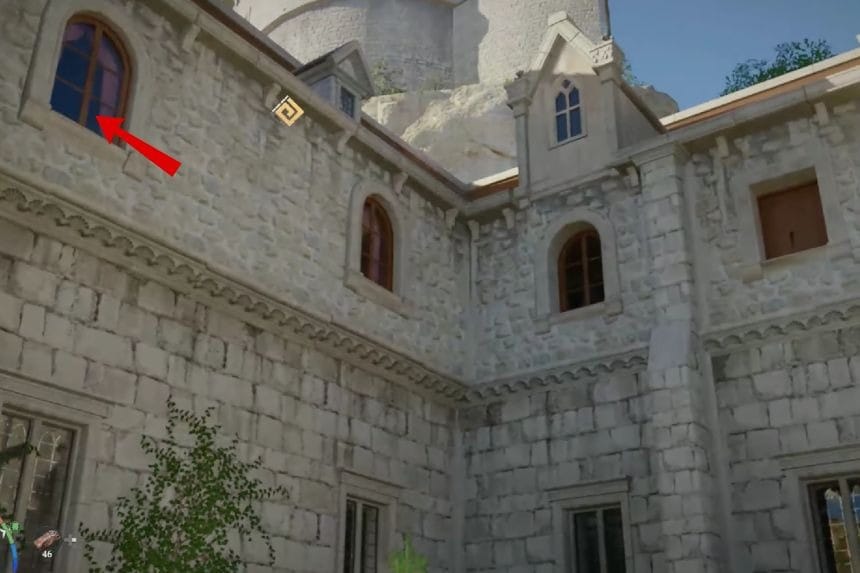
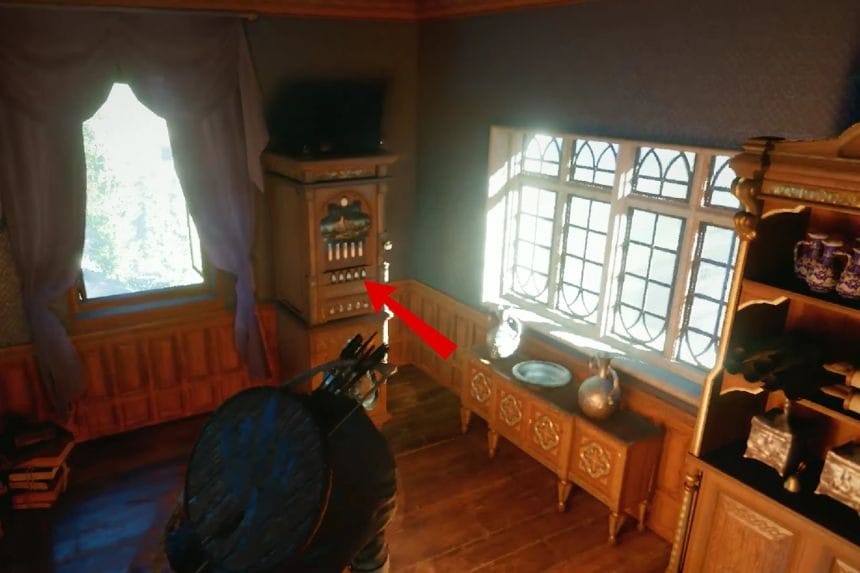
You’ll find this strongbox on the second floor of Hillside Manor, in the southwestern room. To get inside easily, go around to the north side of the building and climb up to the second-floor window at the back. Enter through the window, then make your way across the upper floor. Head toward the southwestern room, and you’ll spot the strongbox sitting near the window.
Hillside Manor Puzzle Solution
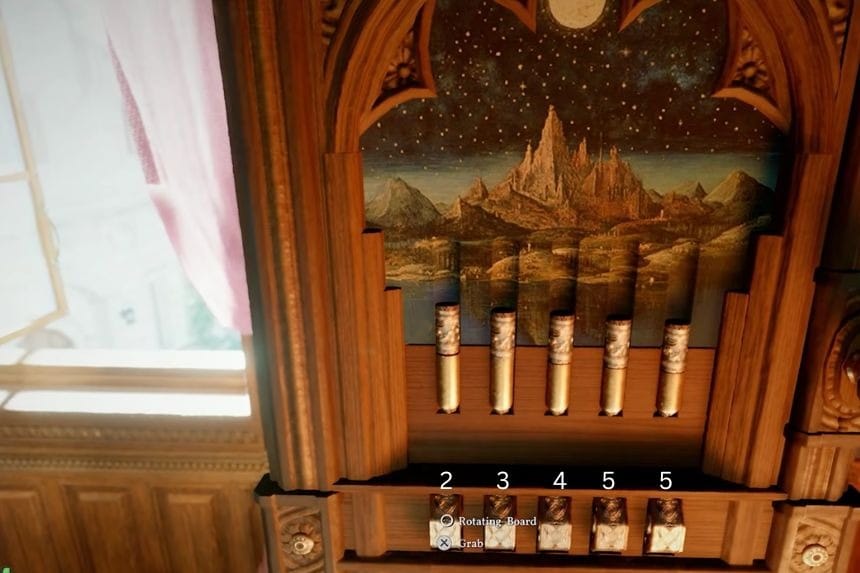
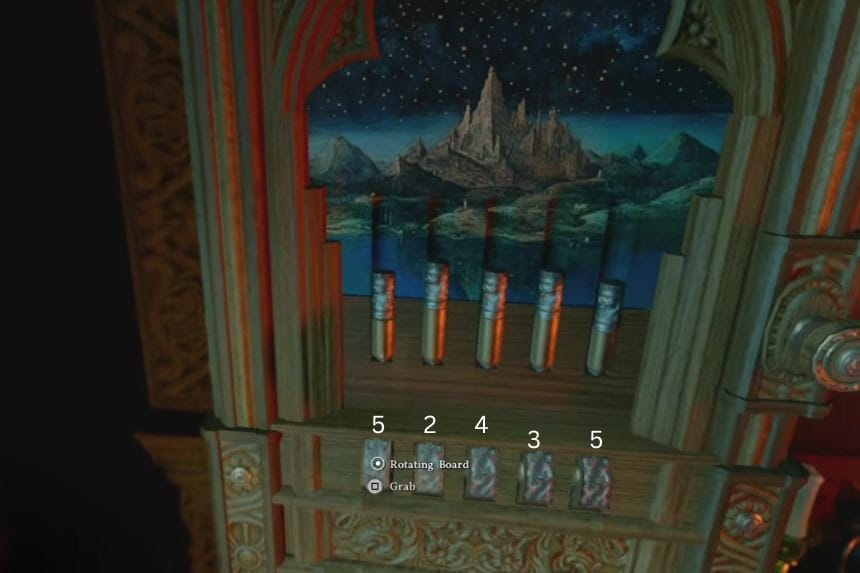
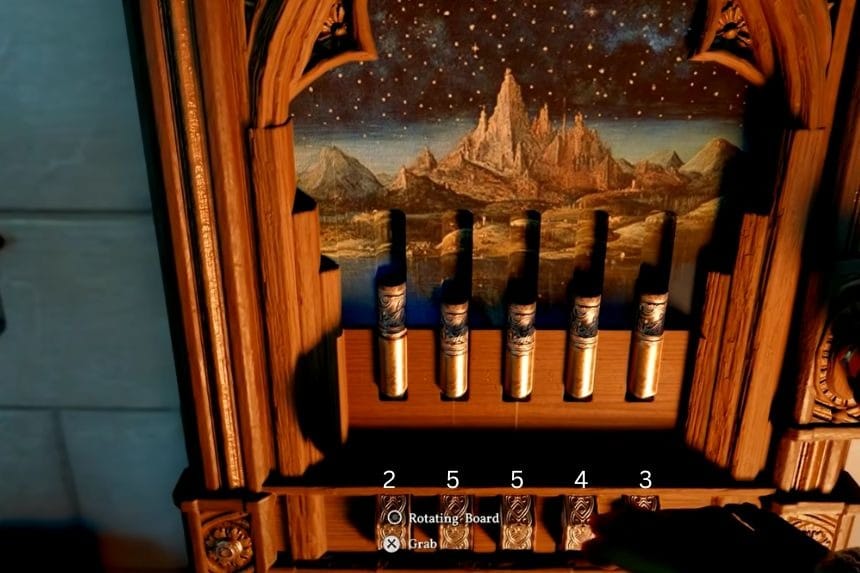
The puzzle involves rotating five pieces at the bottom. Each one needs a specific number of turns. Here’s what you need to do from left to right:
- First piece – rotate 2 times
- Second piece – rotate 3 times
- Third piece – rotate 4 times
- Fourth piece – rotate 5 times
- Fifth piece – rotate 5 times
If you make a mistake, you can reset the puzzle by rotating each piece all the way back to the starting position. Once everything is set correctly, press the button at the top. This will unlock the mechanism and open the strongbox. Inside, you’ll find a small box containing the Saint’s Necklace.
Stellen Manor 1
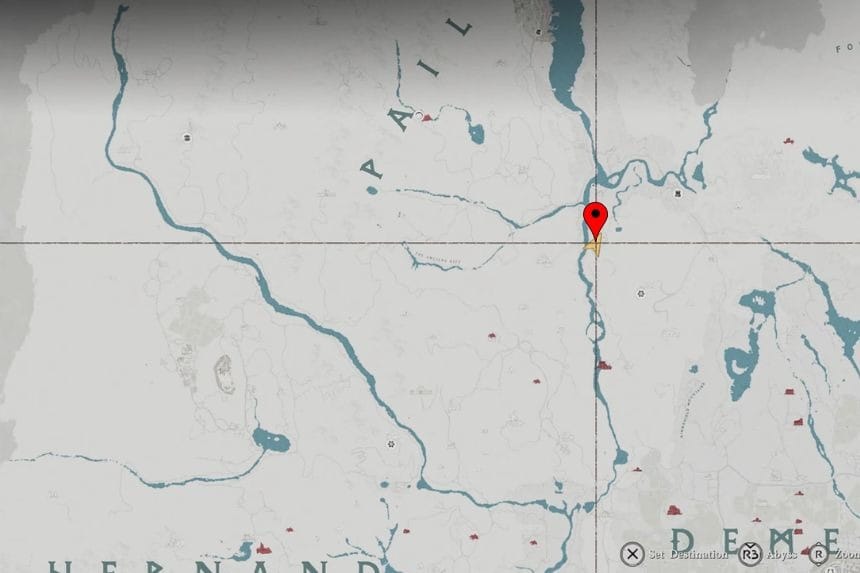
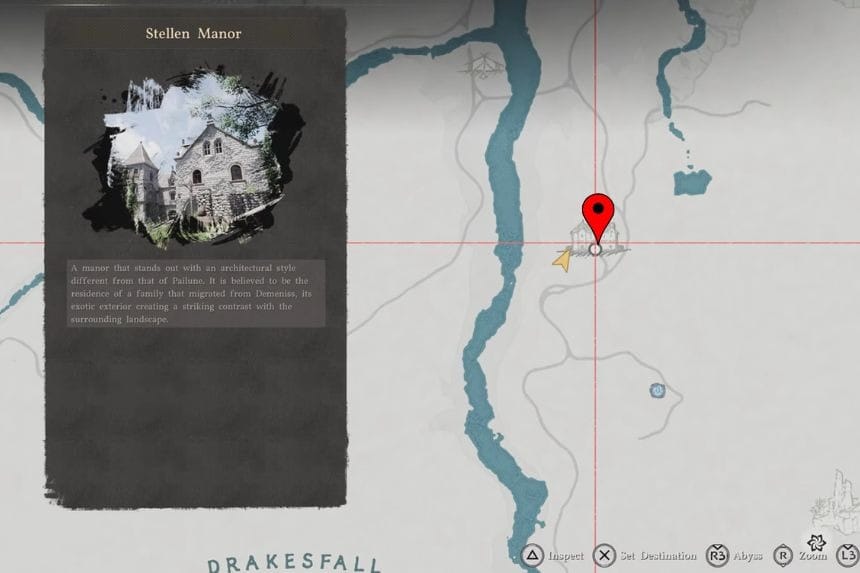
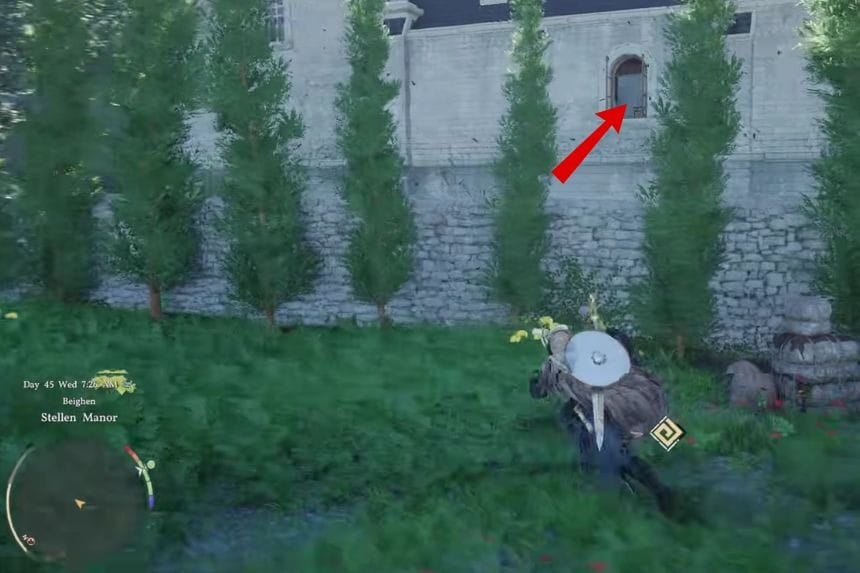
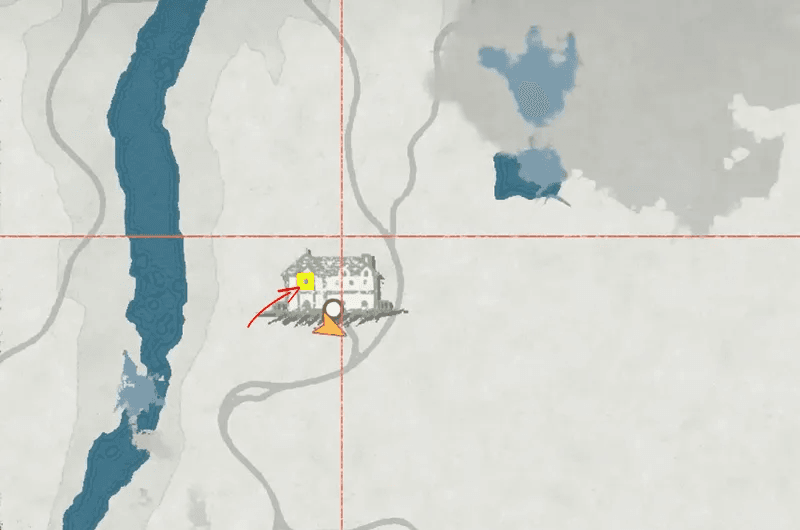
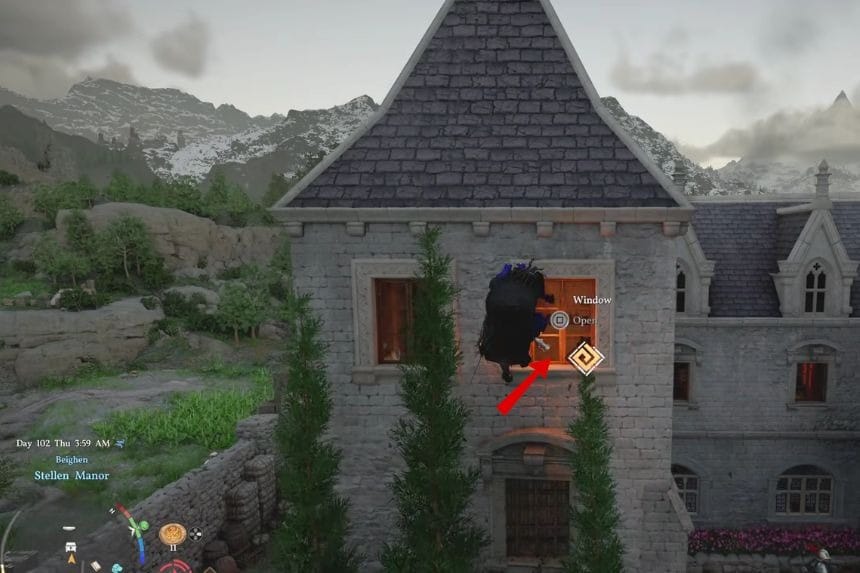
Stellen Manor is located in Pailune, along the eastern side of the river that runs through the region. Once you arrive at the manor, head to the left side of the main entrance and climb up the tower there to get started.
You’ll find the first strongbox in Stellen Manor on the second floor, inside the dining room. The manor is located in Pailune, which sits northeast of Drakesfall Gorge. To get inside, just climb up and enter through one of the windows, then head to the dining room on the second floor to find the strongbox.
Stellen Manor 1 Puzzle Solution
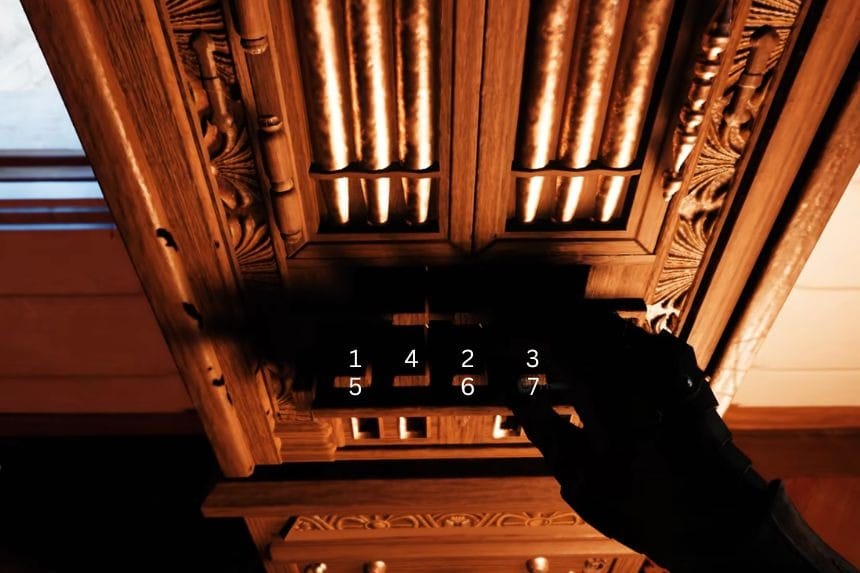
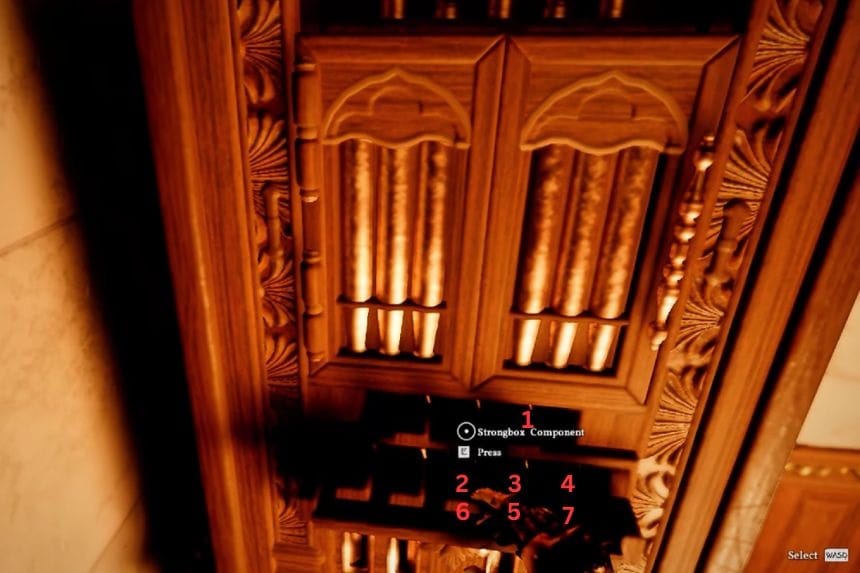
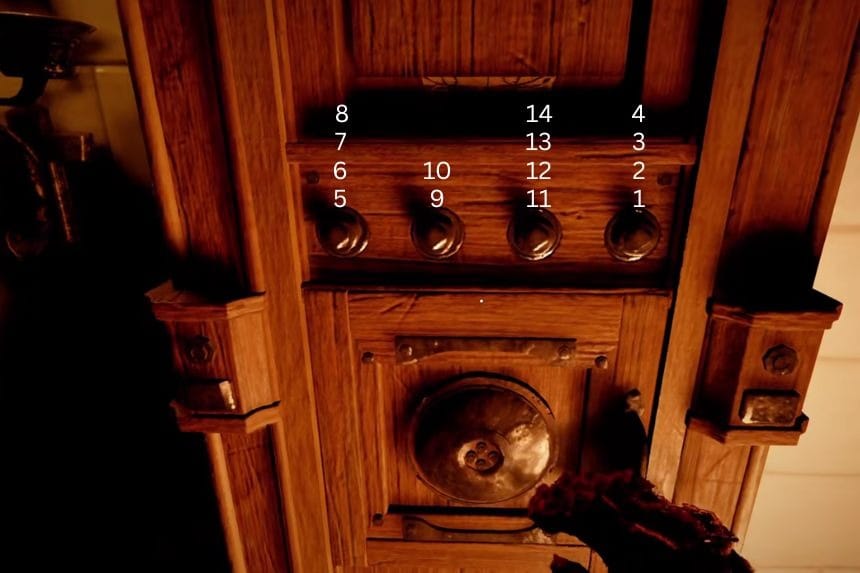
First, enter the manor through a back window. Inside, you’ll find the piano-style strongbox. To solve it, you need to press the keys in the correct order. The right sequence is:
4 – 6 – 7 – 5 – 4 – 6 – 7
You can actually listen to the tune from the side of the box to figure this out, but using the sequence above will open it instantly. Once opened, you’ll get a key.
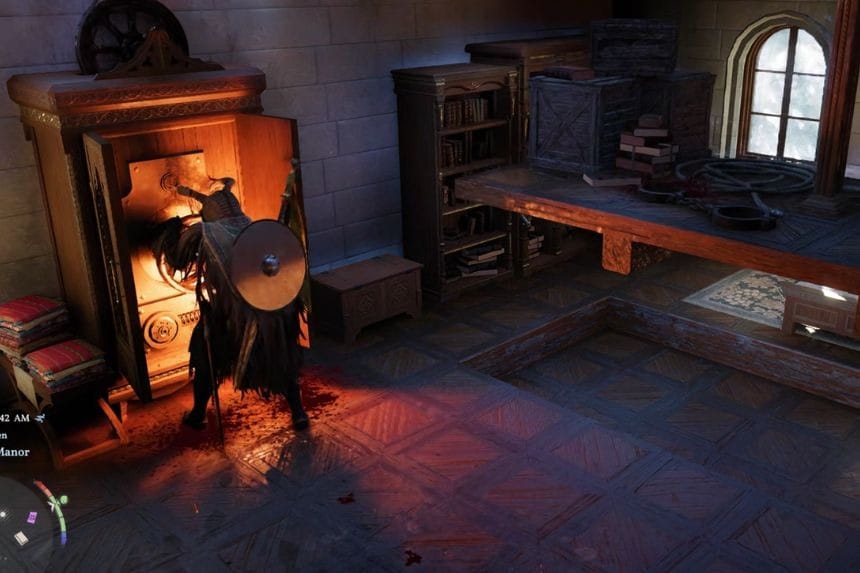
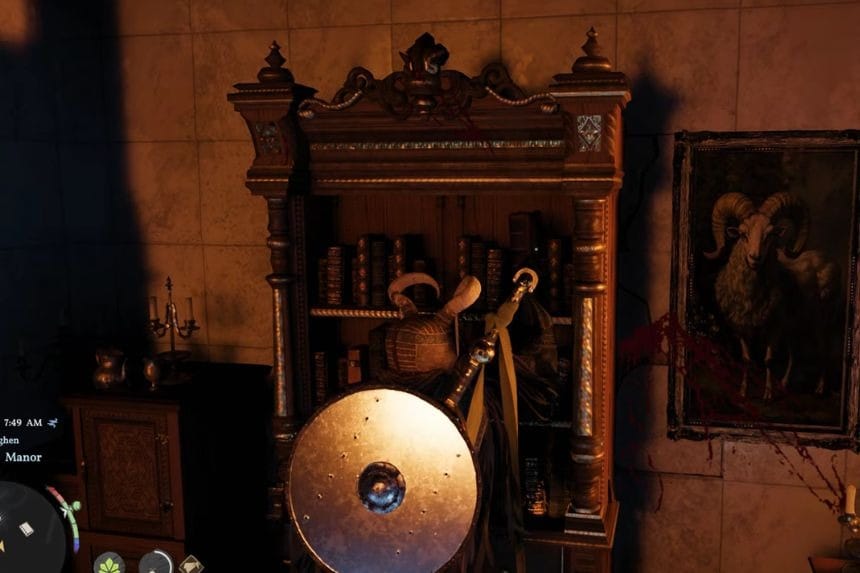
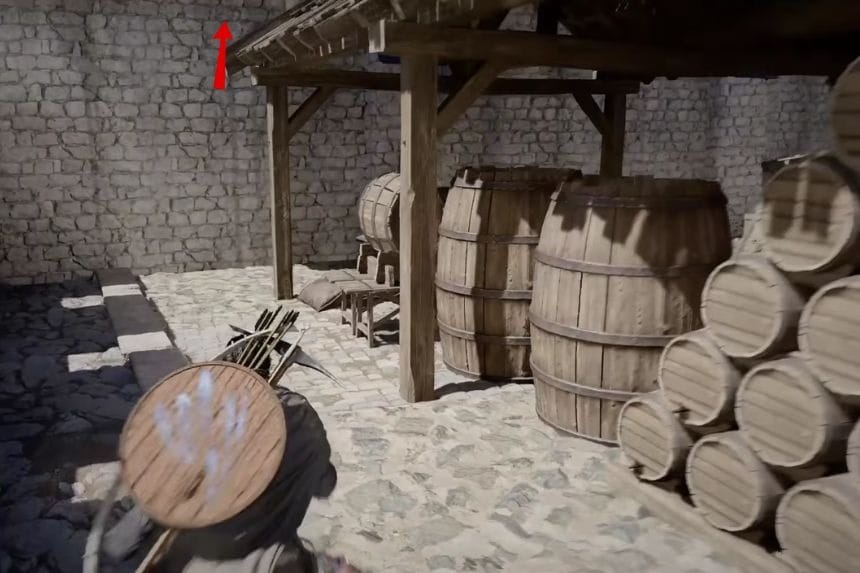
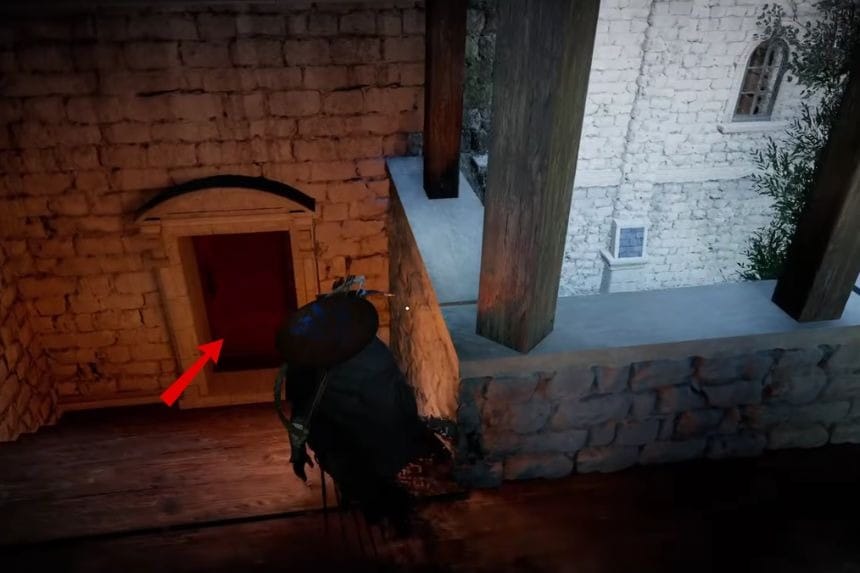
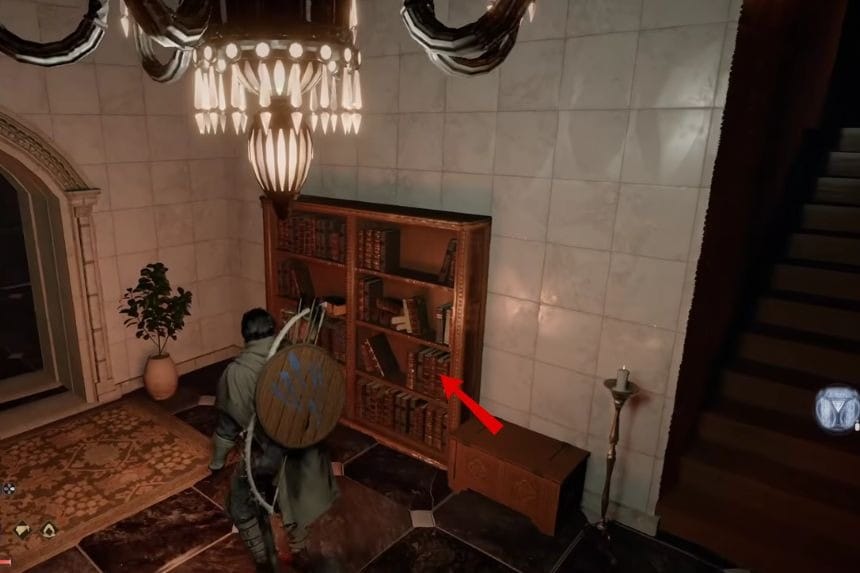
Take the key and go through the door on the right. Inside, look for a wardrobe near the bed and open it. Interact with the mechanism inside, then grab the book hidden there. Now head downstairs. You’ll find a spot where you can place the book. Put it in, and it will open a hidden passage. Go through, move past the barrels, and drop down. At the end, you’ll find a sword.
Stellen Manor 2

Stellen Manor is located in Pailune, along the eastern side of the river that runs through the region. Once you arrive at the manor, head to the left side of the main entrance and climb up the tower there to get started.
Stellen Manor 2 Puzzle Solution
The second strongbox is also in Stellin Manor, near the front area. Climb up the ladder to reach it. This puzzle has five rotating dials. Each one needs a specific number of turns:
- First dial – 2 turns
- Second dial – 5 turns
- Third dial – 5 turns
- Fourth dial – 4 turns
- Fifth dial – 3 turns
Rotate each dial carefully until they’re all set correctly. Once you solve this puzzle, you’ll get a Finely Crafted Gold Ring as your reward. It gives you +1 Attack and a Level 1 Attack Speed boost.
Mudridge Cabin
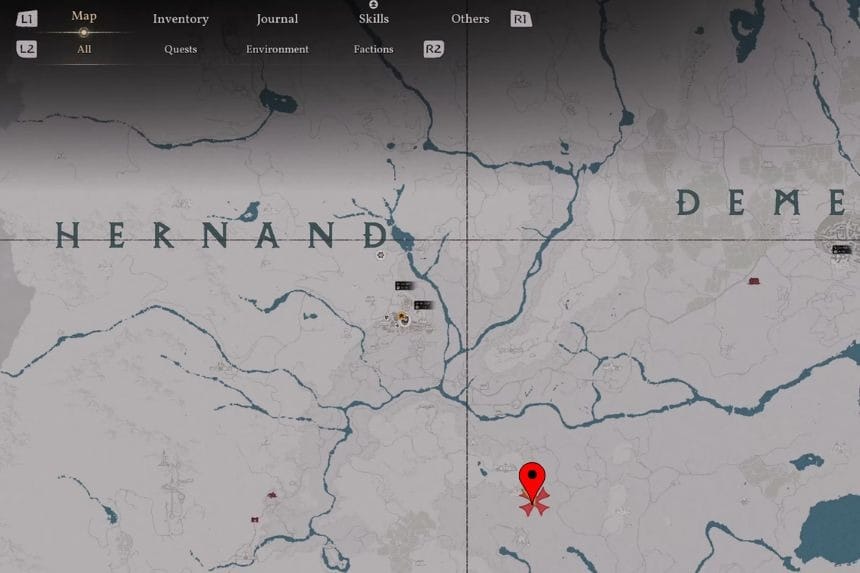
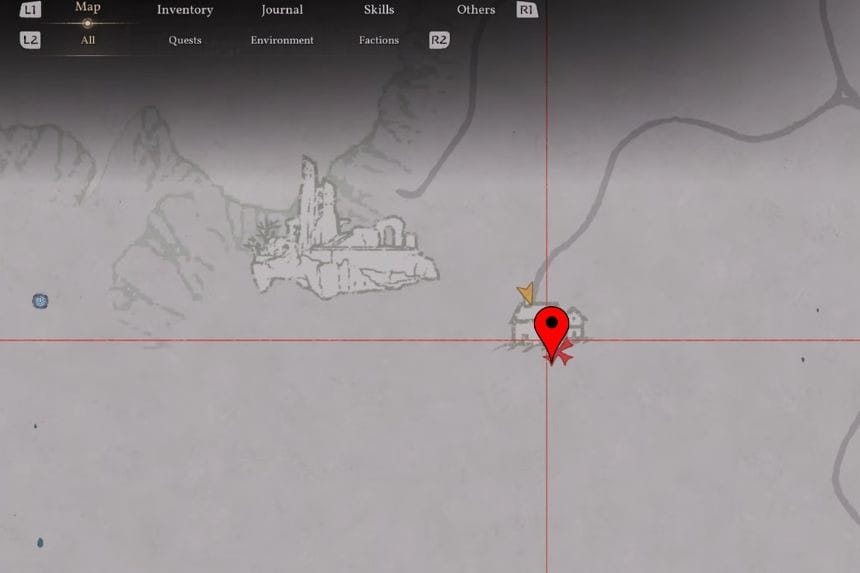
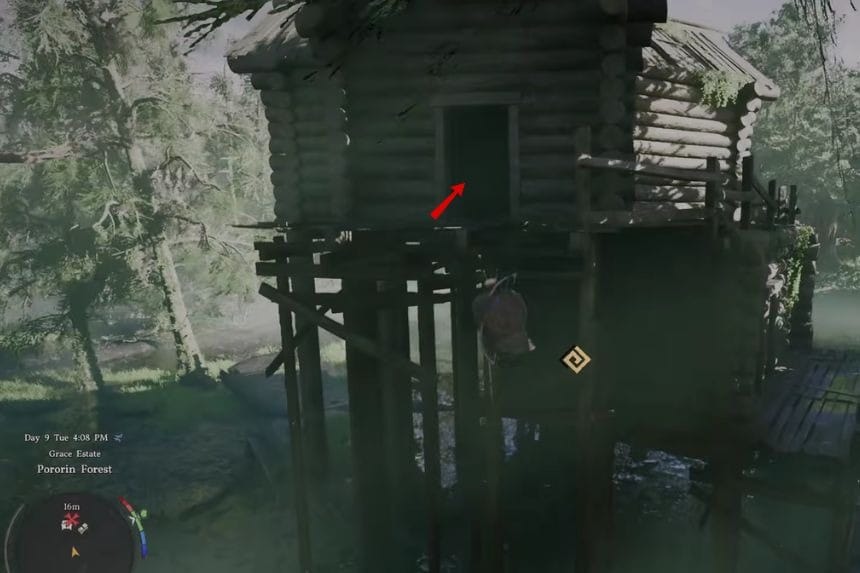
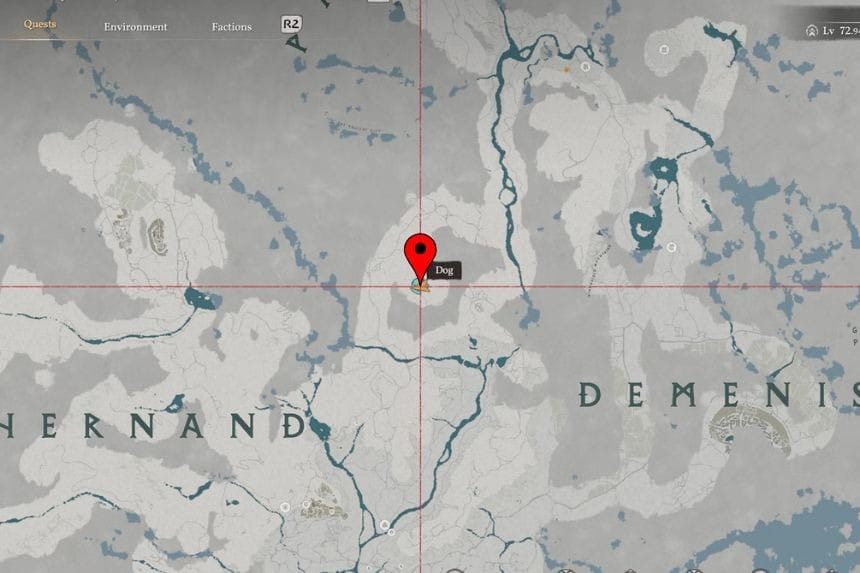
You’ll find this strongbox at Mudridge Cabin in Pororin Forest, near Hernand, just southeast of Unicorn Cliff. To reach it, climb up the wooden posts of the cabin to get to the higher level. Once you’re up there, deal with the bandits in the area. After that, you’ll find the strongbox inside the upper cabin.
Mudridge Cabin Puzzle Solution
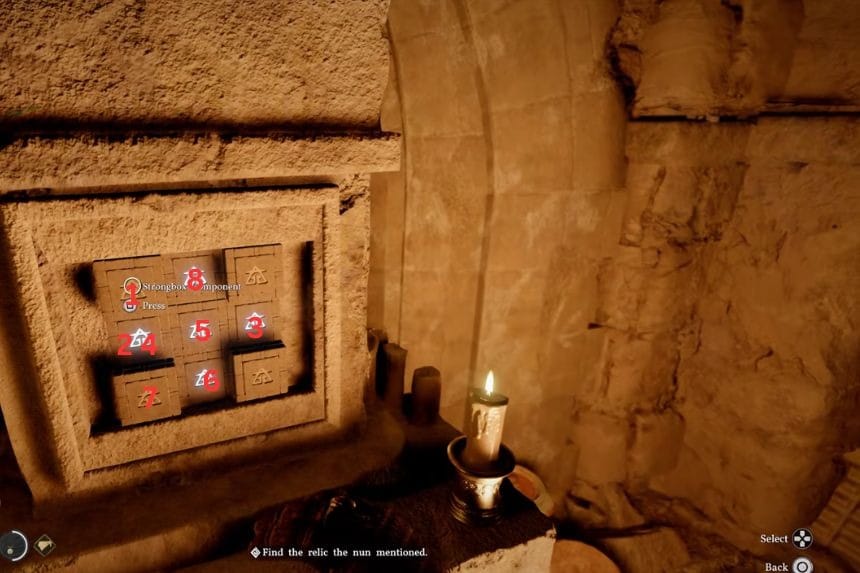
The puzzle has a grid with nine tiles, where eight of them can move. To solve it, you just need to arrange the tiles in the correct pattern. The easiest way to do this is to follow the exact sequence of moves shown. Once you match the correct layout, the puzzle will unlock. Once you open the strongbox, you’ll get the Flower Petal Earring. It’s a unique accessory that can actually play music. Just equip it and press L2 + R2 (or LT + RT / B, depending on your controls) to use it.
Southern Court
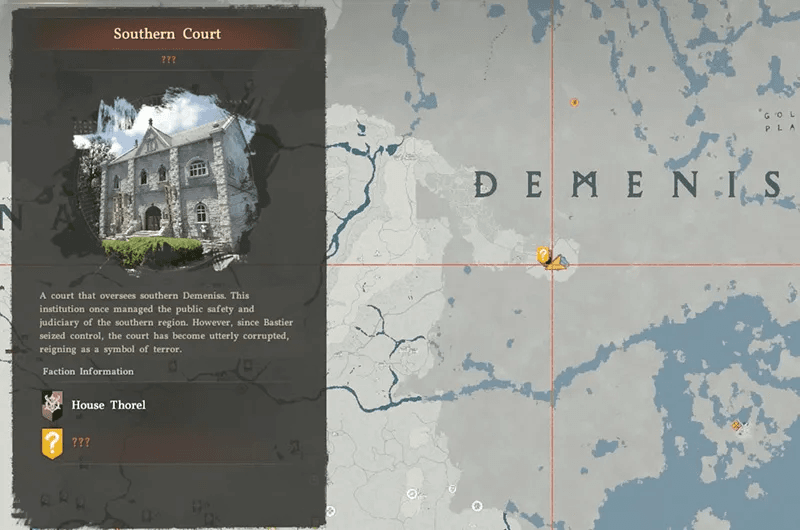
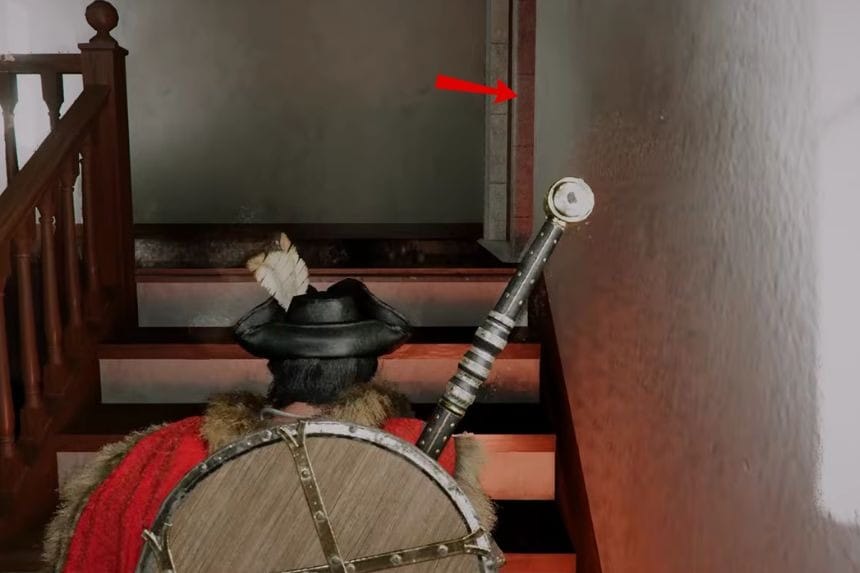
The easiest way to get into Southern Court is by sneaking in from the back. Go around the manor, climb over the wall, and make your way up to the second floor. If you enter this way, you can avoid the guards completely and stay undetected. The strongbox is located inside a room on the second floor, so once you’re up there, just look around and you’ll find it easily.
Southern Court Puzzle Solution
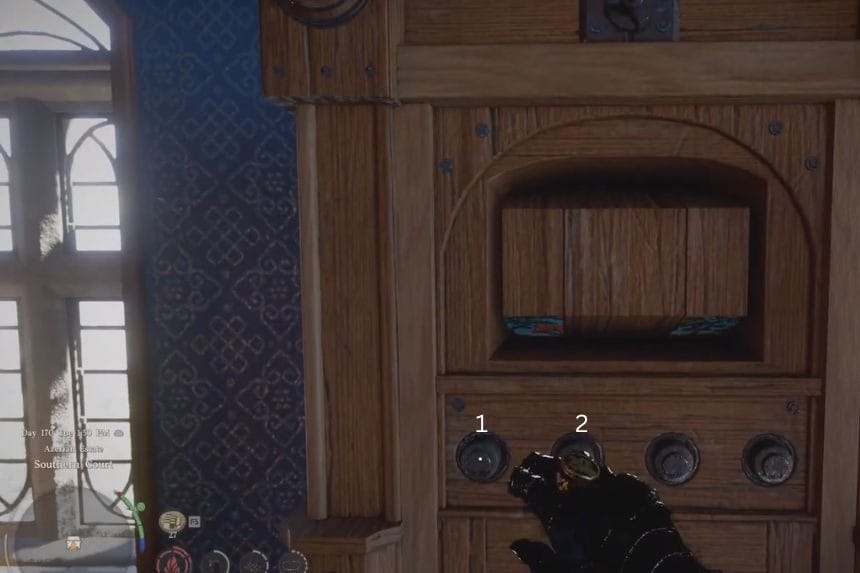
To open the Southern Court strongbox, start by pressing the first button from the left once, then press the second button from the left twice. Once the image lines up correctly, the box will unlock. Open it up to collect your reward, the Witch’s Earring. It gives you 3 Defence and slowly restores health over time, adding +0.2 HP every second.
Western Court
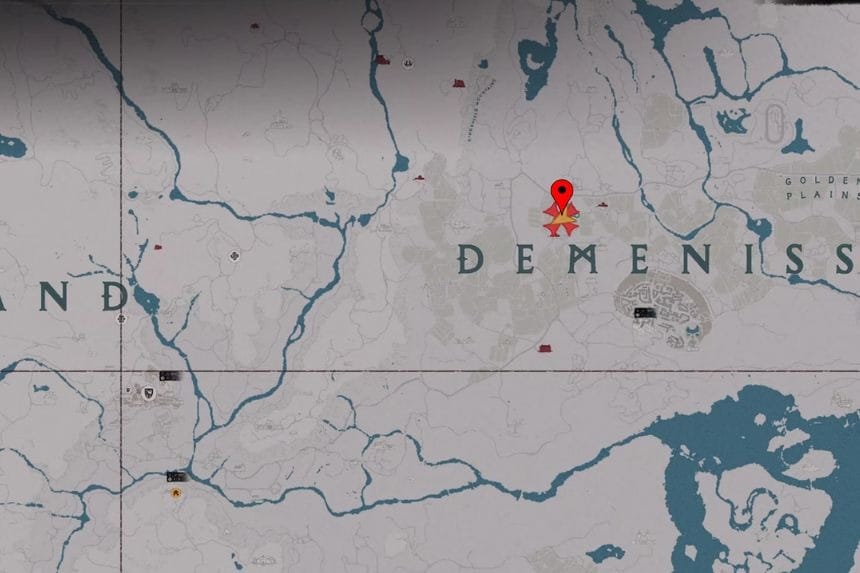
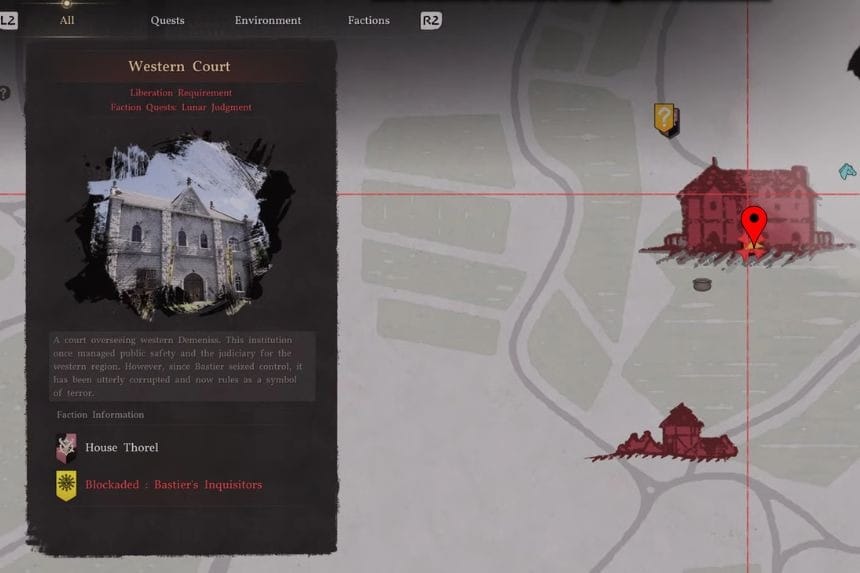
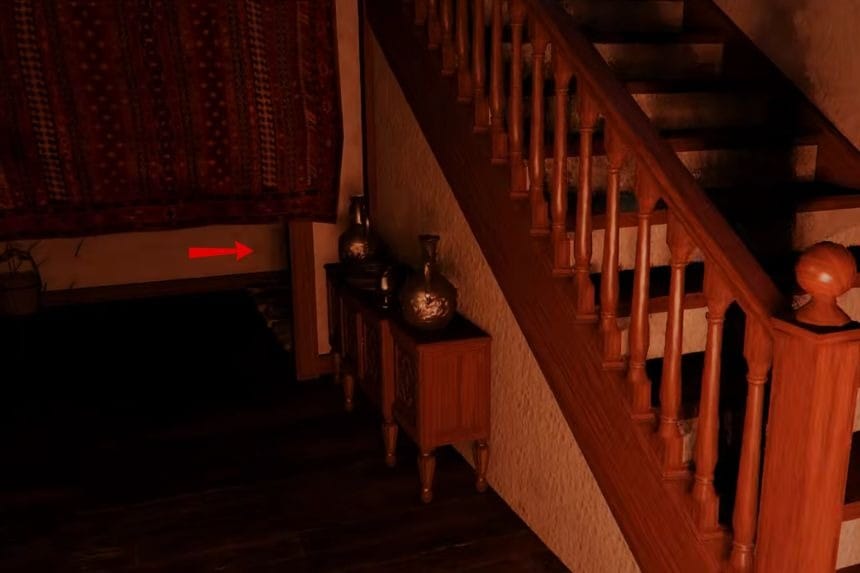
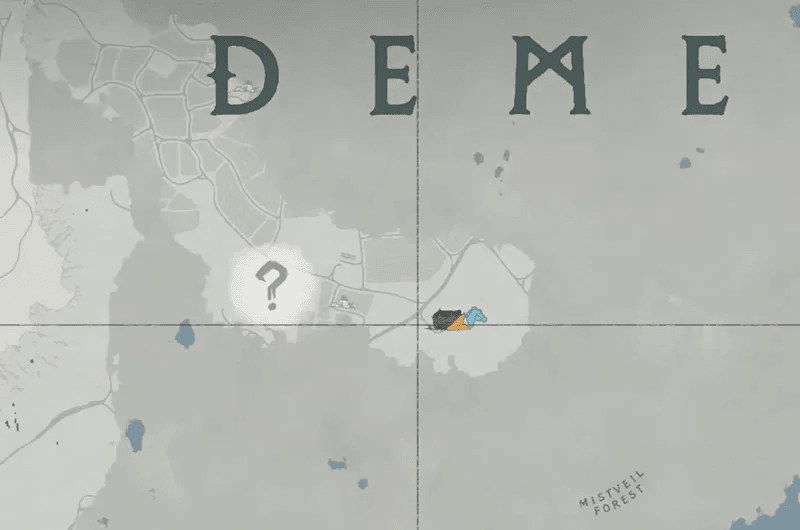
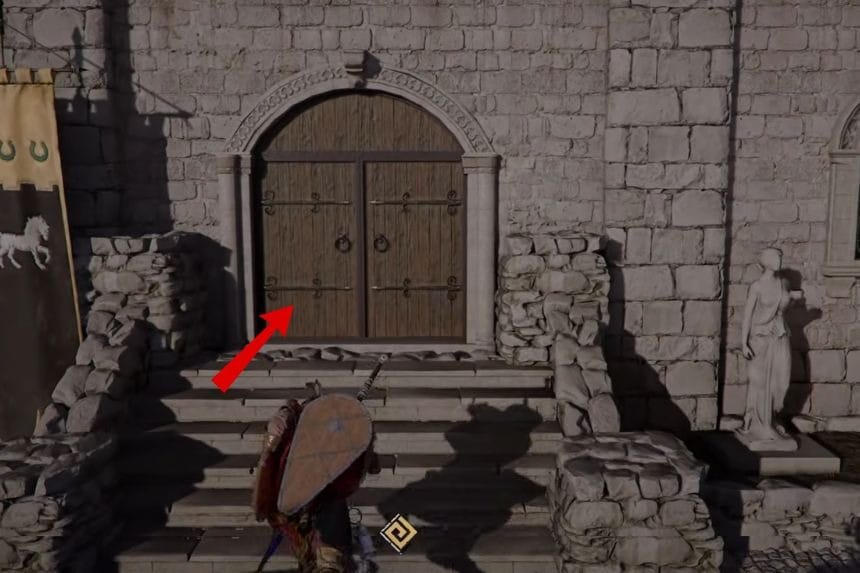
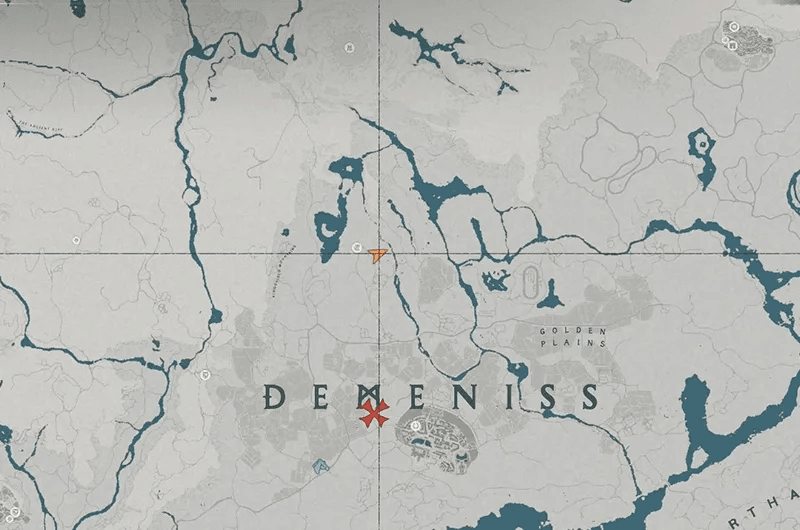
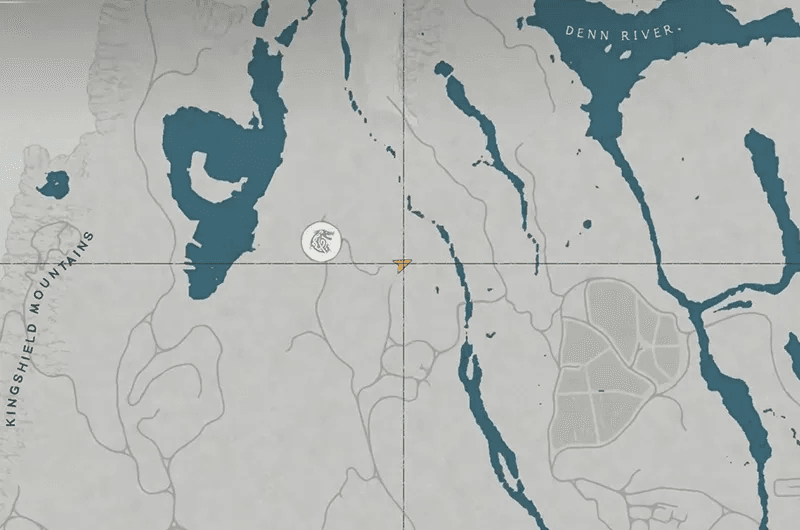
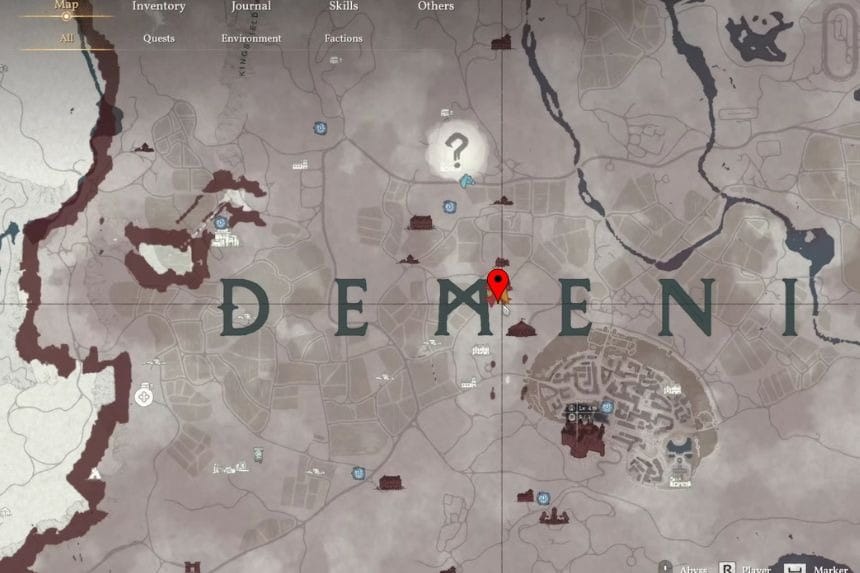
You’ll find this strongbox underground, in the basement of Western Court, which is located northwest of Demeniss. The quickest way to reach it is by entering through the southern door. Once inside, turn right and look for a draped curtain behind it. You’ll find a hidden ladder that leads down to the basement, where the strongbox is.
Western Court Puzzle Solution
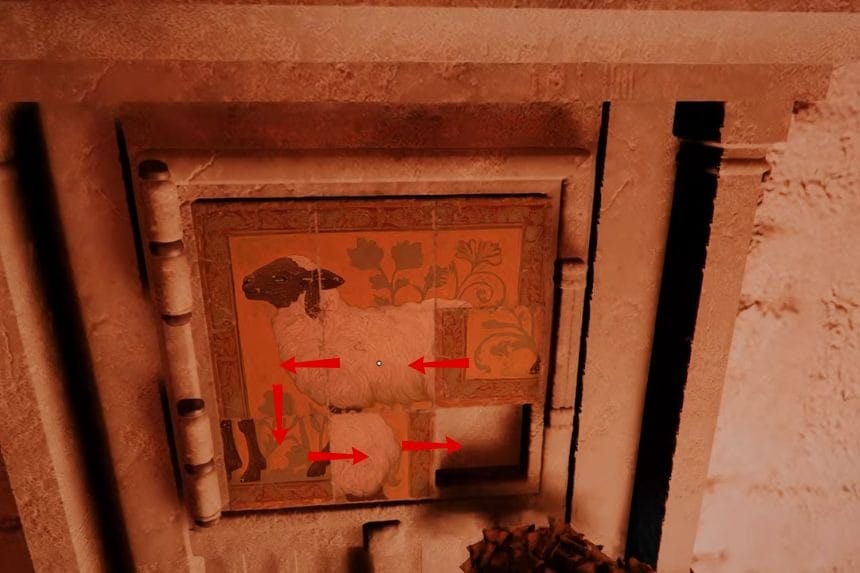
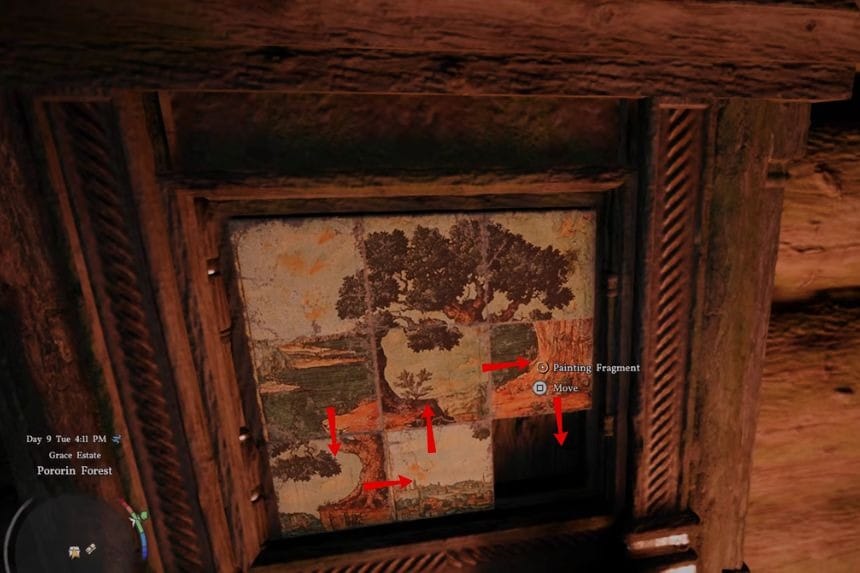
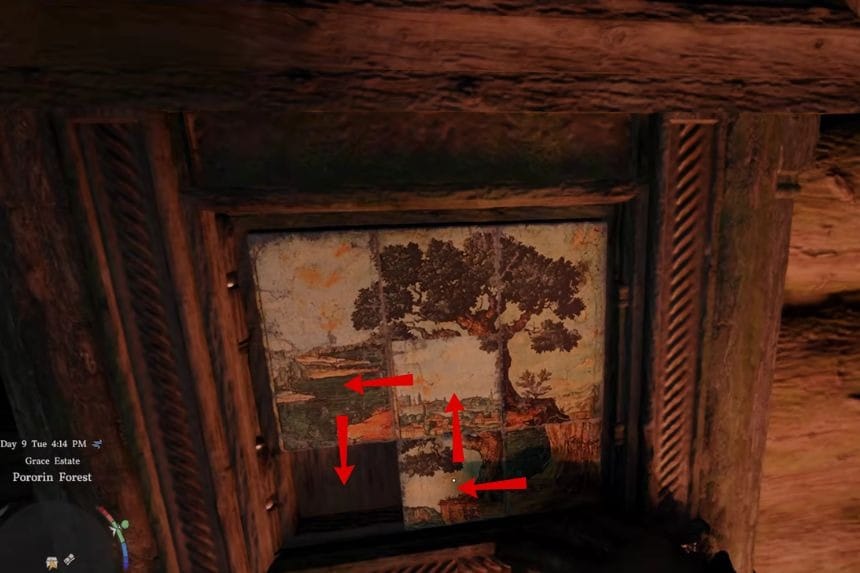
To solve the Western Court strongbox puzzle, you need to slide the panels around until they form the picture of a sheep. Start by moving the bottom middle tile to the right. Then move the bottom left tile to the right as well. After that, slide the centre left tile downward, and move the centre tile to the left. Next, shift the centre right tile to the left.
Now move the bottom right tile upward. Then move the bottom middle tile to the right again, followed by the bottom left tile to the right. Slide the centre left tile down once more, and move the centre tile to the left.
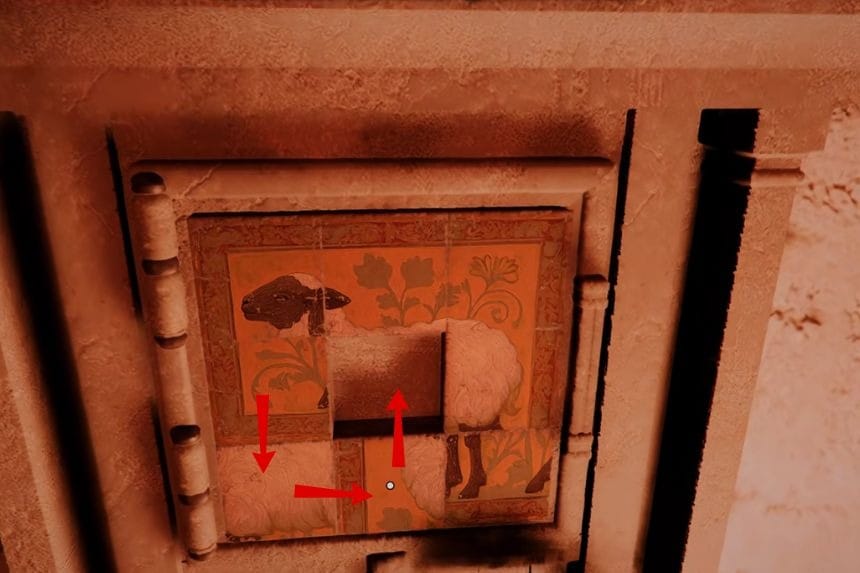
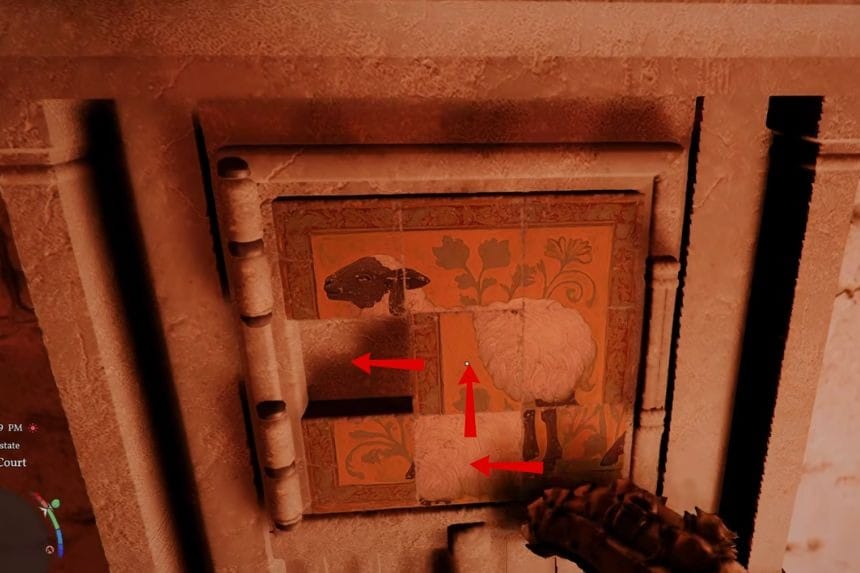
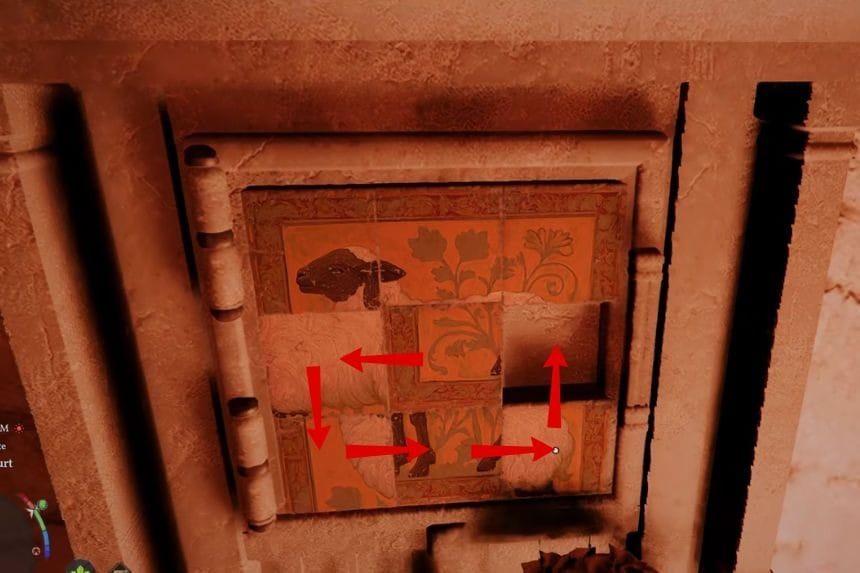
After that, move the bottom middle tile upward, then slide the bottom left tile to the right. Move the centre left tile down again, and shift the centre tile to the left one more time. Finally, move the bottom middle tile upward, and slide the bottom right tile to the left. If you follow these steps carefully, the image will line up into a sheep, and the strongbox will unlock. Once you’ve solved the puzzle, go ahead and open the strongbox to get your reward, a Karanda’s Necklace.
Windmere Manor
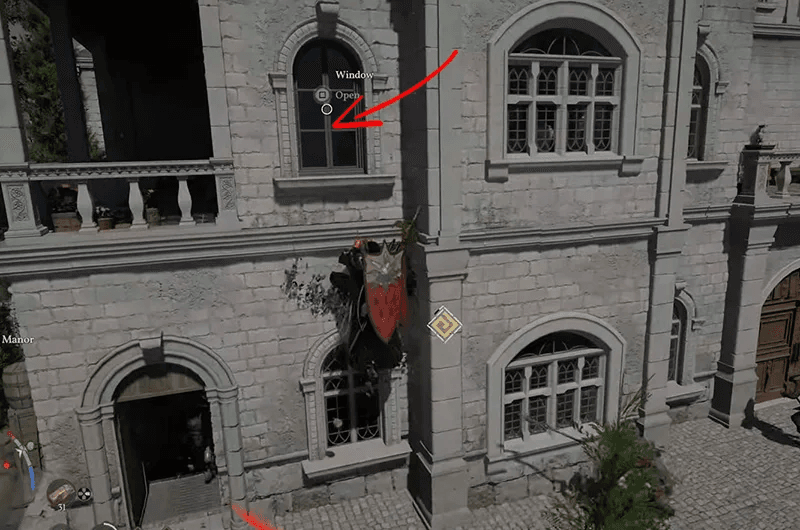
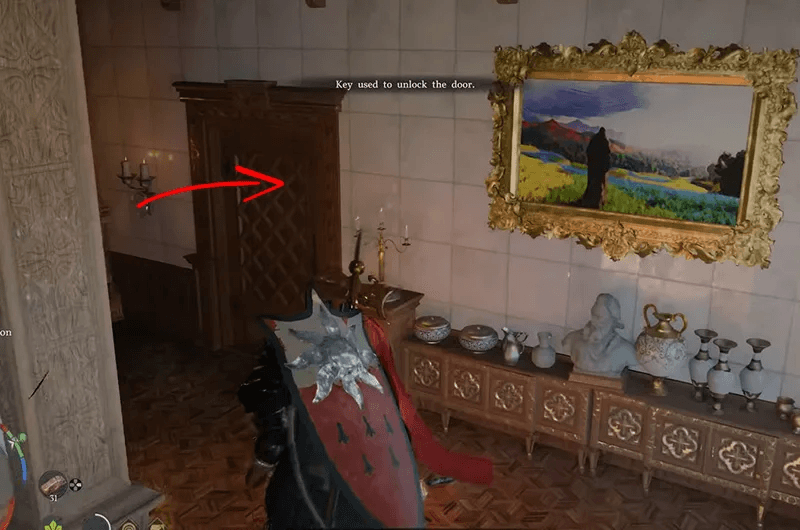
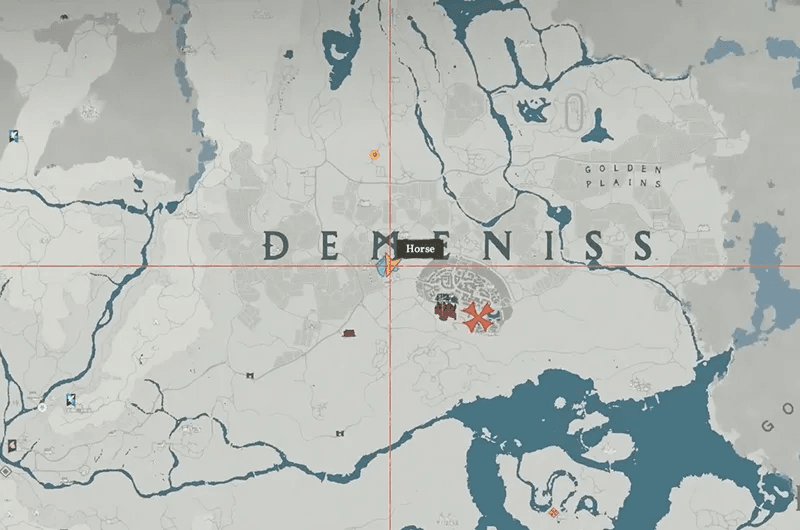
You’ll find this strongbox on the second floor of Windmere Manor, which is located north of the City of Demeniss along the river. Since the manor is guarded, the easiest way in is from the back. Go around where no one is watching, climb up to a second-floor window, and enter from there to avoid being spotted.
Windmere Manor Puzzle Solution
To solve the Windmere Manor strongbox puzzle, you need to rotate the panels until they form the image of a whale.
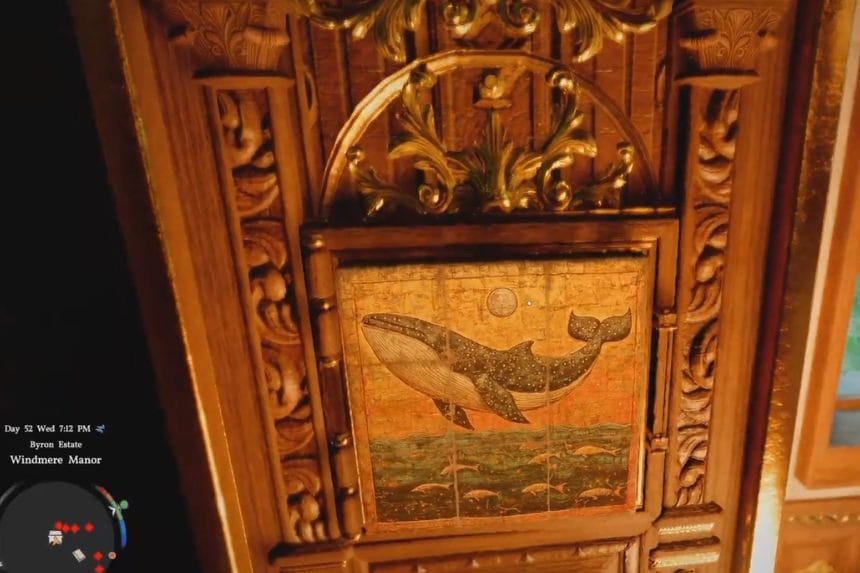
Start with the top-left piece and rotate it once. Then move to the top-middle piece and rotate it twice. After that, go to the centre piece and rotate it twice as well, followed by the middle-right piece, which also needs two rotations.
Next, rotate the bottom-left piece once, and then do the same for the bottom-right piece. Once everything is lined up and the whale image is complete, the strongbox will unlock. Open it to collect your reward, the Mark of Darkness Ring.
Azerian Manor
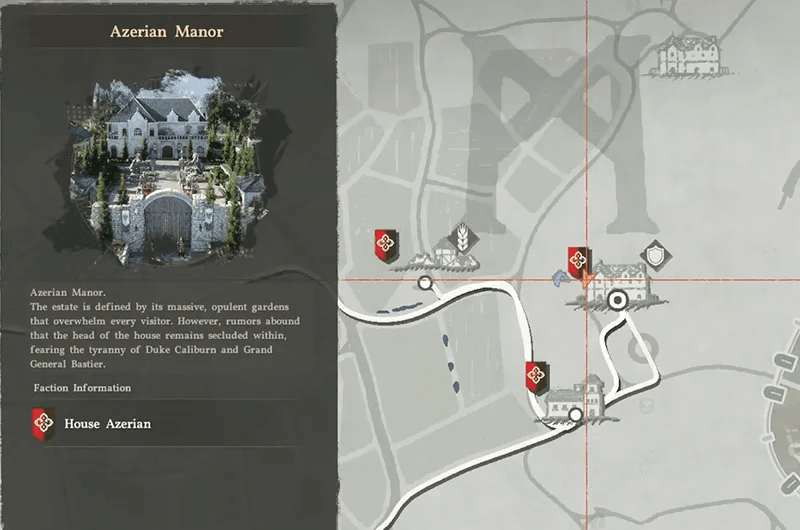

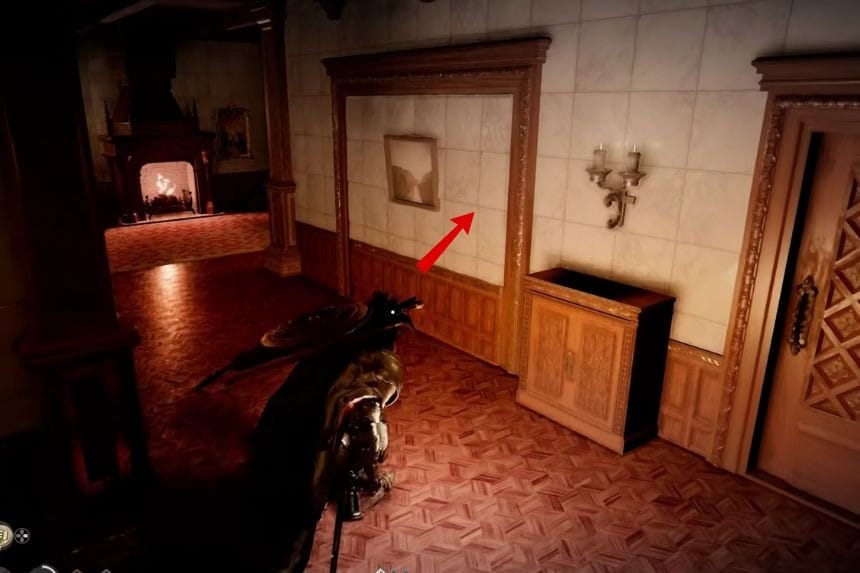
You’ll find this strongbox on the second floor of Azerian Manor, hidden behind a rotating wall that leads into a secret room. The easiest way to get inside is from the back of the manor. Climb up the wall and enter through a second-floor window. Once you’re inside, step out into the hallway and look around. You’ll find the rotating wall there that leads to the hidden room.
Azerian Manor Puzzle Solution
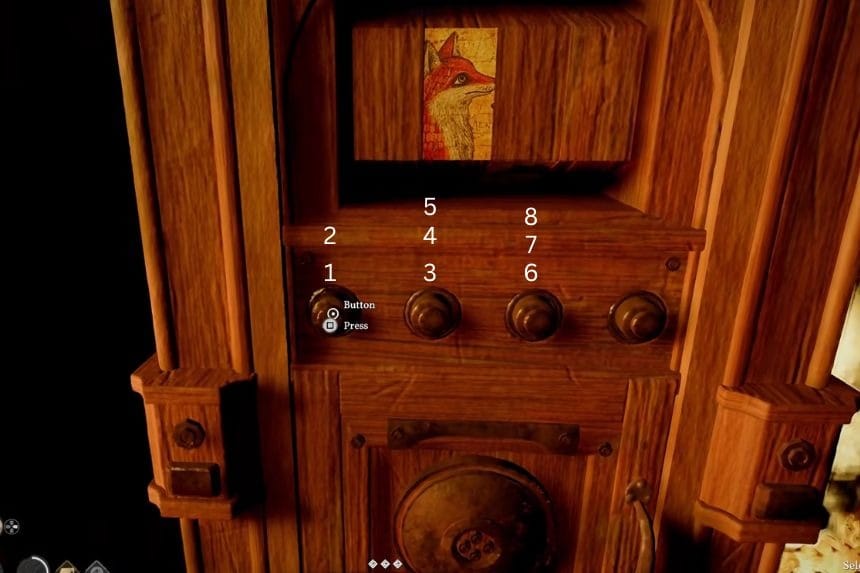
The puzzle has four buttons, but you only need to use the first three. Start by pressing the first button twice, then press the second button three times, and finally press the third button three times. Once you’ve done that, the strongbox will unlock. Once you’ve lined everything up and the image of the two foxes is complete, the strongbox will unlock. Go ahead and open it to collect your reward, the Ancient Earring.
Sungrove Manor
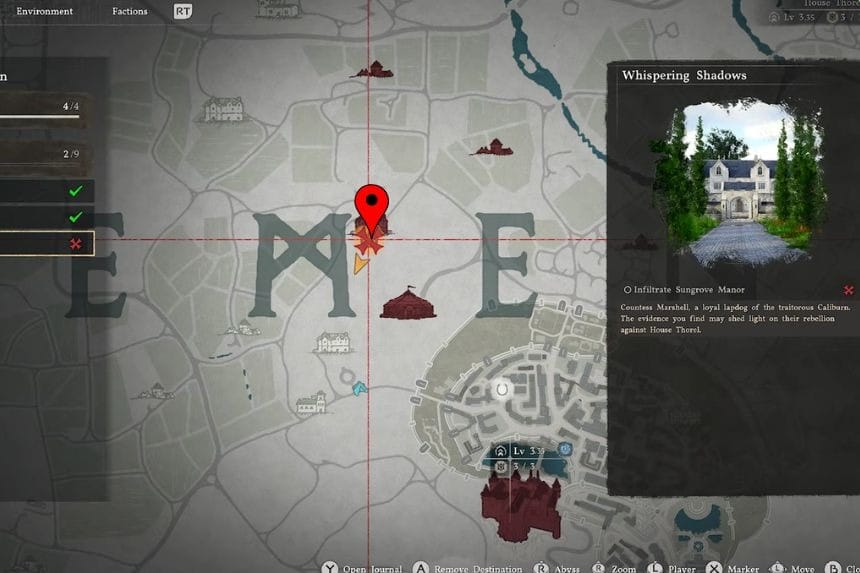
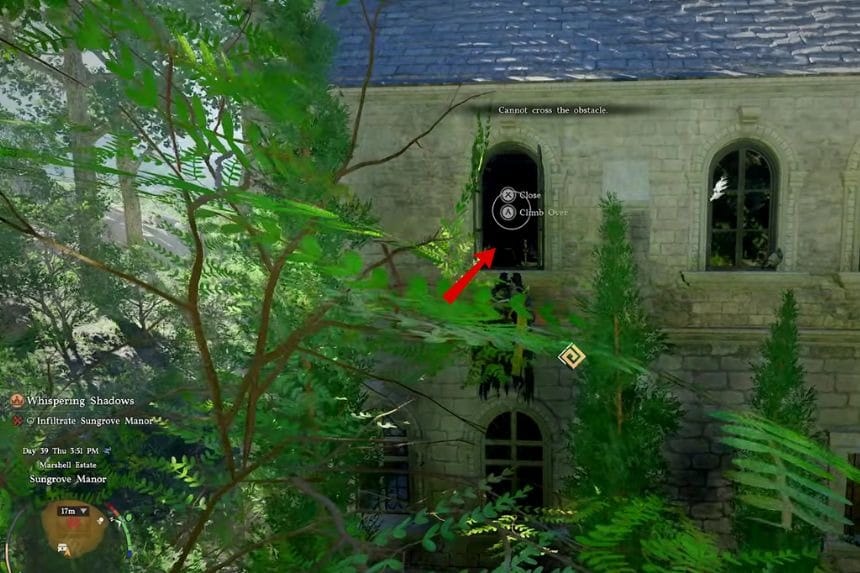
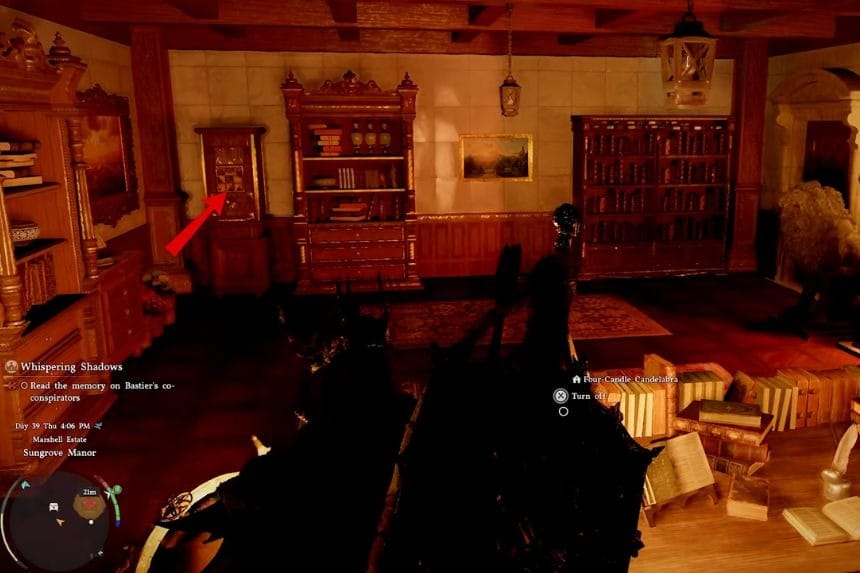
You’ll find this strongbox on the second floor of Sungrove Manor, which is located northwest of the city of Demeniss. To get in safely, go around to the back of the manor on the southeastern side where there are no guards. Climb up the wall and enter through the window. As soon as you’re inside, you’ll see the strongbox right on your left.
Sungrove Manor Puzzle Location
To open the Sungrove Manor strongbox, you need to slide the panels around until they form the image of an eagle. Since the puzzle starts in a different layout each time, there isn’t a fixed set of moves you can follow. Instead, focus on slowly arranging the pieces so they match the final eagle image. Take your time with it; you can make as many moves as you need, so there’s no rush. Once the image is complete, the strongbox will unlock.
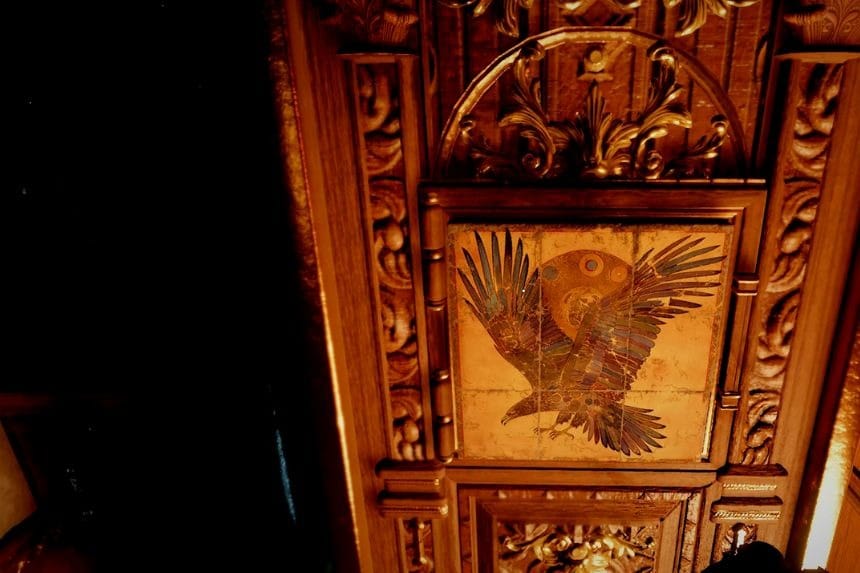
You can rotate each square either clockwise or anticlockwise using the button prompts shown on your screen. Just focus on one square at a time and keep rotating it until it matches the correct part of the final image. Once all nine squares are lined up properly, the strongbox will open. After solving the Sungrove Manor puzzle, you’ll receive the Sungrove Manor Key as your reward.
Reventine Monastery
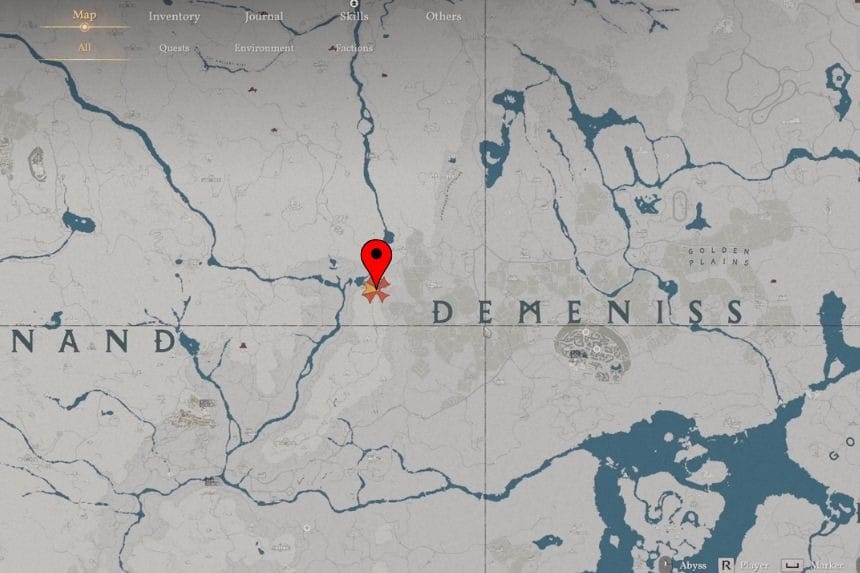
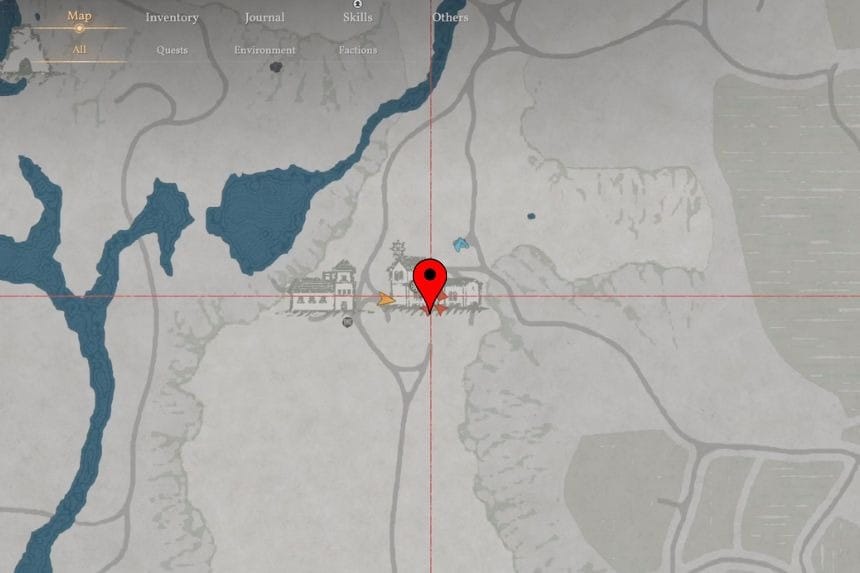
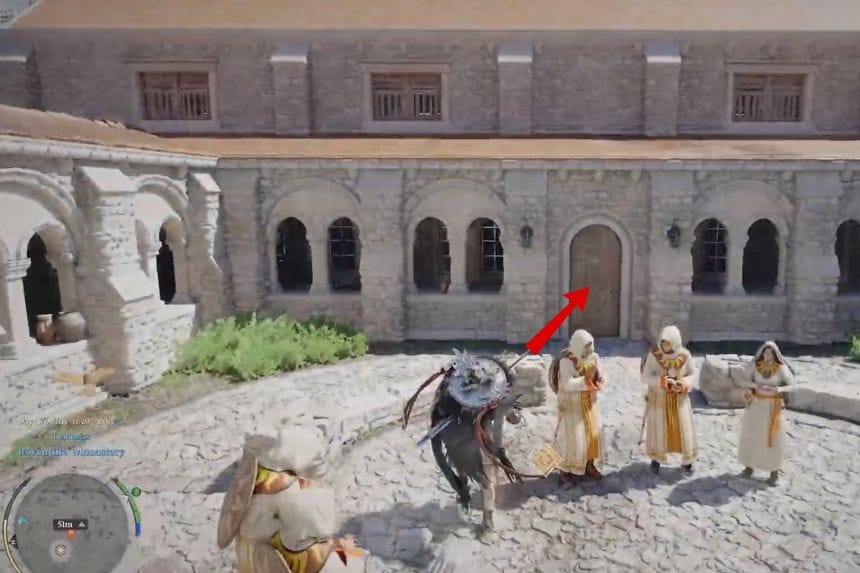
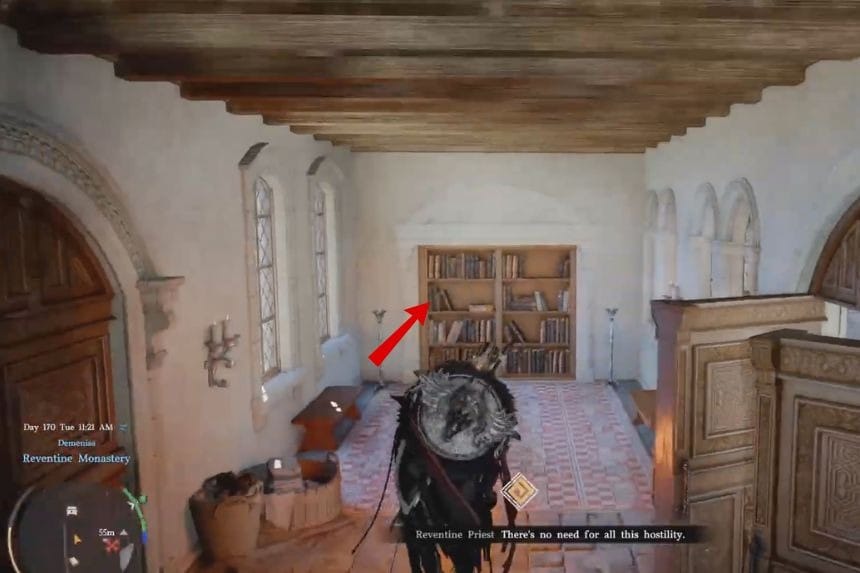
You’ll find this strongbox inside Reventine Monastery, which is located on the west side of Demeniss. Once you’re inside the monastery, head to the southeast corner and look for a bookshelf against the wall. Go up to it and interact with it will move and reveal a hidden room. Walk through into that secret room, and you’ll find the strongbox along the wall on your left.
Reventine Monastery Puzzle Solution
To solve the Reventine Monastery strongbox, you need to slide the panels around until they form the image of a castle.
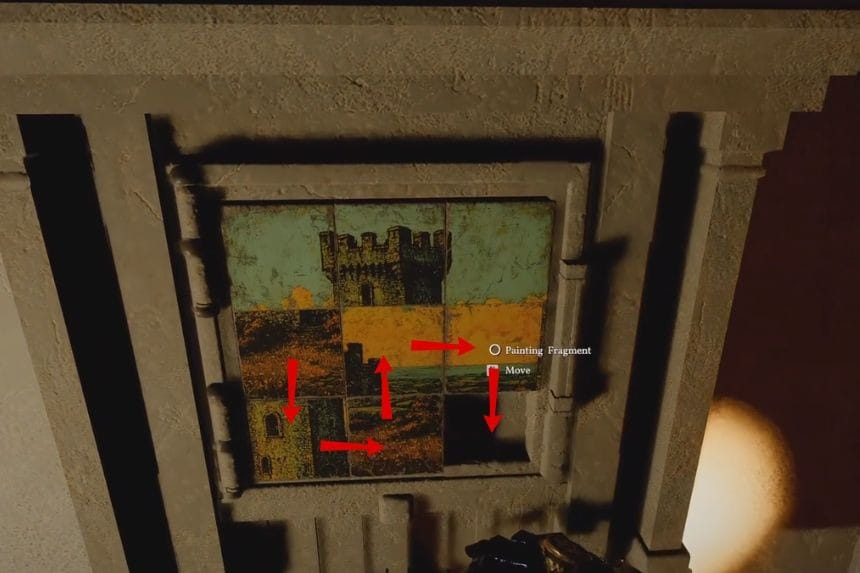
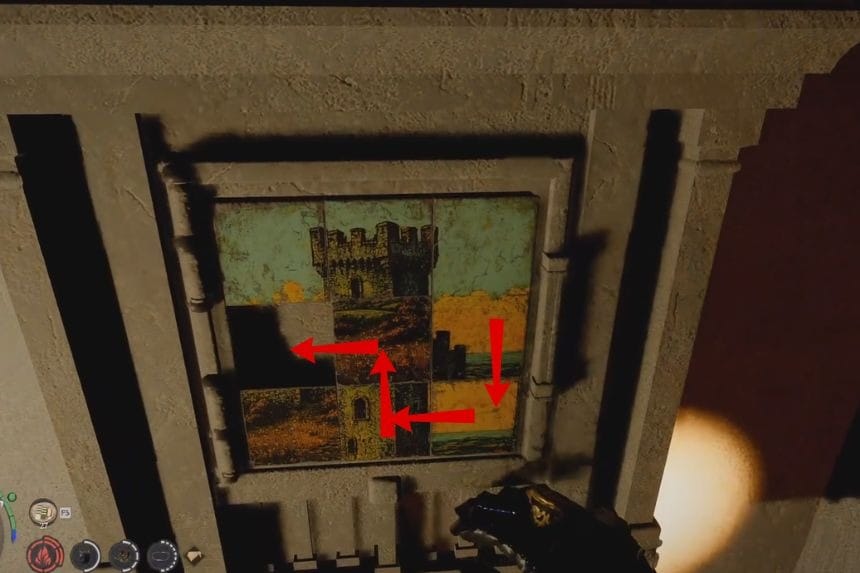
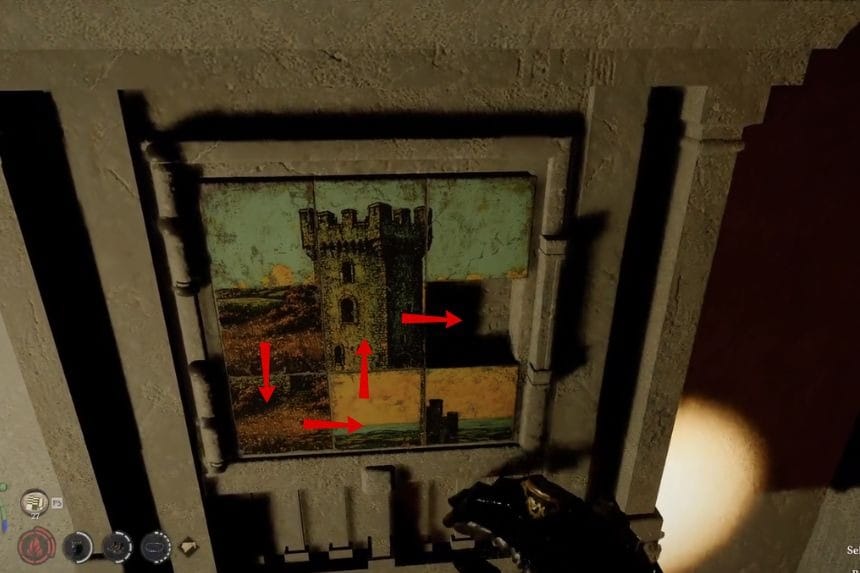
Start by moving the middle-right tile down, then slide the centre tile to the right. After that, move the bottom-middle tile up, followed by the bottom-left tile to the right. Next, slide the middle-left tile down into the corner and move the center tile back to the left. Now bring the bottom-middle tile up into the centre of the puzzle, then move the bottom-right tile to the left. After that, slide the middle-right tile down again and move the center tile to the right.
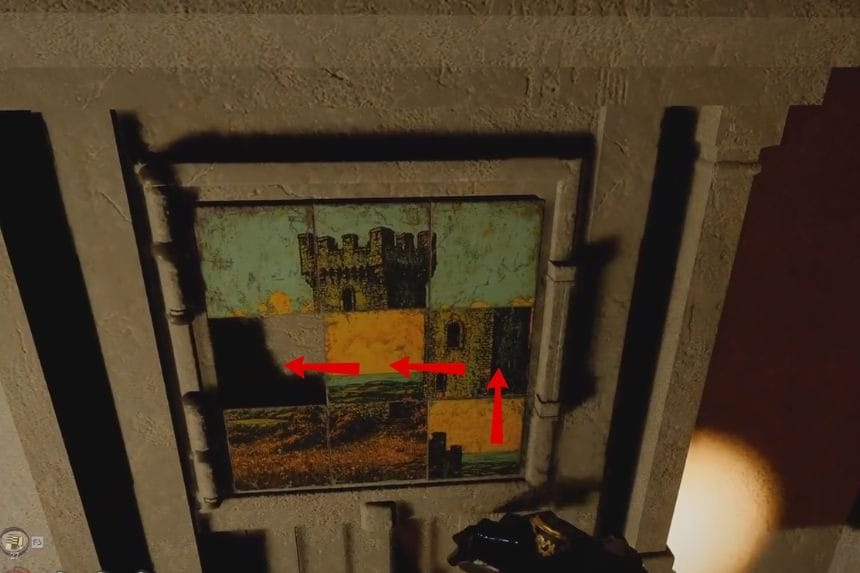
Continue by moving the bottom-middle tile up, then slide the bottom-left tile to the right. Move the middle-left tile down once more and shift the centre tile back to the left. Then move the middle-right tile to the left. Finally, slide the bottom-right tile upward to complete the image. Once everything lines up into a castle, the strongbox will unlock. Once you open the strongbox, you’ll receive the Reventine Monastery Exclusive Document.
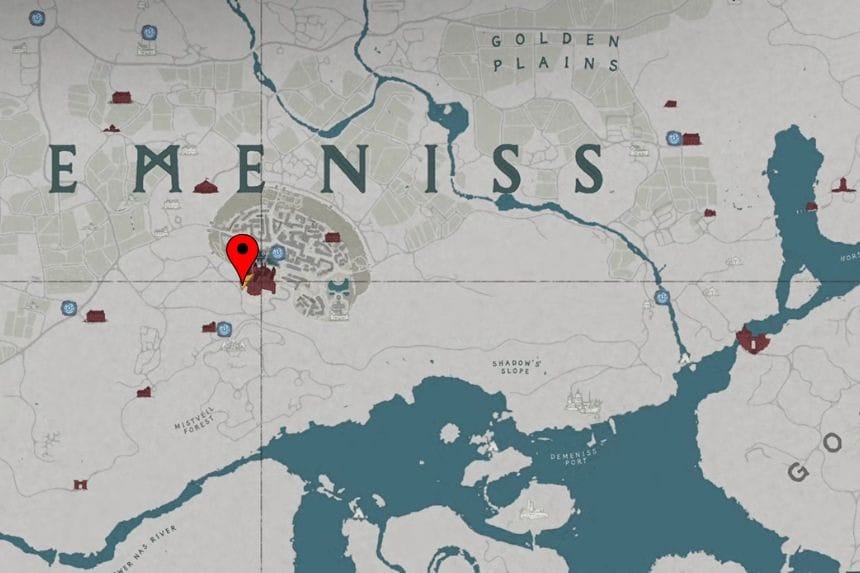
City of Demeniss

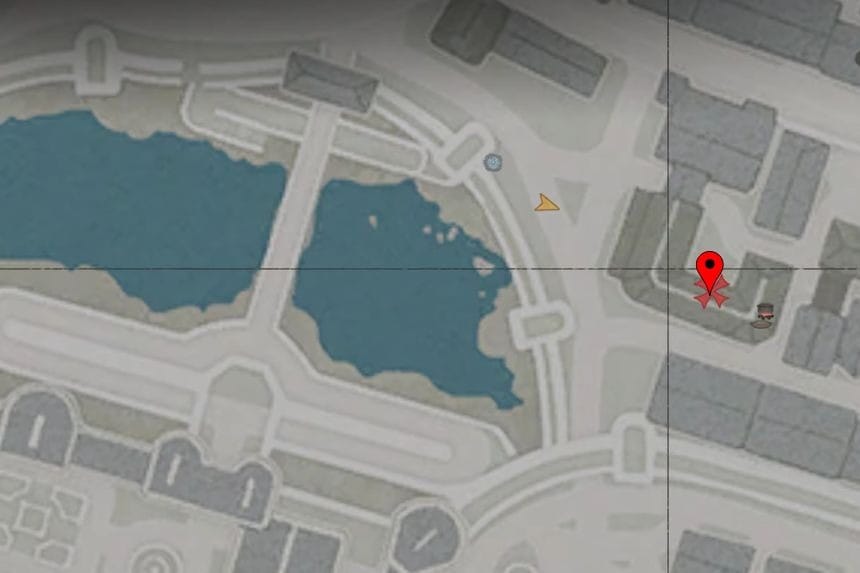
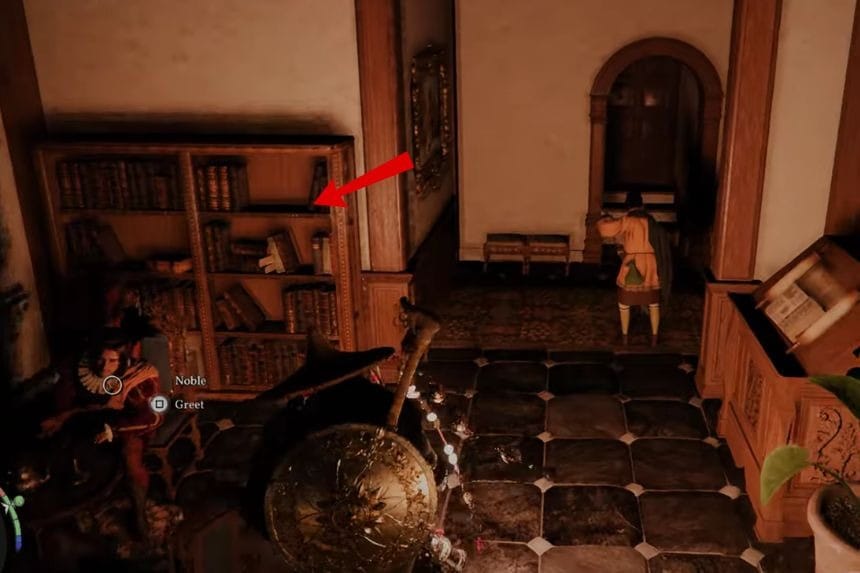
You can find this strongbox inside the City of Demeniss, on the northeast side. It’s located in a manor along the inner north wall of the city, hidden behind a bookshelf on the ground floor. The area is guarded, so you’ll either need to sneak in carefully or deal with the enemies first. If you enter from the north side, you’ll have a better chance of getting inside unnoticed.
City of Demeniss Puzzle Solution
Start with the leftmost wheel and move toward the right. You’ll need to lower each wheel the correct number of times to line everything up. The first wheel should be lowered 3 times, the second 4 times, the third 2 times, the fourth 5 times, and the fifth 2 times. Once all of them are set correctly, go ahead and press the switch on the right to complete the puzzle.
Demeniss Tribinual

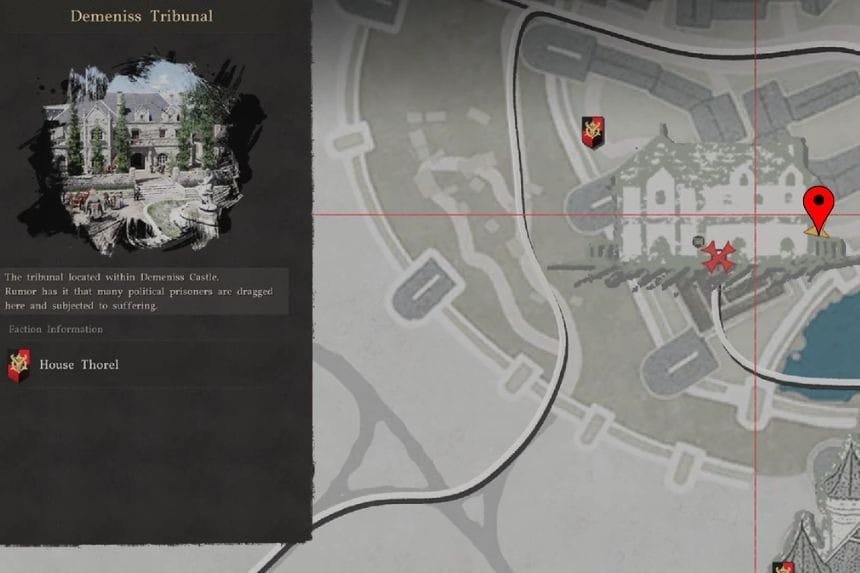
You can find this strongbox in a hidden room on the second floor of the Demeniss Tribunal, located on the southwest side of the City of Demeniss. To reach it, climb in through the window from the room that connects to the tower.
Demeniss Tribinual Puzzle Solution
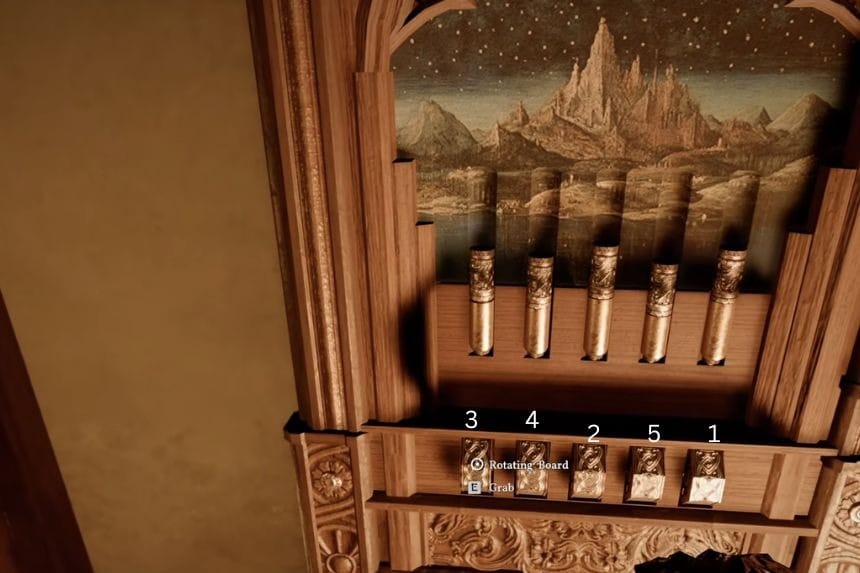
To solve the Demeniss Tribunal strongbox puzzle, you need to press the keys in the correct order so they match the tune shown on the side of the box. Start by hitting the bottom third key, then the bottom first key, followed by the top second key. After that, press the bottom third key again, then the bottom second key, and next the top third key. Finally, finish with the top first key. Once you play the sequence correctly, the strongbox will open, and you’ll receive the Golden Deer’s Tear as your reward.
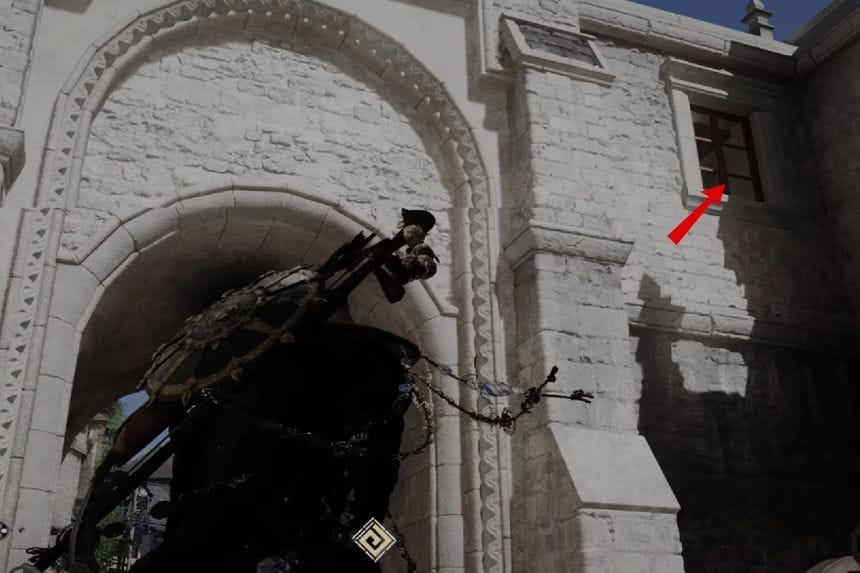
Brookfield Manor

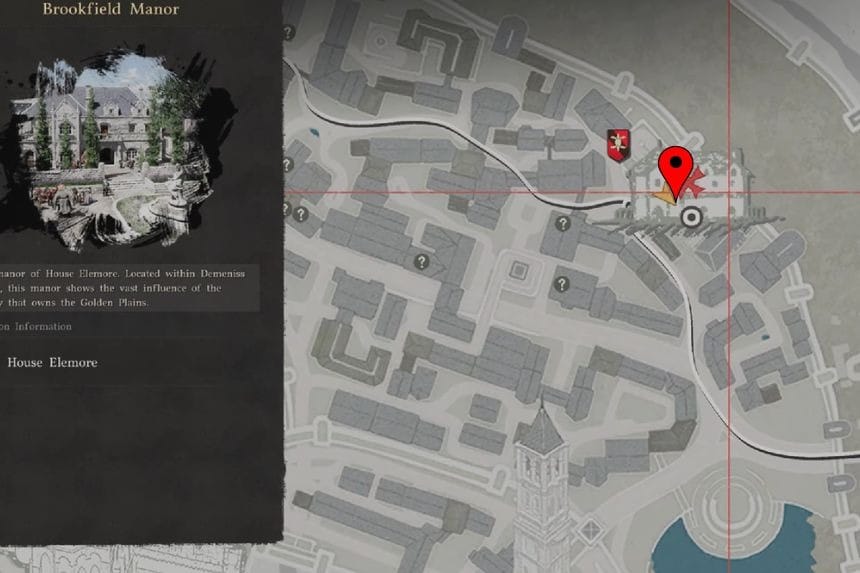

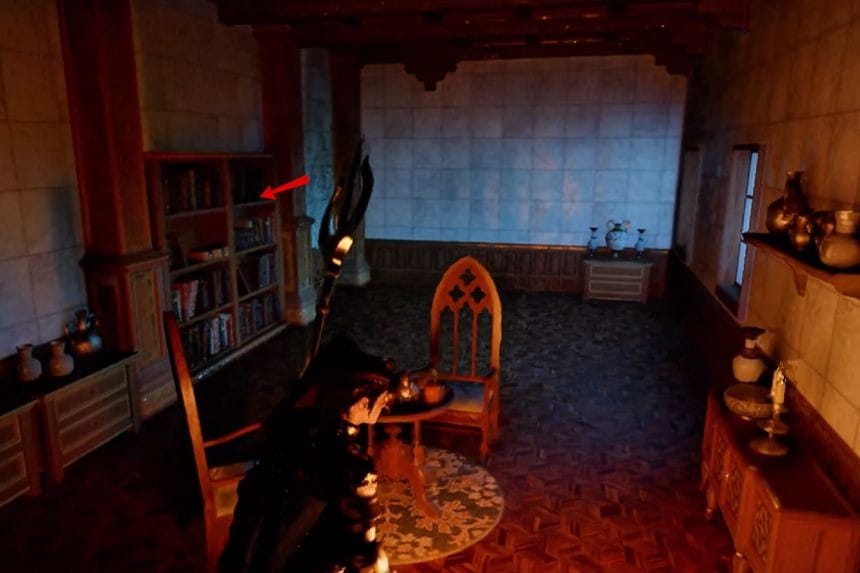
You’ll find this strongbox on the second floor of Brookfield Manor, located on the northeastern side of Demeniss. It’s hidden behind a rotating bookshelf inside one of the rooms. Since the guards won’t let you in through the front door, the easiest way is to climb up to the second-floor balcony and enter through a window. Alternatively, if you have a key, you can also use the second-floor door to get inside.
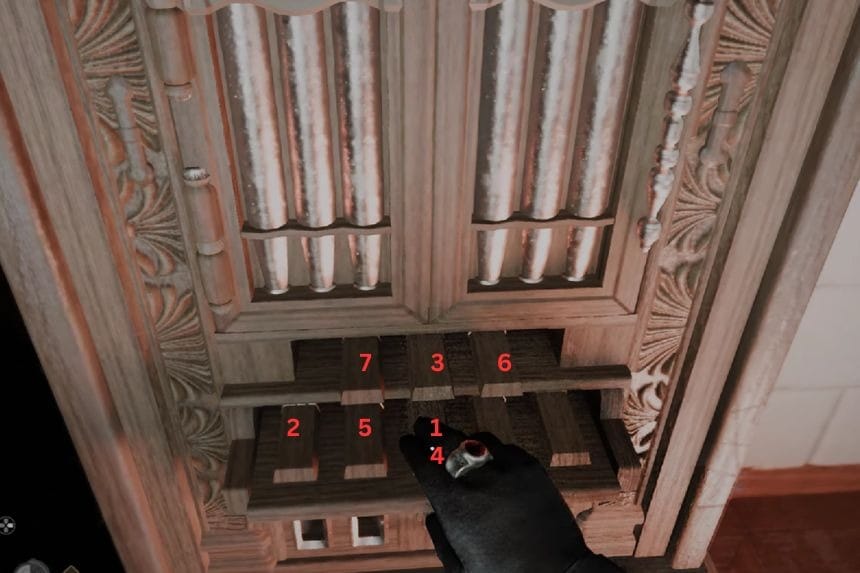
Brookfield Manor Puzzle Solution
This is a musical puzzle with two rows of keys:
- 3 keys on the top row
- 5 keys on the bottom row
You can listen to the tune using the device on the side, but if you want the quick solution, just press the keys in this order:
Top row third key > bottom row third key > bottom row fourth key > bottom row fifth key > bottom row fourth key > bottom row third key > bottom row fifth key. If done correctly, the tune will play, and the strongbox will unlock. Once opened, you can take the item inside. The reward is a recipe for an Extravagant Meal, which lets you craft a high-quality dish.
Eastern Court
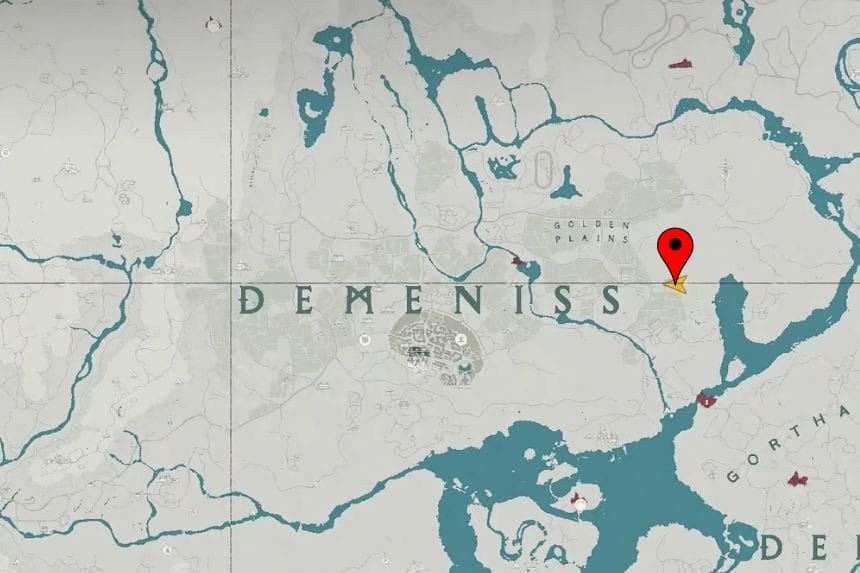
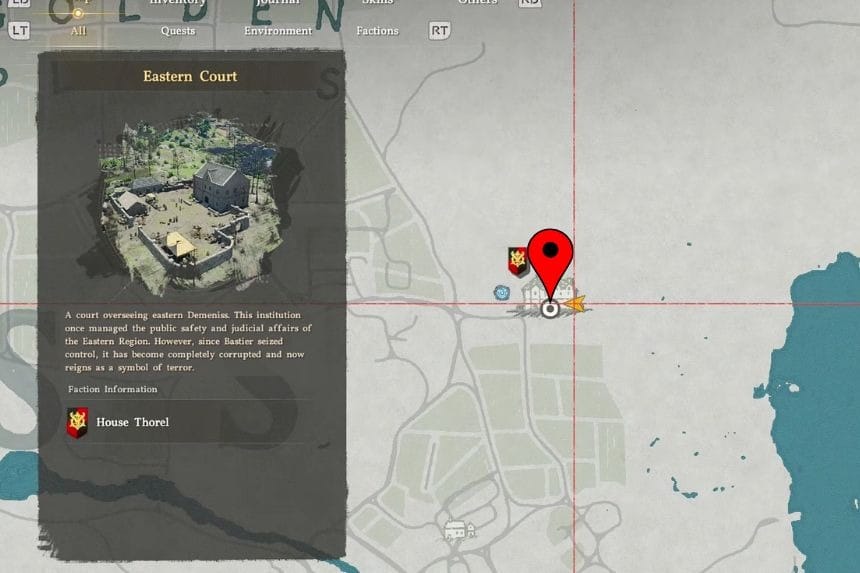

You’ll find this strongbox underground in the basement of Eastern Court, which is located east of the city of Demeniss. Since the ground floor is heavily guarded, it’s best to go around to the back of the manor where no one is watching. From there, climb up the wall to a second-floor window and enter the building quietly.
Eastern Court Puzzle Solution

To open the Eastern Court strongbox, you need to carefully turn the dial in both directions. Start by turning it to the right (clockwise) and keep going until you hear a clicking sound, then stop. After that, turn it to the left until you hear another click, and stop again. Once you do this correctly, the strongbox will unlock. Inside, you’ll get the Necklace of Lightning as your reward.
Demeniss Castle
You’ll find this strongbox on the first floor of Demeniss Castle, in the southwestern corner, hidden behind a rotating bookshelf. To get inside without being spotted as Kliff, climb up the castle walls and then glide down toward the side entrance. From there, you can slip in through the side door without alerting any guards.
Demeniss Castle Puzzle Solution
To open the Demeniss Castle strongbox, you need to press the buttons in the correct order so they form the image of two deer.
Start by pressing the fourth button four times. Then move to the first button and press it four times as well. After that, press the second button twice, and finally press the third button four times.
If you’ve done everything correctly, the image will line up into two deer and the strongbox will unlock. Open it to collect your reward, the Ogre’s Ring.
Eastern Hills
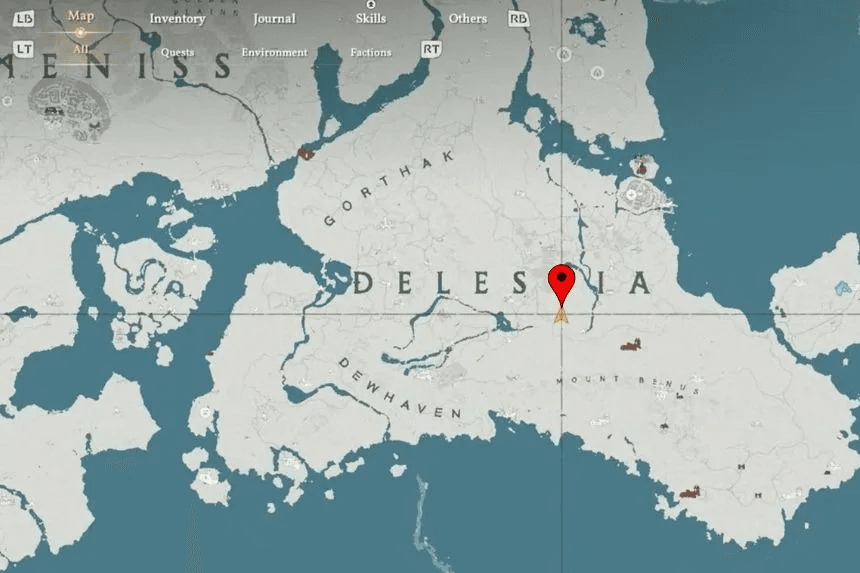
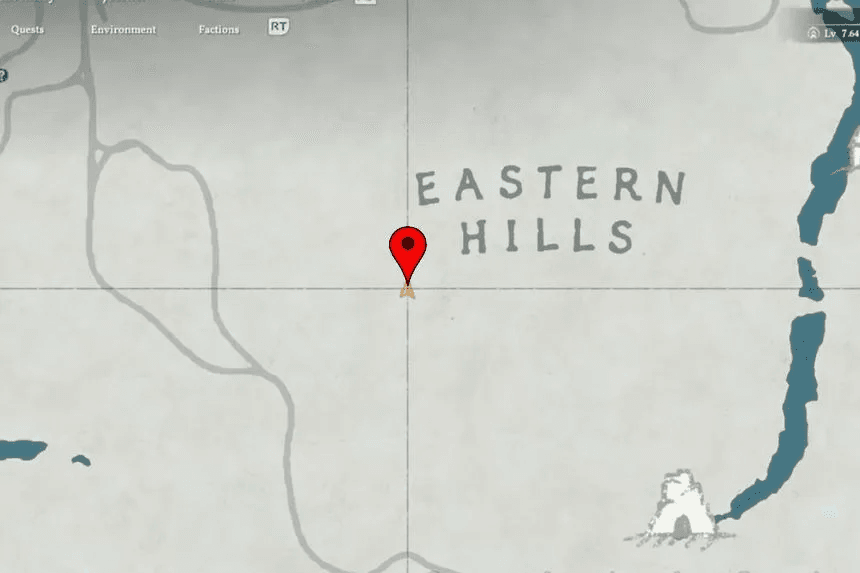

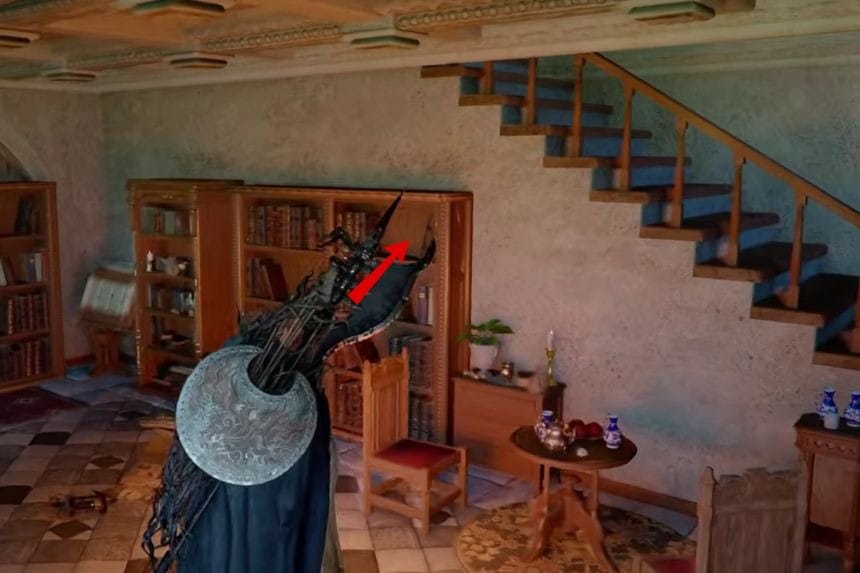
You’ll find this strongbox inside a small, unmarked house in the Eastern Hills of Delesyia. Head inside and look on the first floor for a rotating bookshelf. Move it aside, and you’ll discover the hidden strongbox behind it.
Eastern Hills Puzzle Solution
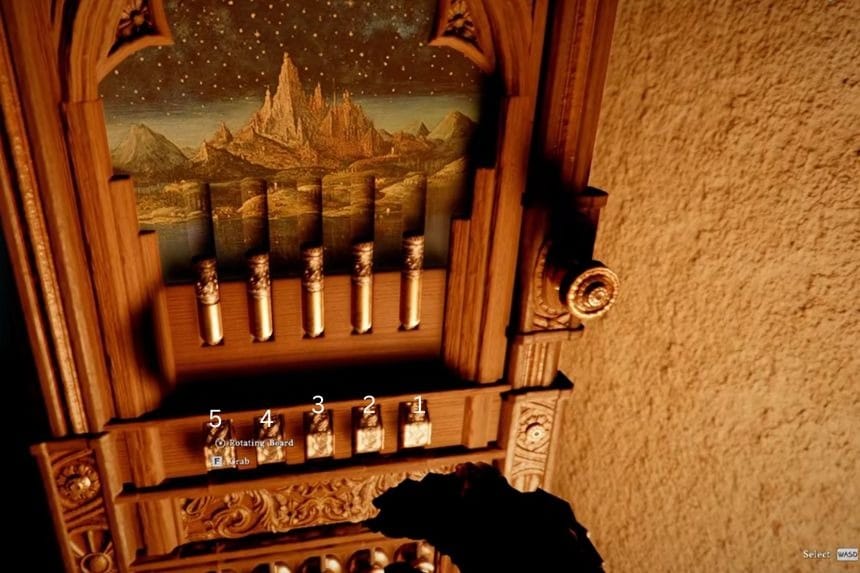
Interact with it to start the puzzle. Begin by rotating the first dial five times. Then move to the next one and rotate it four times. After that, rotate the third dial three times, the fourth dial two times, and finally rotate the last one just once. Once everything is set, press the button to unlock it. The strongbox will open, and you can collect your reward.
Delesyia Castle
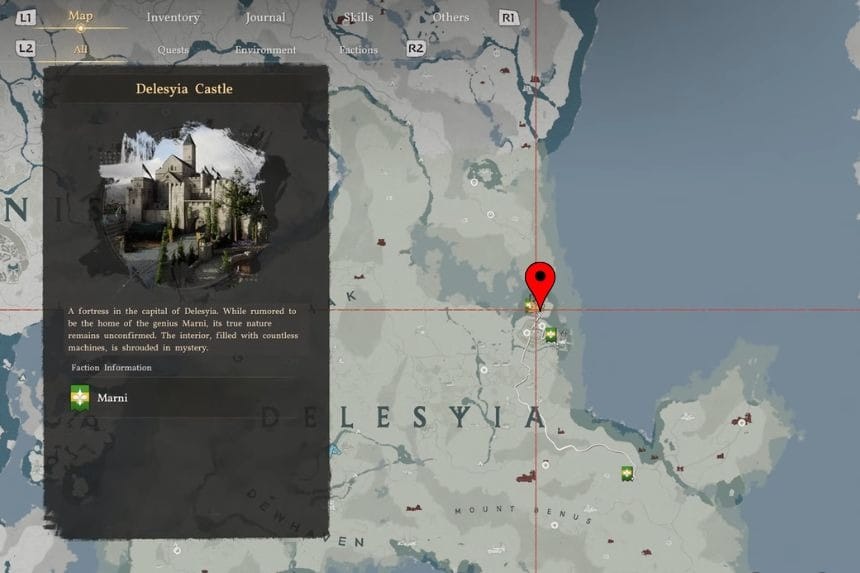
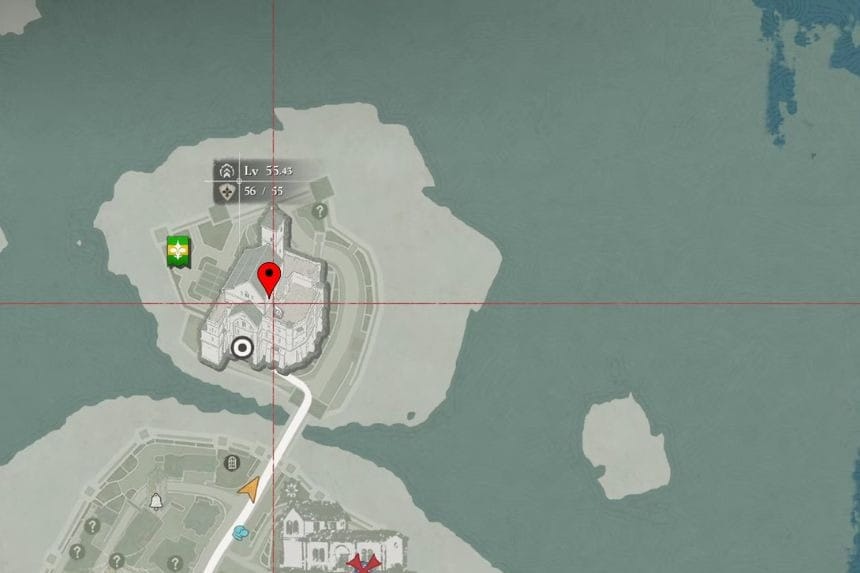
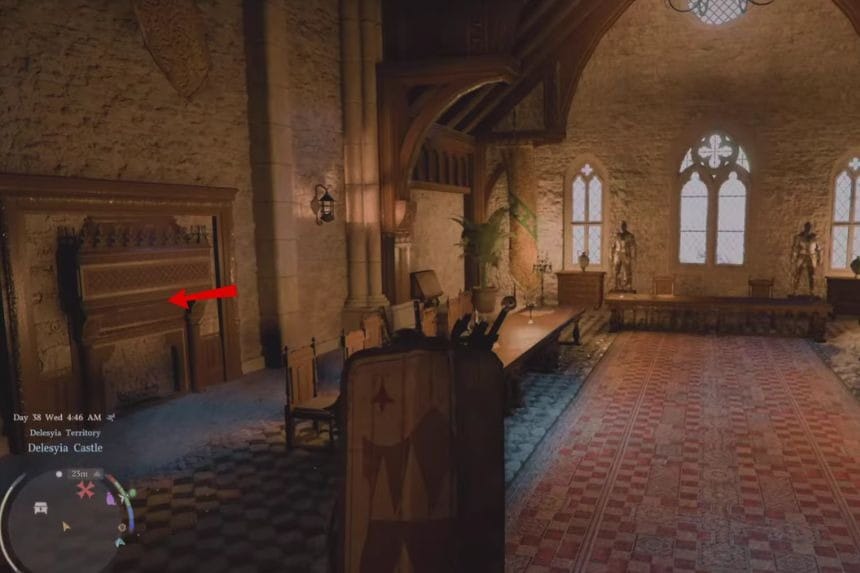
You’ll find this strongbox in the dining hall of Delesyia Castle, hidden behind a rotating bookshelf. To get inside the castle, equip the Visione helmet first, then climb up the castle walls and enter through the rooftop door. Once you’re in, head to the dining hall to find the strongbox.
Delesyia Castle Puzzle Solution
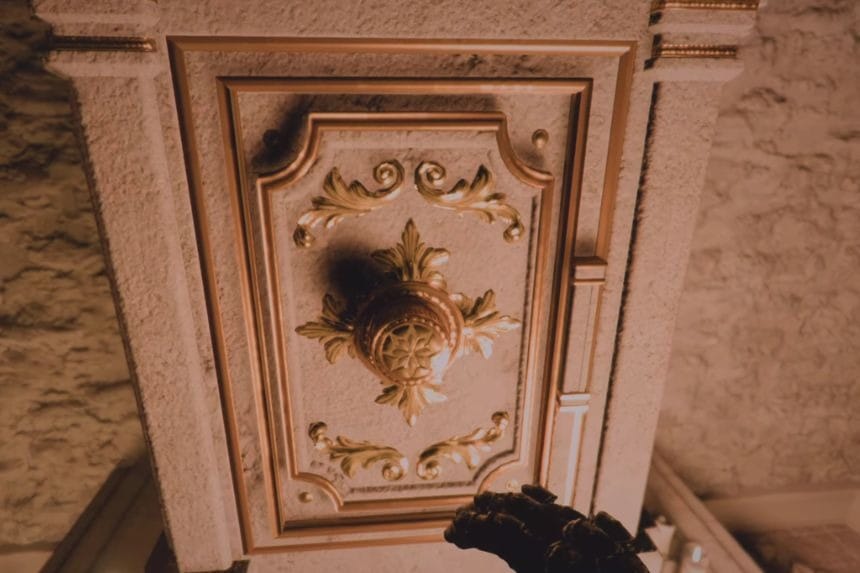
To open the strongbox in Delesyia Castle, you need to solve its simple lock. First, turn the dial to the right (clockwise) until you hear a clicking sound, then stop. Next, turn it to the left (counterclockwise) and again stop when you hear the click. Once done correctly, the strongbox will open. Inside, you’ll get the White Horn’s Earring.
Vat’nholl Fortress
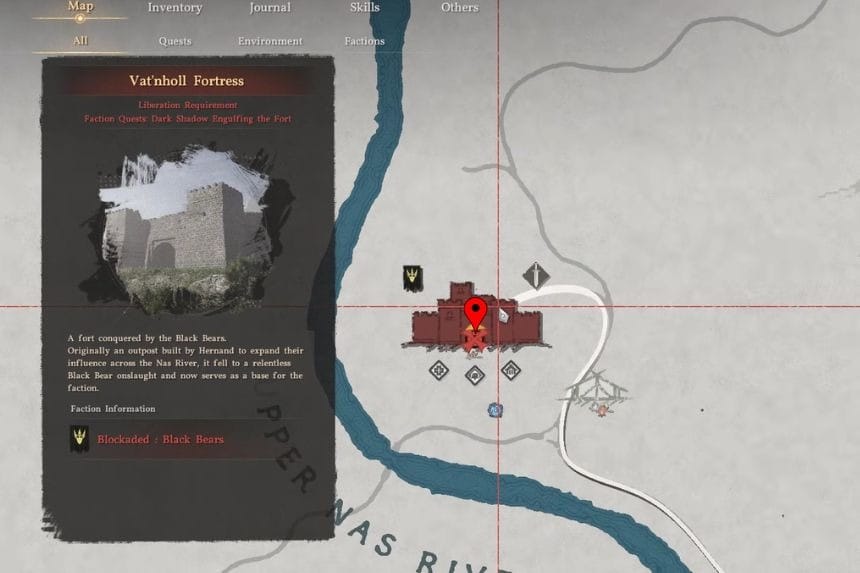
In Vatenhole Fortress, you’ll find a secret strongbox hidden in the area where a boss fight takes place. This location is on the far west side of Pale Yune, and you’ll naturally come here during a quest where you defeat a White Claw enemy.
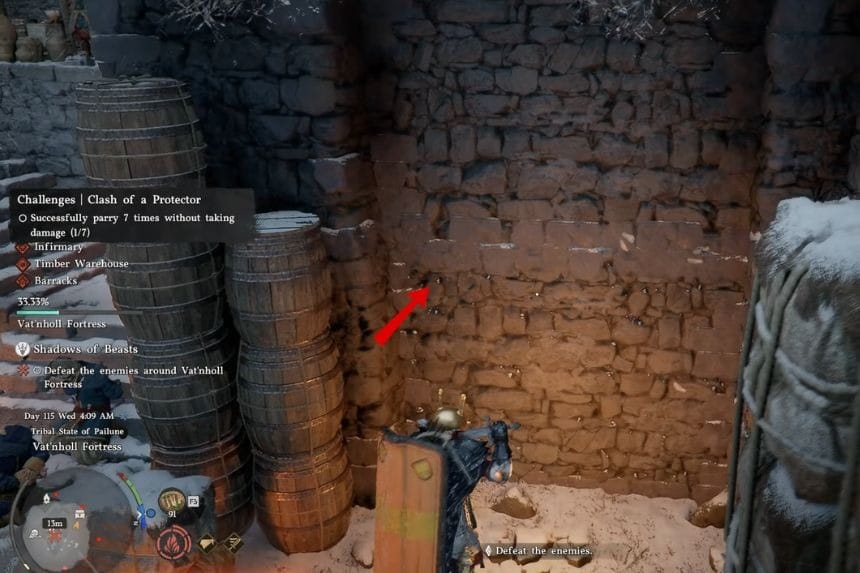
Once the area is cleared, look for a chest icon on the wall inside the same room. You’ll notice a prompt showing that the wall can be forced open. To get inside, jump onto the wall and move slightly down until you’re just above the ground. Then hold your resist key and use force palm on the wall to spin it open, which will drop you into a hidden room with the strongbox.
Vat’nholl Fortress Puzzle Solution
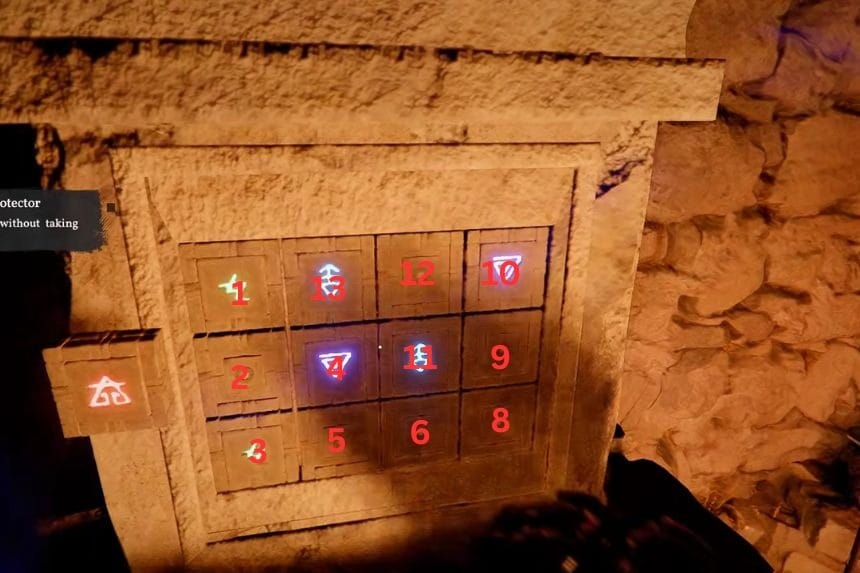
The puzzle inside is all about connecting matching symbols without crossing paths. You start with the green icons, linking them in order to form a straight connection. Then move on to the other symbols, carefully connecting each set step by step until all lines are completed. Once everything is correctly connected, the strongbox will unlock. The reward is a Flame Lantern, which is basically a cosmetic lantern skin.
Whisperleaf Fortress

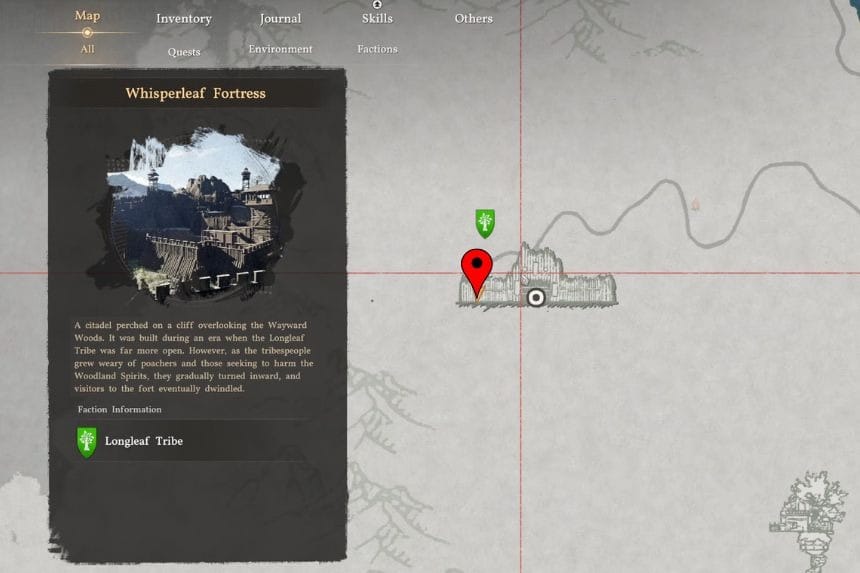
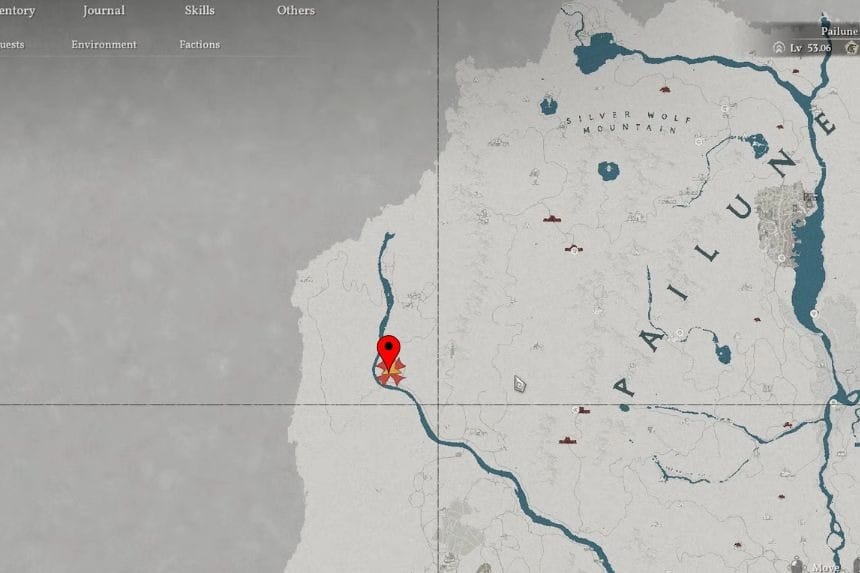
The strongbox is beneath Whisperleaf Fortress. You’ll find this fortress to the west of the Silver Wolf Mountains in the Pailune region on the main map.
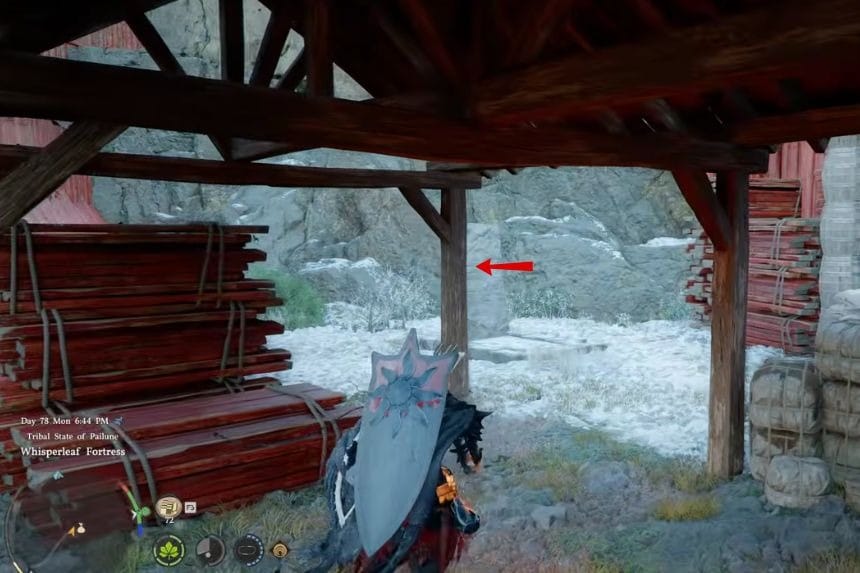
To get it, enter the fortress from the northern side and follow the path on your left all the way down toward the southern end. Behind the tower at that spot, you’ll see a stone stele. Use your Force Palm ability on it, and it will open a hidden hatch leading underground where the strongbox is kept.
Whisperleaf Fortress Puzzle Solution
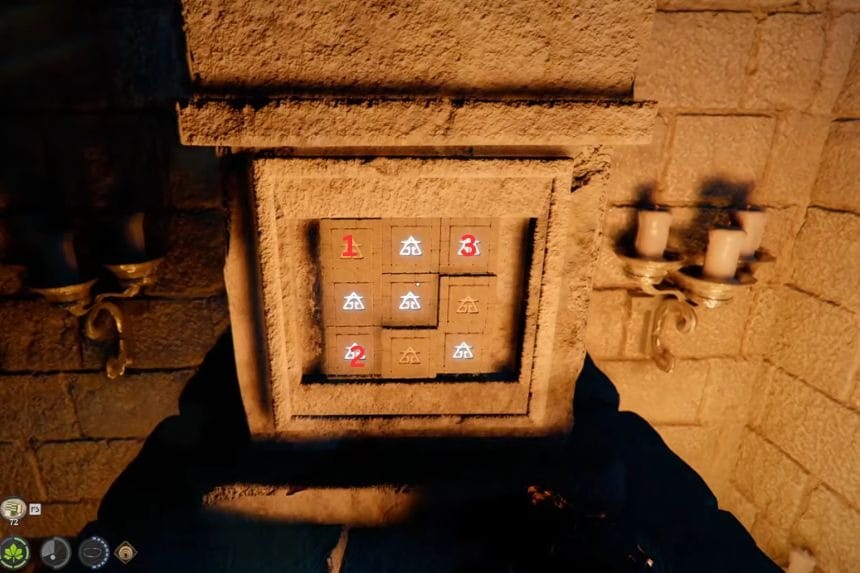
To solve the Whisperleaf Fortress strongbox, the goal is to light up all nine buttons so they all glow. Start by pressing the top left button, then move on to the top right, and finally press the bottom left button. Once you’ve done this correctly, the puzzle will be completed, and the strongbox will open. Inside, you’ll be rewarded with the Ring of Lightning.
Scholastone Institute
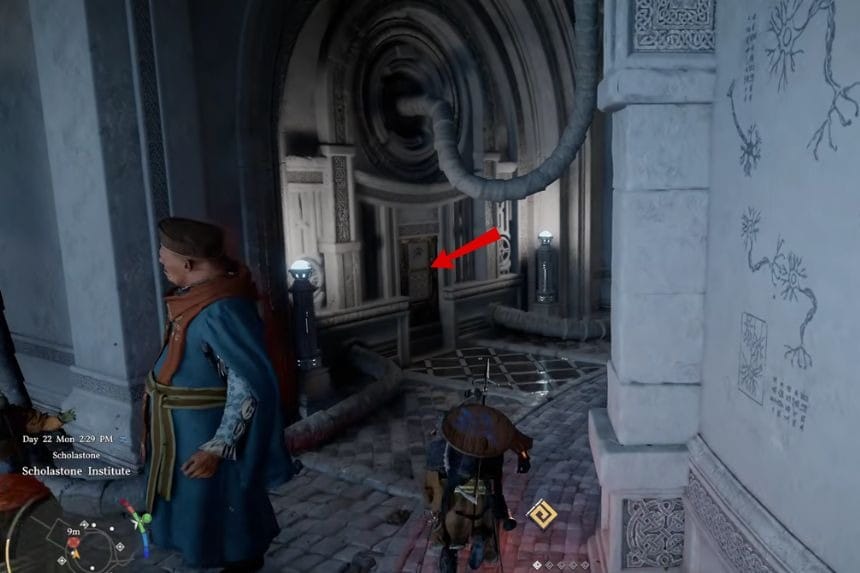
After you reach the Scholastone Institute and talk to the Dean, you’ll be asked to help Octavius with his experiment, which involves solving the Scholastone puzzle. To begin, you need to find the lock device switch hidden underground. Head south, drop down to the lower ledge, and then go up the stairs into the large chamber. Once you move around the corner, you’ll spot a square panel with buttons.
Scholastone Institute Puzzle Solution
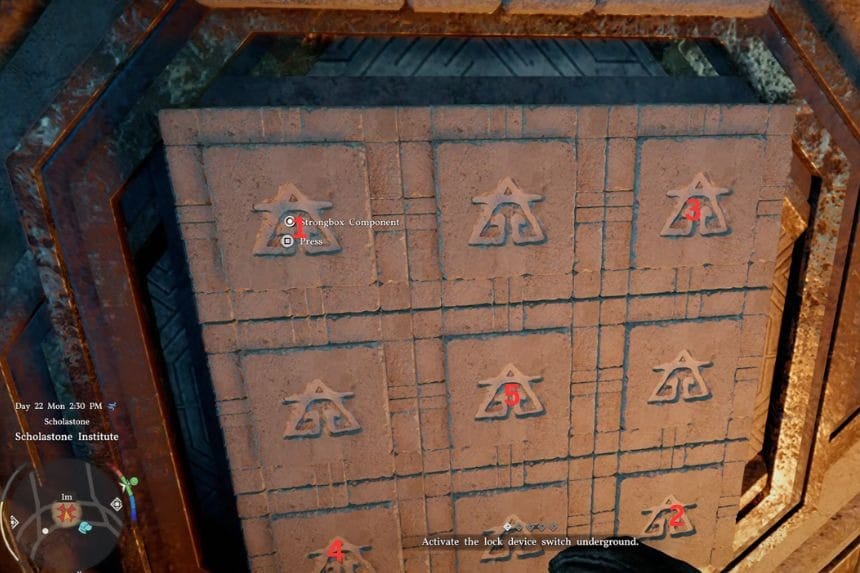
Once you reach the puzzle, you need to press the buttons in a specific order. Start with the top left button, then press the bottom middle one. After that, press the bottom left, followed by the bottom right, and finish by pressing the top left again. If done correctly, the device will activate and unlock successfully. Once you’ve finished the puzzle, the wall panel will drop down and reveal a handle. Just interact with it to turn the power on. After that, head back up the stairs to where Octavius is waiting.
Church of the West Demeniss
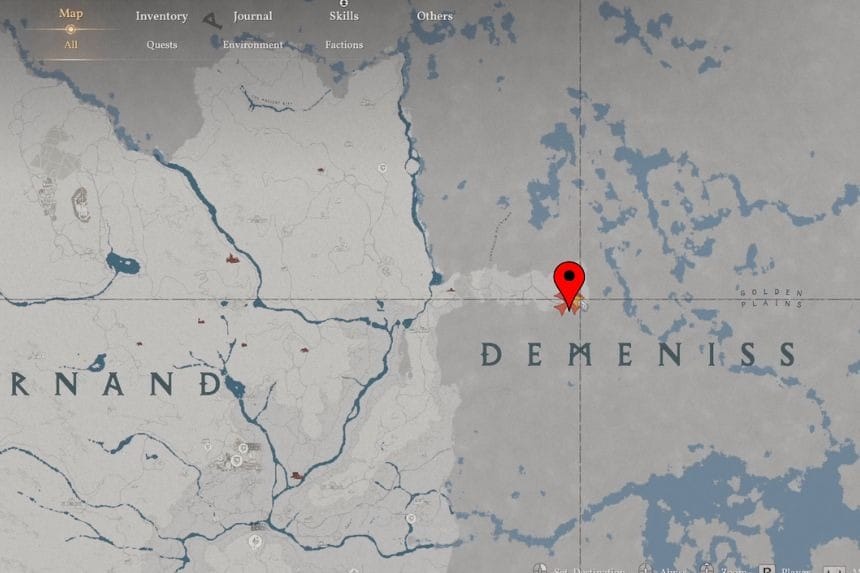
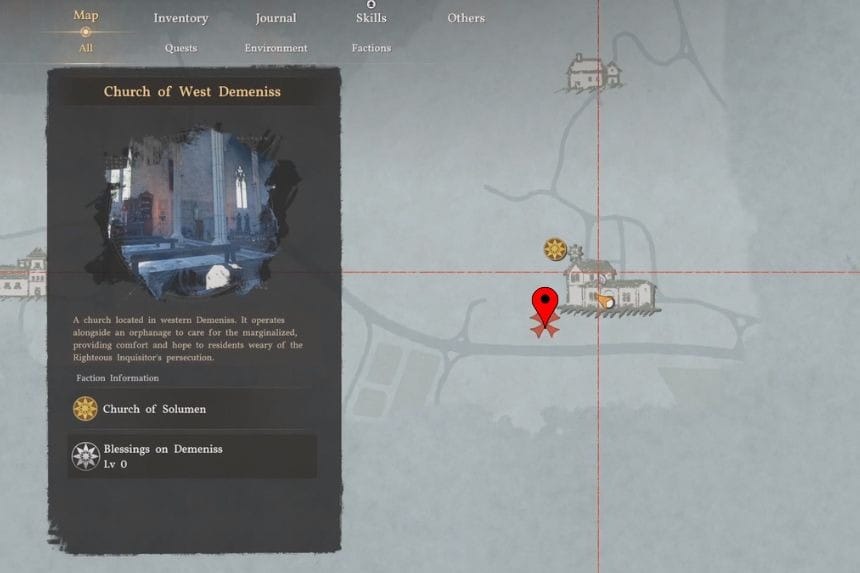
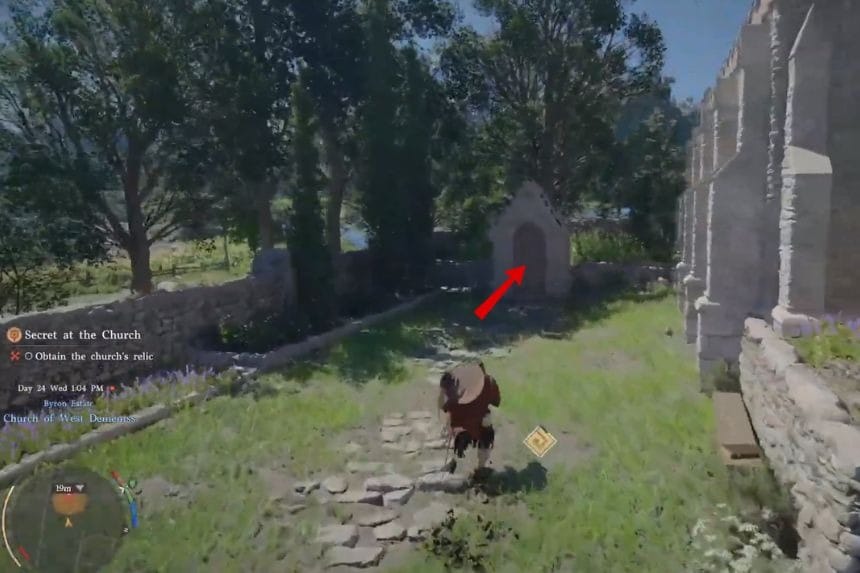
You can find this strongbox in the Church of West Demeniss, located in the Byron Estate. It becomes available as part of the “Secret at the Church” main quest. Just progress through the quest, and you’ll come across it while exploring the church area.
Church of West Puzzle Solution
To solve the strongbox in the Church of West Demeniss, you need to press the buttons in the correct order: start with the lower right box, then move to the upper left, followed by the lower left, and finally press the upper right box. Once done correctly, the strongbox will open and you’ll receive the Dagger of Radiance as your reward.
Arboria Castle
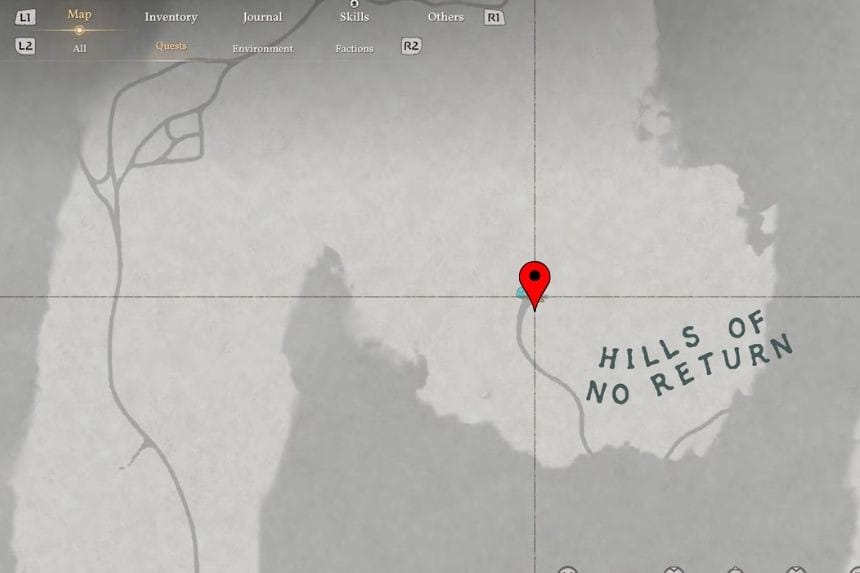
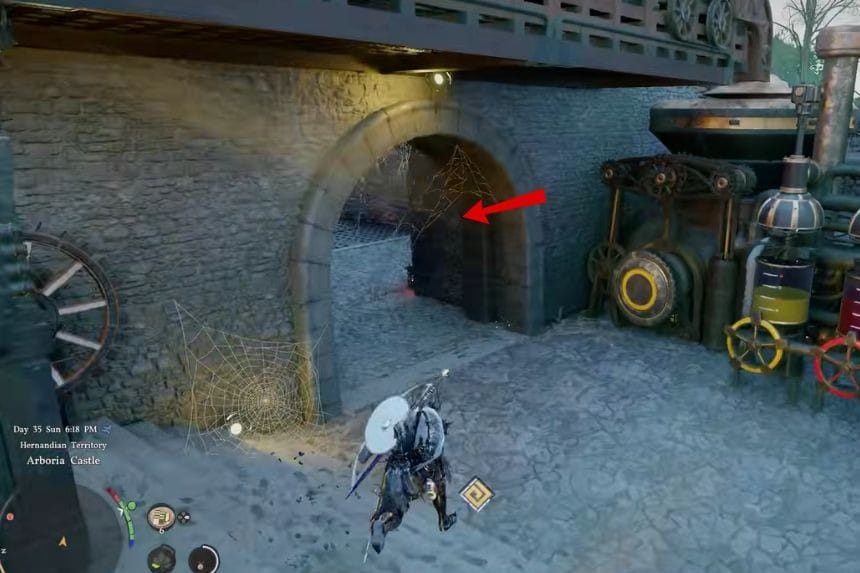
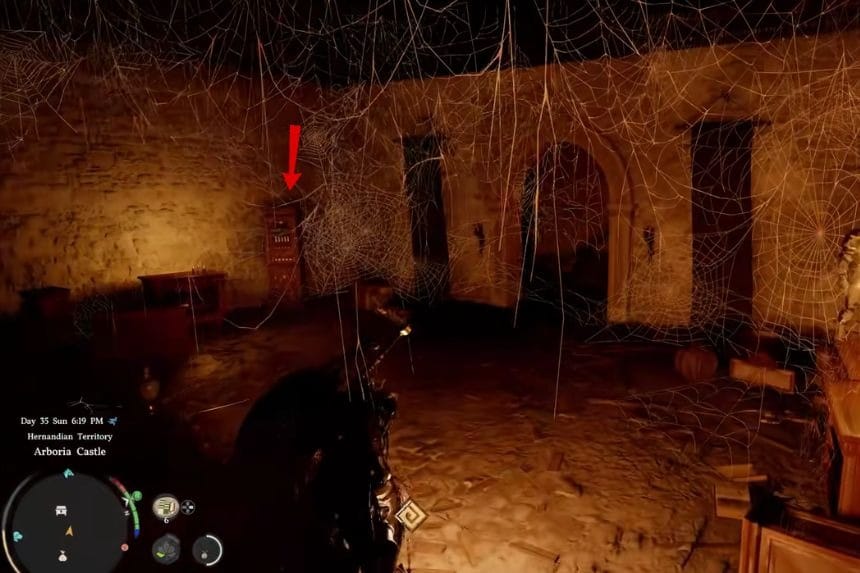
You’ll find this strongbox at the lower level of Arboria Castle. Arboria Castle is located in the middle of the Hills of No Return, north of Hernand, and you’ll need to cross the Hook Rapids to get there. Once you arrive at the castle, go to the drawbridge and then take the path to the right, where you’ll go down a set of stairs. From there, turn left and keep moving forward until you reach a room. Inside that room, go left again and head up the stairs, and you’ll find the strongbox waiting there.
Arboria Castle Puzzle Solution
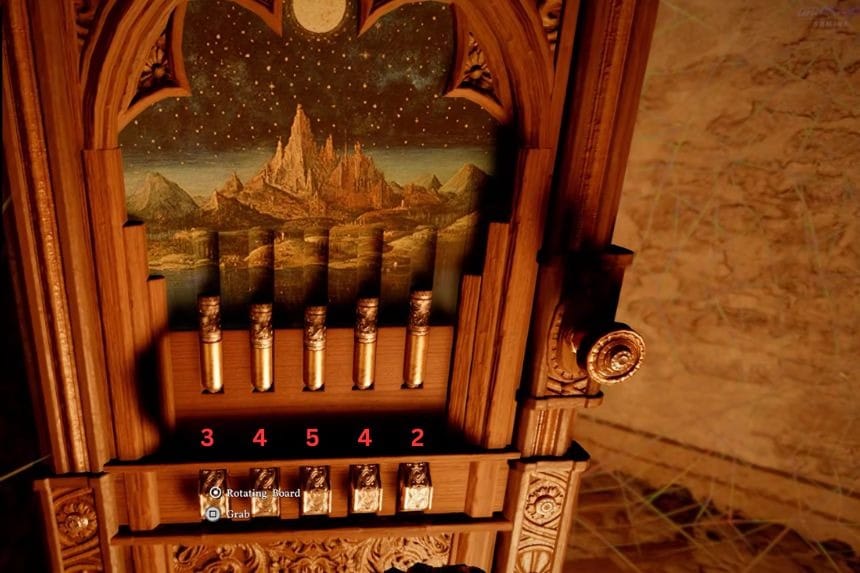
The puzzle is all about adjusting a set of rotating panels. You need to press each one a certain number of times so they line up correctly. Start with the left panel and press it 6 times, then move to the next one and press it 8 times. After that, press the third panel 10 times, then the next one 8 times, and finally the last panel 4 times. Once all the panels are aligned, the strongbox will open. Inside, you can turn the mechanism and claim your reward.