
The Avowed Delemgan Queen offers a significant challenge with her demanding strategic setup and skilled execution. This guide will arm you with the skills to triumph over this multi-stage boss fight, from knowing her attack patterns and maximizing your companions’ abilities to the key items and figuring out each stage’s intricacies. Whether you’re finding it hard to survive the first wave of minions or need a solid strategy for the final battle, this analysis provides you with useful tips to guarantee your success in the Delemgan Glade.
Delemgan Queen Boss in Avowed
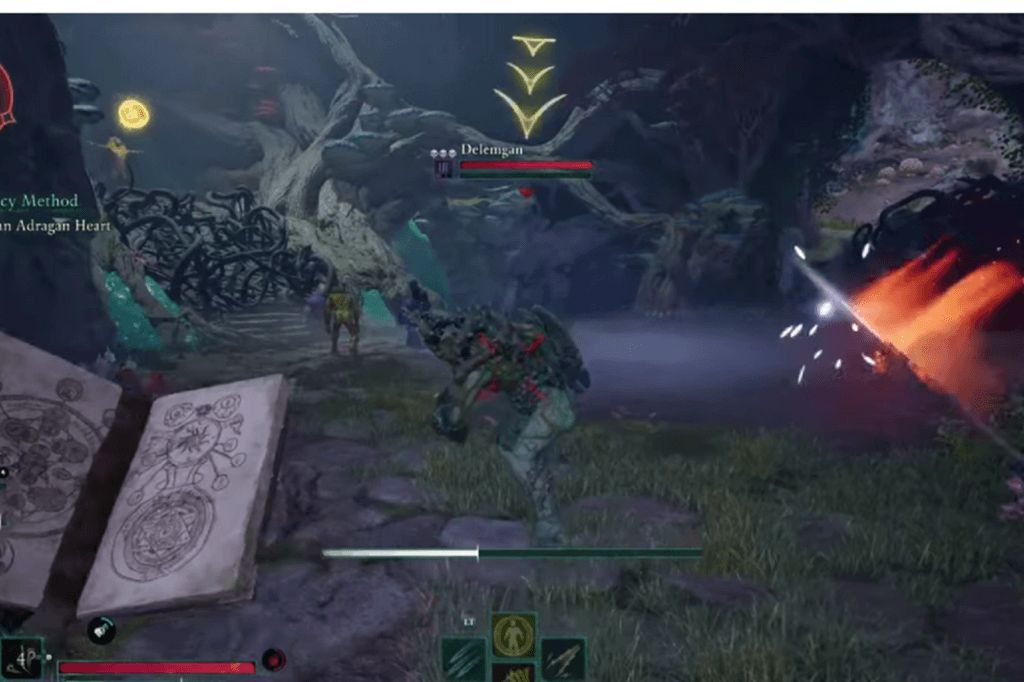
In Avowed, you’re going to run into a tough boss fight with the Delemgan Queen. She’s not alone, either; she brings a bunch of her Delemgan Minions with her, which can make things really hectic if you don’t take them out fast. You’ll find her in the Delemgan Glade, which is east of the Shrine to Skaen. Basically, if you’re heading that way, be prepared for a big fight.
How to Defeat the Delemgan Queen Boss in Avowed
Okay, so you’re about to face this tough boss, the Delemgan Queen, and it’s going to be a multi-stage battle with tons of enemies. To make it a bit easier, we can tweak your companions’ skills before jumping in.
Delemgan Queen Boss Attacks
Here’s the breakdown of the Delemgan Queen’s attacks, and how to counter them:
- Poison Summon:
- Description: She drops and then raises her arm, forming poison pools directly under your allies.
- Counter: Take this time to do as much damage as possible to her while she’s executing the attack.
- Extending Arm Punch:
- Description: She lunges forward with an extended punch, covering a surprising distance.
- Counter: Simply backing up might not be enough. As soon as she begins to move forward, back up further and prepare to dodge to the side.
- Double Arm Smash AOE:
- Description: The Queen raises both arms, which stretch, and then slams them down, creating a large red circle AOE.
- Counter: Immediately move outside the red circle to avoid the impact.
Companions Abilities
For Marius, you’ll want to focus on his “Binding Roots” ability. Basically, you’re going to want to upgrade it so it can hit a bunch of enemies at once and stun them more easily. Think of it as turning his roots into a big, sticky trap for the bad guys.
Use Marius’ “Binding Roots” to basically freeze them in place. That way, they can’t move or attack, and you can deal with all the other annoying enemies first.
The good thing about melee enemies is that they’re usually easier to handle. You can block their attacks, dodge them, and generally keep them at bay. So, leave them for last, and use Marius to keep them out of the way while you focus on the bigger threats.
And for Kai, make sure he’s got a way to draw enemy attention – that’s what a “taunt” does. He can use either “Fire and Ire” or “Leap of Daring” for that. Also, give him “Second Wind” so he can heal himself up when things get rough. It’s all about keeping him alive and distracting the enemies while you deal damage.
While you’re busy dealing with those smaller Sporeling enemies, you need to make sure the Tempests aren’t wrecking your team. Get Kai to use his “Fire and Ire” to basically yell at them and make them focus on him instead of you. That buys you time to take out the Sporelings. But, most importantly, you need to kill those Tempests as quickly as possible. If you don’t, another wave of them will show up, and you’ll be overwhelmed.
Amulets to Use
White Key Cameo accessory. A lifesaver. Essentially, if you ress up a fallen teammate, it’ll revive you for half health. However, there’s the catch: you must be wearing it beforehand to revive them. Essentially a free health pot just for having a good pal. Just switch into it first before reviving them.
Second, if you have the “Dream Touch” skill, reserve it for when someone drops. It’s not only a heal; it can actually resurrect people from death. So, don’t waste it on tiny heals. Save it for those “oh crap” situations where someone’s down and you have to get them up quick so you don’t wipe the entire team.
Phase 3
Okay, Phase 3 – things get serious. The Queen herself jumps into the fight, and you’ve got this annoying Delemgan Grovetender hanging back, spamming summons at you.
Here’s the plan: First, get Marius to use “Binding Roots” on the Queen. Pin her down, keep her out of the way. Then, find that Grovetender! They’re your priority. Take them out fast, and all their summoned buddies will disappear too.
Once the Grovetender’s gone, you’ll mostly just have the Queen and a few straggling Sporelings left. At this point, you can basically play keep-away with the Queen. Run her around, dodge her attacks. The Sporelings won’t be much of a problem.
Now, to take her down, use a combo of Marius’ “Binding Roots” and Kai’s “Fire and Ire” to stun her repeatedly. While she’s stunned, chip away at her health. It’s a slow and steady process, but you’ll get there. Basically, stun, hit, run, repeat!