")
If you are someone who likes weapons and tuning different builds, Crimson Desert has you covered. The game has a plethora of options when it comes to weapons, shield, armor, accessories, and mounts. In this guide, we will cover all the unique weapons and gear in the game. This is the second part of the guide. Access the first part with the link below.
All Unique Weapons & Gear Locations in Crimson Desert (Part 1)
All Unique Weapons Locations
You can collect unique weapons with strong modifiers and special abilities. These weapons are usually earned by defeating bosses or finishing certain quests, and unlike regular gear, they cannot be upgraded using duplicate copies.
Oblivion of The Past
Oblivion of the Past is located in a cave under the train tracks. This cave is located east of Crimson Mountain Fortress.
| Attack | 24 |
|---|---|
| Critical Rate | Lvl 2 |
| Attack Speed | Lvl 1 |
| Refinement | 4/10 |
| Sells for | 18.57 |
| Additional | Stamina Siphon lvl 1 |
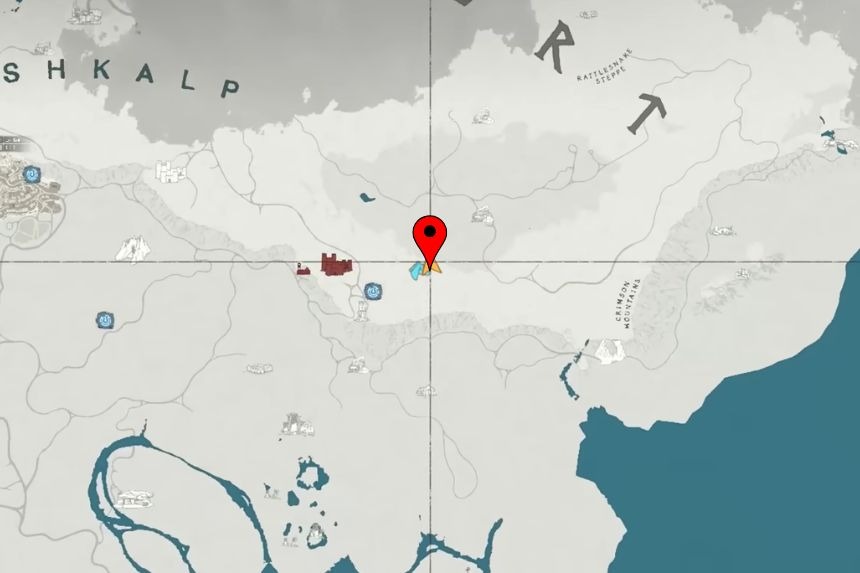
Octar’s Legacy
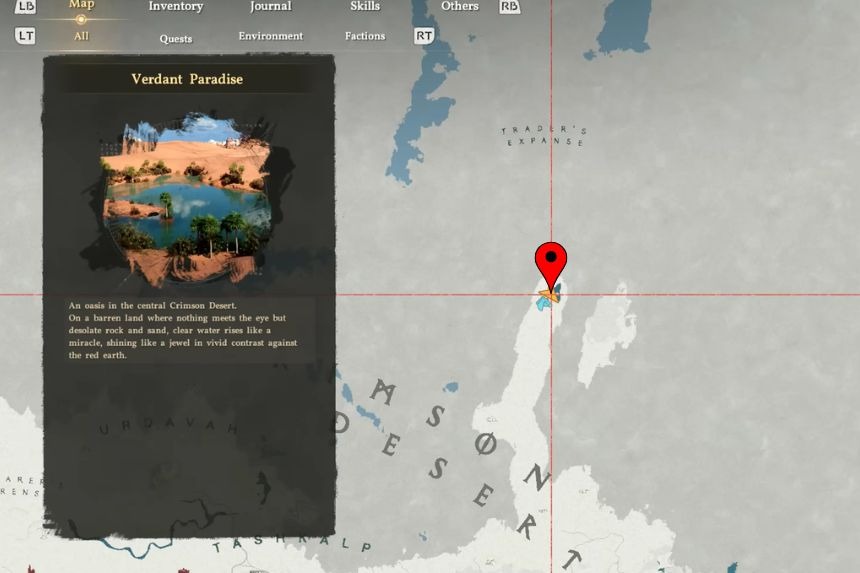
Octar’s Legacy is located in Verdant Paradise Oasis. It is present on the top of the box near the water.
| Attack | 17 |
|---|---|
| Critical Rate | Lvl 0 |
| Attack Speed | Lvl 0 |
| Refinement | 2/10 |
| Sells for | 2.67 |
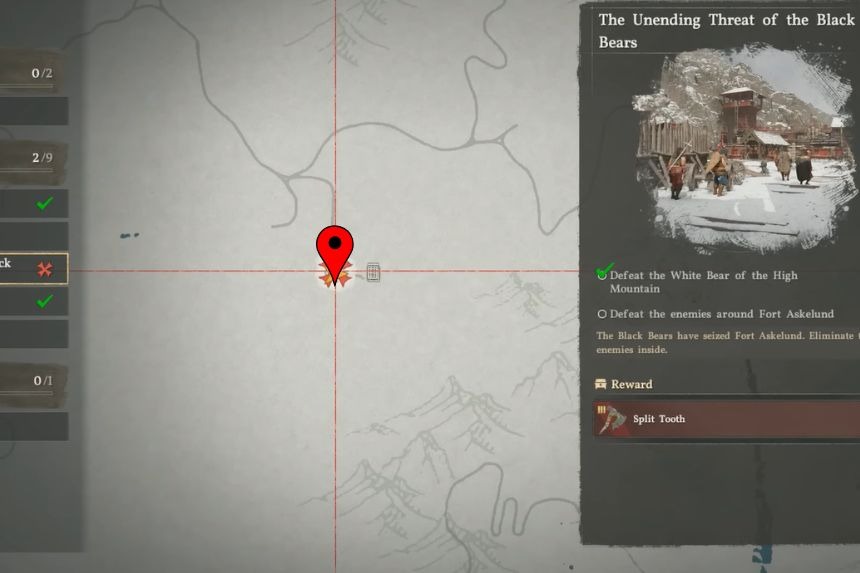
Split Tooth
| Attack | 24 |
|---|---|
| Critical Rate | Level 1 |
| Attack Speed | Level 1 |
| Refinement | 3/10 |
| Sells for | 16.22 |
| Additional | – |
To get the Split Tooth, you’ll need to defeat the White Bear of the High Mountain boss during the Unending Threat of the Black Bear quest.
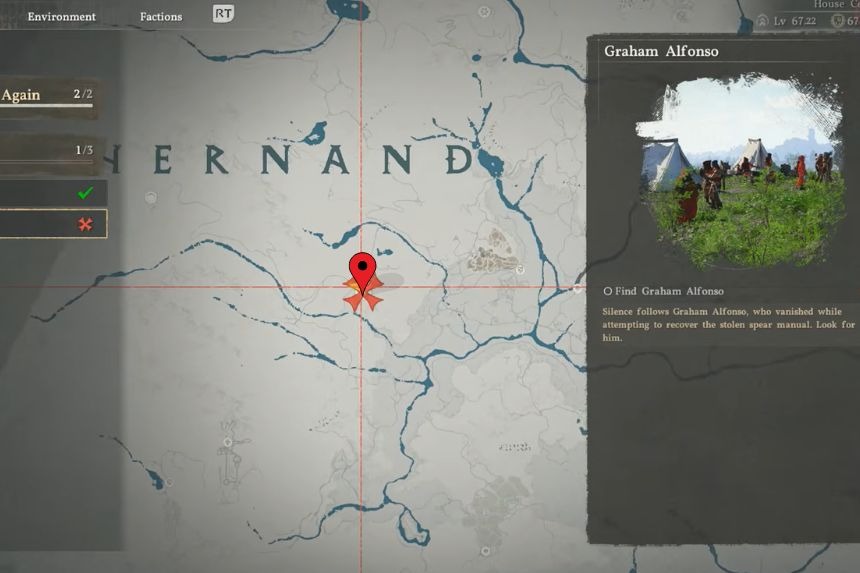
Alfonso Spear
| Attack | 12 |
| Attack Speed | Level 1 |
| Refinement | 0/10 |
| Critical Rate | Level 1 |
| Sells for | 4.80 |
| Additional | – |
To get the Alfonso Spear, you’ll need to complete the Weight of Legacy faction quest and get the two-handed weapon as a reward.
Nobleman’s Bow
| Attack | 18 |
|---|---|
| Critical Rate | Level 1 |
| Refinement | 3/10 |
| Sells for | 17.49 |
| Additional | +4.0% damage to mighty foes |
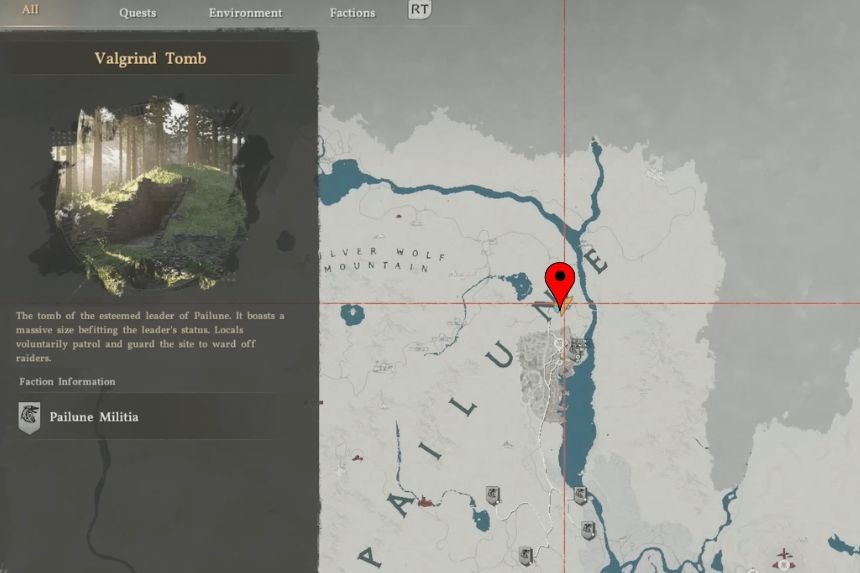
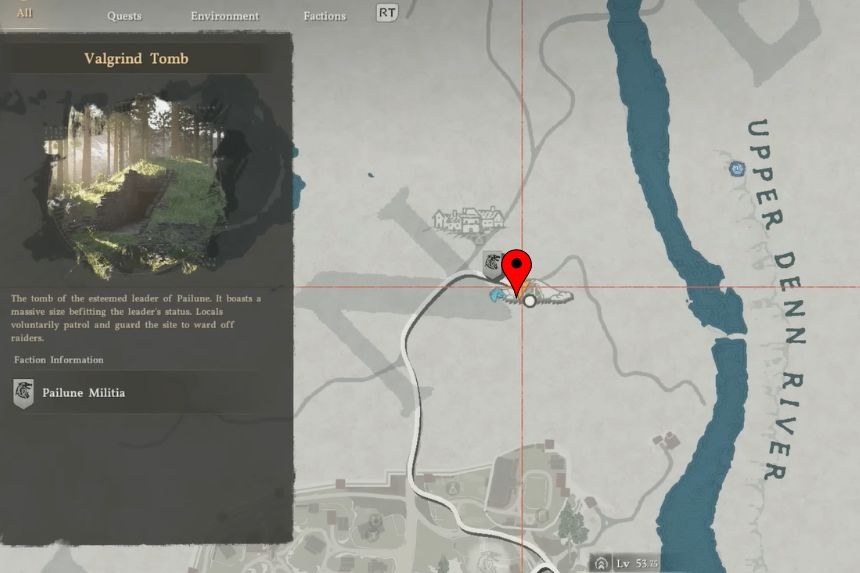
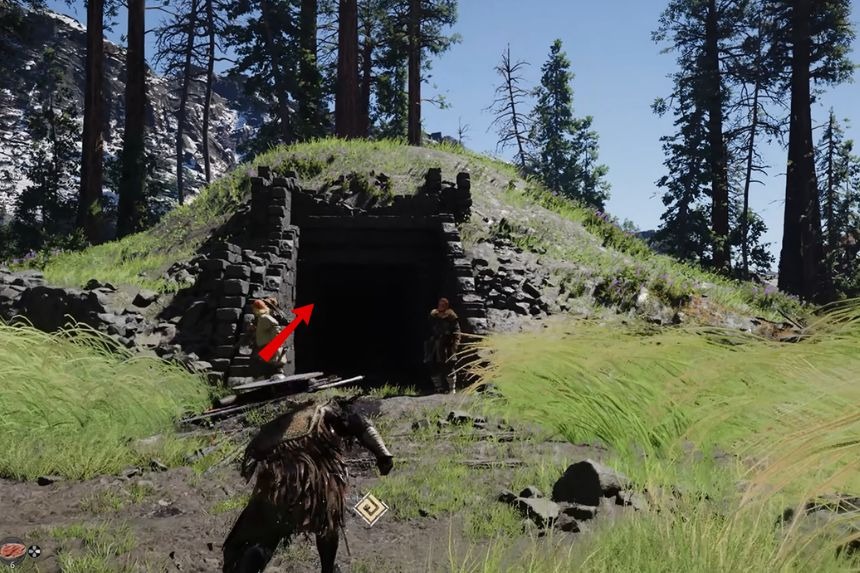
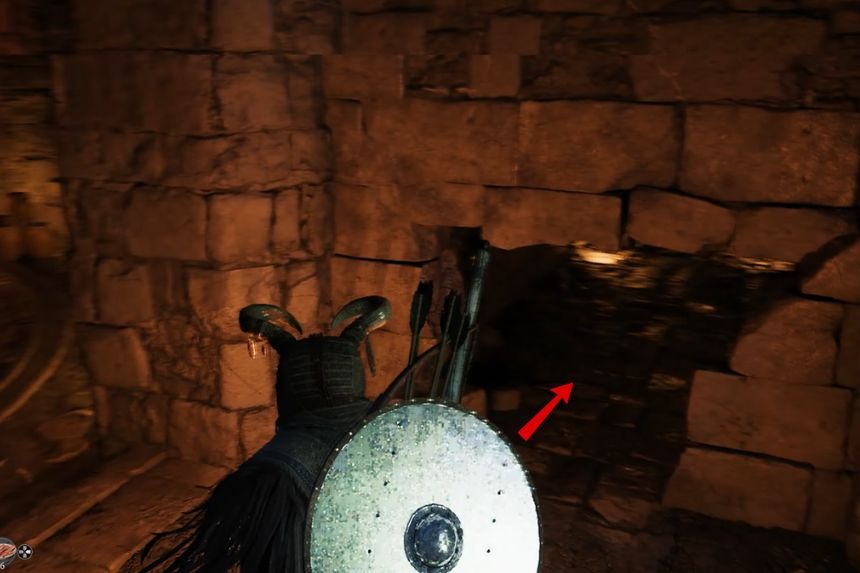
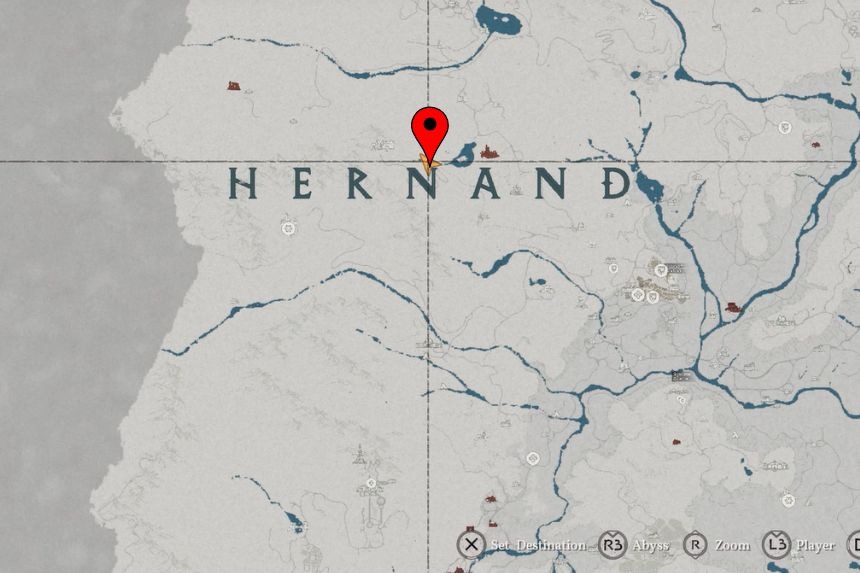
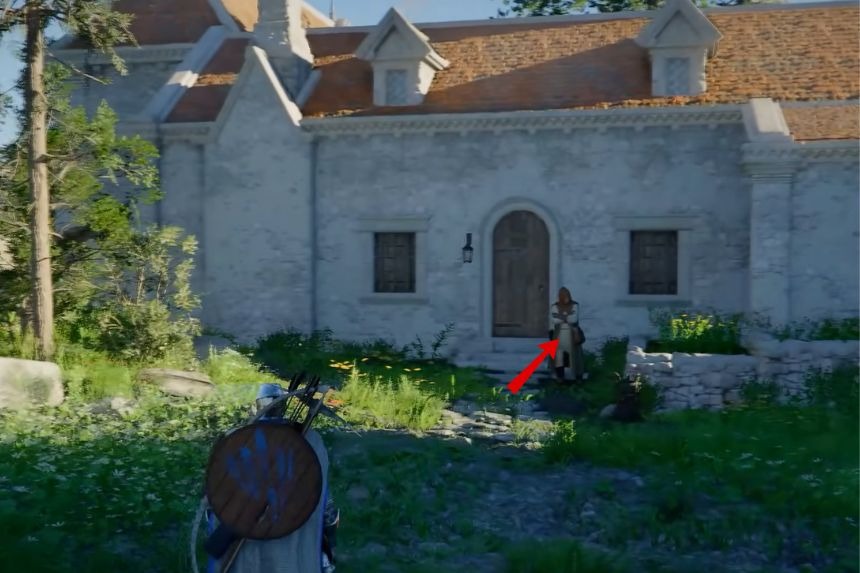
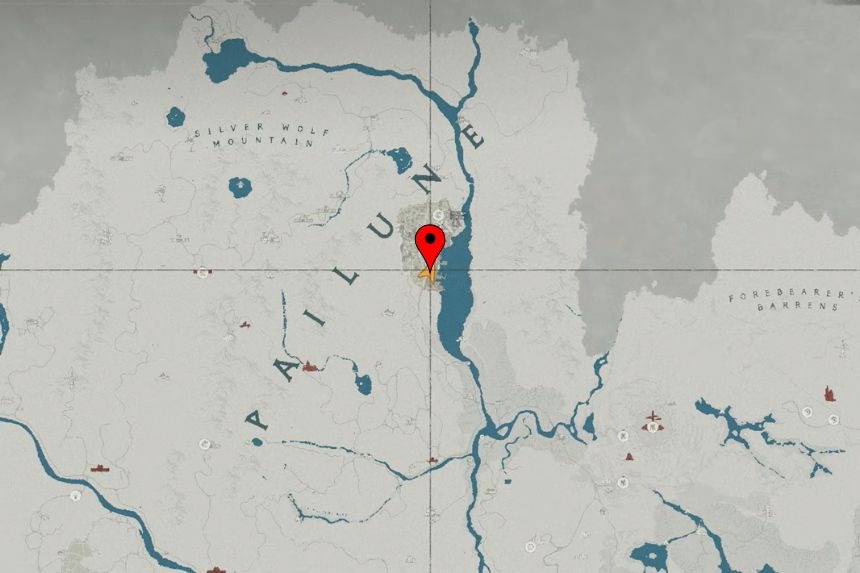
To get the Nobleman’s Bow, you’ll need to go to the Valgrind Tomb that’s found north from Pailune. Once you reach the marked location, you’ll find the tomb entrance in front of you. Go inside and on the right side, you’ll find a hole in the wall leading to a different room. Use the to reach the small room with the treasure chest that contains the Nobleman’s Bow.
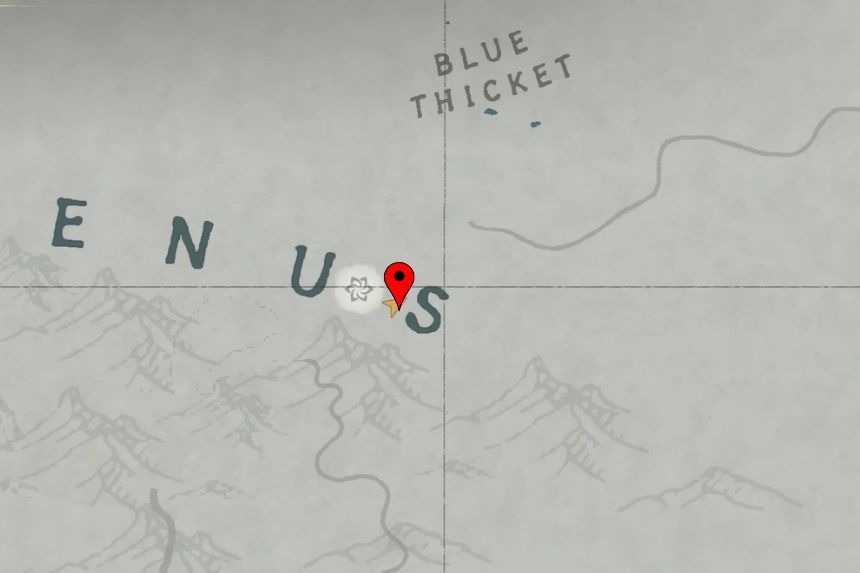
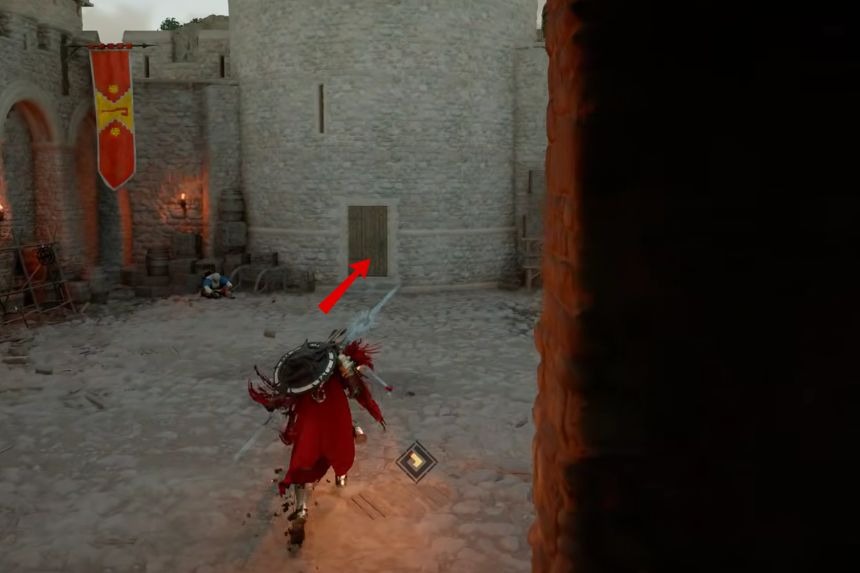
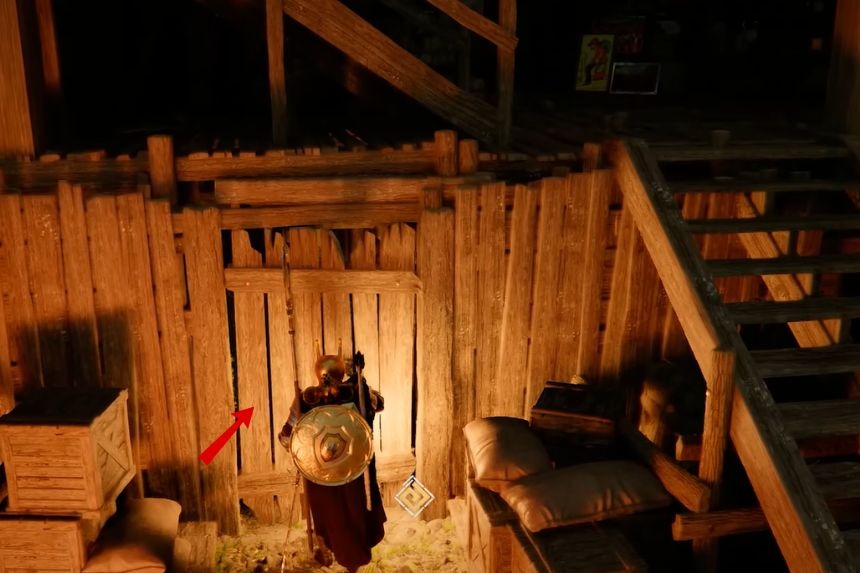
Thalwynd Longsword
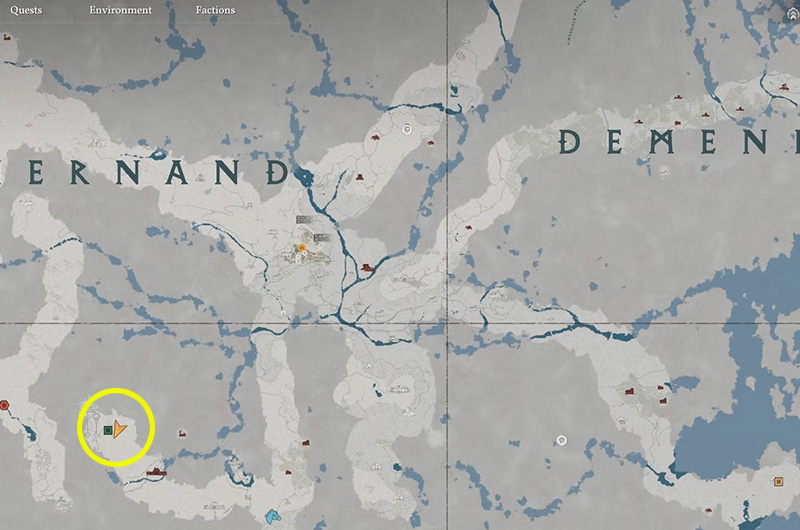
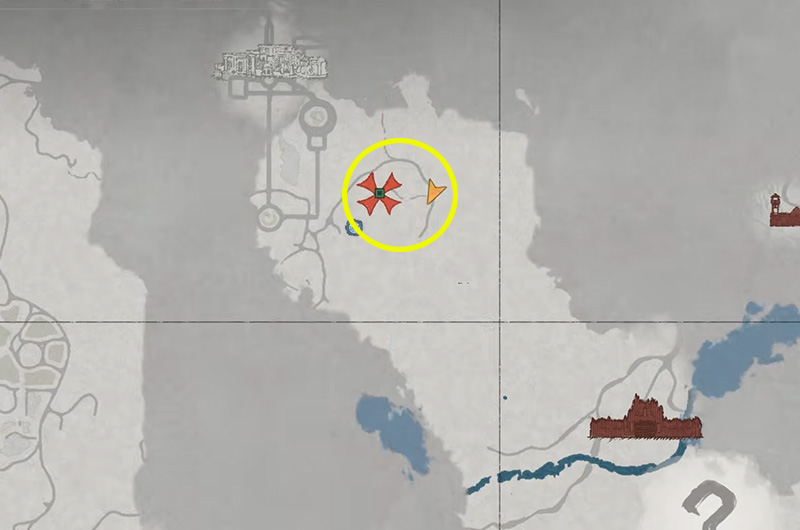
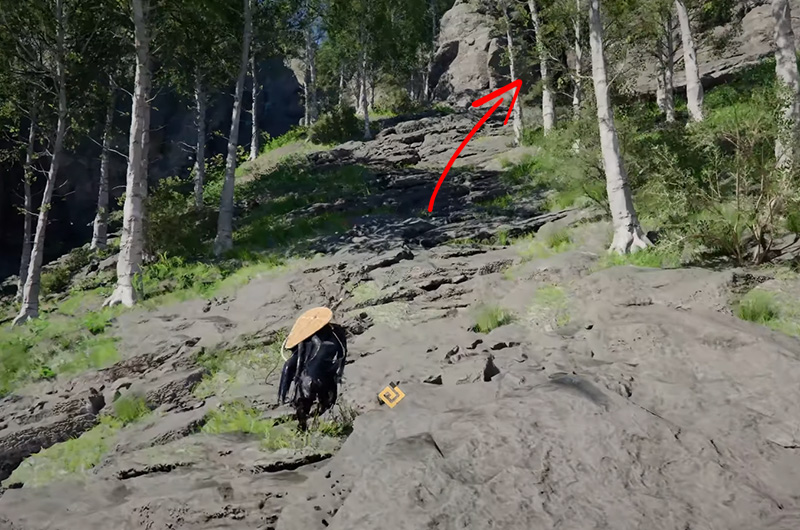
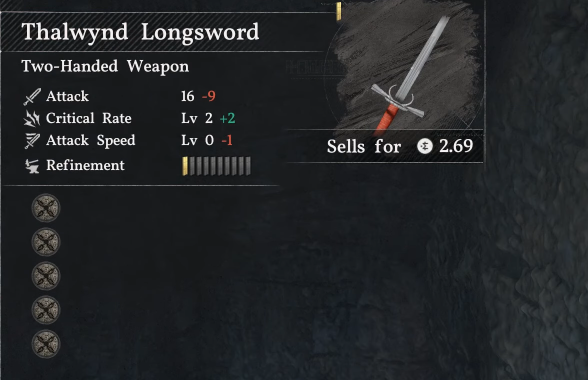
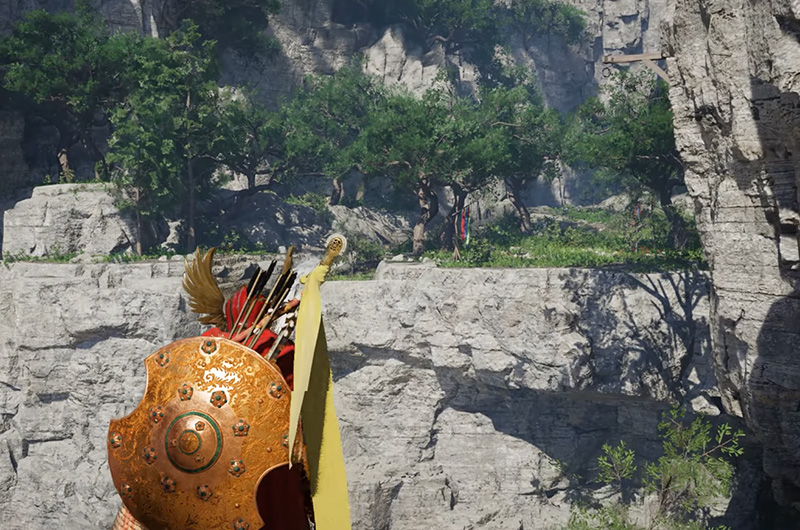
The Thalwynd Longsword is an easy find once you know the location. Go to the location marked on the map and climb up the hill, there is a small cave hidden behind the trees. Use the images for clues and you will find the sword standing against the cave wall.
Golden Vanguard
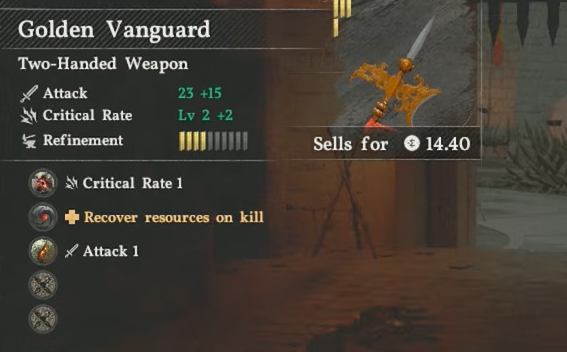
You will get the Golden Vanguard as a reward during the story of Chapter 8, specifically the quest Where the Winds Guides Us.
Delesyian Longsword
| Attack | 25 |
|---|---|
| Critical Rate | Level 2 |
| Attack Speed | Level 1 |
| Refinement | 4/10 |
| Sells for | 18.64 |
| Additional | Health Siphon Level 1 |
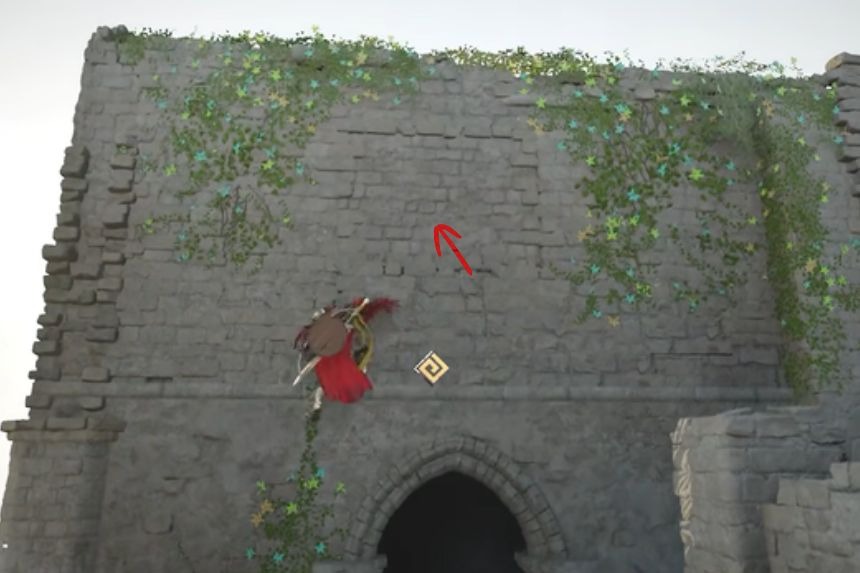
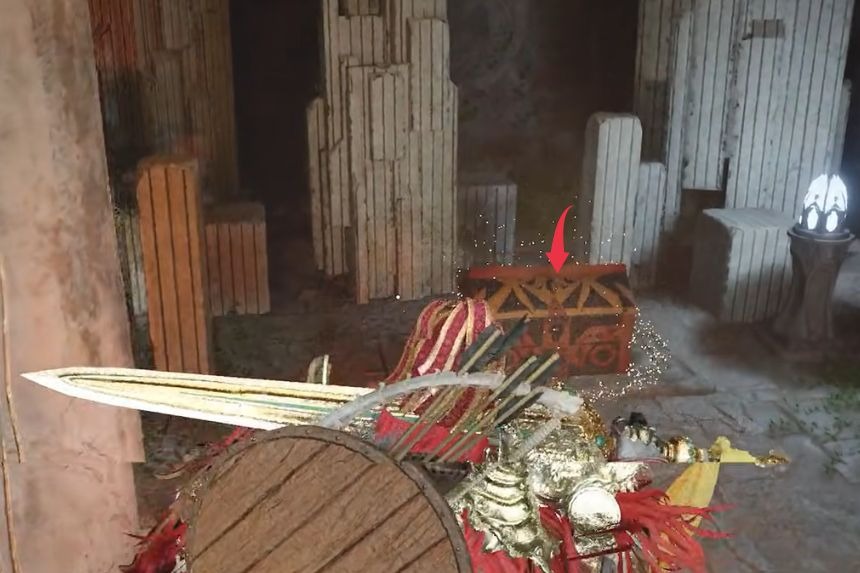
The Delesyian Longsword can be found in the Sanctum of Veneration. Go to the marked location and go to the top by climbing the wall of the sanctum. Use stab on the wall to gain entrance and you’ll find a treasure chest inside containing the Delesyian Longsword.
Eastern Witch’s Fan
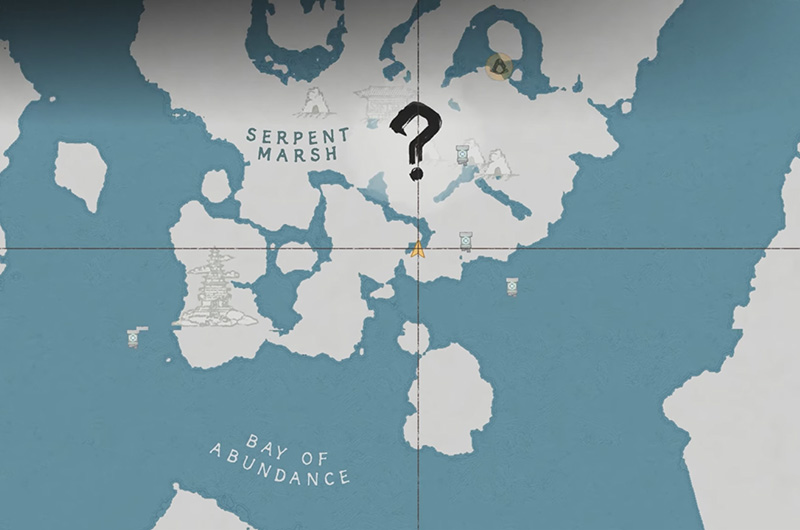
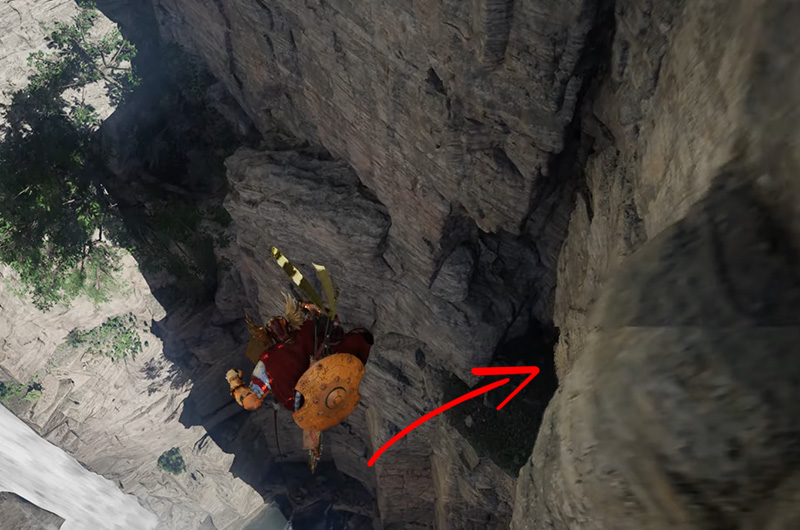

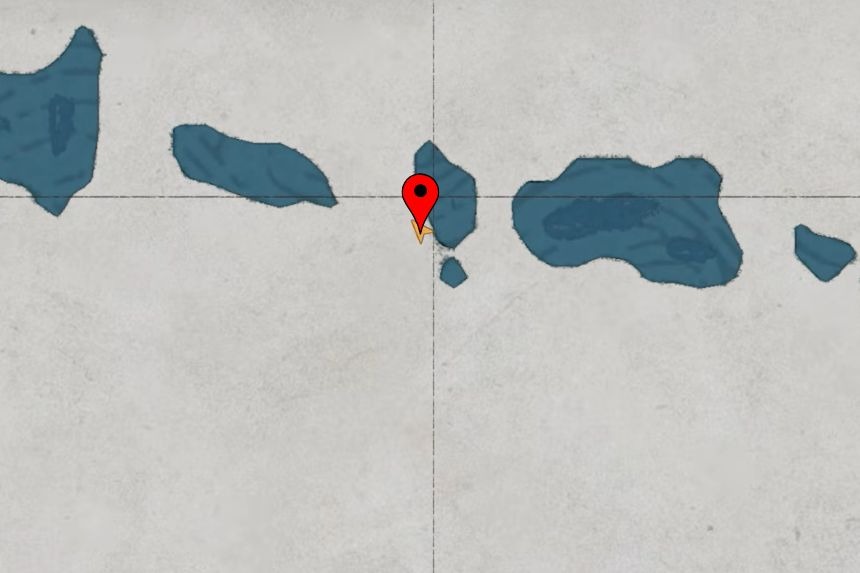
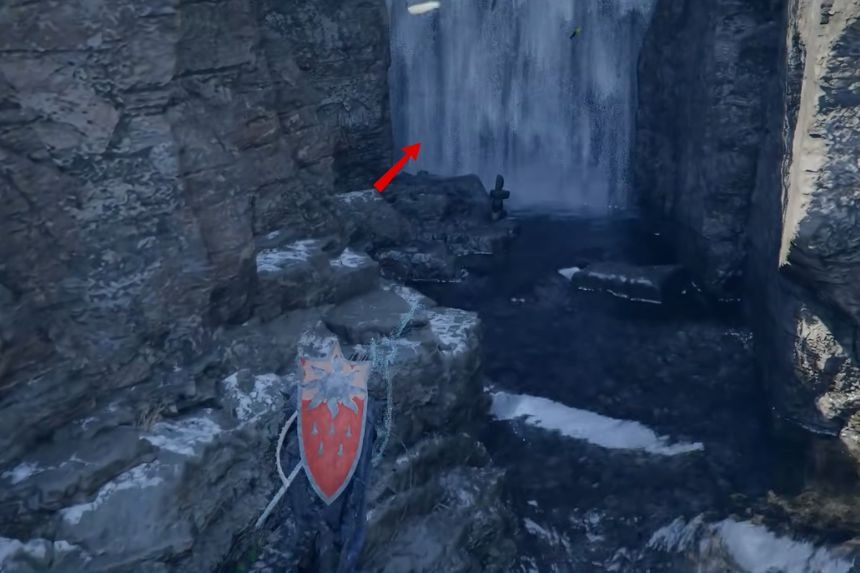
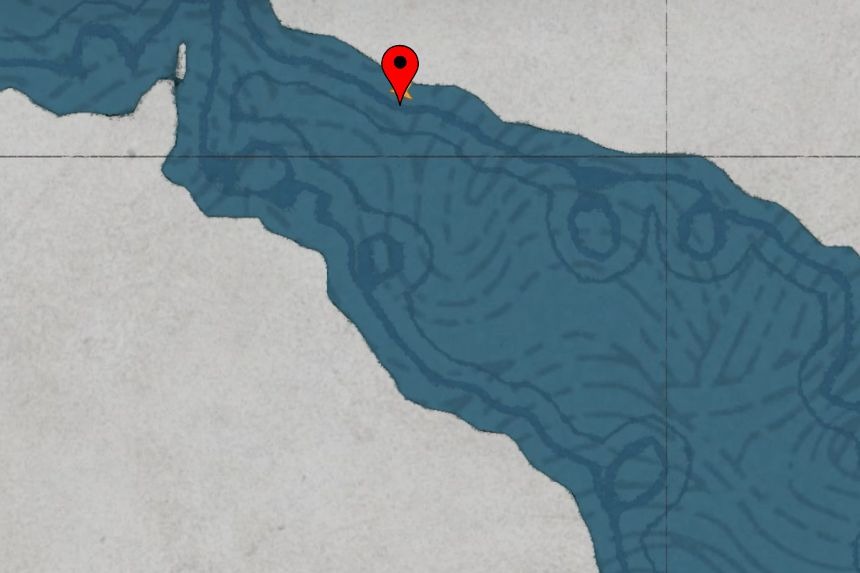
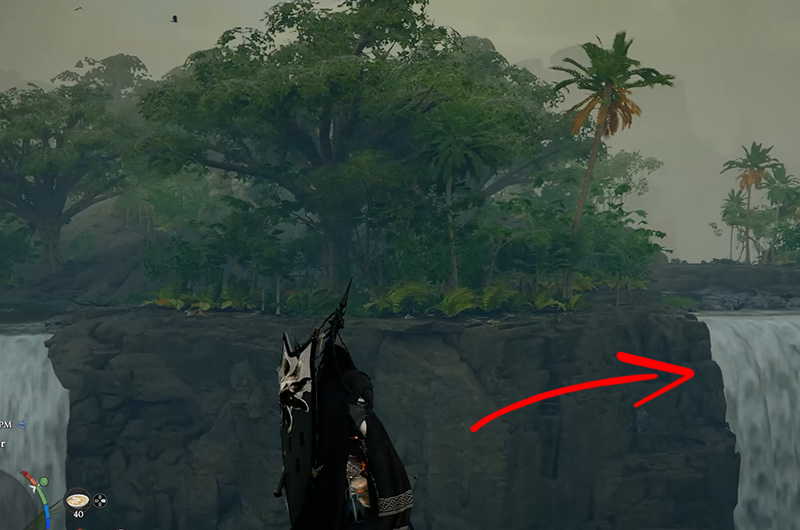
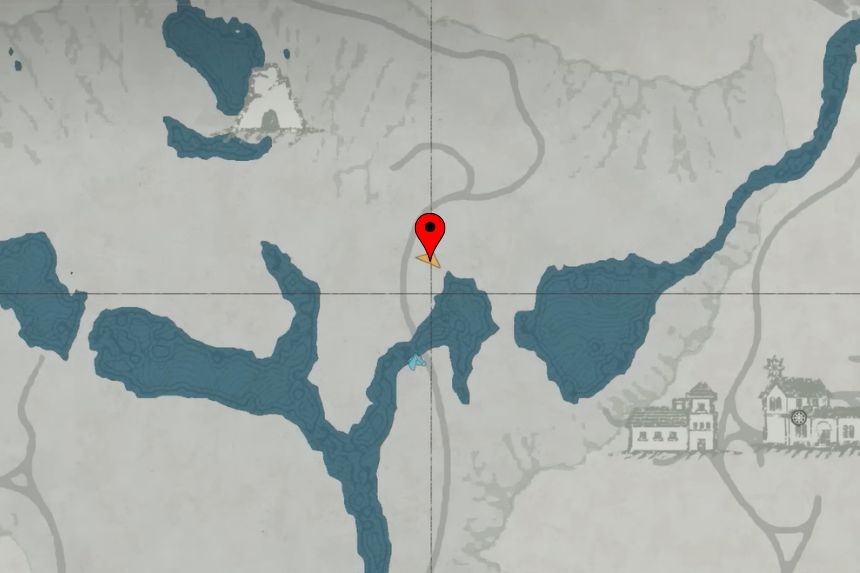
To get the Eastern Witch’s Fan, go Southeast from the Serpent Marsh. If you are at the exact location on the above maps, you will find yourself looking down a cliff and facing a waterfall. Now, you do not have to go to the waterfall. Instead, jump and you will notice a platform or a cave on the opposite site of the waterfall. Glide and land at the cave entrance. Clear the stone blocking the way and inside there is a chest that has the Eastern Witch’s Fan.
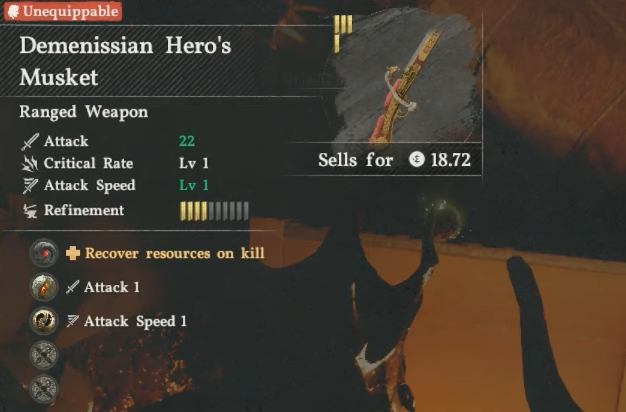
Demenissian Hero’s Musket
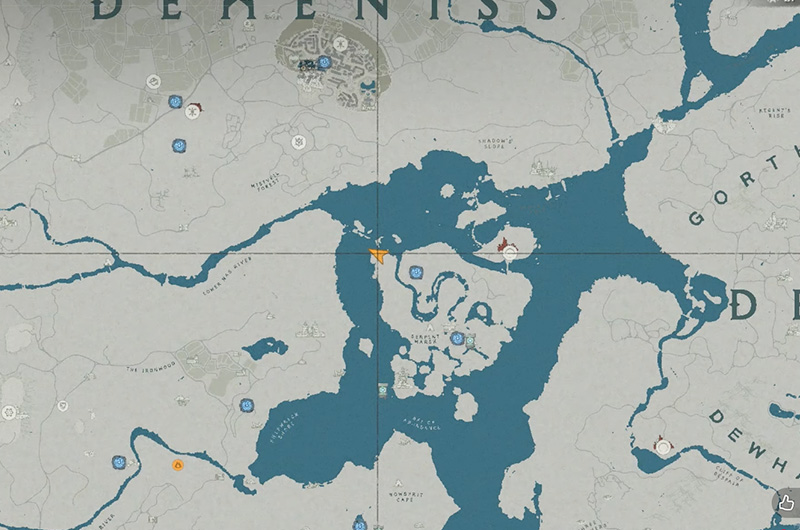
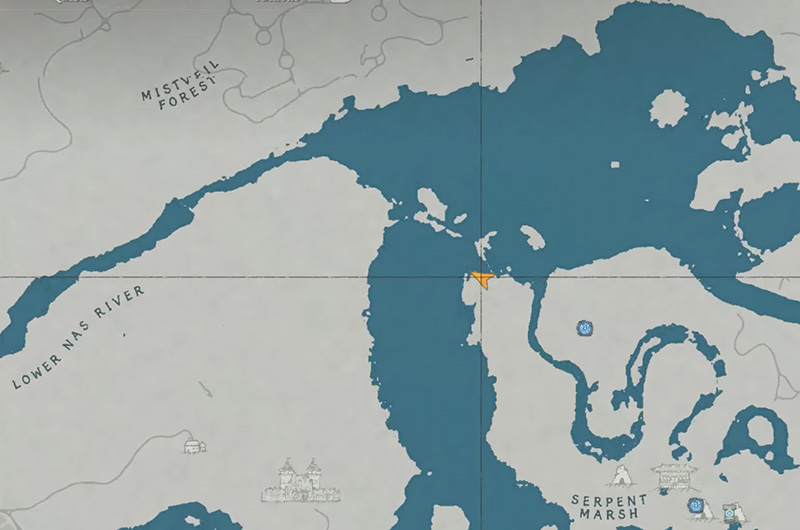
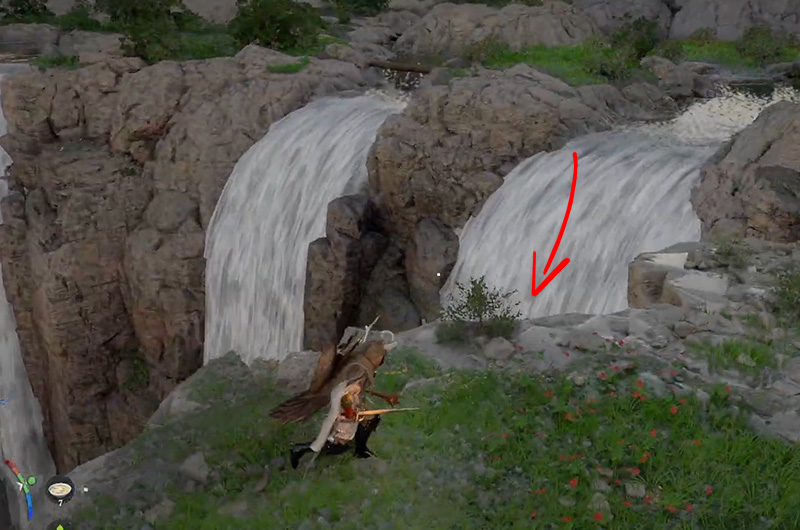
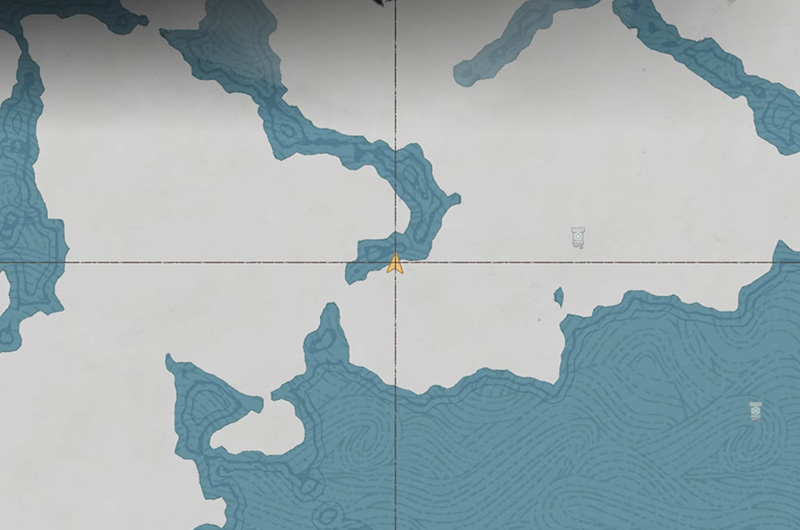
To get the Demenissian Hero’s Musket, you need to go to Northwest from the Serpent Marsh. If you arrive at the above location on the map, you will notice a bunch of waterfalls, go to the bottom of the Southern most waterfall and use stab skill to pierce through the waterfall and get to the other side. At the end of the path, you will find a chest with the Demenissian Heroes Musket.
Tommasoan Bow
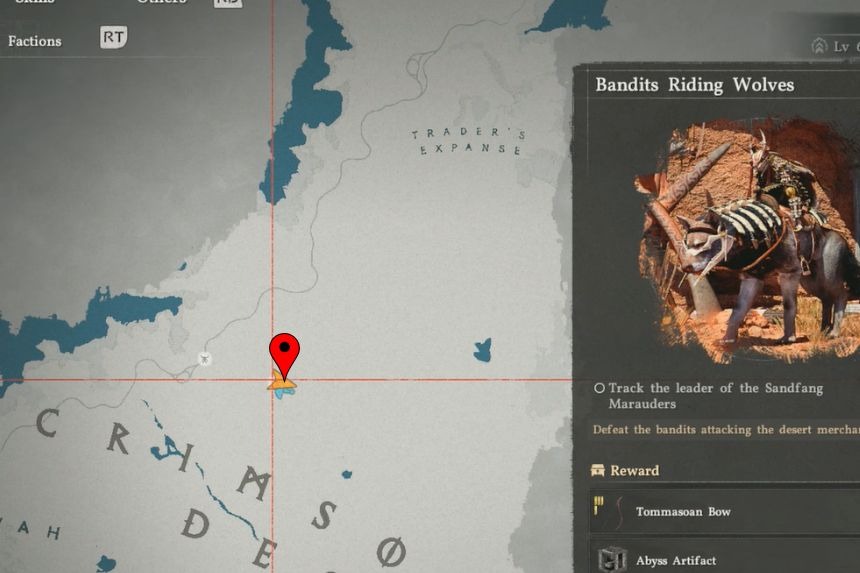
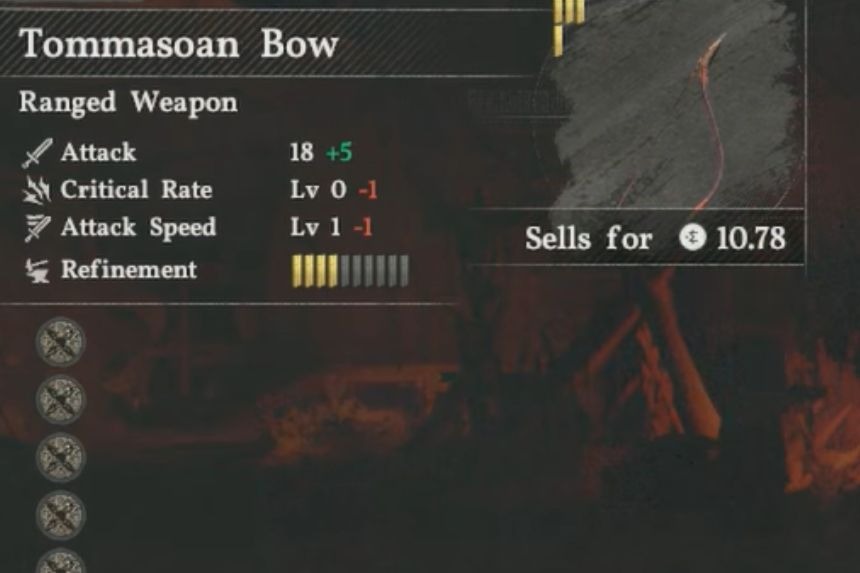
To obtain the Tommasoan Bow, you’ll first need to defeat Gristle, the Sandfang Marauder during the Bandits Riding Wolves quest. This challenge is a little difficult as you’ll have to track him and fight him three times to finally defeat him. Once the boss has been defeated, you’ll get the Tommasoan Bow as a reward.
Golden Greathammer
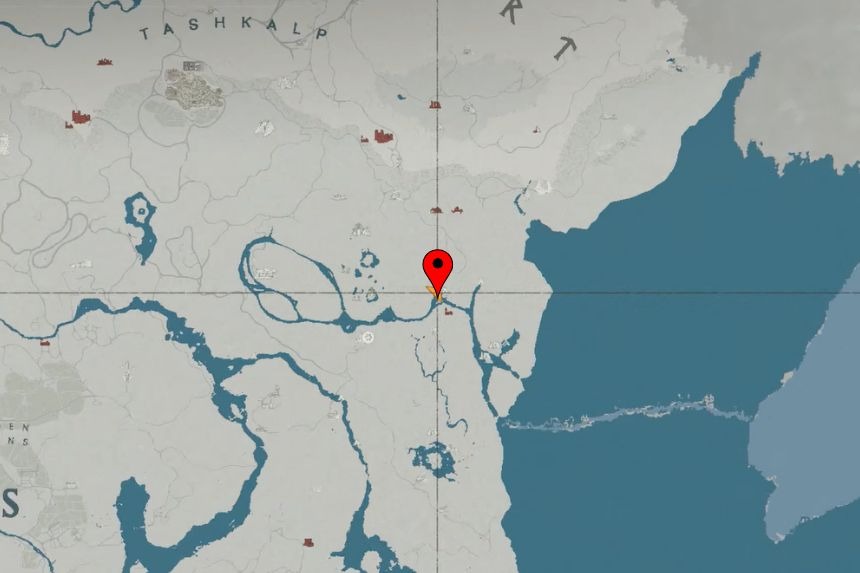
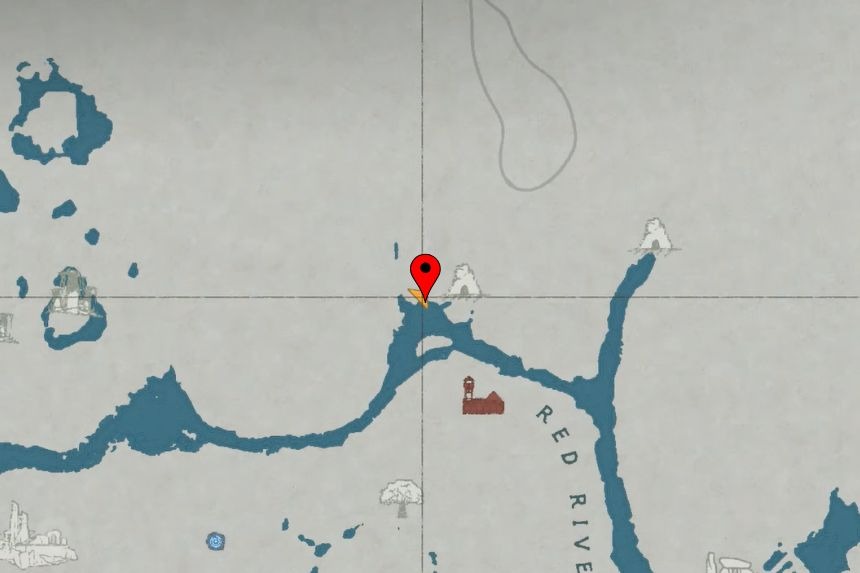

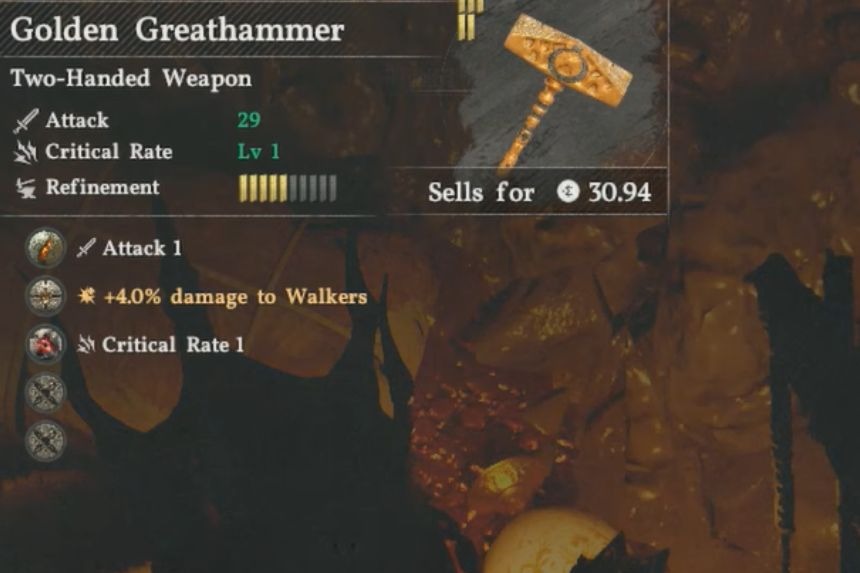
To obtain the Golden Greathammer, you’ll need to go to the second Sacred Beast Cave that can be found close to the Red River Cliff Watchtower. Once you reach the marked location, you’ll find a waterfall on your right side, go behind it, and use stab to enter the Sacred Beast Cave. Inside, you’ll find the treasure chest containing the Golden Greathammer.
Beehive Club
While the Beehive Club may not boost an impressive stat when compared to several other weapons in our list, this weapon is at the moment broken and deals a large amount of damage, especially due to the constant attack by the bees on the enemies. It’s even a one-shot weapon on many early bosses.
However, the Beehive Club has a limited durability of only 30 and once broken it cannot be repaired. But, the good news is that the weapon farmed at the same location. Simply, go to the nearest fast travel point and return, this will respawn the hives.
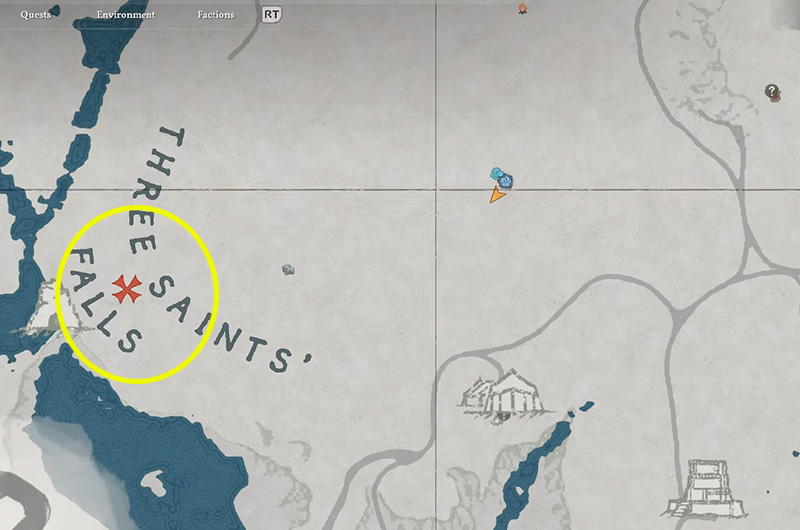
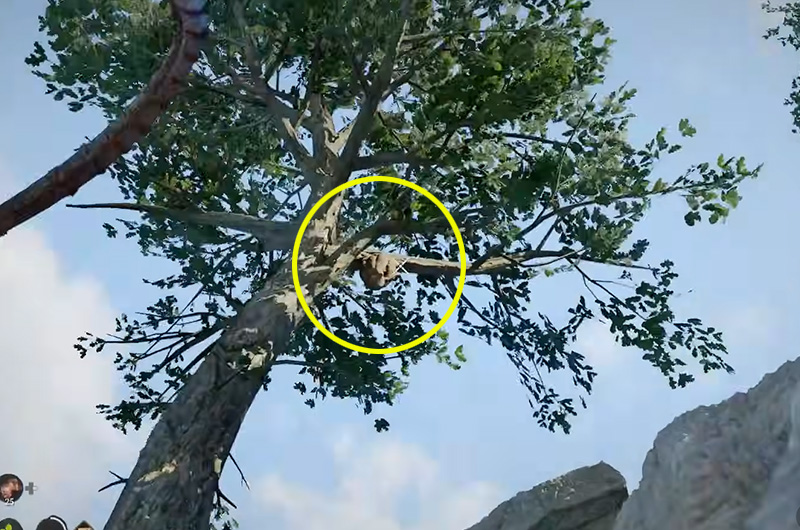
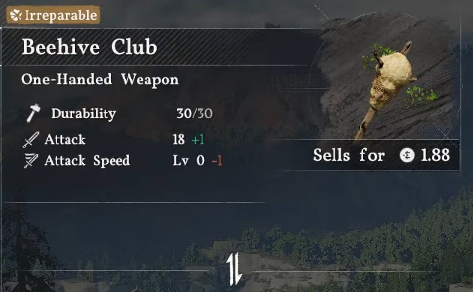
To get the Beehive Club, you need to find a location with lots of beehives as not all will drop this weapon. Once you find a location, use the bow to knock down the hives and search the ground. Most of the time, you will simply find Beehive, but every once in a while a Beehive Club will drop.
All Shields Locations
Crimson Desert has a wide array of shields that you can onbtain by defeating enemies, as quest rewards, or found in treasure chests. Here are all the shields in the game.
Shield of Radiance
The location of Shield of Radiance is in a hole in the sand, North of Verdant Paradise.
| Defense | 5 |
|---|---|
| Movement Speed | Lvl 2 |
| Refinement | 2/10 |
| Sells for | 6.69 |
Blazing Shield
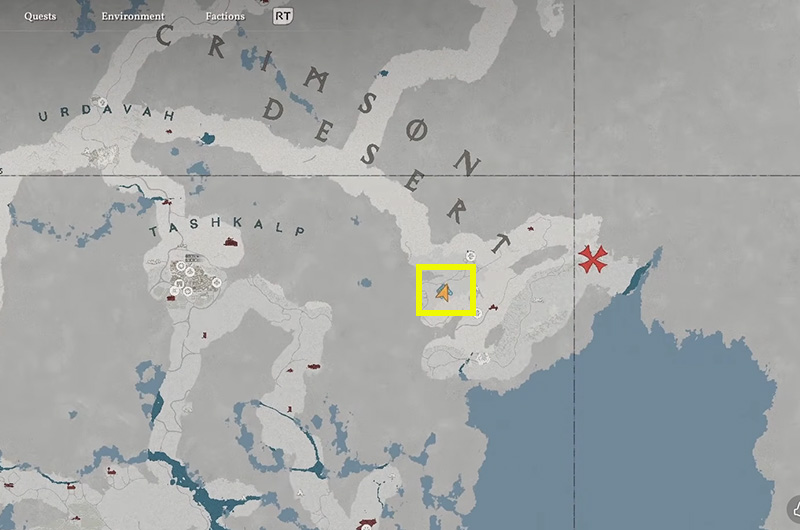
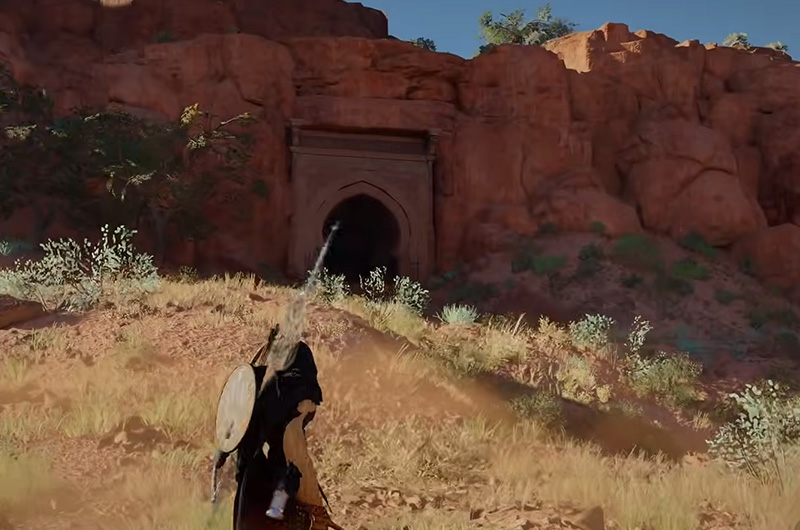
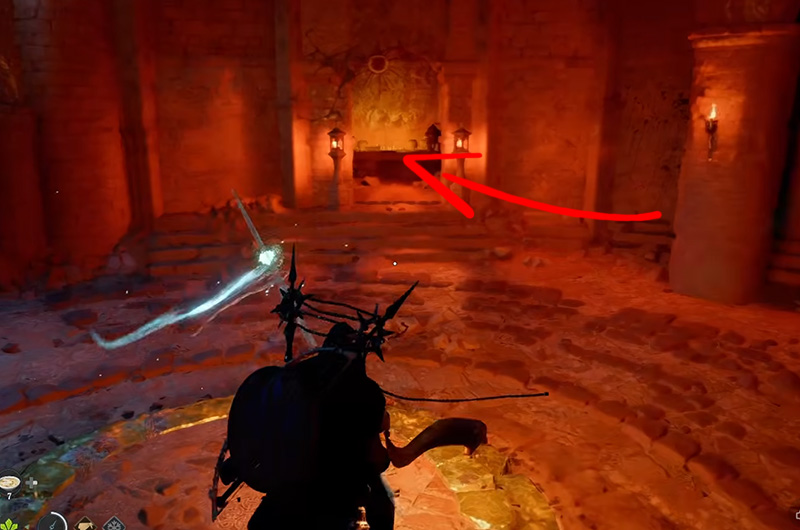
To get the Blazing Shield, you need to go to the Crimson Desert, the location is directly south of the R in Crimson Desert. You will notice train tracks at the lcoation and an entrance built into the mountains. Do note that this is a near late game area and the enemies are super tough.
Go inside and take care of the enemies. Stand on the circle at the center of the room if you did not already during the fight and go into the open room, you will find the Blazing Shield there.
| Defense | 11 |
|---|---|
| Attack Speed | Lv 1 |
| Movement Speed | Lv 1 |
| Refinement | 3/10 |
| Sells for | 6.03 |
| Slots | Defense 3Defense 3 |
Shield of Ringing
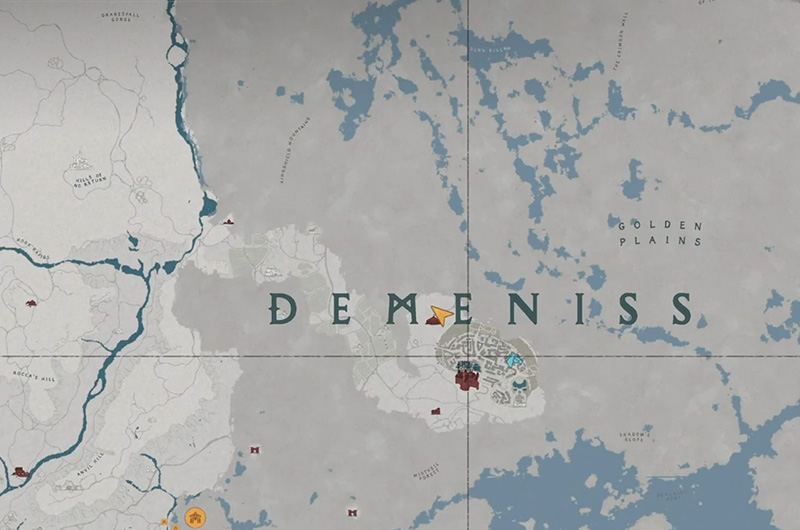
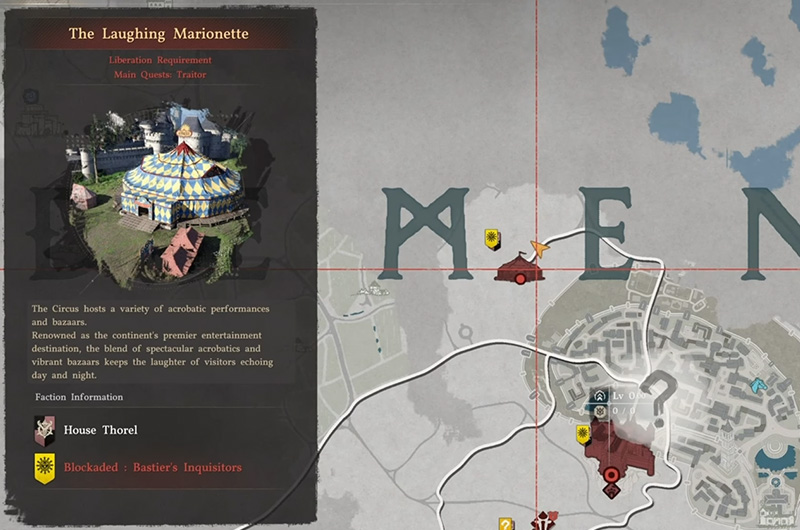
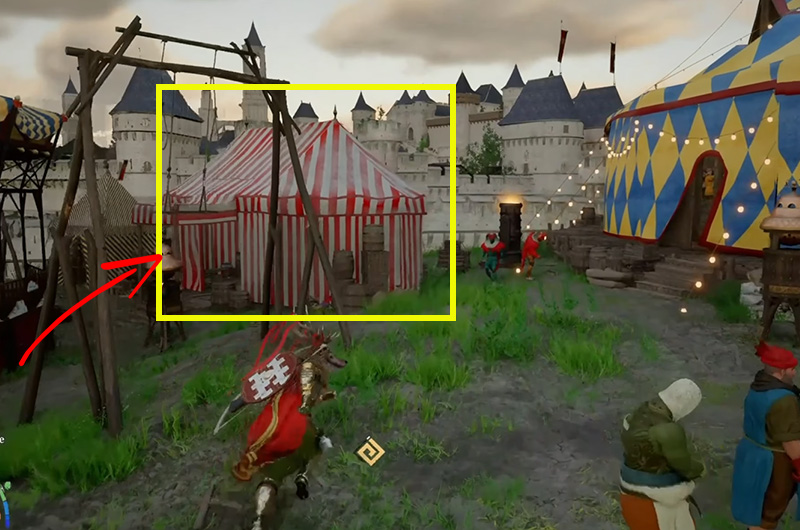
To get the Shield of Ringing, go to The Laughting Marionette, which is at the heart of Demeniss, between M and E of Demeniss. Once you reach the location, go to the large tent and in front of it, there is a smaller tent. Look around inside the tent to find the shield.
Golden Shield
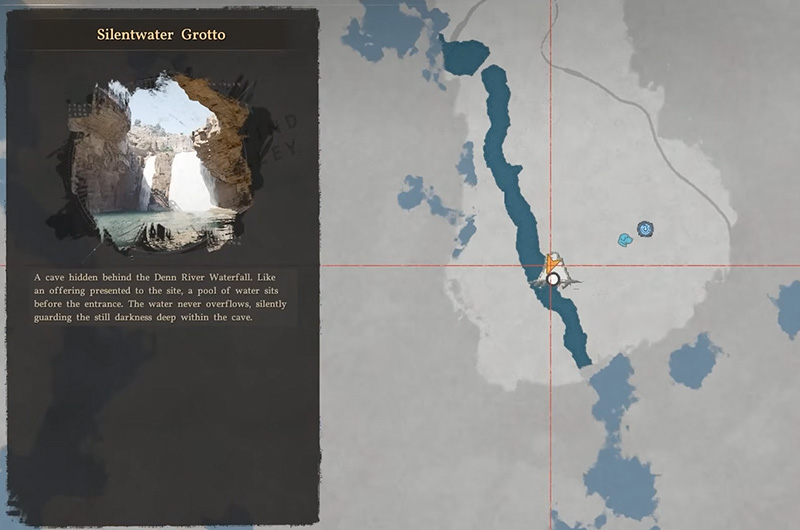
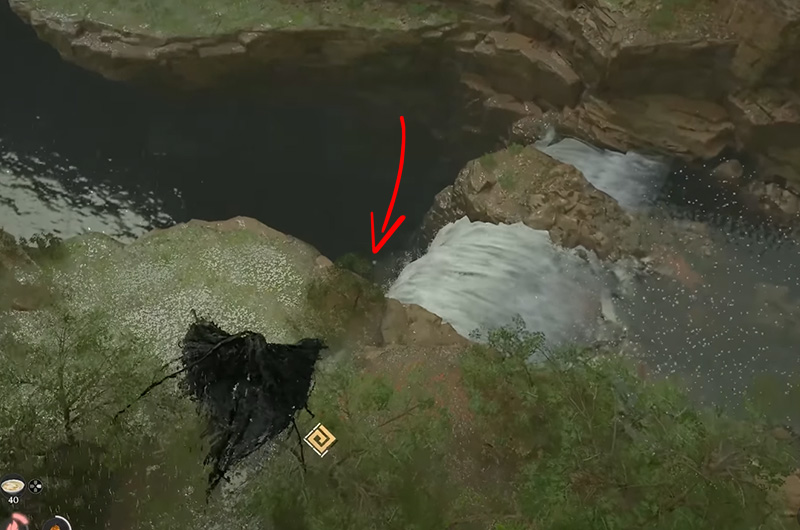
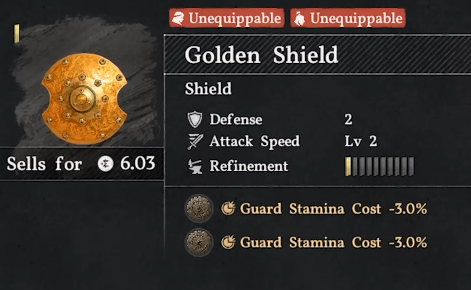
If you have already discovered the Golden Greed Plate Set, then the Golden Shield is not far from that. If you haven’t then, you will want to get that along with the shield. Go to the Silentwater Grotto on the map and you will notice train tracks all around. There is a waterfall in the area. Go to the base of the waterfall and use a stab to pierce through the waterfall. The Golden Sword is in a chest inside.
Freeswords Shield
| Attack | – |
|---|---|
| Defense | 5 |
| Refinement | 2/10 |
| Movement Speed | Level 2 |
| Additional | – |
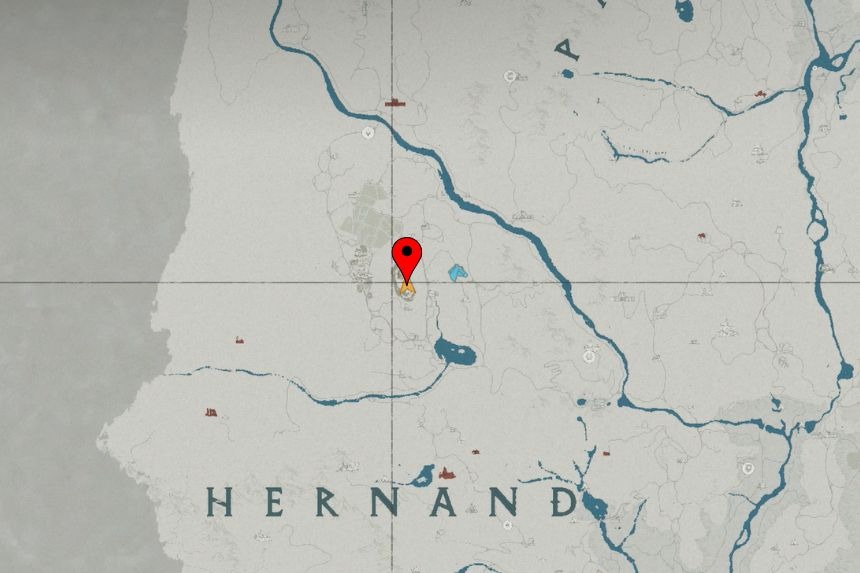
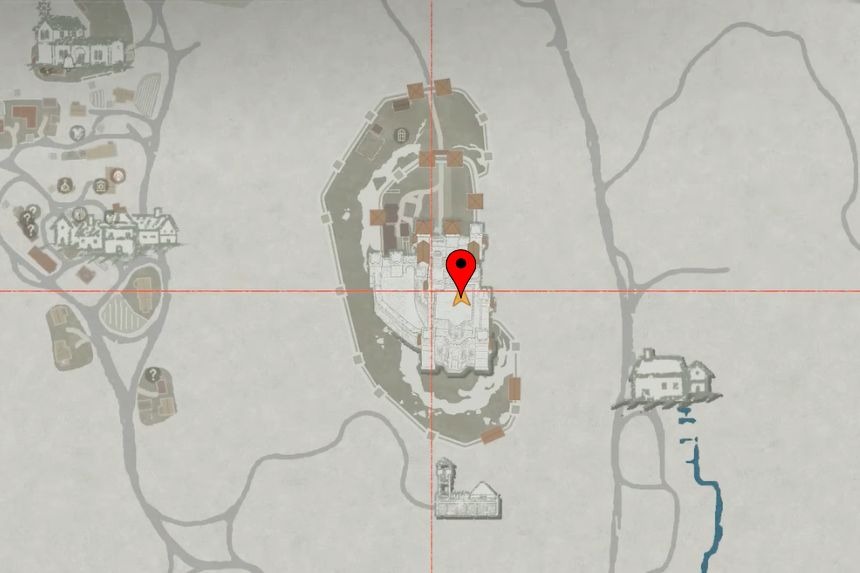
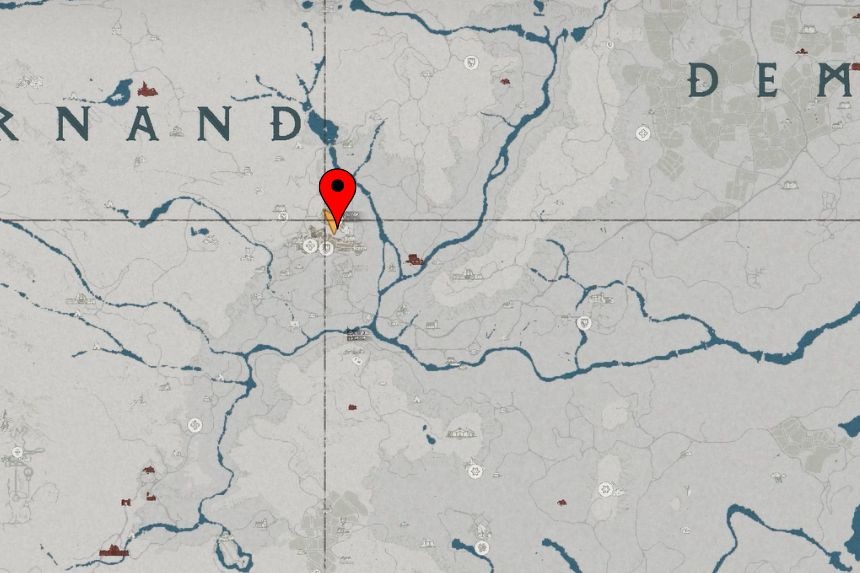
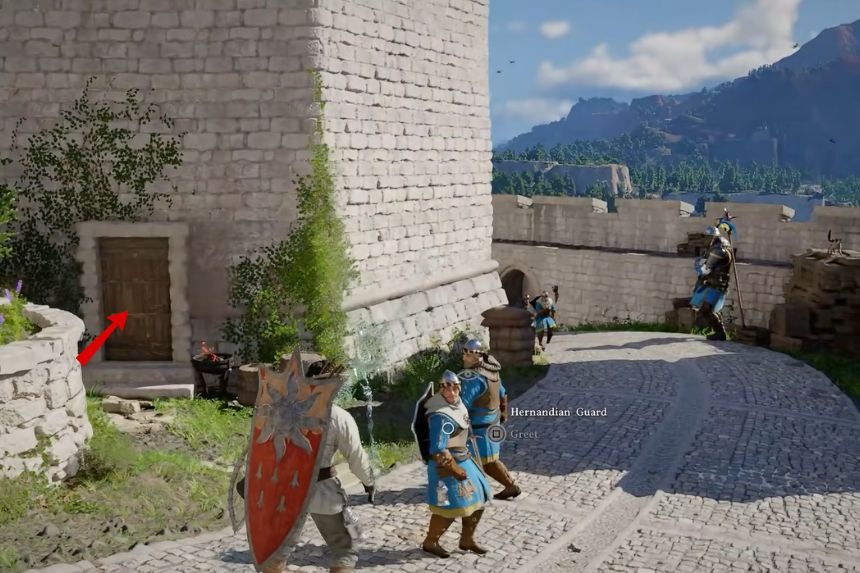
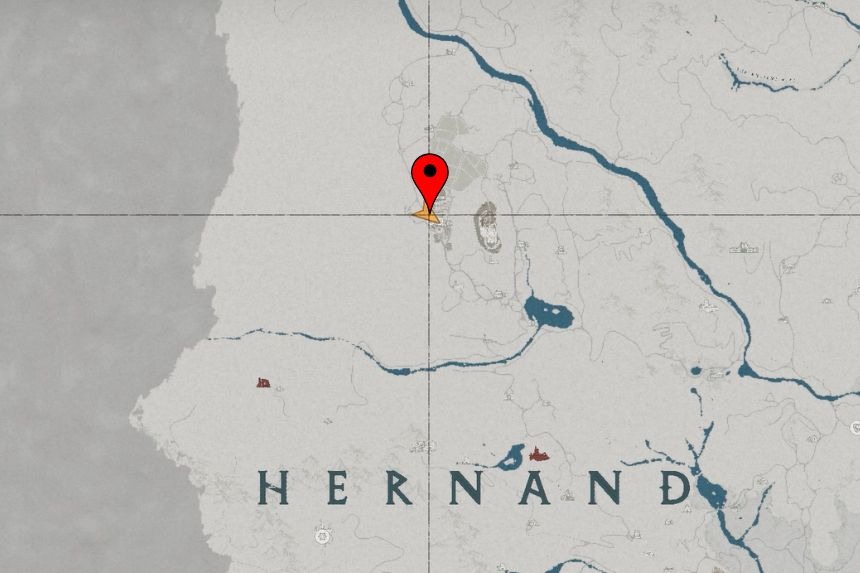
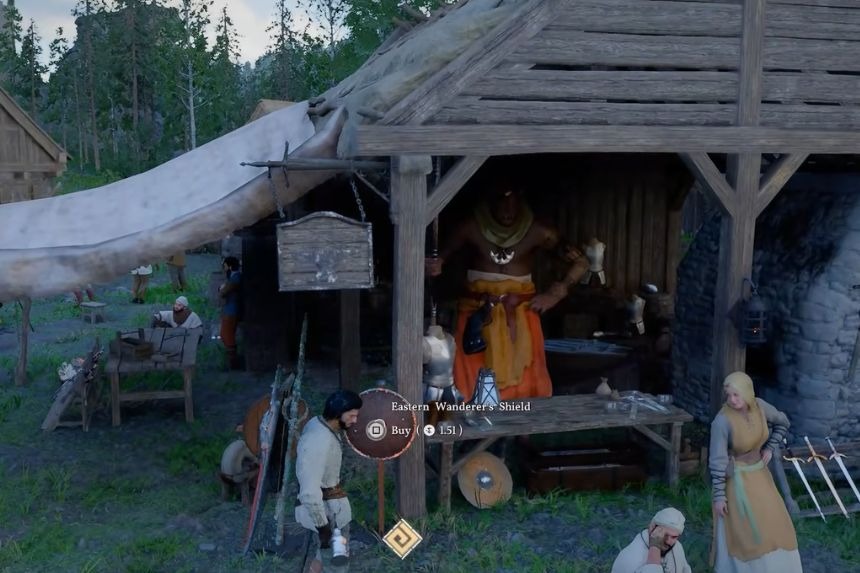
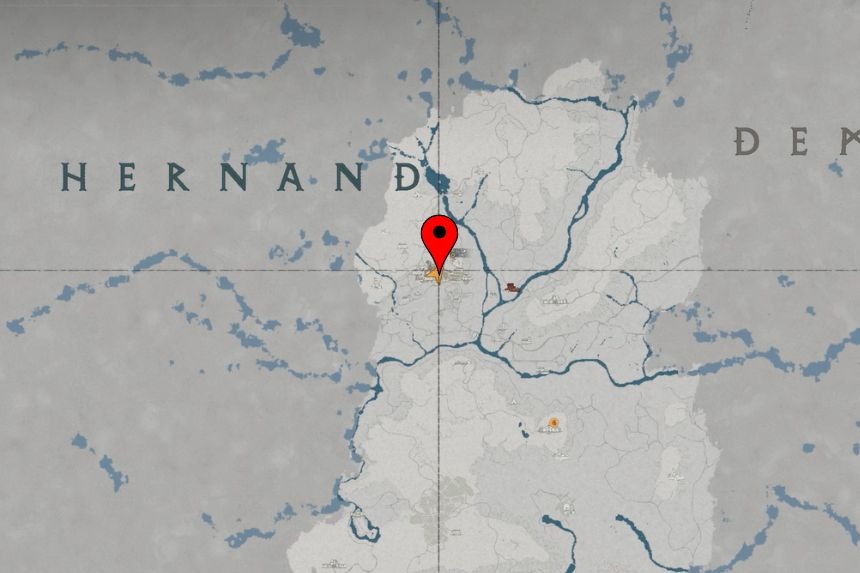
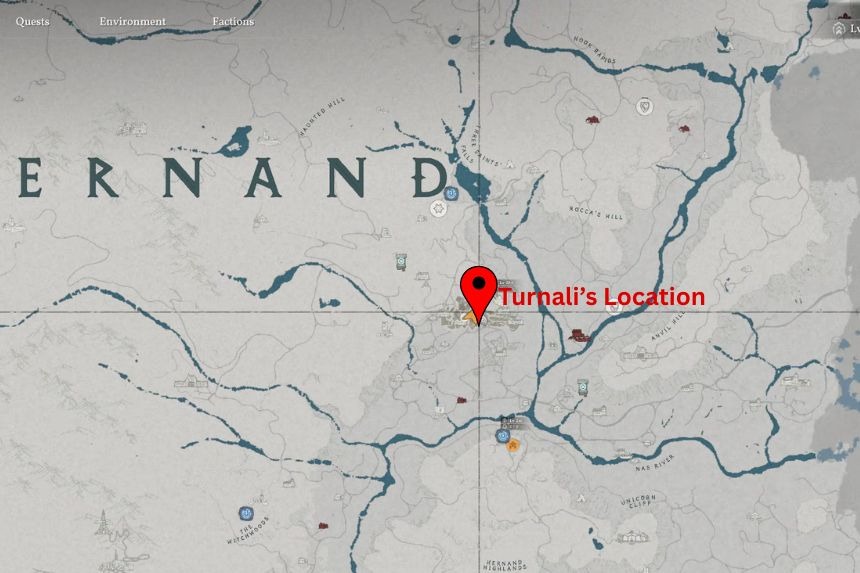
The Freeswords Shield is a craftable item for which you’ll need to go to the Calphade Castle first. There, you’ll find the shield manual inside the Calphade Castle. Enter the castle from the main entrance, go right, and inside a room. Ascend the stairs until you reach the top, where there is a library. Scan the bookshelf there to get the manual. Finally, go to the Hernand Smithy, Turnali and get the Freeswords Shield crafted for yourself.
Shield of Blossoming Spring Day
| Attack Speed | Level 2 |
|---|---|
| Defense | 3 |
| Refinement | 2/10 |
| Sells for | 1.49 |
| Additional | – |
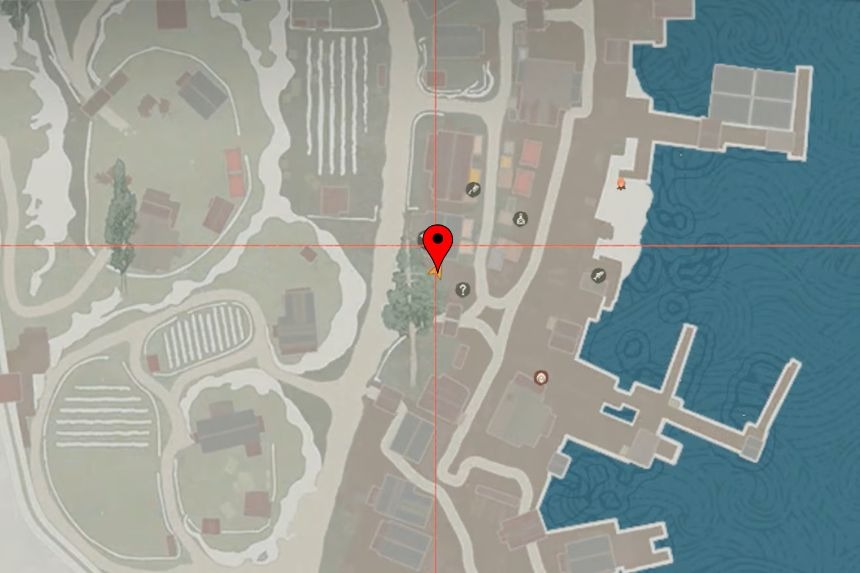
The Shield of Blossoming Spring Day can be found on the shore that’s east of Stoneward Harbor. Go over to the marked location and you’ll find a broken rowing boat on the right side of the shore.
Dewhaven Shield
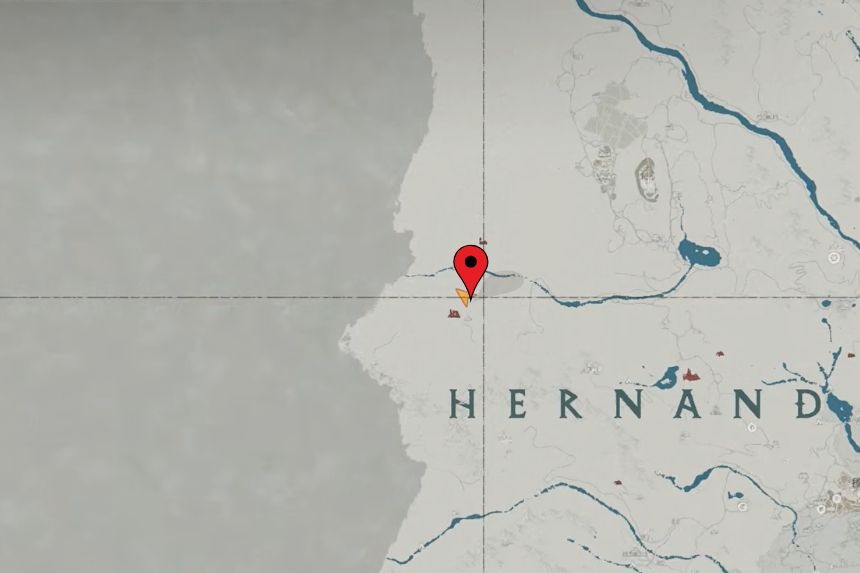
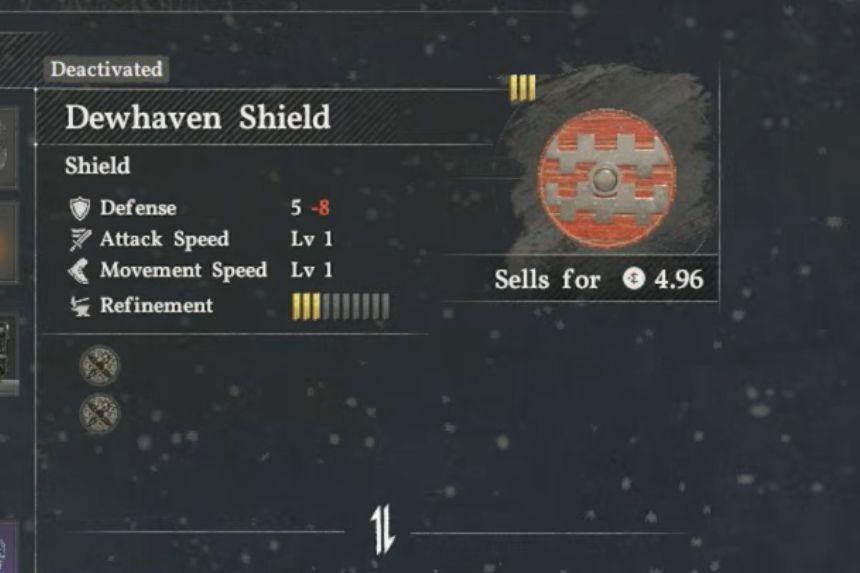
The Dewhaven Shield can be found in the northern part of the Hodmark Ruins. Climb up to the top of the ruins and once you reach the very top, you’ll find the Dewhaven Shield on the right side, sitting on top of some crates/boxes.
All Armor Locations
You can earn unique armour by completing certain quests or solving puzzles. These armour pieces cannot be upgraded using duplicate copies, so you will need other materials if you want to improve them.
Master Trainer’s Touch
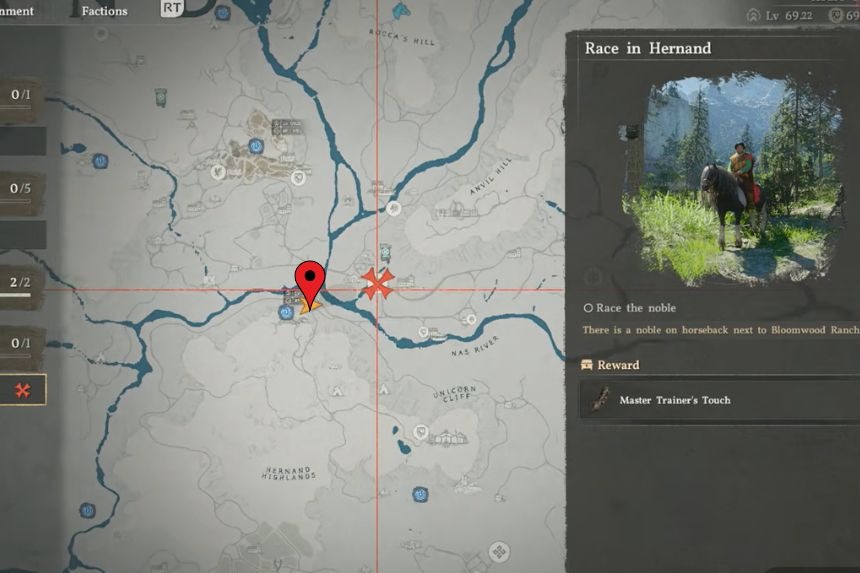
| Attack | 11 |
|---|---|
| Defense | 3 |
| Refinement | 0/10 |
| Critical Rate | Level 1 |
| Sells for | 13.95 |
| Additional | – |
To get the Master Trainer’s Touch, you’ll need to complete the Race in Hernand quest for the House Circus. Once you’ve finished the quest, you’ll get the Master Trainer’s Touch as a reward.
Plate Boots Of The Fallen Kingdom
| Attack | 12 |
|---|---|
| Defense | 5 |
| Attack Speed | – |
| Refinement | 1/10 |
| Sells for | 6.28 |
| Additional | Stamina Regen +2% |
Go over to the marked location and you’ll come across a waterfall. Go behind the waterfall and it will lead you to a cave with the treasure chest containing the Plate Boots Of The Fallen Kingdom. The boots give you Lightning Resistance level 1.
Counterweight Leather Gloves
| Attack | 17 |
|---|---|
| Defense | 4 |
| Refinement | 3/10 |
| Sells for | 1.90 |
| Additional | Lightning Resisance Level 1 |
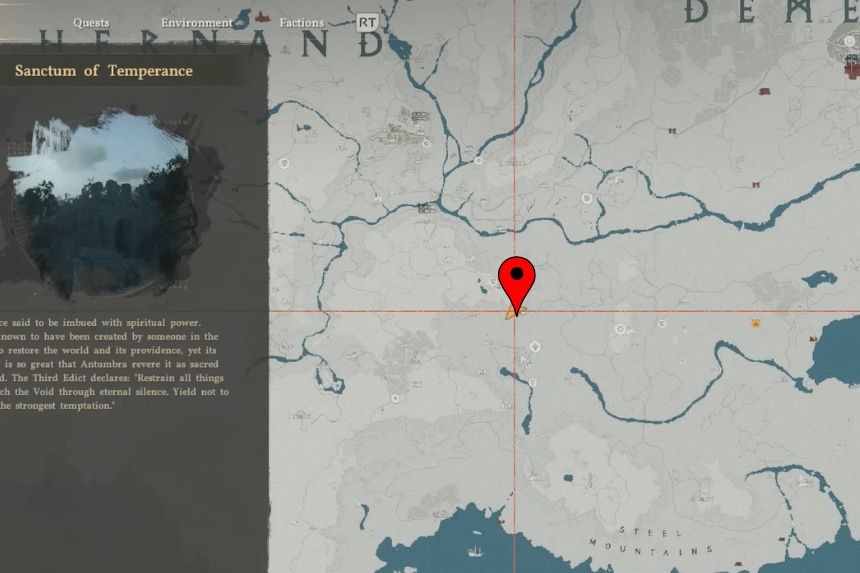
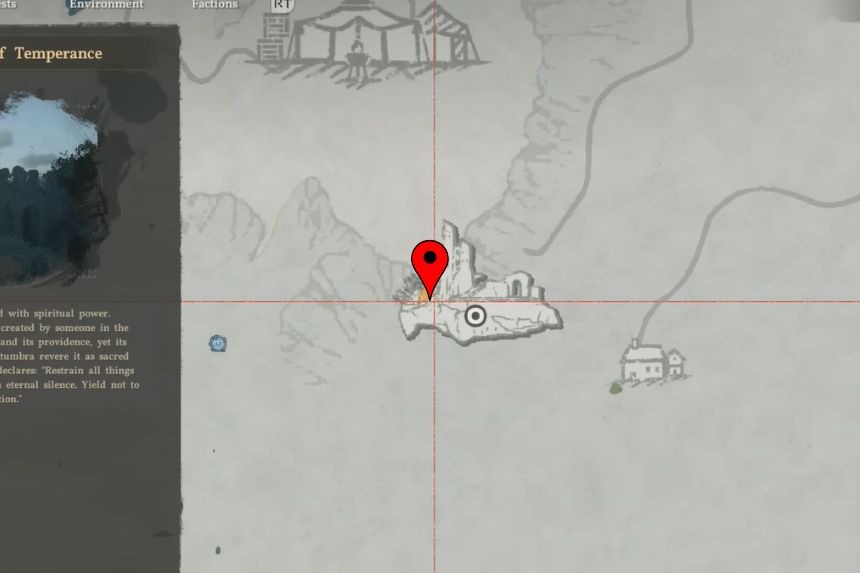
The Counterweight Leather Gloves can be found at the Sanctum of Temperance. Just go to the marked location, and you’ll find yourself standing on top of the sanctum. Jump down and land on the ledge in front of the gate. There’s a lantern on the left side that you’ll need to turn on to open the gate of the sanctum. Go inside, and you’ll find the treasure chest containing the Counterweight Leather Gloves.
Blackwing Leather Armor & Mask
Blackwing Mask
| Attack | – |
|---|---|
| Defense | 4 |
| Movement Speed | Level 1 |
| Refinement | 2/10 |
| Sells for | 7.12 |
| Additional | – |
Blackwing Armor
| Attack | – |
|---|---|
| Defense | 5 |
| Movement Speed | Level 1 |
| Refinement | 1/10 |
| Sells for | 9.25 |
| Additional | Lightning Resistance Lv 1 |
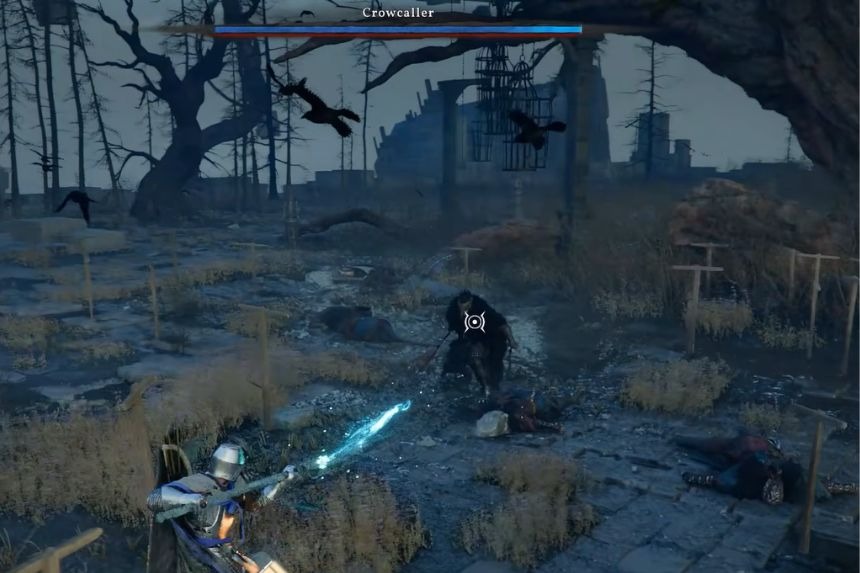
To get the Blackwing Leather Armor & Mask, you’ll need to defeat Crowcaller during the Crow’s Nest quest. The mask offers Defense 4 and Movement Speed level 1, while the armor provides you Defense 5, Movement Speed level 1, and Lightning Resistance level 1.
Hyena Helm
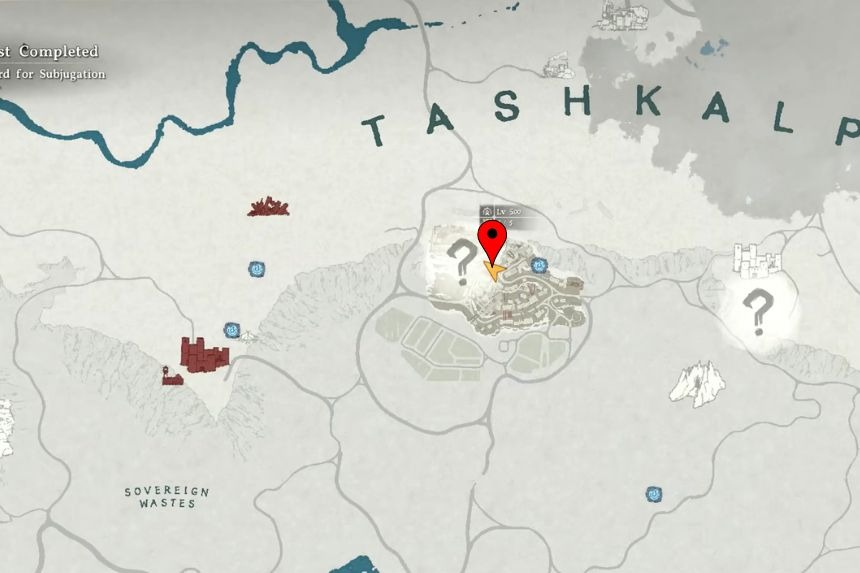
Hyena Helm is rewarded for completing the quest of subjugating Skevald and killing him.
| Defense | 4 |
| Sells for | 15.50 |
| Refinement | |
| Additional | Poison Immunity |
Frostcursed Plate Boots
To obtain the Frostcursed Plate Boots, you’ll need to go to the Denn River. Simply head over to the marked location to reach the river where you’ll find a waterfall as well. Go behind the waterfall and it will lead you to a cave. Inside the cave, you’ll find the treasure chest with the Frostcursed Plate Boots inside it.
Wolf Tracker Leather Boots
| Attack | 11 |
|---|---|
| Defense | 3 |
| Movement Speed | Level 1 |
| Sells for | 15.22 |
| Additional | Abyssal Toxin Immunity |
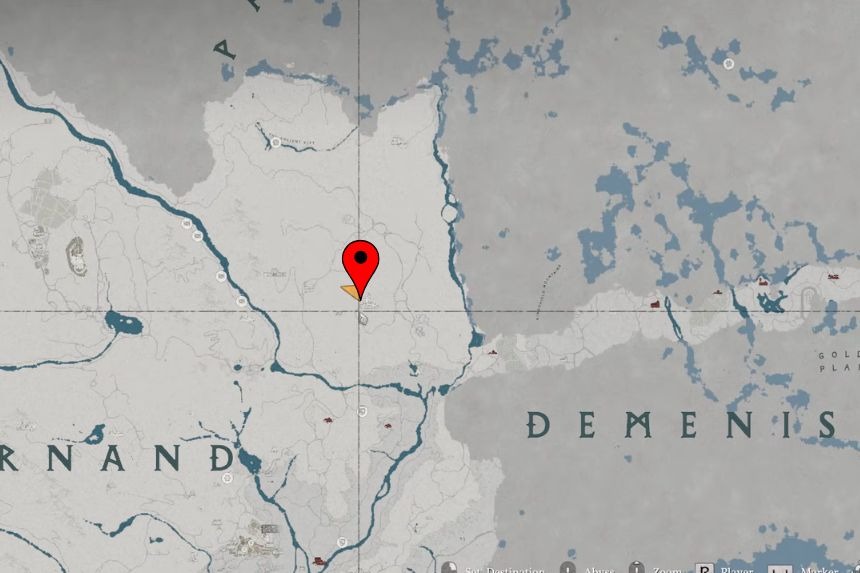
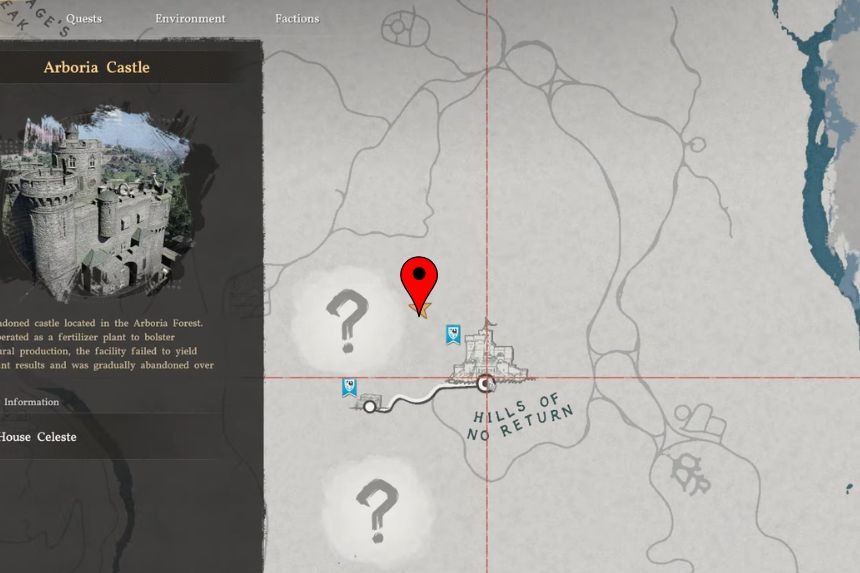
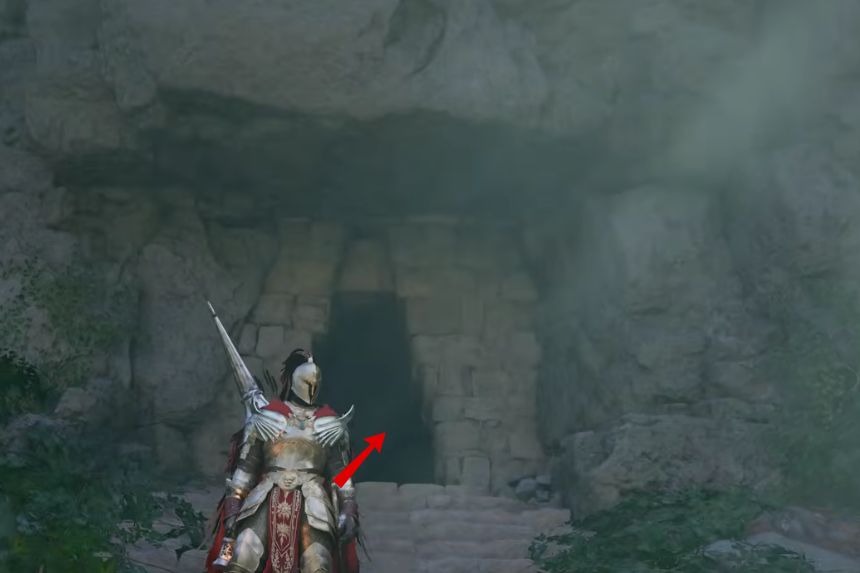
To get the Wolf Tracker Leather Boots, you’ll need to go near Arboria Castle. Once you reach the marked location in Arboria Forest, you’ll find the Sanctum of the Goddess Whose Prayers Ceased. Go inside, then use the ladder to go down, follow the path on the left, jump down, go left again, and you’ll come across a stone wall that acts as a hidden door. Use the handle on the left to open the door and access the room where the boots are.
Radiant Plate Boots
The location of Radiant Plate Boots is in a small water cave in Windbloom Springs.
| Attack | 19 |
|---|---|
| Defense | 7 |
| Refinement | 4/10 |
| Sells for | 6.38 |
| Additional | Fire Resistance lvl 1Climb Speed Multiplier 2.0% |
Light of the Battlefield Cloth Cloak
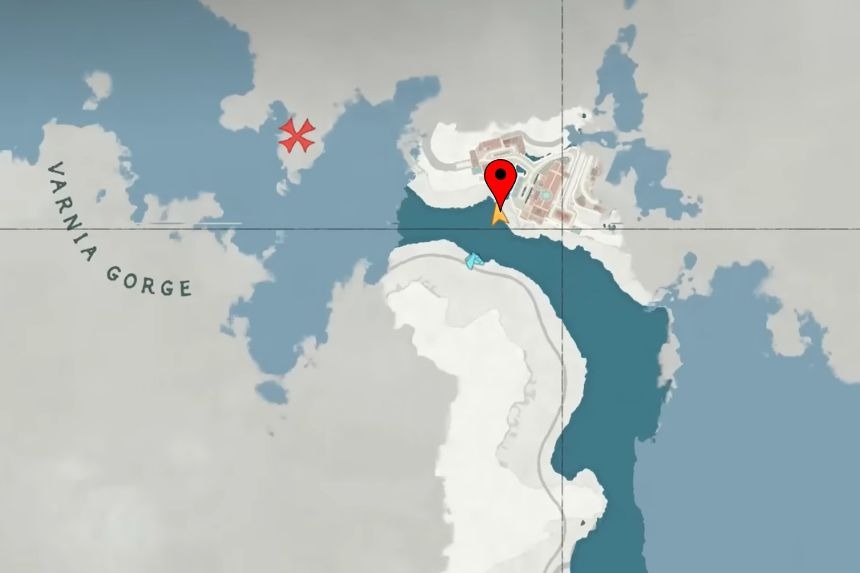
The location of the Light of the Battlefield Cloth Cloak is in Sun’s Gate Cave. It is hidden behind a waterfall in Varnua City.
| Defense | 4 |
|---|---|
| Refinement | 4/10 |
| Sells for | 4.40 |
| Additional | Ice Resistance lvl 3 |
Desert Marauders Cloak
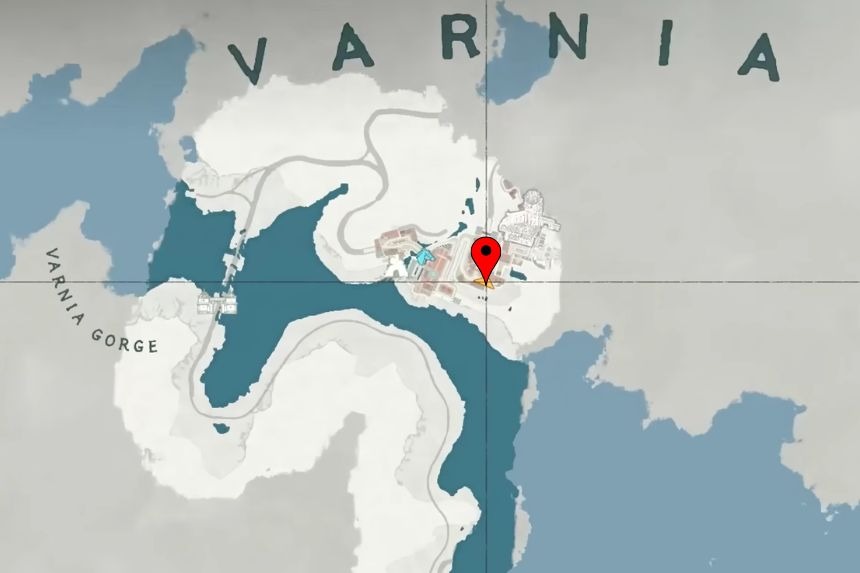
The location of Desert Marauders Cloak is in the Taylor shop in Varnia City.
| Defense | 2 |
|---|---|
| Additional | Helm DisguiseIce Resistance lvl 3 |
Bolton Plate Set

Bolton Plate Helm
| Attack | – |
|---|---|
| Defense | 4 |
| Refinement | 2/10 |
| Sells for | 4 |
| Additional | – |
Bolton Plate Armor
| Attack | – |
|---|---|
| Defense | 8 |
| Refinement | 0/10 |
| Sells for | 7 |
| Additional | – |
Bolton Plate Cloak
| Attack | – |
|---|---|
| Defense | 2 |
| Refinement | 2/10 |
| Sells for | 6 |
| Additional | Fire Resistance Level 3 |
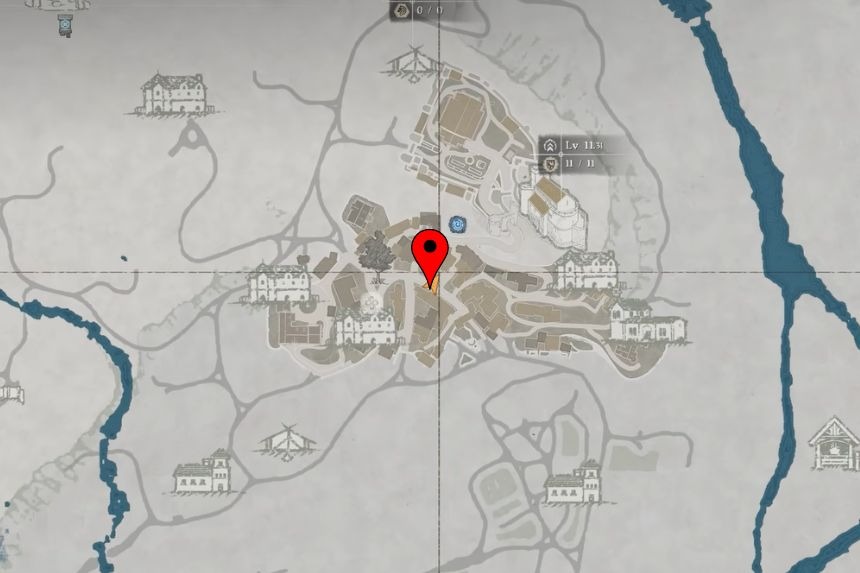
To get the Bolton Plate set, you’ll need to head over to the Contribution Shop in Hernand. Go to the marked location and you’ll reach the castle area, where on the left side, you’ll find the shop. Go inside, talk to Haldwin, and buy the entire set from him.
Unyielding Warrior’s Set

Unyielding Warrior’s Plate Armor
| Defense | 4 |
|---|---|
| Refinement | 0/10 |
| Sells for | 5.82 |
Unyielding Warrior’s Plate Helm
| Defense | 2 |
|---|---|
| Refinement | 0/10 |
| Sells for | 5.28 |
Unyielding Warrior’s Plate Cloak
| Defense | 1 |
|---|---|
| Refinement | 1/10 |
| Sells for | 5.82 |
| Fire Resistance | Level 3 |
Unyielding Warrior’s Plate Boots
| Attack | 10 |
|---|---|
| Defense | 4 |
| Refinement | 0/10 |
| Sells for | 1.51 |
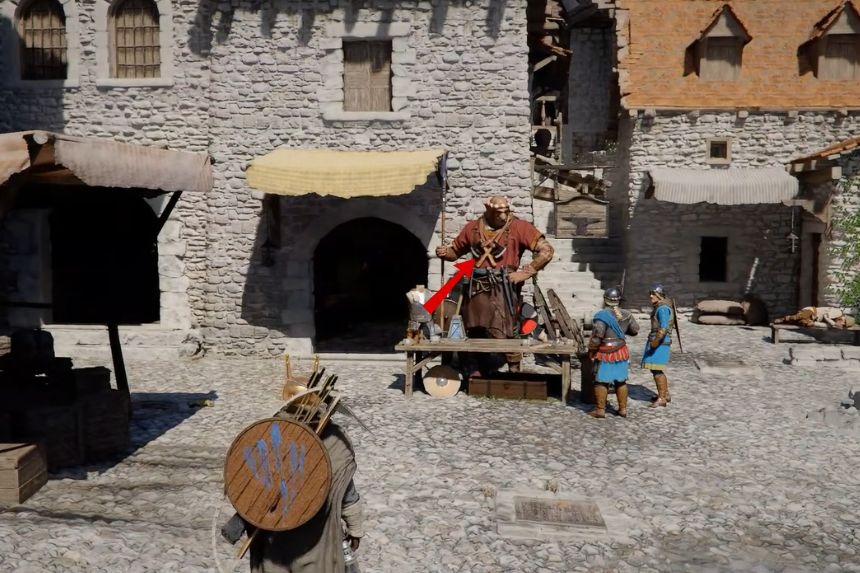
The Unyielding Warrior’s set can be bought from a shop in the Calphedean Territory. Just go to the marked location and you’ll find a cluster of small shops on the right side. You’ll see that there’s a shop in the front with a man and woman chatting in front of it; this is the Calphade Equipment Shop where you’ll find Temir, the person who sells you the Warrior set.
Canta Plate Set
Canta Plate Helm
| Defense | 3 |
|---|---|
| Attack Speed | – |
| Refinement | 1/10 |
| Sells for | 2.82 |
| Additional | Daze Immunity |
Canta Plate Armor
| Defense | 6 |
|---|---|
| Attack Speed | – |
| Refinement | 1/10 |
| Sells for | 6.18 |
Canta Plate Gloves
| Defense | 3 |
|---|---|
| Attack | 13 |
| Refinement | 1/10 |
| Sells for | 2.22 |
Canta Plate Cloak
| Attack Speed | – |
|---|---|
| Refinement | 0/10 |
| Sells for | 5.82 |
| Additional | Fire Resistance Level 2 |
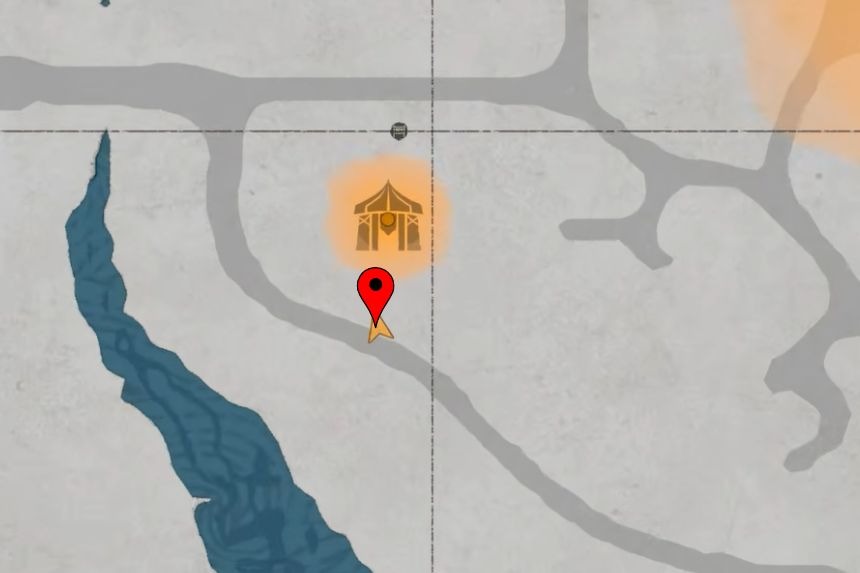
To get the Canta Plate set, you will first have to defeat Matthias during the main story named “For Honor,” and then go to the Hernand Equipment Shop located in the northwestern part of the map. There, you can buy the Canta Plate set easily from the shopkeeper Rhett.
St. Halssius Priest’s Set

St. Halssius Priest’s Hat
| Defense | 3 |
|---|---|
| Movement Speed | Lv 1 |
| Sells for | 57 |
| Additional | St. Halssius Disguise |
St. Halssius Priest’s Attire Armor
| Defense | 2 |
|---|---|
| Movement Speed | Lv 1 |
| Sells for | 1.14 |
| Additional | St. Halssius Disguise |
St. Halssius Priest’s Cloak
| Defense | 3 |
|---|---|
| Movement Speed | – |
| Sells for | 80 |
| Additional | St. Halssius Disguise, Ice Resistance Lv 3 |
St. Halssius Priest’s Leather Footwear
| Attack | 9 |
|---|---|
| Defense | 2 |
| Movement Speed | Lv 1 |
| Sells for | 46 |
| Additional | St. Halssius Disguise |
You can obtain the St. Halssius Priest’s Set during the main story Familiar Curses. Go to the marked location and it will take you to the St. Halssius’s House of Healing. Engage in dialogue with the guard standing on the gate and he will give you the St. Halssius Priest’s Set.
Plate Armor Of Shadows Set
Plate Helm of the Shadows
| Defense | 8 |
|---|---|
| Attack Speed | – |
| Refinement | 3/10 |
| Sells for | 5.84 |
| Additional | Glacial Domain, Daze Immunity |
Plate Armor of the Shadows
| Defense | 13 |
|---|---|
| Attack Speed | – |
| Refinement | 3/10 |
| Sells for | 12.65 |
| Additional | Petrification Immunity, Stamina Regen +2% |
To get the Plate Armor of Shadows Set, you’ll first need to complete chapter 6 of the main story and then go to the marked location, which will take you to the Hoenmark Ruins. There, you’ll find Beloth the Darksworn, whom you’ll need to defeat and take the armor set from him.
Plate Cloak of the Shadows
| Defense | 13 |
|---|---|
| Attack Speed | – |
| Refinement | 3/10 |
| Sells for | 8.29 |
| Additional | Fire Resistance Level 7 |
Plate Armor of the Shadows
| Defense | 13 |
|---|---|
| Attack Speed | – |
| Refinement | 3/10 |
| Sells for | 12.65 |
| Additional | Petrification Immunity, Stamina Regen +2% |
Plate Gloves of the Shadows
| Defense | 3 |
|---|---|
| Attack | 18 |
| Refinement | 3/10 |
| Sells for | 6.35 |
| Additional | Climb Speed Multiplier 2.0%, Swim Speed Multiplier 2.0% |
Plate Boots of the Shadows
| Defense | – |
|---|---|
| Attack | 16 |
| Refinement | 3/10 |
| Sells for | 6.21 |
| Additional | +10.0% Skill EXP Gain, Climb Speed Multiplier 2.0% |
To get the Plate Armor of Shadows Set, you’ll first need to complete chapter 6 of the main story and then go to the marked location, which will take you to the Hoenmark Ruins. There, you’ll find Beloth the Darksworn, whom you’ll need to defeat and take the armor set from him.
Witters Plate Helm
| Attack | – |
|---|---|
| Defense | 3 |
| Refinement | 1/10 |
| Sells for | 5.98 |
| Additional | Daze Immunity |
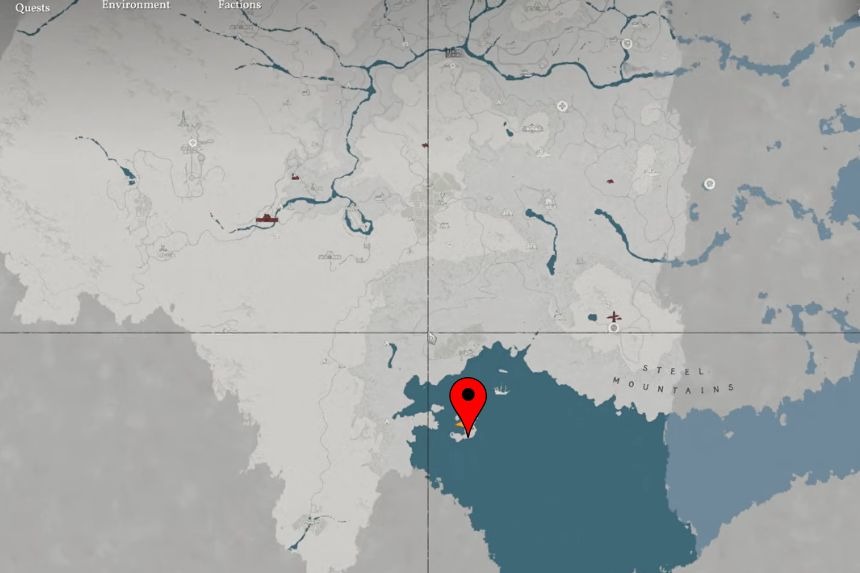
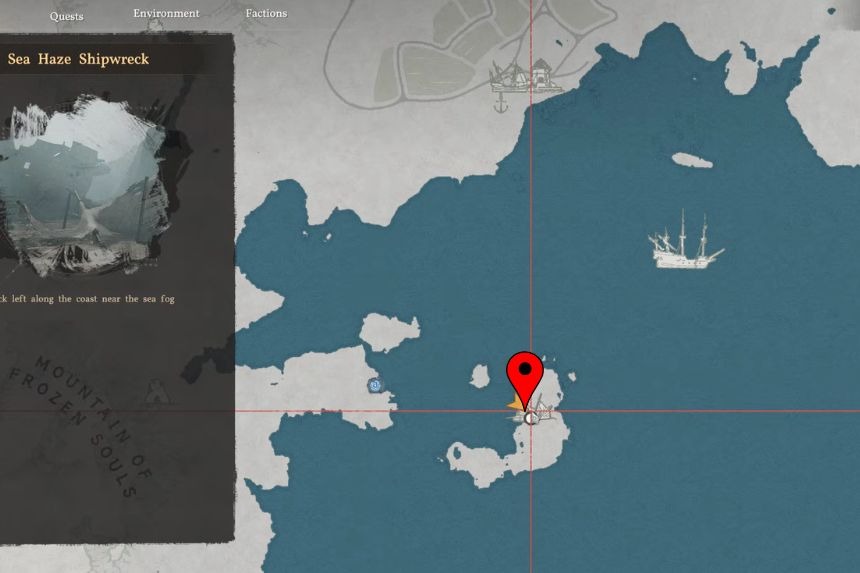
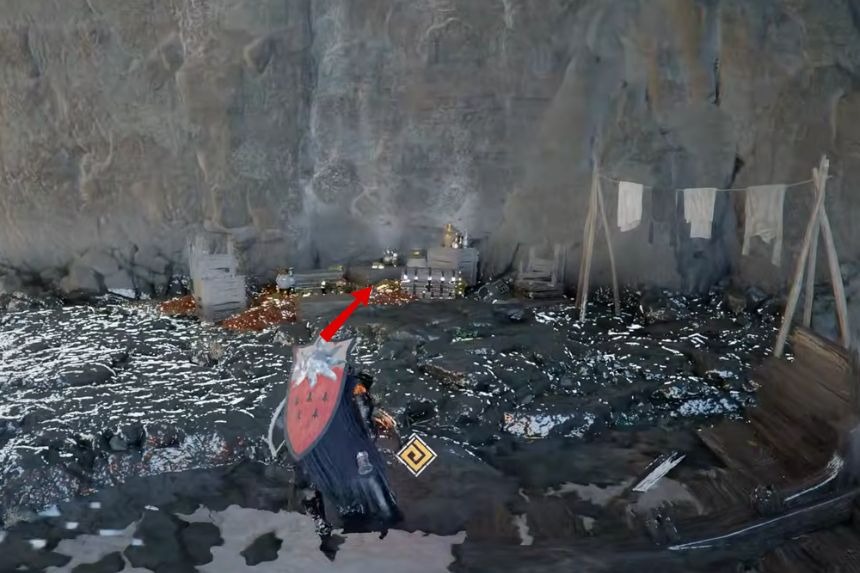
To get the Witters Plate Helm, you’ll need to go to the Sea Haze Shipwreck near the sea fog region. Once you’re at the location, you’ll find the broken ship’s structure on your right, and just opposite to it, you’ll find an area with a treasure chest and wooden boxes. The Witters Plate Helm can be found lying near them.
Horse Plate Armor

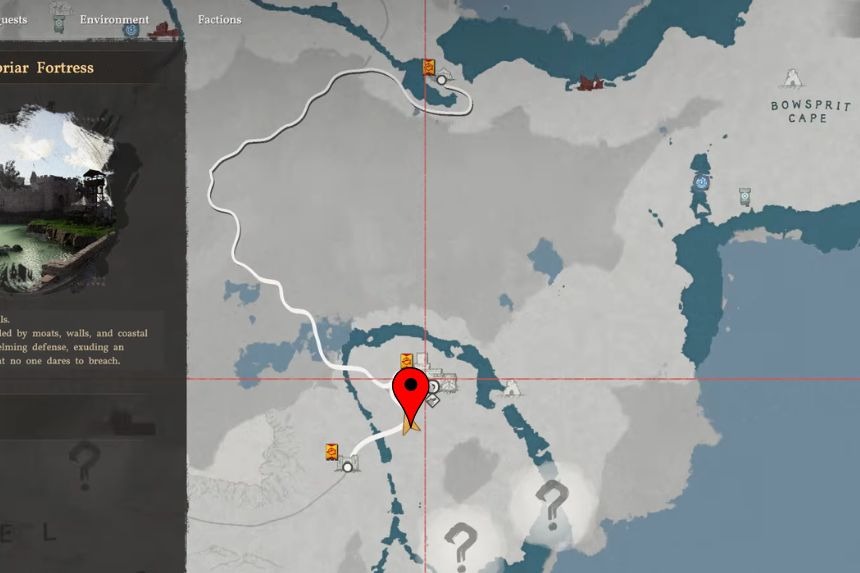
To get the Horse Plate Armor, you’ll need to go to the Thornbriar Fortress. Enter the fortress from the left side and follow the path until you come across a circular structured building. Go inside and descend the stairs until you reach the bottom where you’ll find a table on the left side with the Warhorse Tack blueprint. Once you’ve got the blueprint, go to the Turnali, and get the armor crafted from him.
Exclaire Barding
| Attack | – |
|---|---|
| Defense | 10 |
| Sells for | Cannot Sell |
| Additional | – |
Wells Military Barding
| Attack | – |
|---|---|
| Defense | 50 |
| Sells for | 19.57 |
| Additional | – |
Wells Military Champron
| Attack | – |
|---|---|
| Defense | 10 |
| Sells for | 5.75 |
| Additional | – |
Wells Warhorse Saddle
| Attack | – |
|---|---|
| Defense | 50 |
| Sells for | 1.10 |
| Additional | – |
Wells Military Stirrups
| Attack | – |
|---|---|
| Health | +0.6 every 1 sec |
| Sells for | 3.67 |
| Additional | – |
Golden Greed Plate Armor Set
Golden Greed Plate Cloak
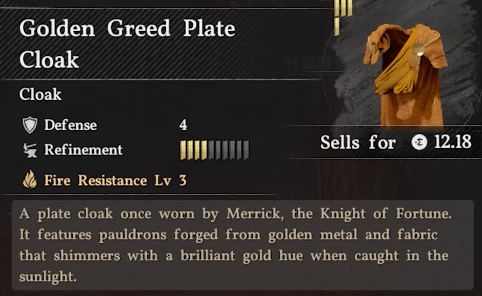
The great thing about the Golden Greed set is that you can get them all in a single run without having to defeat bosses and they are so close by one another. All of the armor in the set can also be upgraded so you can use them till the end-game if you choose.
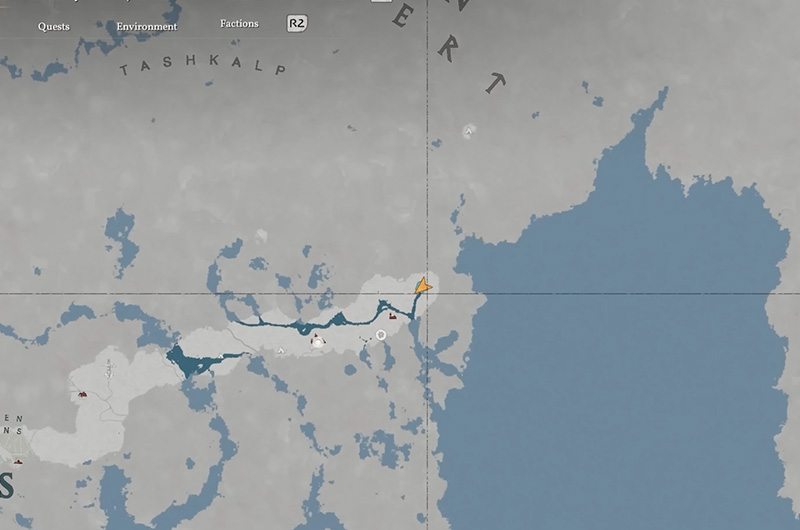
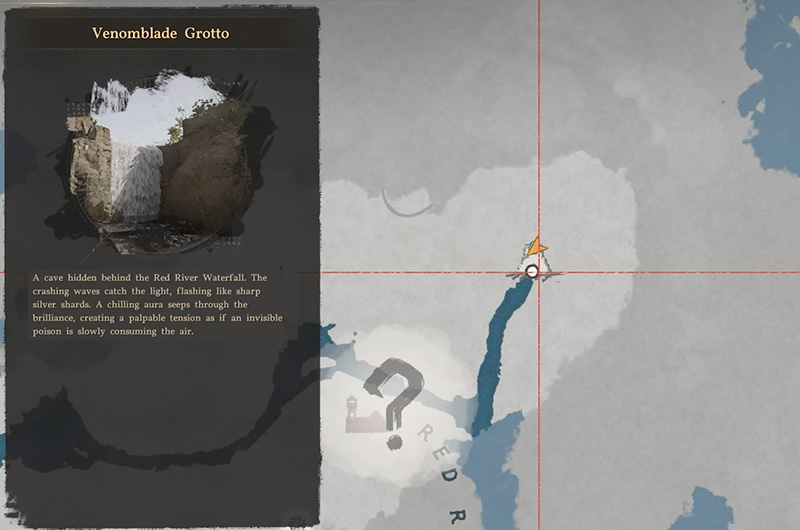
The Golden Greed Plate Clock is in the Venomblade Grotto. Go to the location on the map and you will notice two waterfalls. Go to the second waterfall or the east most. Use the stab to pierce through the waterfall and inside in a chest you will find the Plate Cloak.
Golden Greed Plate Boots
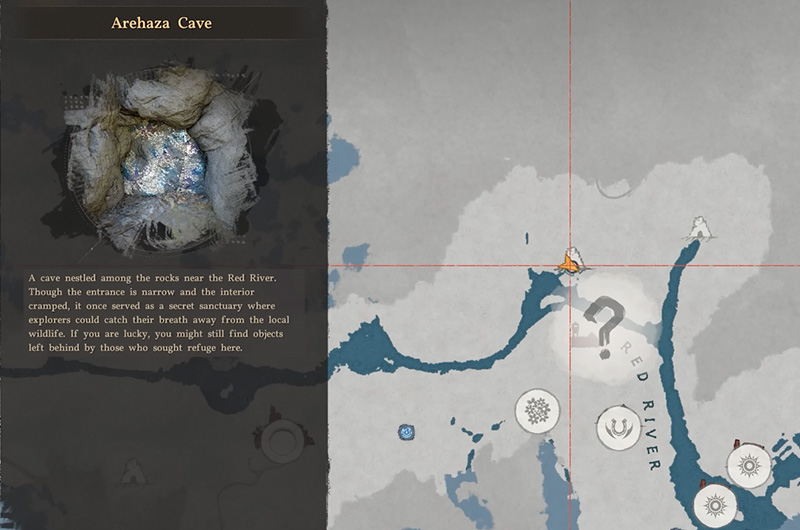
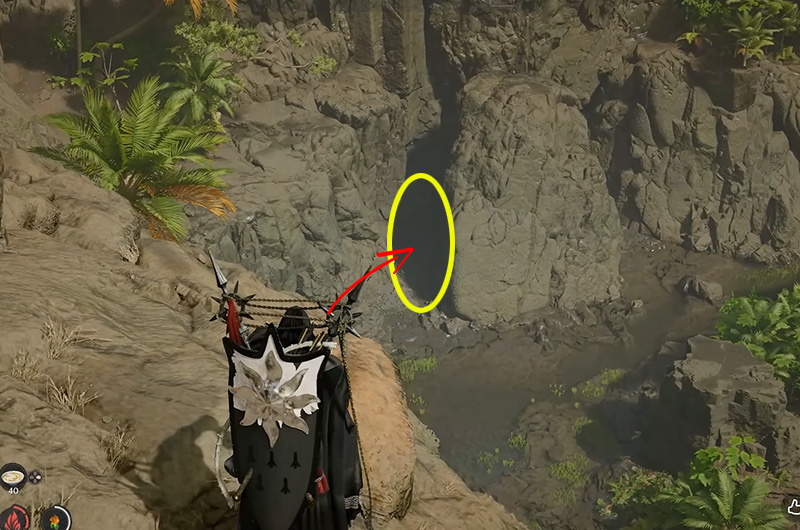
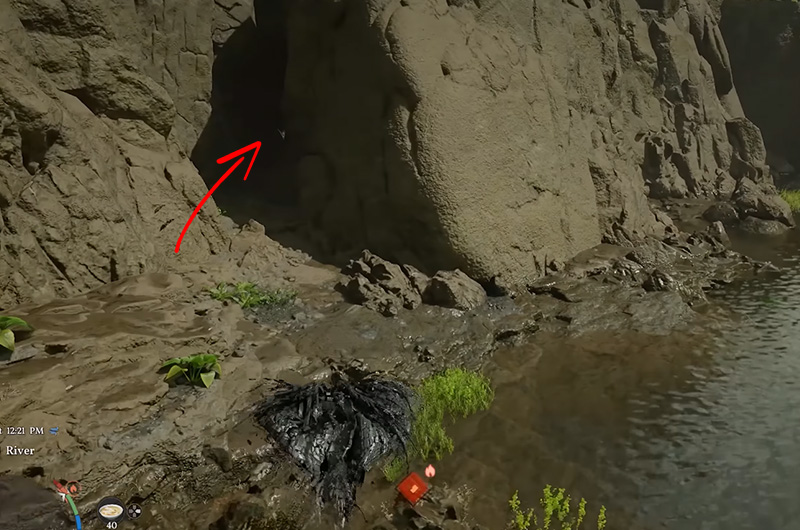
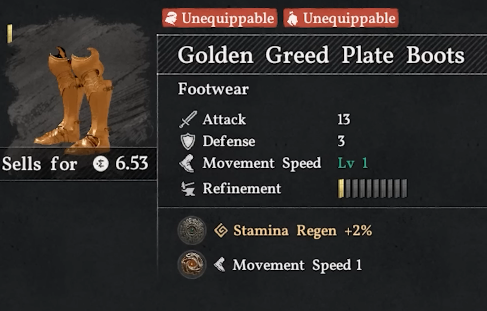
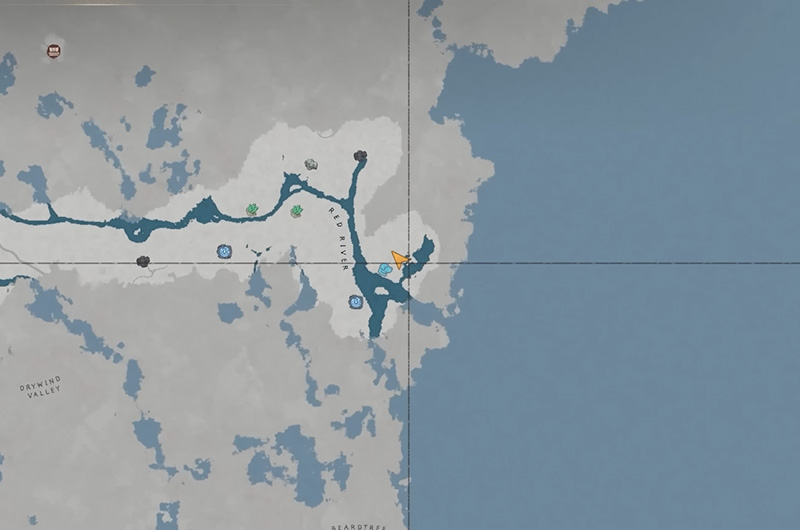
For the Plate Boots, you need to go to Arehaze Cave. If you have already been to the Sanctum of Renunciation, the cave is straight below down the cliff. Go to the location on the map and head inside the cave. You will need to remove the boulder blocking the path with your forced palm. Inside the cave in a chest you will find the Golden Greed Plate Boots.
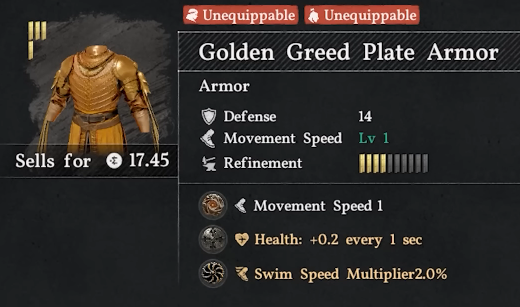
Golden Greed Plate Armor
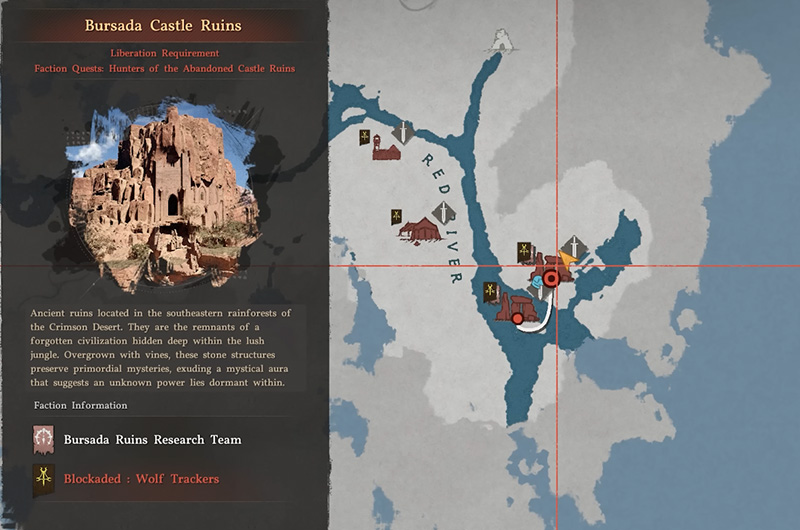
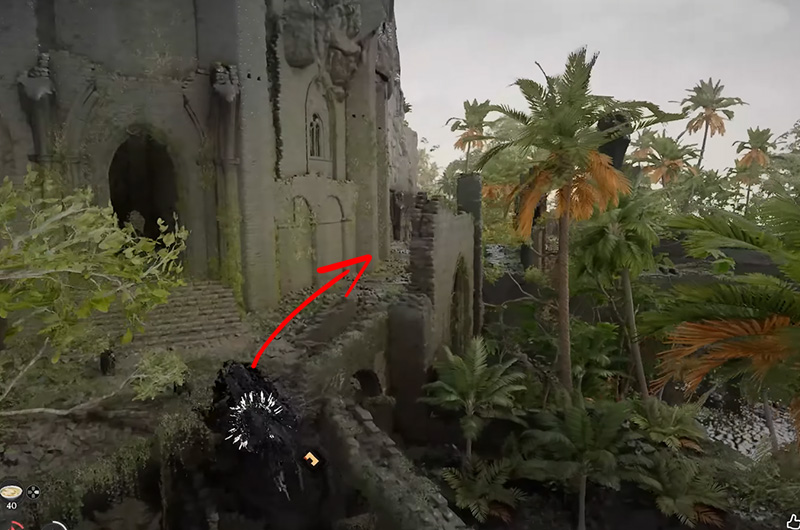

For plate armor, you need to go to the Bursada Castle Ruins. This area has a lot of enemies, but you do not need to engage them for the armor. Follow the above map and image cues. When you arrive at the location, depending on where you are you will notice a big archway, follow the path on the right next to the archway and you will come up some stairs.
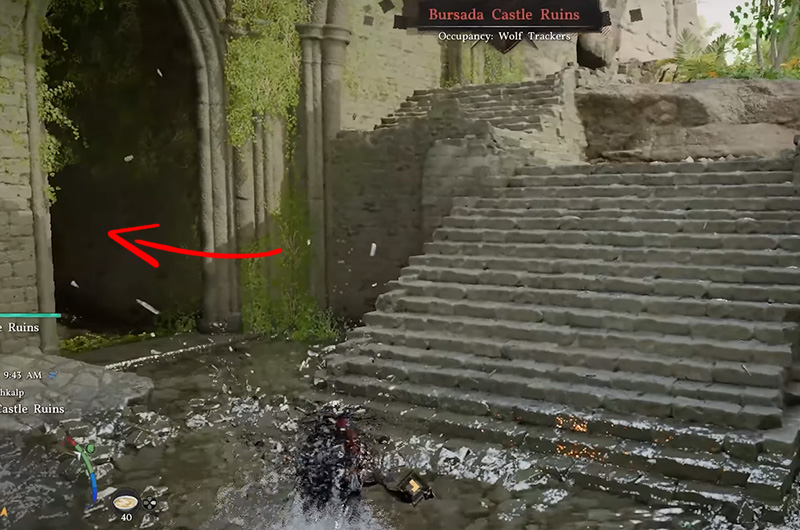
Go down the stairs and take the first left and go straight. If you use your lantern at this point, you will notice a wall that can be punched down. Use the force palm to open the way and there is a chest there with the Golden Greed Plate Armor.
Golden Greed Plate Helm


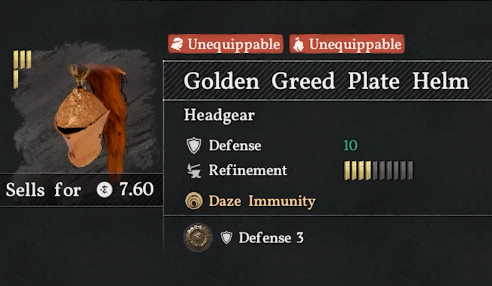
To get the Golden Greed Plate Cloak, you need to head to the Sanctum of Renunciation. When you arrive at the map location, you will notice a ruin, it’s the sanctum. If you approach the Sanctum from the south, the plate cloak is easily accessible. Clear the enemies and light the two lanterns to reveal a room that has the chest with the plate cloak.
Golden Greed Plate Gloves
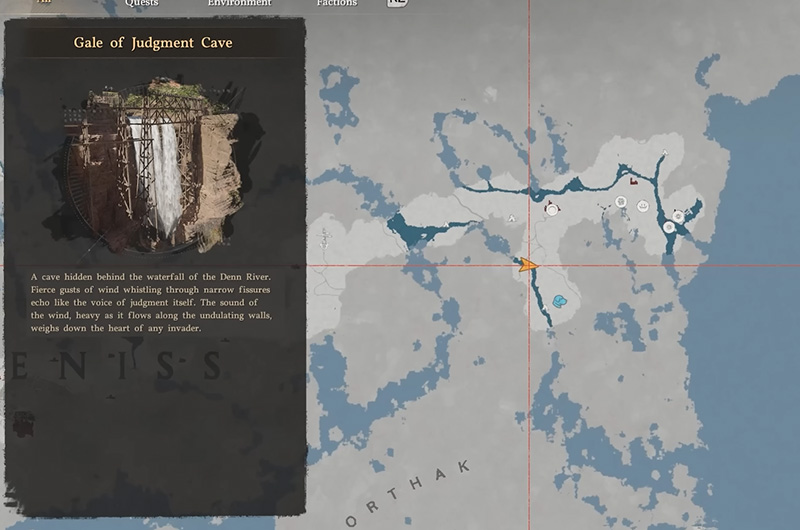
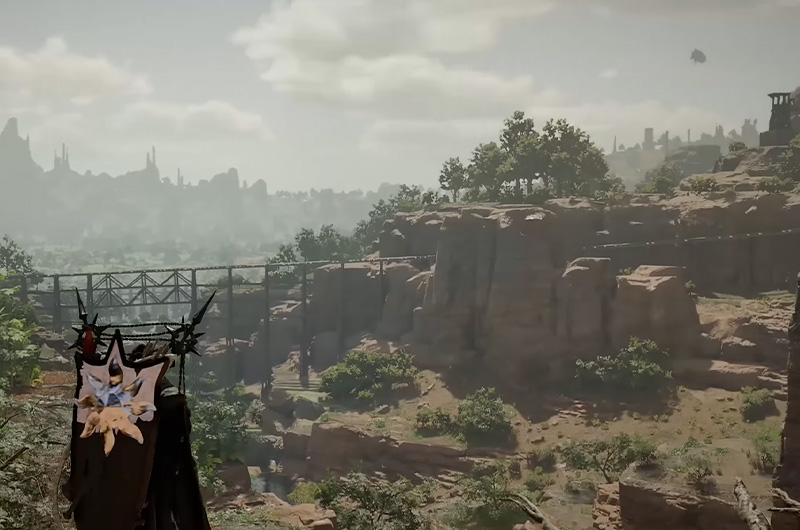
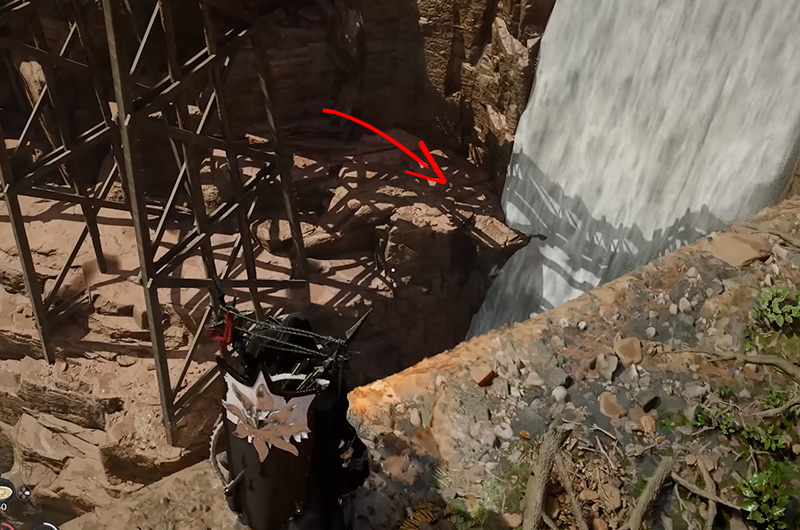
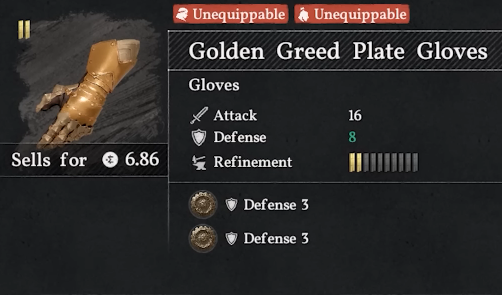
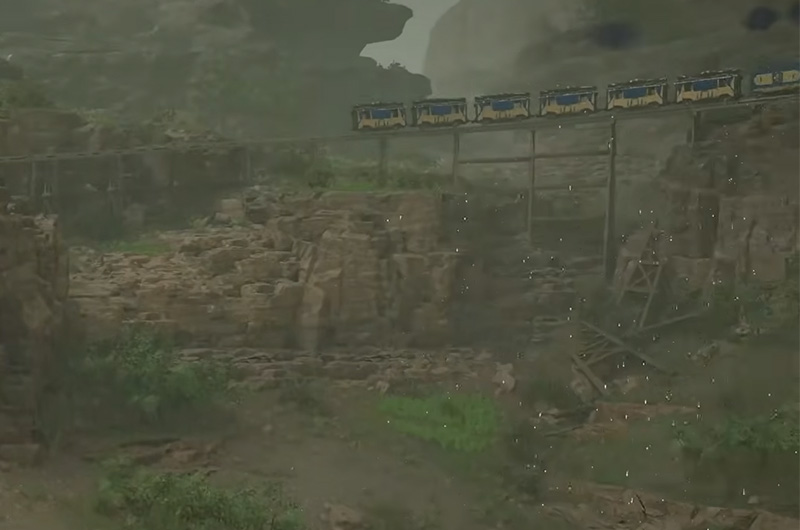
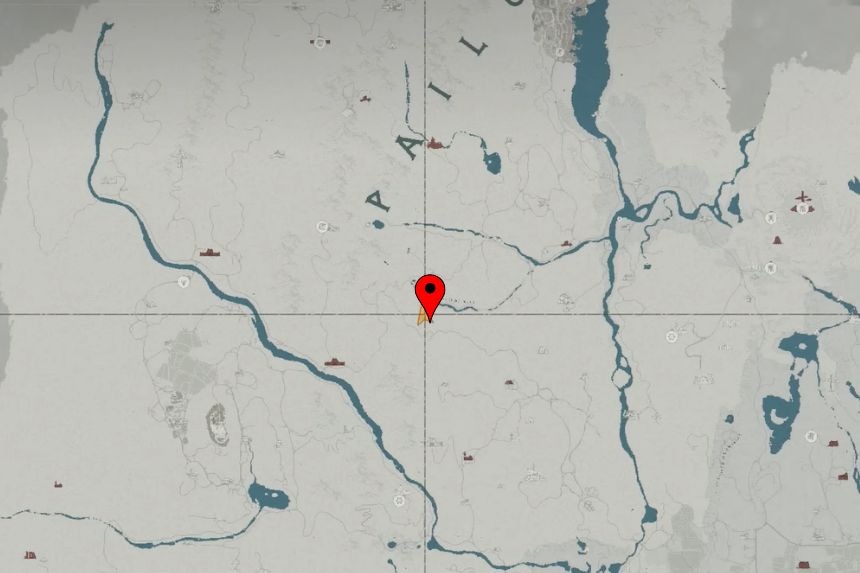
To get the final piece to complete the set, you need to go to the Gale of Judgement Cave. This is another cave hidden behind a waterfall. Go to the location and you will notice a train tracks bridge, the waterfall underneath is where you need to go. Jump down from the cliff, but don’t go all the way down, there is a platform midway, you need to stab the waterfall there, which will take you inside. Go in and claim your reward – The Golden Greed Plate Gloves.
Vaporwalker
| Attack | 16 |
|---|---|
| Defense | 5 |
| Refinement | – |
| Sells for | 14.94 |
| Additional | Skipping Stones (in shallow) |
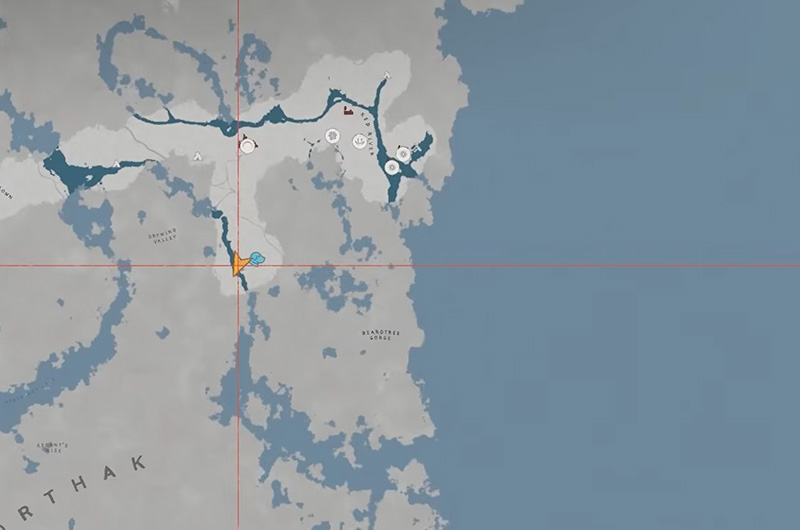
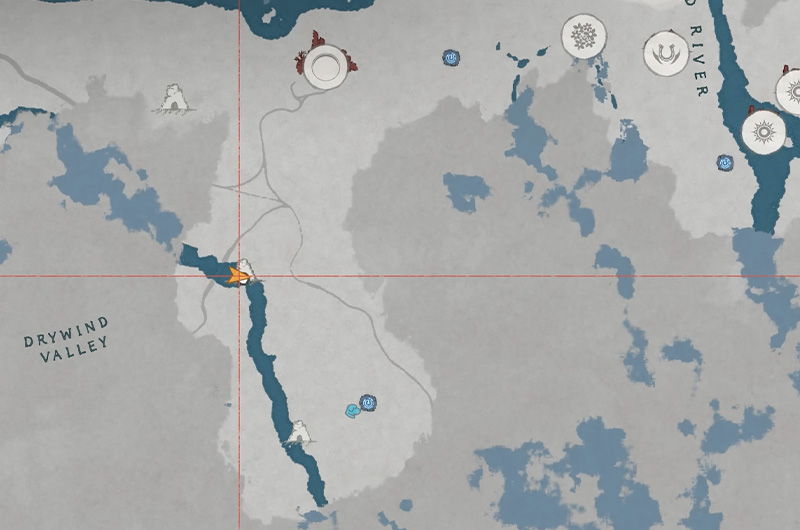
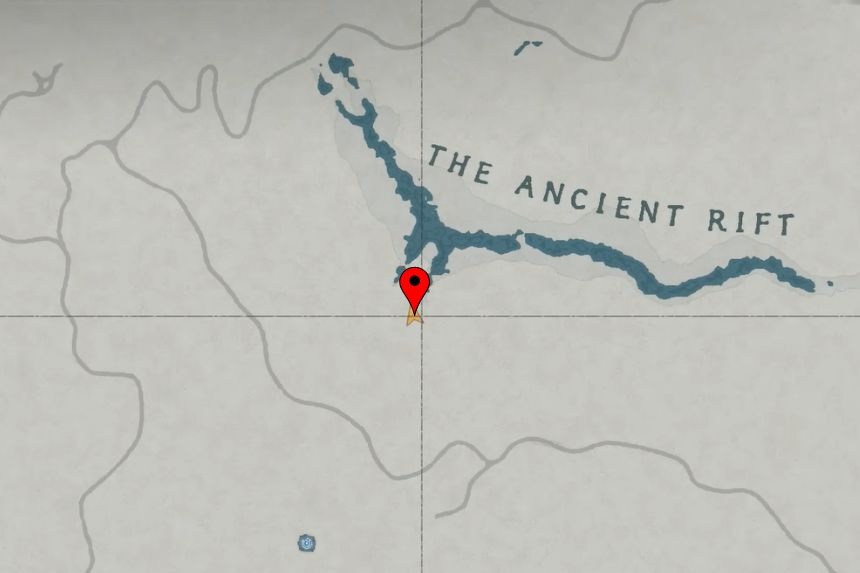
To get the Vaporwalker, you’ll need to go to the Ancient’s Heart Cave in Ancient Rift. Simply go to the marked location and you’ll find yourself on top of the waterfall crest. Jump down and go behind the waterfall to enter the cave; there, you’ll find a treasure chest containing the Vaporwalker.
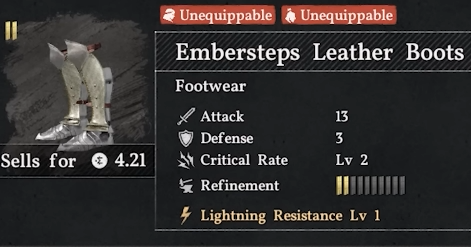
Emberstep Leather Boots
| Attack | 13 |
|---|---|
| Defense | 3 |
| Refinement | 2/10 |
| Critical Rate | Level 2 +2 |
| Sells for | 4.21 |
| Additional | Lightning Resistance Level 1 |
To get the Emberstep Leather Boots, you’ll need to go to the Cave of Knowledge. Go to the marked location and you’ll find yourself near a waterfall in Hills of No Return. Jump down and go behind the waterfall to reach the cave. There, you’ll find a treasure chest containing the Emberstep Leather Boots.
Dancing Catfish Cloth Armor
| Attack | – |
|---|---|
| Defense | 3 |
| Movement Speed | Level 1 |
| Sells for | 3.31 |
| Additional | Pirate Disguise |
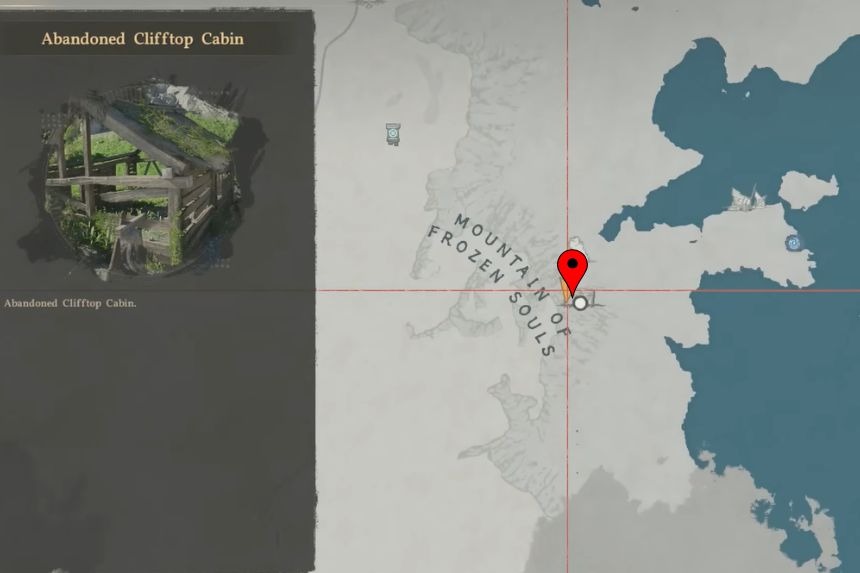
To get the Dancing Catfish Cloth Armor, you’ll need to go to the Abandoned Cliffside Cabin located on the Mountain of Frozen Souls. Head over to the marked location and you’ll find the cabin to your right. The Dancing Catfish Cloth Armor can be found just outside the cabin near a crate.
Scorchflame Helmet
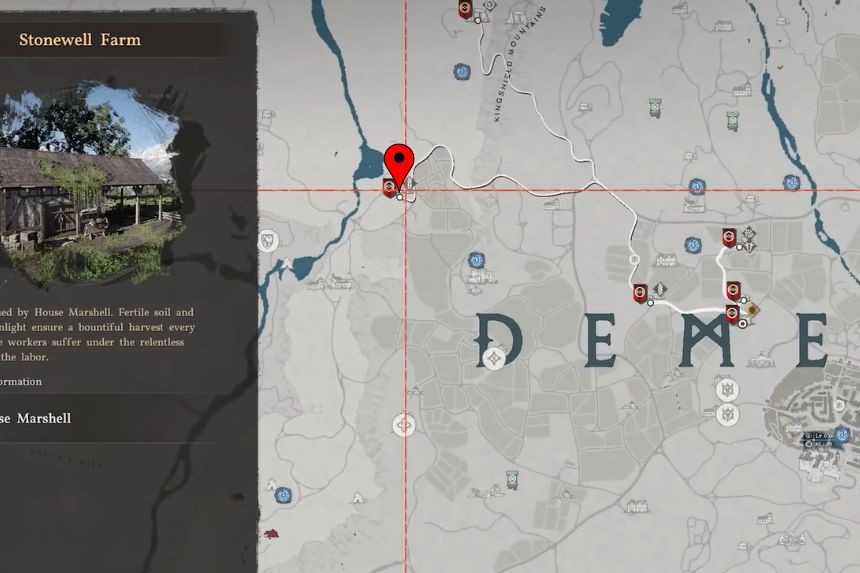
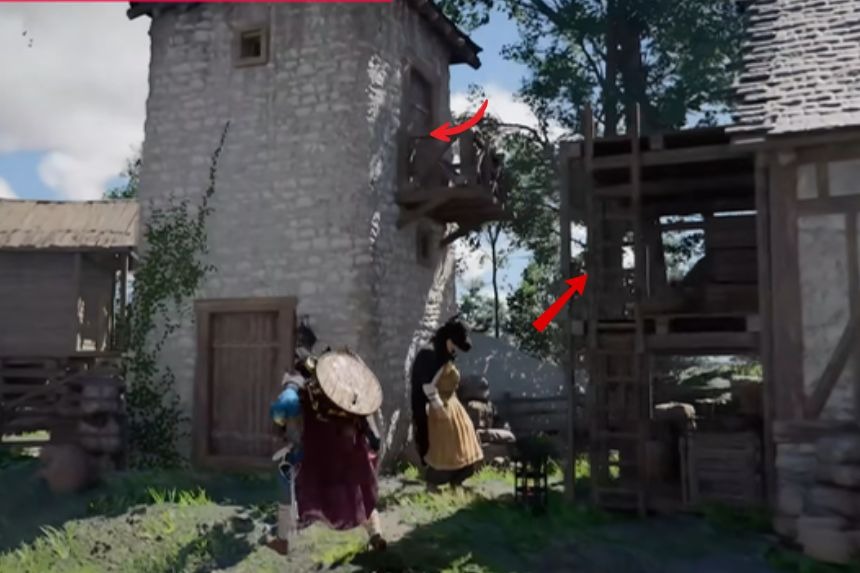
To get the Scorchflame Helmet, you’ll need to go to the Stonewell Farm and find the small tower. You’ll need to climb the nearby building, use the ladder, and jump across to the tower’s gate. Inside, you’ll find a treasure chest containing the Scorchflame Helmet.
Scorchflame Chest Plate
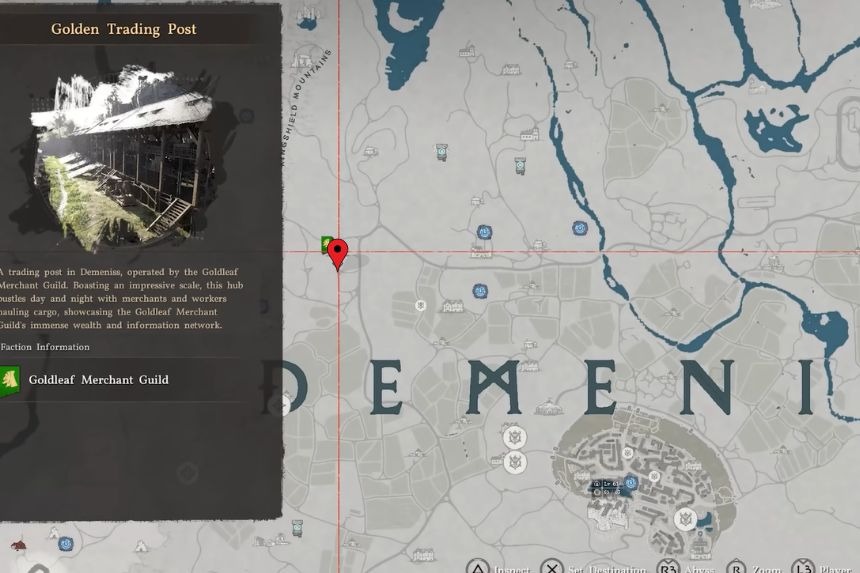
To obtain the Scorchflame Chest Plate, you’ll need to go to the Golden Trading Post and find the rotating wooden board acting as a door. Go behind it and you’ll find the treasure chest containing the Scorchflame Chest Plate. Once you’ve gotten this, your Scorchflame Chest will be complete.
Grey Wolf Leather Boots, Cloak, and Armor
Grey Wolf Leather Boots
| Attack | 13 |
|---|---|
| Defense | 2 |
| Refinement | 1/10 |
| Sells for | – |
| Additional | Lightning Resistance Level 1 |
Grey Wolf Leather Armor
| Attack | – |
|---|---|
| Defense | 9 |
| Refinement | 3/10 |
| Sells for | – |
| Additional | Lightning Resistance Level 1 |
Grey Wolf Leather Cloak
| Attack | – |
|---|---|
| Defense | 3 |
| Refinement | 3/10 |
| Sells for | – |
| Additional | Lightning Resistance Level 1 |
The Grey wolf set can be purchased from the merchant Lola by going to the Tailor’s Shop in Pauline. Remember though, you’ll have to gift her money bags in order to increase her friendship level to 100. After it’s maxed out, she will sell the Grey Wolf set to you.
Embersteps Leather Boots
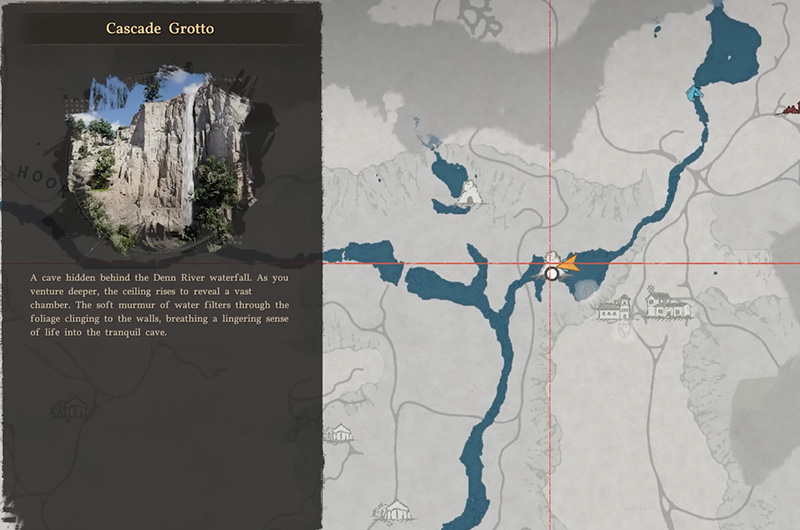
To get the Embersteps Leather Boots, go to Cascade Grotto and you will find a waterfall there, go to the platform close to the waterfall and use the Stab skill to pierce through to the other side. Go to the end of the cave and inside a chest you will find the Embersteps Leather Boots.
Ashad Plate Helm

| Attack | – |
|---|---|
| Defense | 5 |
| Refinement | 3/10 |
| Sells for | 3.81 |
| Additional | Daze Immunity |
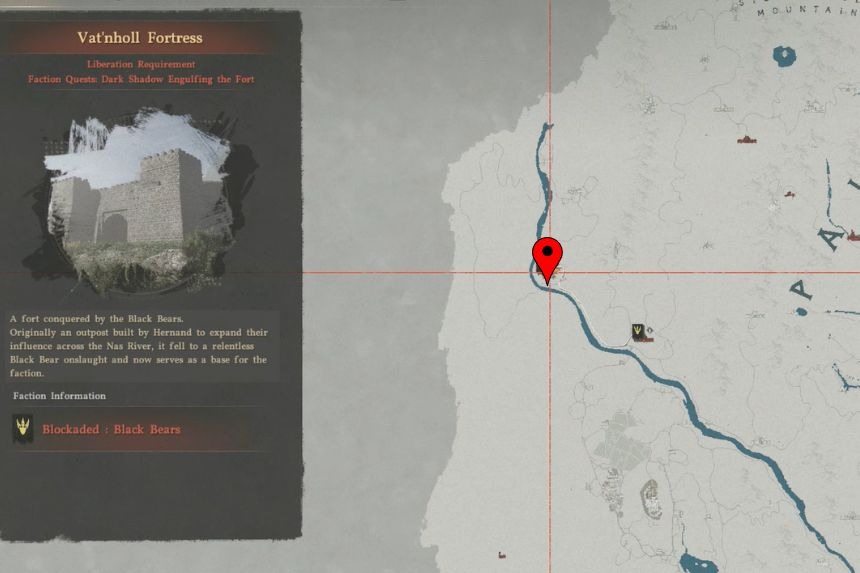
You get the Ashad Plate Helm as a reward for defeating the White Bearclaw at Vat’nholl Fortress. Just go to the marked location and you’ll find the White Bearclaw roaming just outside the Vat’nholl Fortress.
Ashad Plate Boots

| Attack | 16 |
|---|---|
| Defense | 7 |
| Refinement | 3/10 |
| Sells for | 5.45 |
| Additional | Health: +0.1 every 1 sec, Climb Speed Multiplier 2.0 |
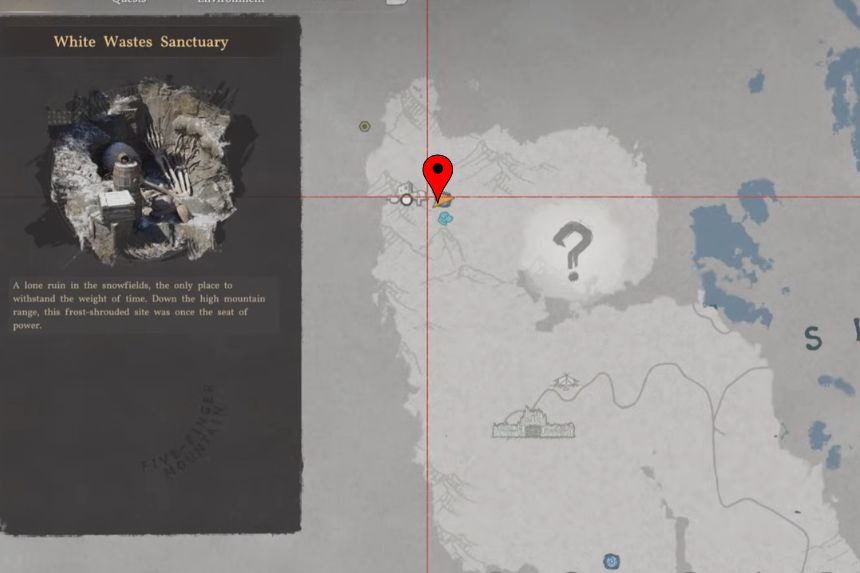
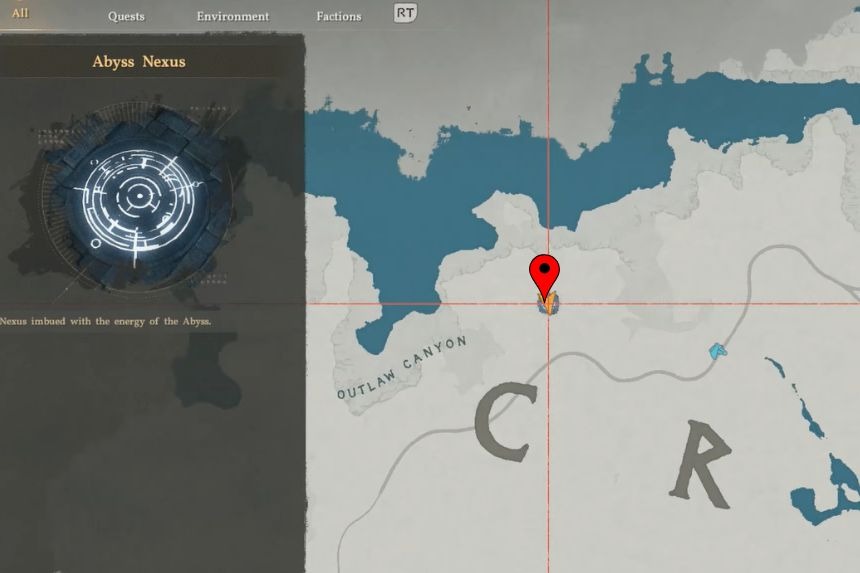
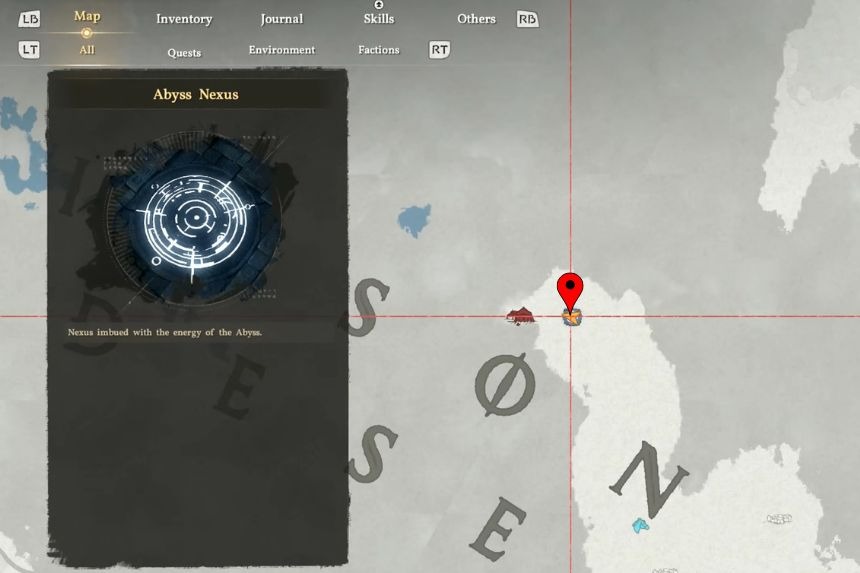
To get the Ashad Plate Boots, you’ll need to go to the White Wastes Sanctuary. You can reach it by traveling from Hernand using fast travel points while sticking to the right side of the mountains, since the left path is blocked. Once you reach the nearby fast travel point by the Abyss Nexus, head down to the waterfall below it and use the stab ability to get behind it, where you’ll find a hidden cave with several chests. Open the treasure chest in the middle to get the boots.
Tidebreaker Boots

| Attack | 13 |
|---|---|
| Defense | 4 |
| Movement Speed | Level 1 |
| Sells for | 14.27 |
| Additional | Tidebreaker while swimming |
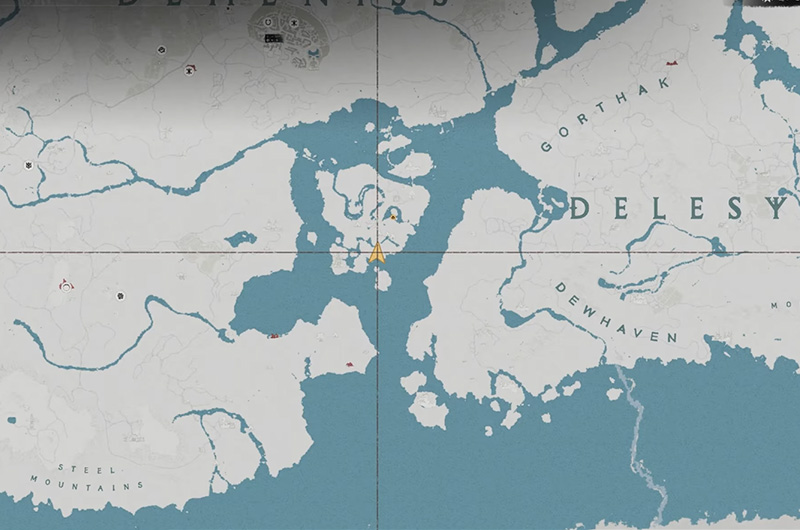
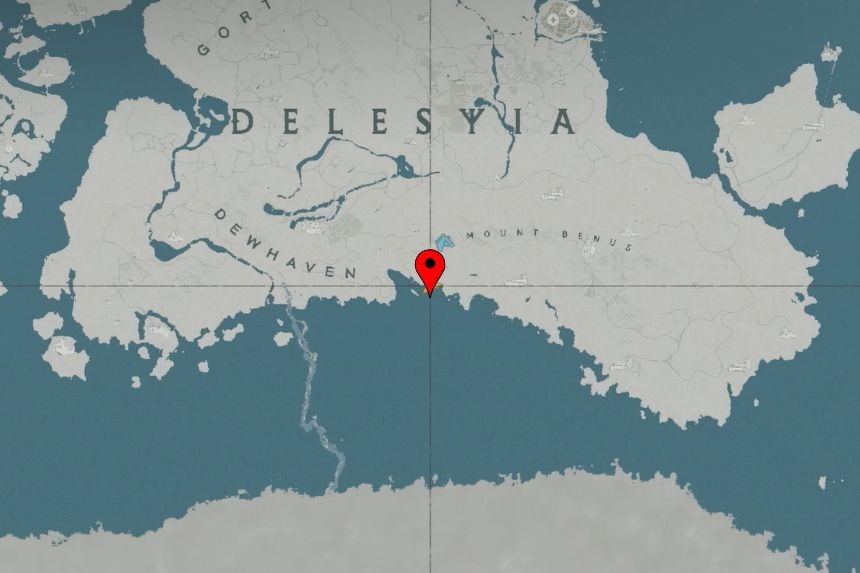
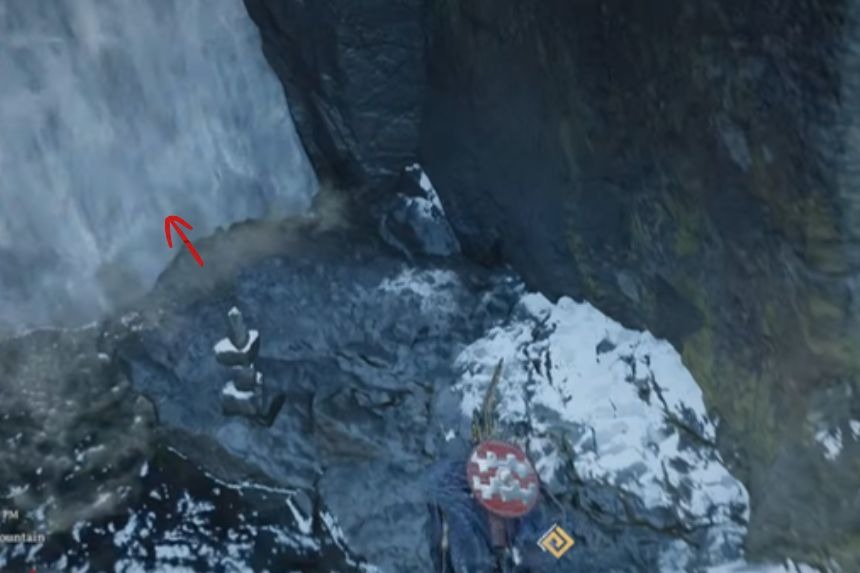
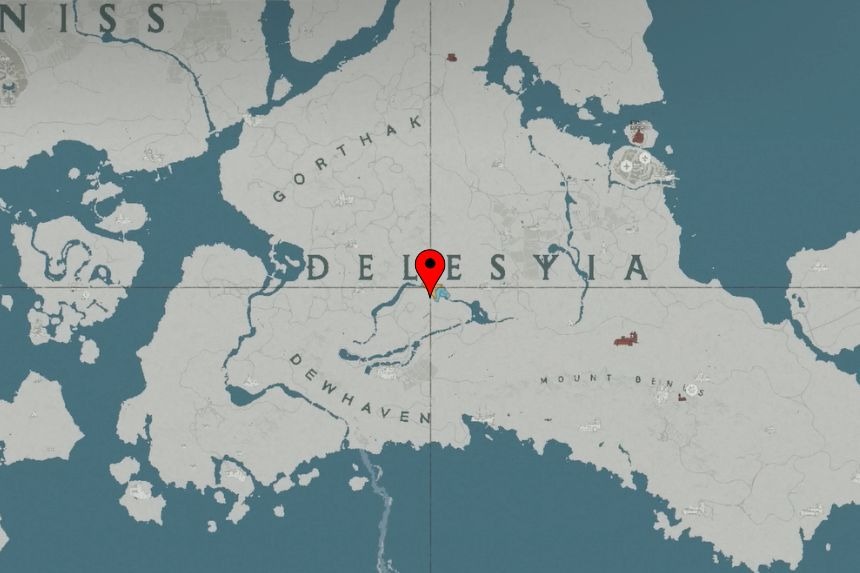
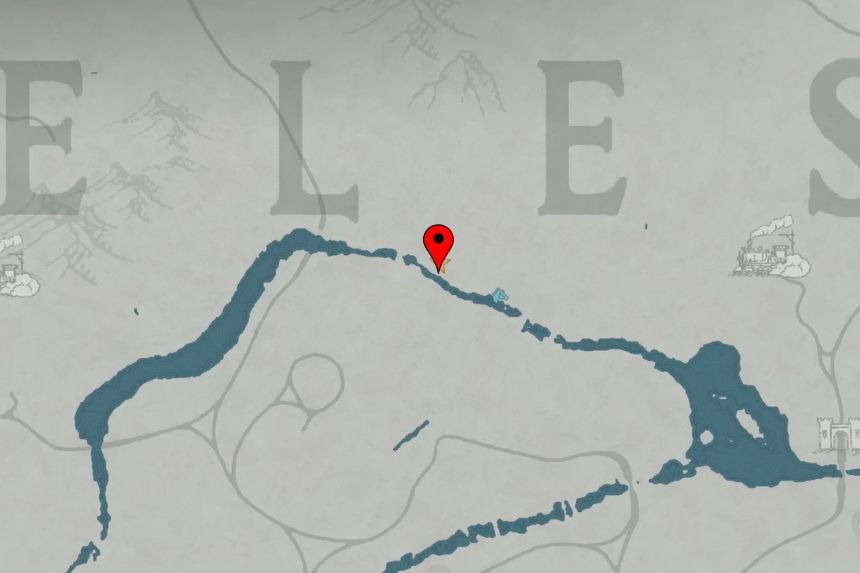
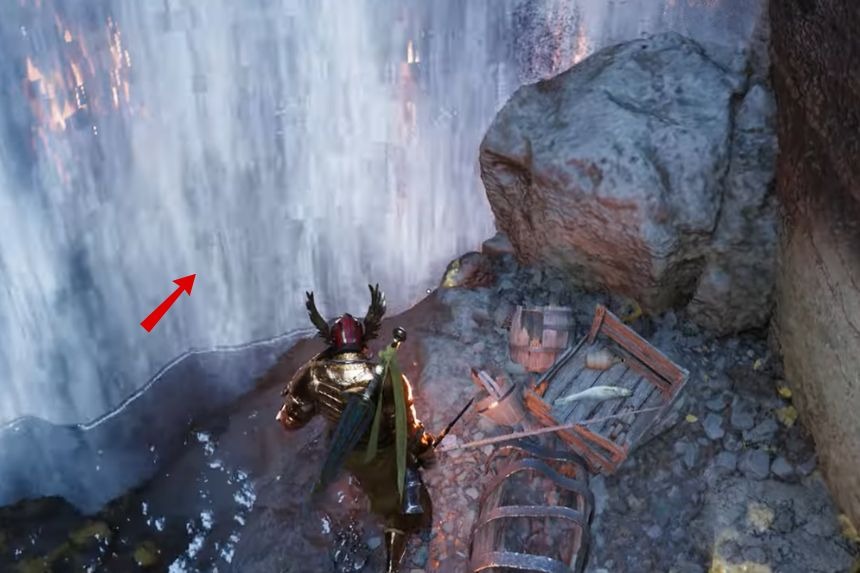
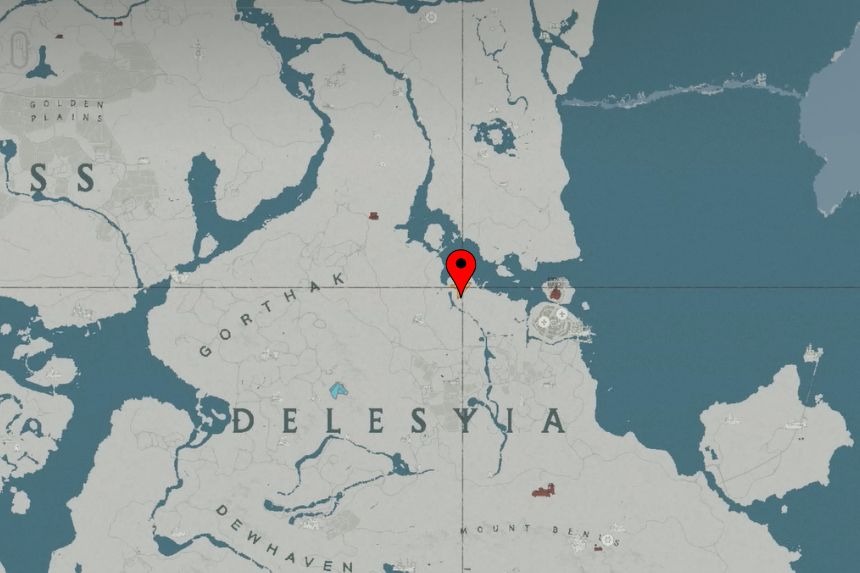
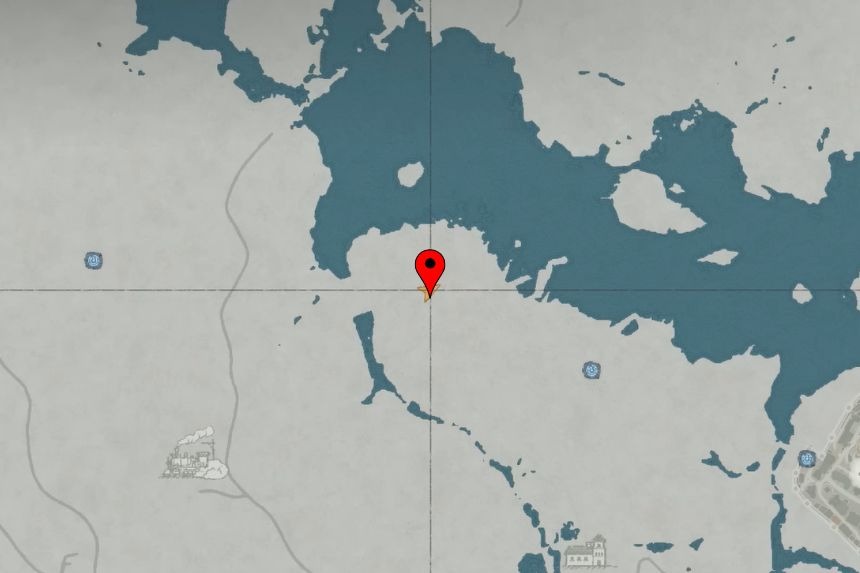
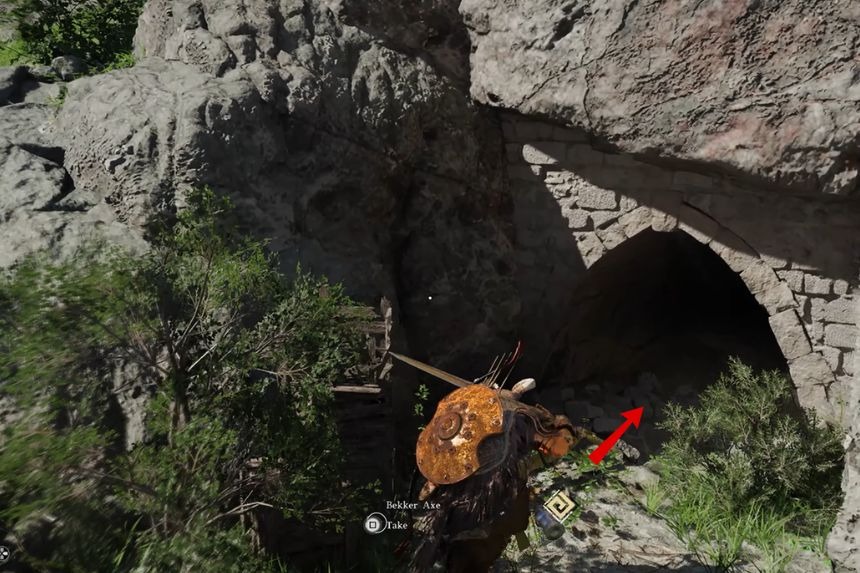
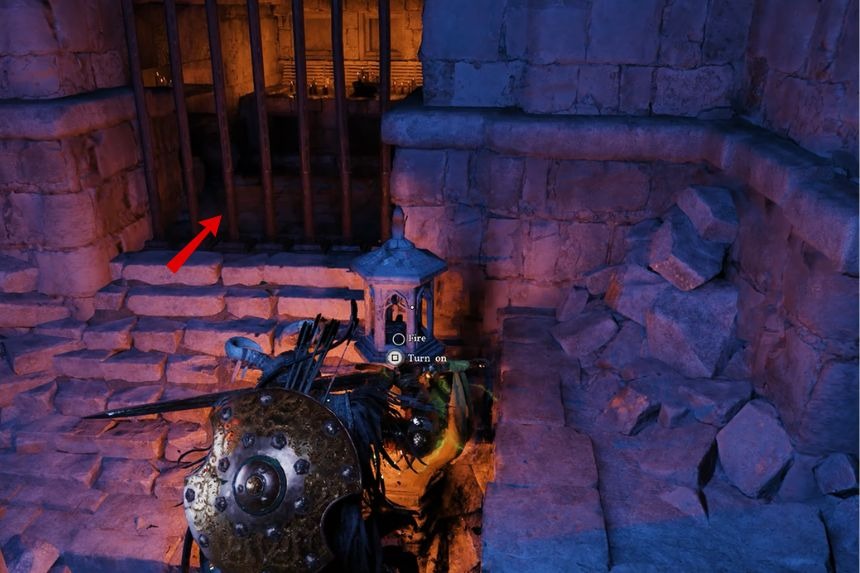
The Tidebreaker Boots can be obtained from the Guardian’s Cave located in Delesyia. Go to the marked location and you’ll come across a waterfall. Go behind the it and use stab against the wall to gain entrance to the cave. Once inside the cave, you’ll face another stone wall which you’ll need to break to reach the treasure chest containing the Tidebreaker Boots.
Herald of Six O’Clock
| Attack | – |
|---|---|
| Defense | 2 |
| Movement Speed | – |
| Sells for | 14.13 |
| Additional | Cock-a-doodle-doo! |
The Herald of Six O’Clock is a headgear found inside the Rune Fortress that’s west of Delesyia City. Once you reach the marked location, go down towards the right and you’ll come across the fortress entrance. Go inside and follow the path to your right. Keep going until you come across a gate in front of which there is a lantern. Turn the lantern’s fire on to open the gate and get the Herald of Six O’Clock.
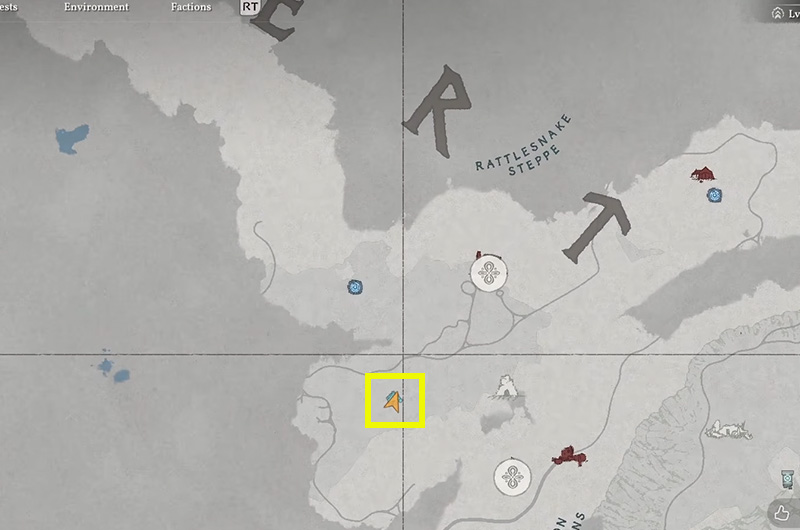
Light of the Battledield Plate Helm
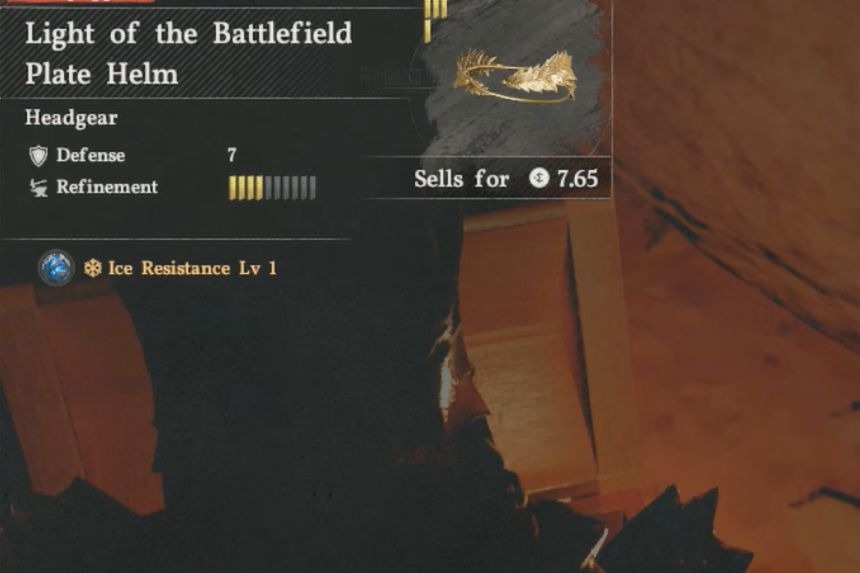
The Light of the Battlefield Plate Helm can be found hidden inside a large rock just north of Crimson Desert. Use the Abyss Nexus to fast travel and reach the marked location, turn right, jump down, and then towards the huge rock that’s in the middle of the water body. You’ll find the Light of the Battledield Plate Helm pressed between the rocks.
Light of the Battlefield Plate Armor

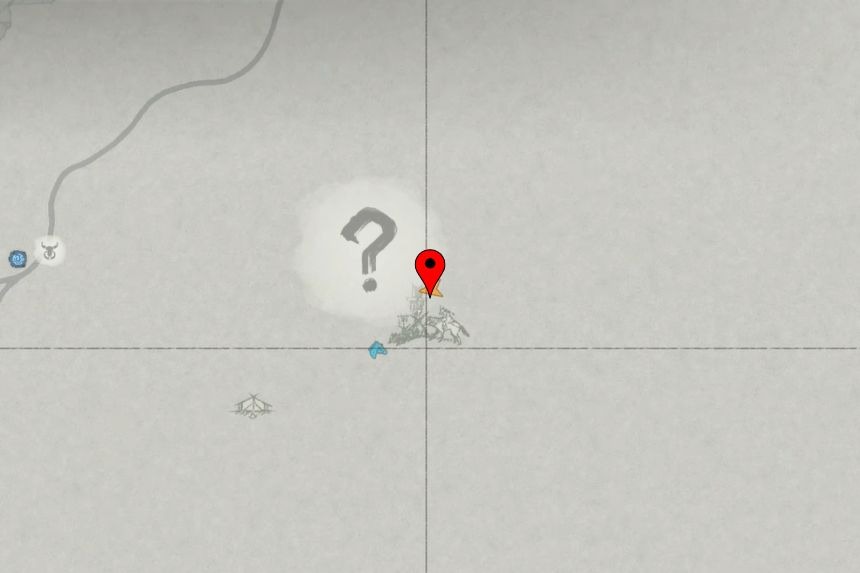
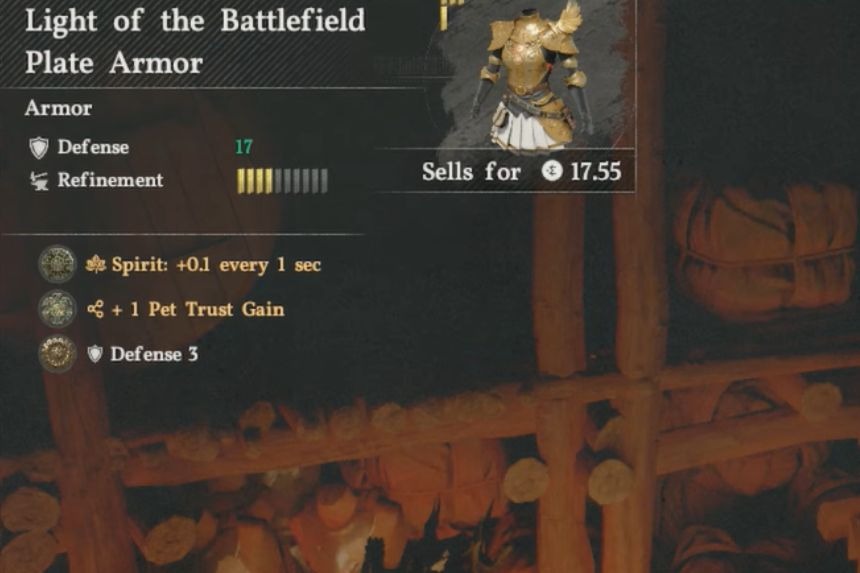
To get the Light of the Battlefield Plate Armor can be found in the Howlsands Camp in Crimson Desert (this is also where you fight the Sandfang Marauder). Go to the marked location and you’ll find the camp in an abandoned situation. Go inside the cave-like structure in the camp and you’ll find the chest containing the Light of the Battlefield Plate Armor.
Light of the Battlefield Plate Boots
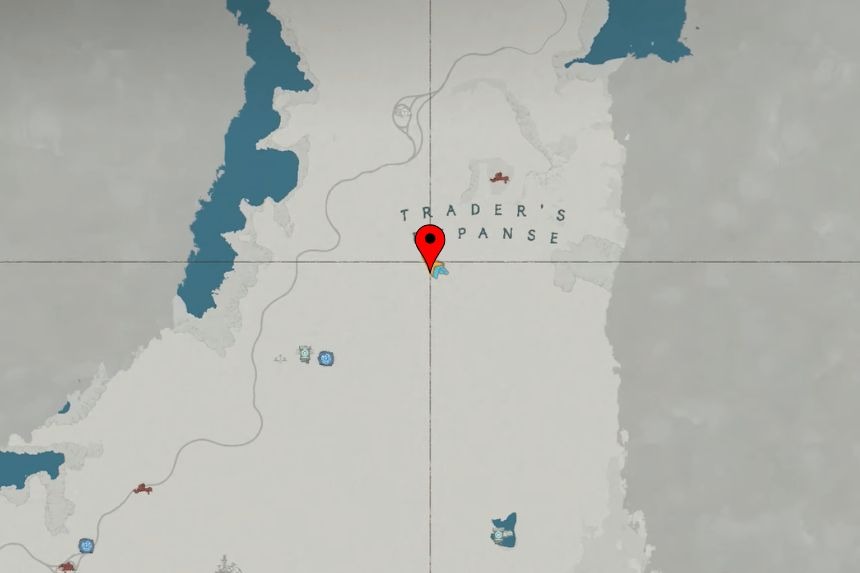
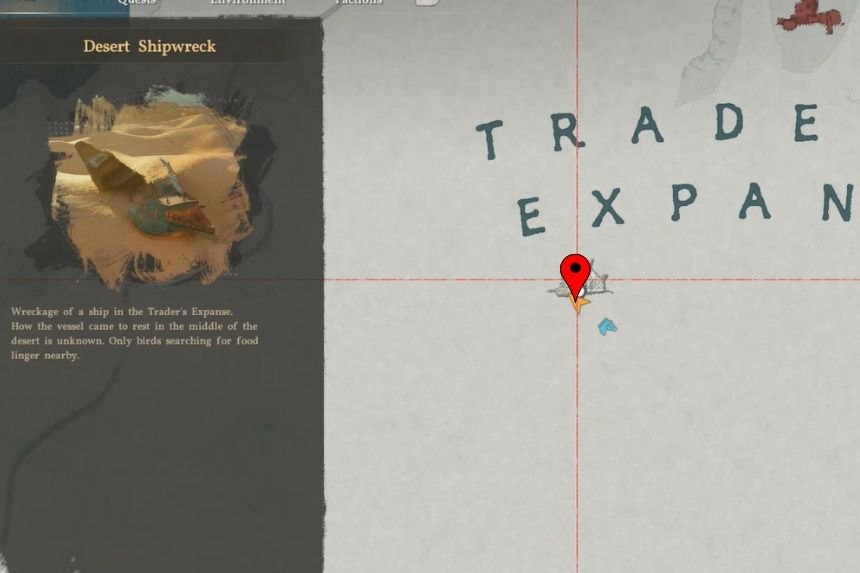
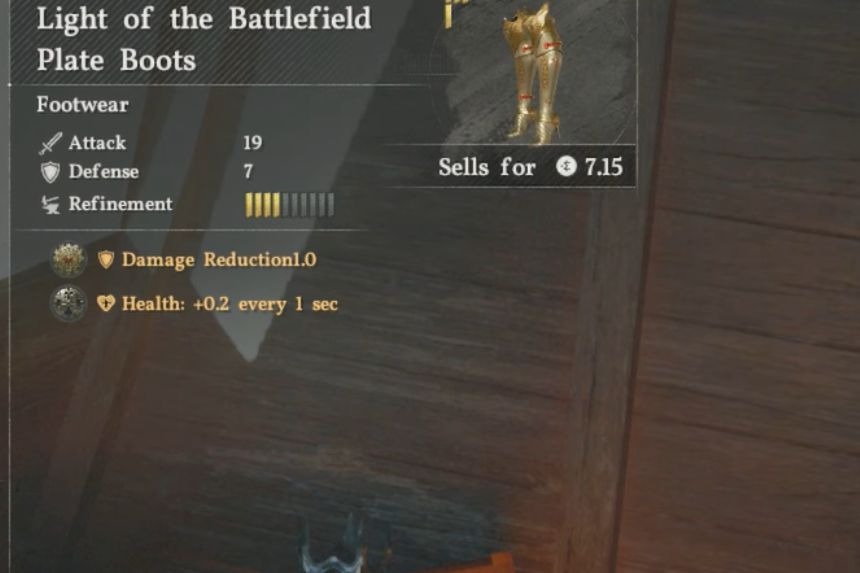
To get the Light of the Battlefield Plate Boots, you’ll need to go to the Desert Shipwreck in Trader’s Expanse. After reaching the location, go inside the broken part of the ship on the left side, and you’ll find the treasure chest containing the Light of the Battledield Plate Boots.
Light of the Battlefield Plate Gloves
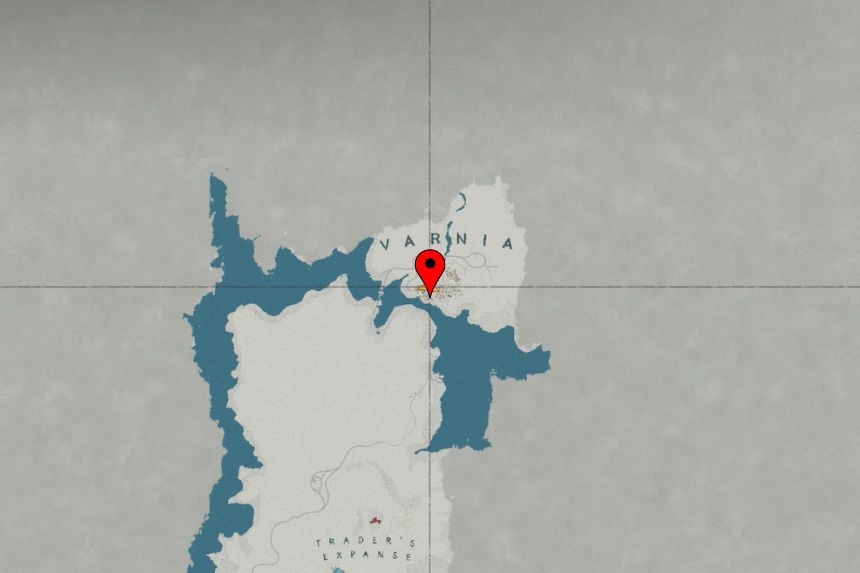
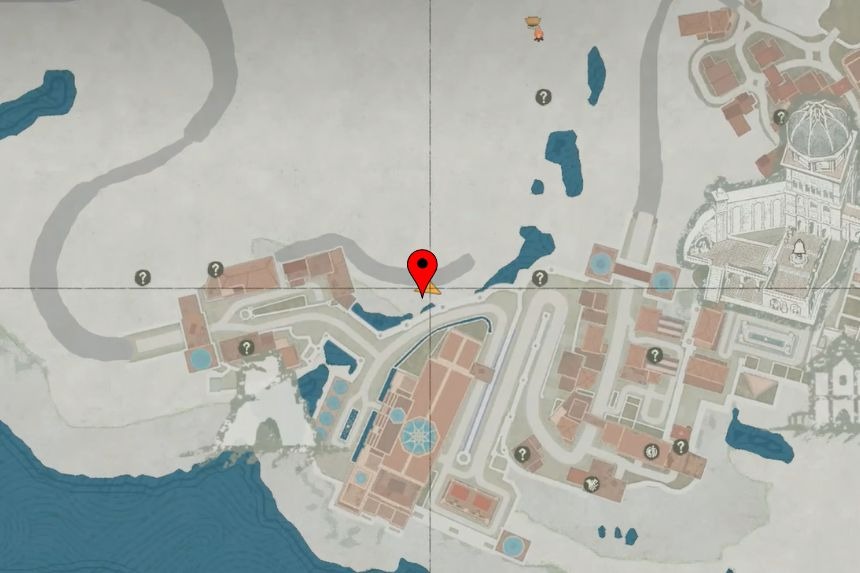
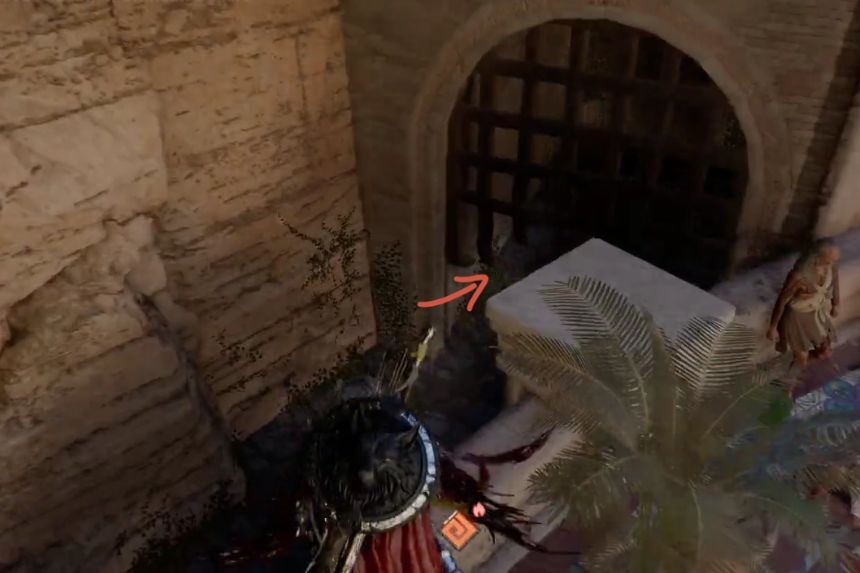
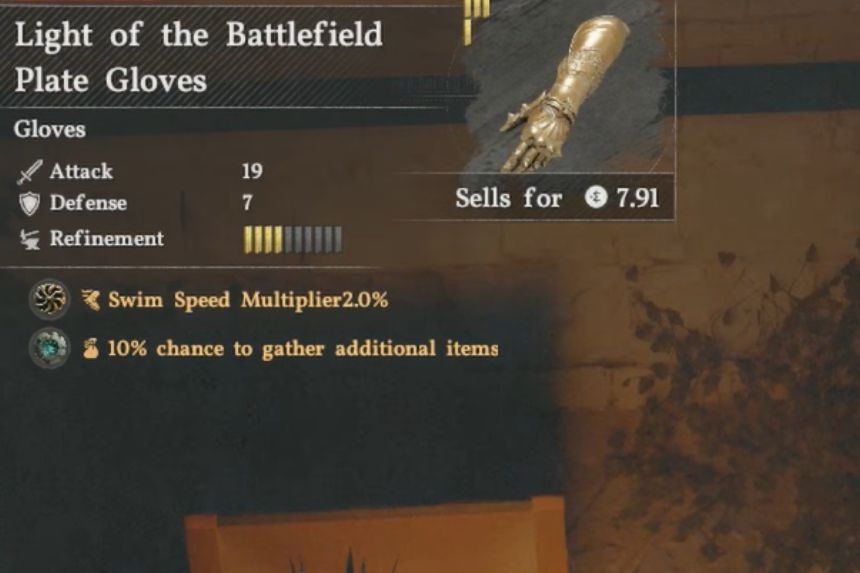
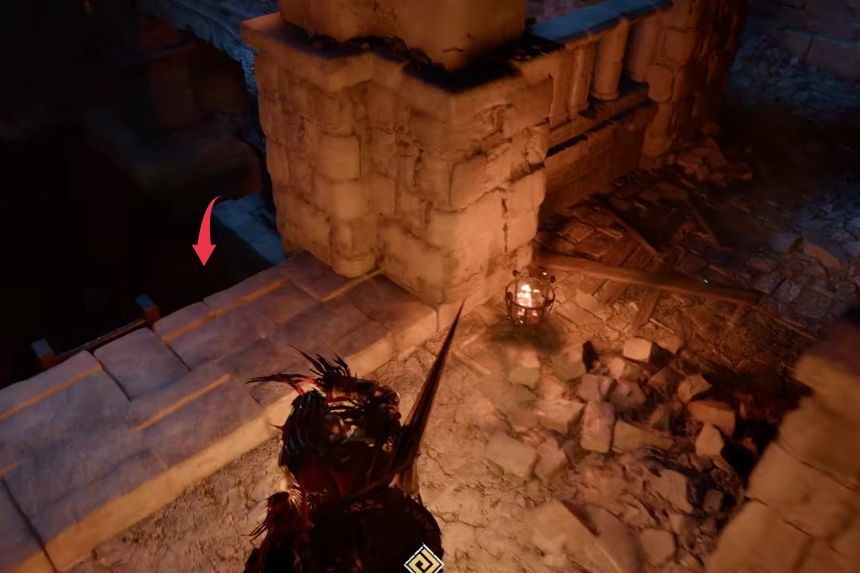
To get the Light of the Battlefield Plate Gloves, you’ll need to head over to Varnia City. Once you reach the marked location, jump down, and go left to reach the area with the treasure chest containing the Light of the Battlefield Plate Gloves.
Plate Boots of Cursed Soul
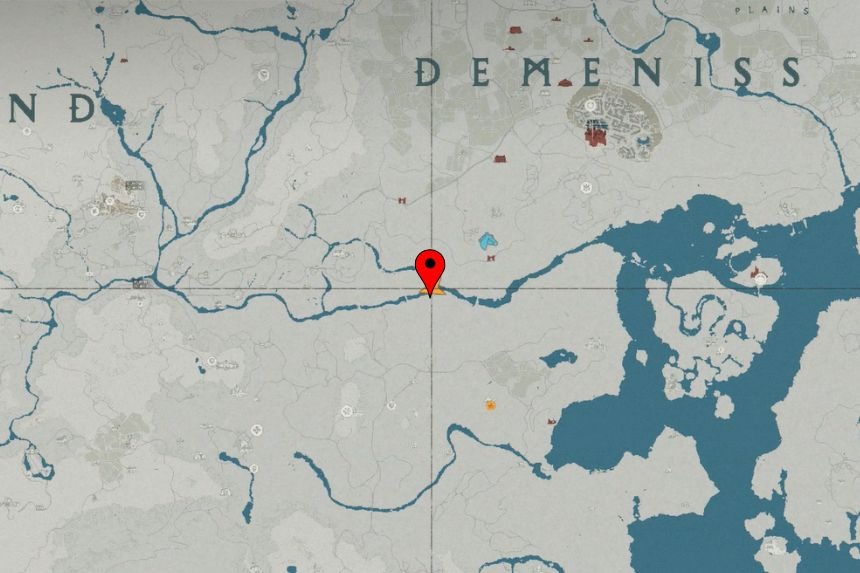
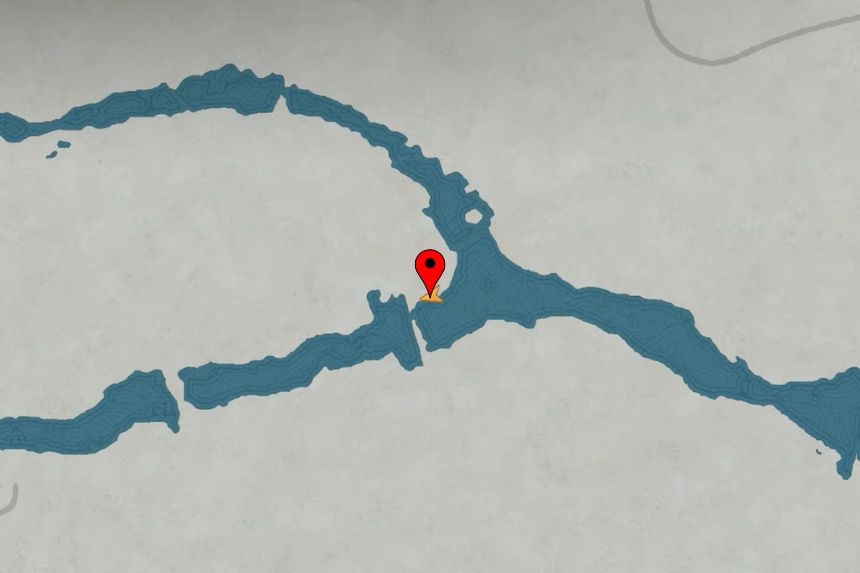
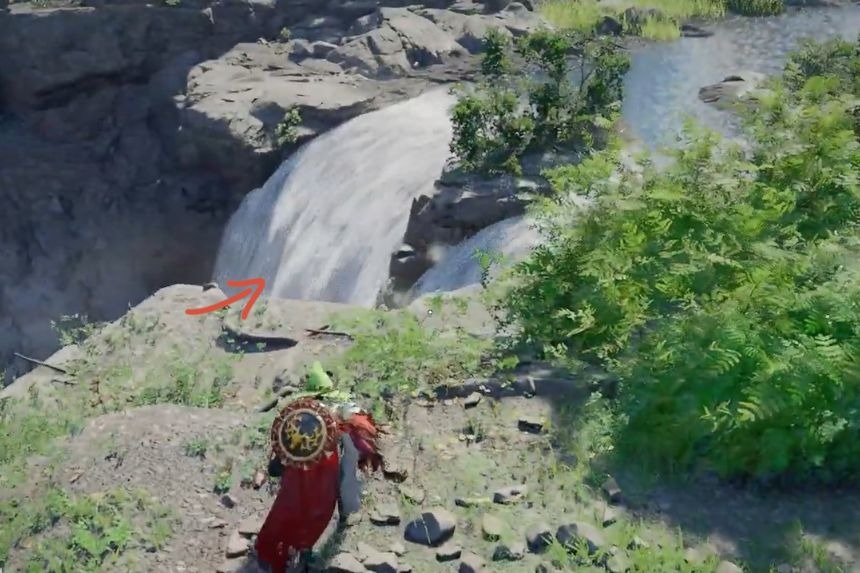
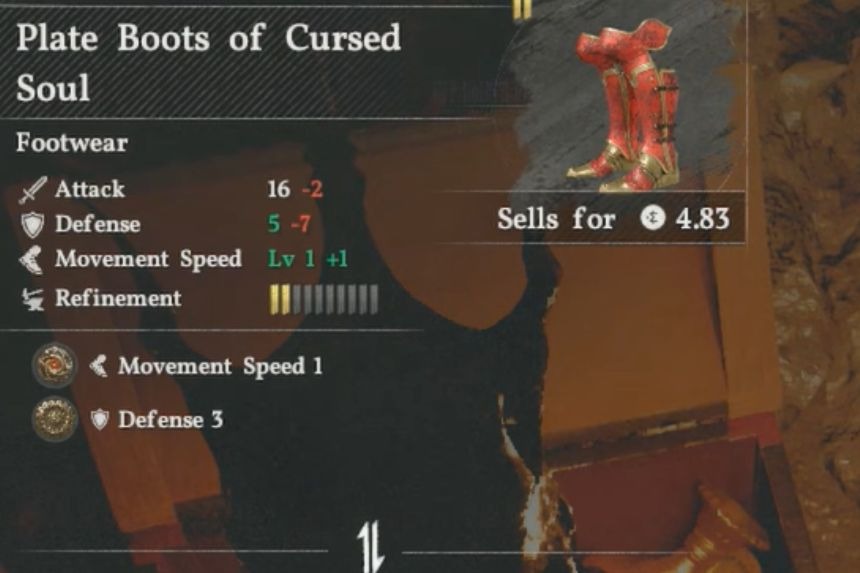
The Plate Boots of The Cursed Soul can be found inside the Shadowfall Cave. Head over to the marked location and you’ll find a waterfall on your right side, go behind it, use stab against the stone wall, and enter the cave. Inside, you’ll find the treasure chest containing the Plate Boots of The Cursed Soul.
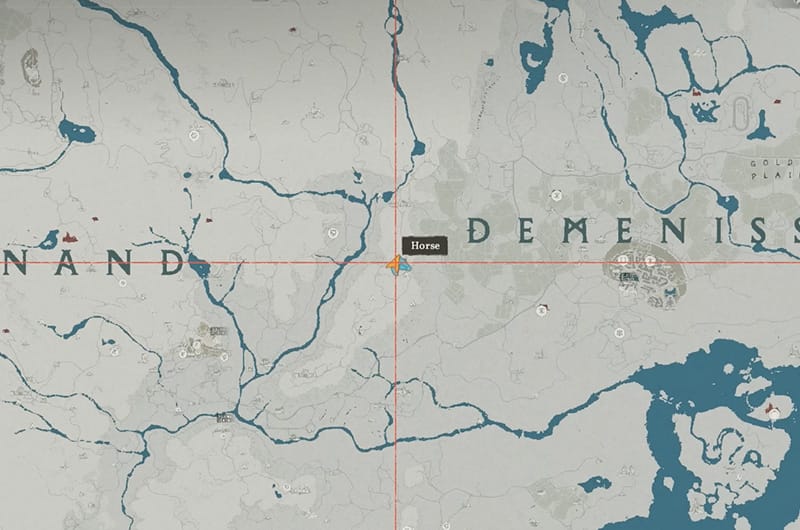
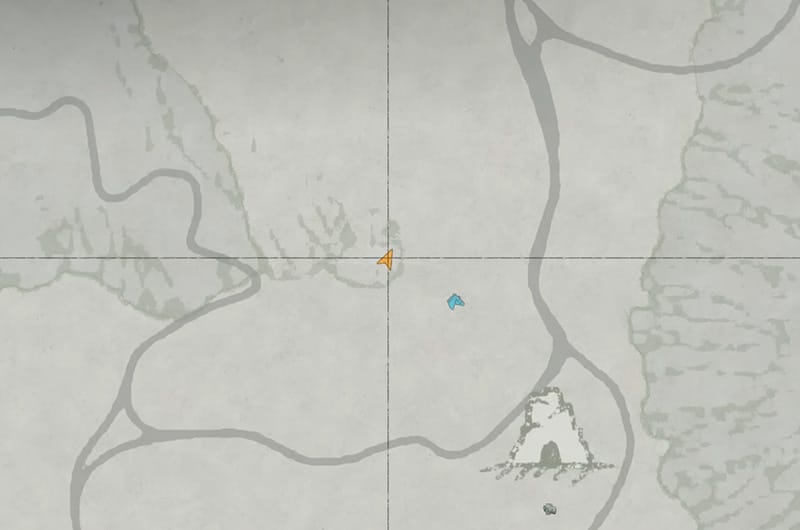
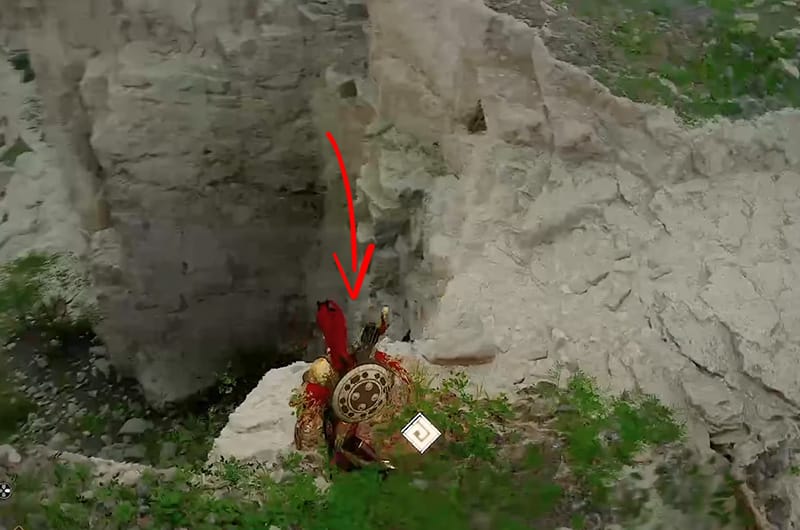
Plate Armor of Cursed Soul
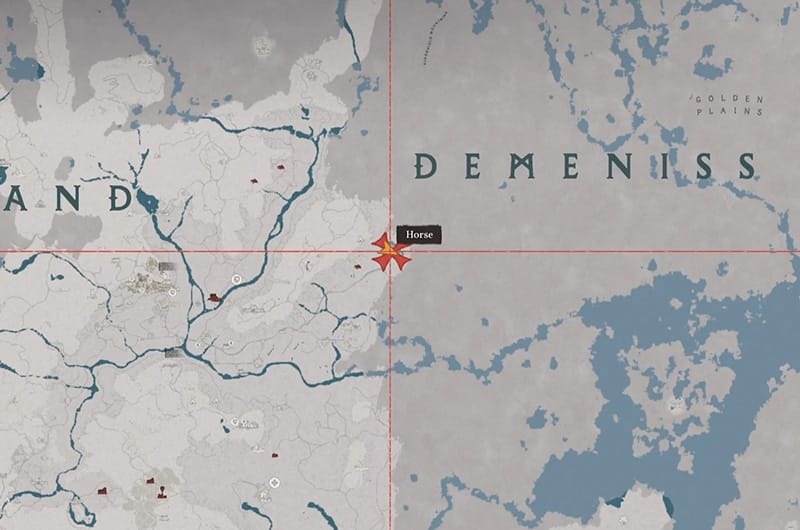
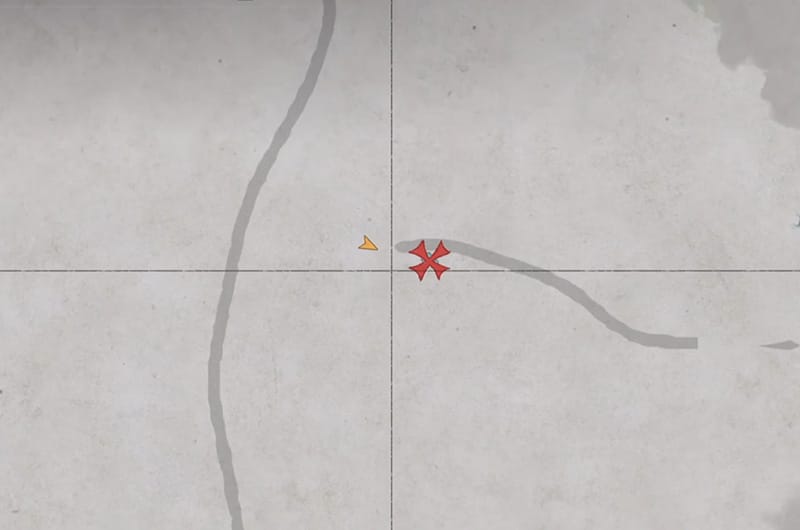
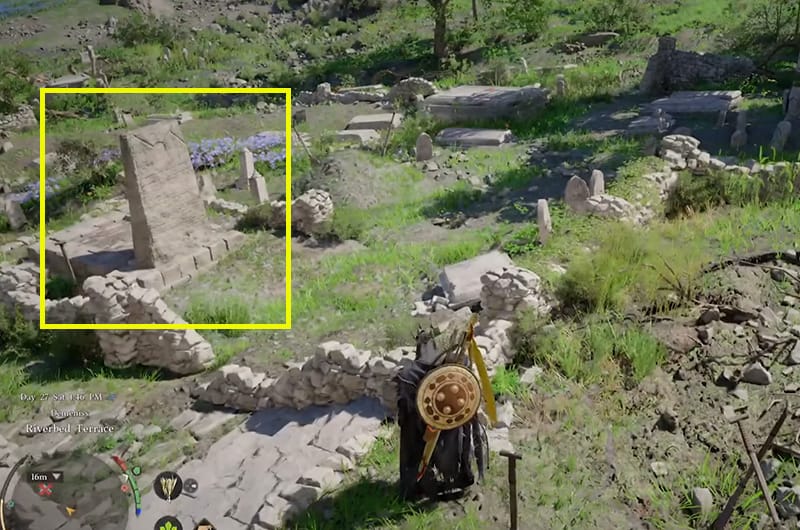
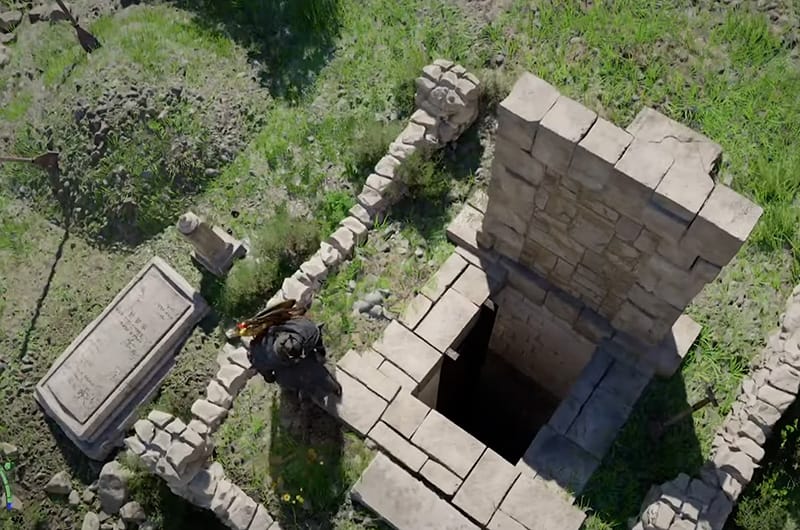
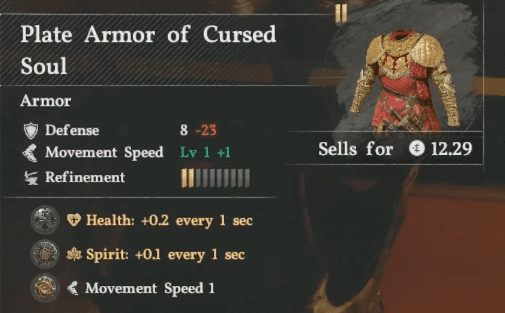
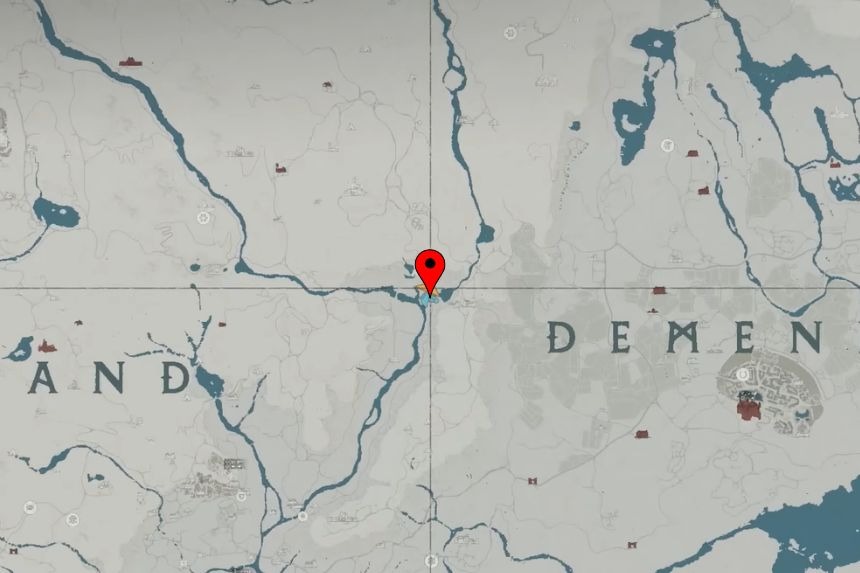
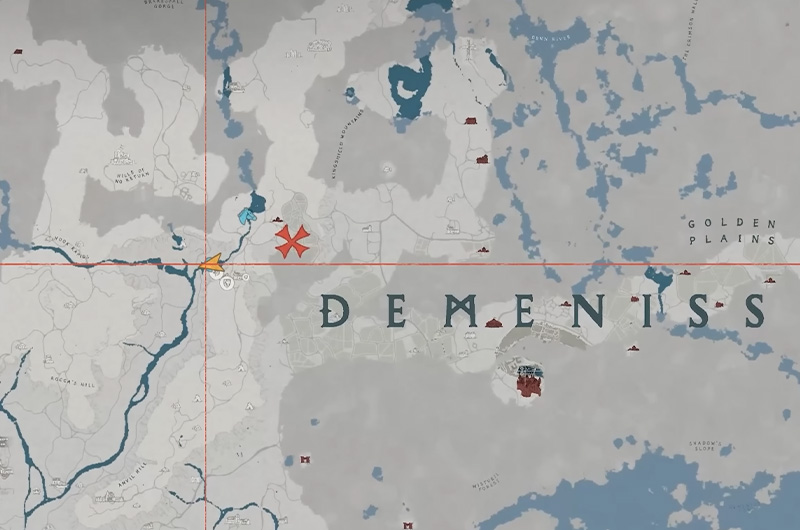
To get the Plate Armor of Cursed Soul, go to the South of D in Demeniss. At the location, you will find a graveyard. Go to the gravestone in the above images and use Forced Palm to strike the gravestone, which will flip open an underground path. Go inside and open the chest to get the armor.
Plate Gloves of Cursed Soul
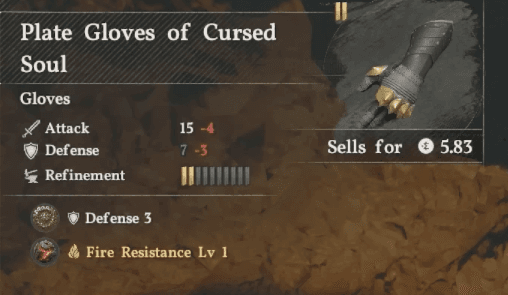
To get the Plate FLoves of Cursed Soul, you need to go to the Anvill Hill Longing Cave, Southwest of D in Demeniss. Break the boulder blocking the path of the cave. Inside, you will find a chest that has the Plate Gloves.
Plate Cloak of Cursed Soul
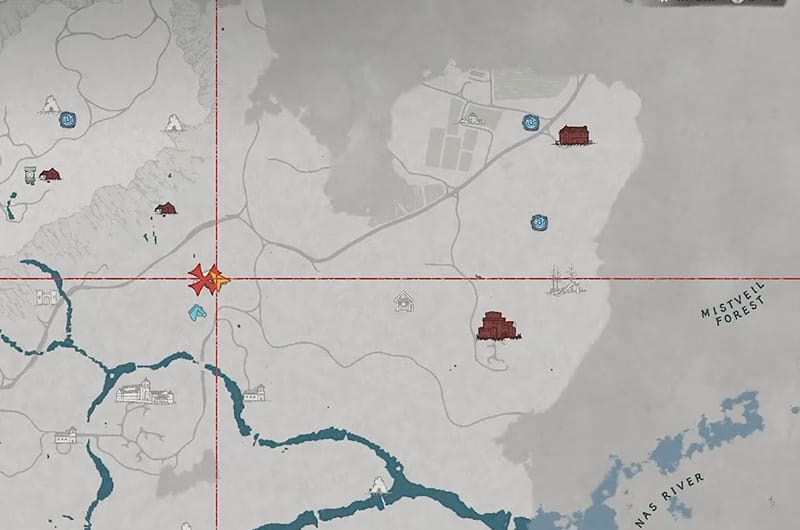
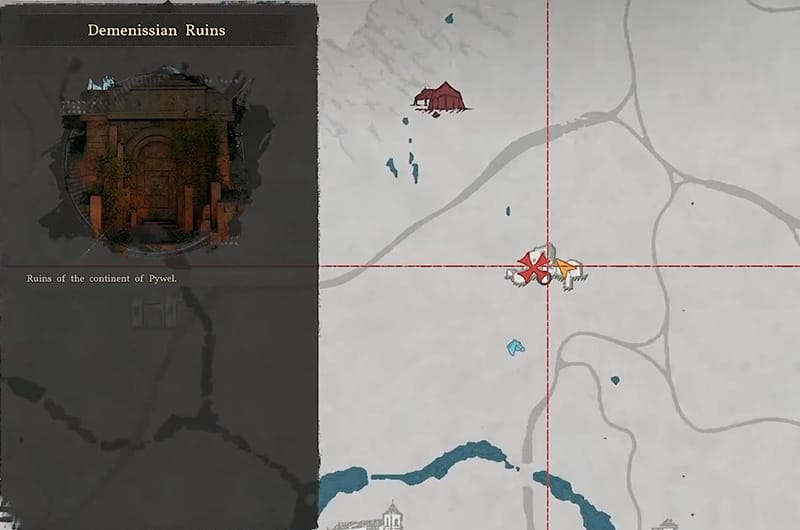

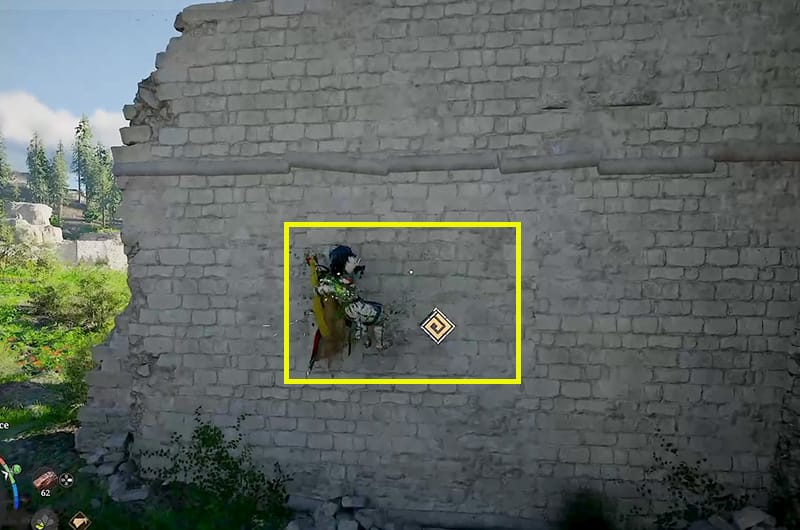
To get the Plate Cloak of Cursed Soul, go to the Demenissian Ruins. At the ruins, you will find a wall that seems a bit off, you can use your lamp to reveal it or use the above image for guidance. Use the forced palm to flip yourself to the other side of the wall. Inside, there is a chest that has the plate cloak.
Official Knight Plate Armor, Gloves, and Boots
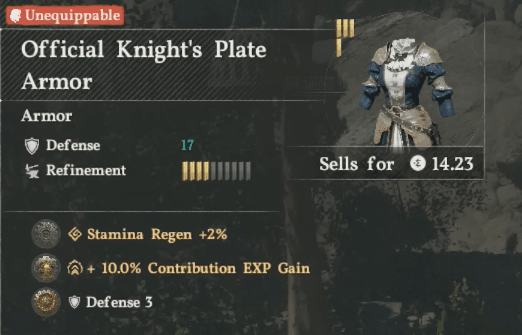
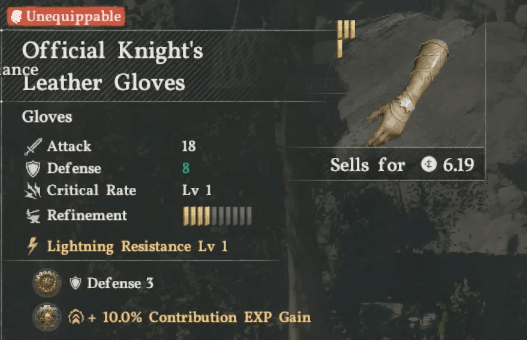
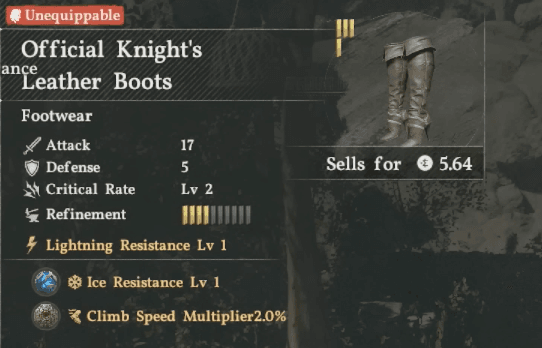
The Official Knight Plate Armor, GLoves, and the Boots are a reward for beating Awakened Lucian Bastier. Here are the stats.
Eclipse Solas Plate Gloves
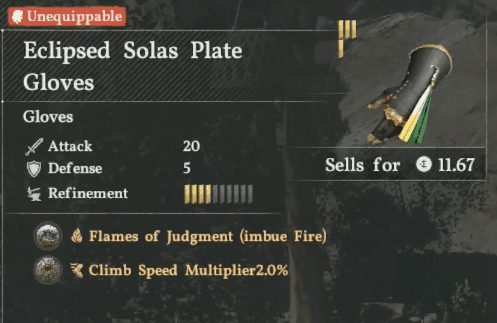
The Official Knight Plate Armor, GLoves, Boots, and Eclipse Solar Plate Gloves are a reward for beating Awakened Lucian Bastier. Here are the stats.
Marni’s Laser Helm
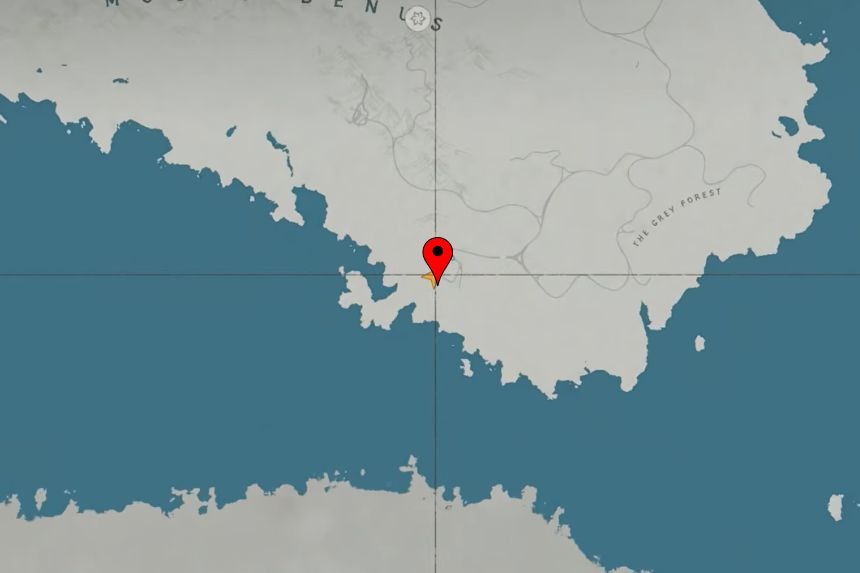
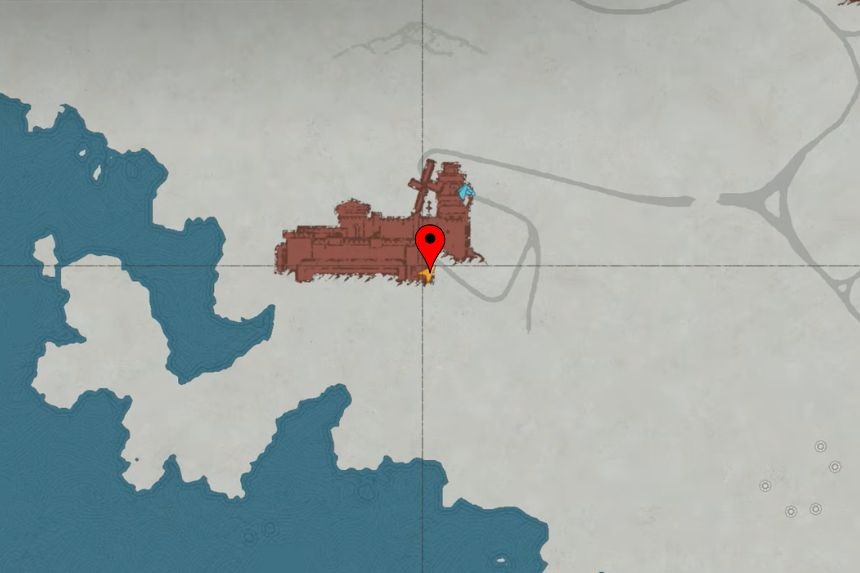
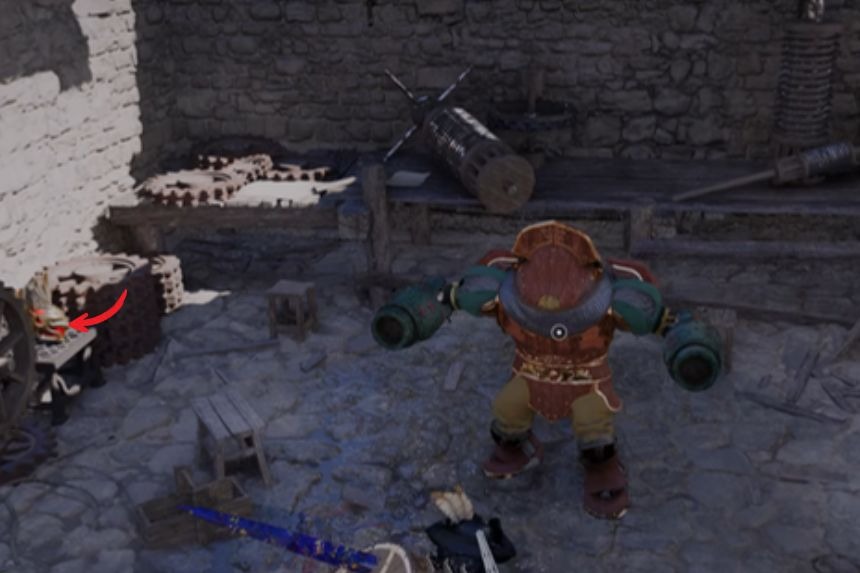
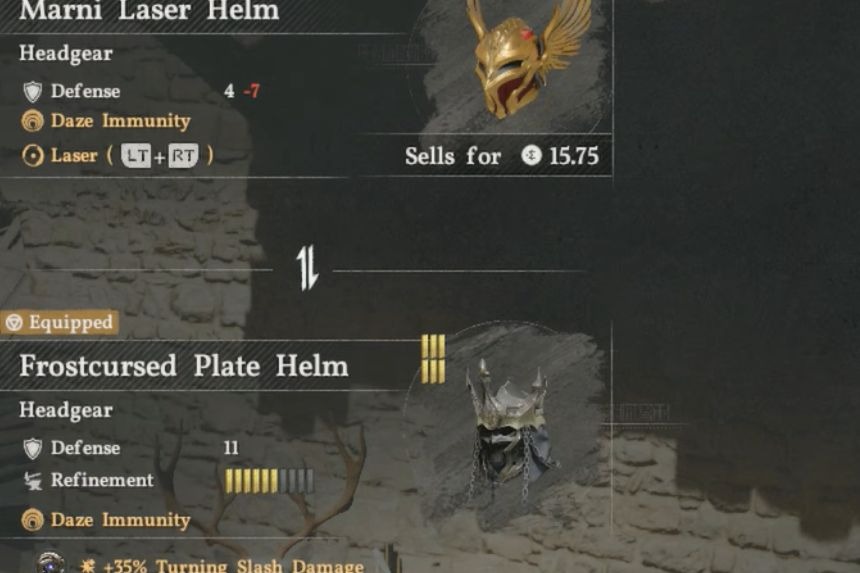
The Marni’s Laser Helm can be found in Marni’s Masterium, but to obtain it, you’ll first need to defeat all the surrounding enemies before you can finally pick up the helm for yourself.
Accessories
Ancient Necklace
| Attack | 3 -2 |
|---|---|
| Defense | – |
| Refinement | 3 |
| Sells for | 7.87 |
| Additional | Spiri +0.1 every 1 sec |
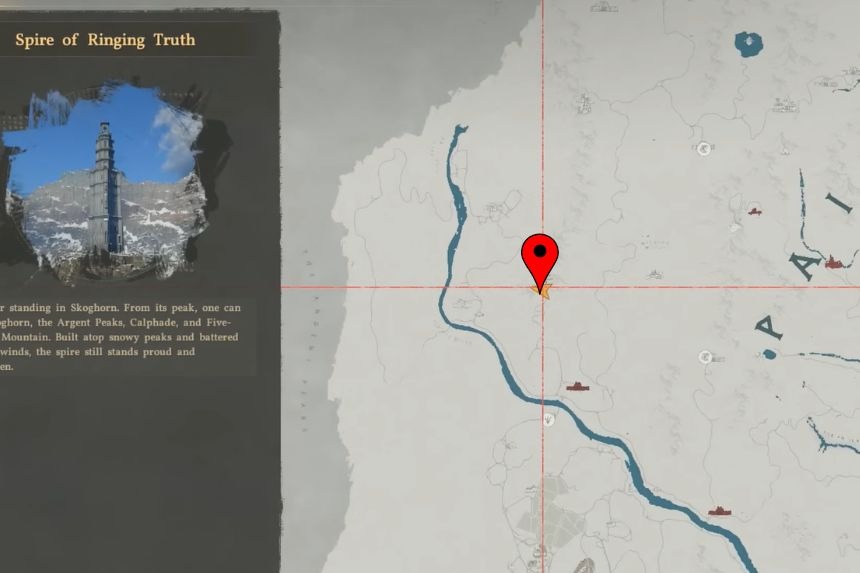
To get the Ancient Necklace, you’ll have to defeat Priscus the Ancient boss at the Spire of Ringing Truth. The boss fight isn’t too difficult so it should be easy.
Ogres Ring & Colossal Might Abyss Gear
Ogre’s Ring and Colossal Might are rewarded for completing the quest of subjugating the ogre boss in Desolate Megalith Altar.
| Attack | 5 |
|---|---|
| Defense | 0 |
| Refinement | 5/10 |
| Sells for | 28.84 |
| Additional | Spirit: +0.2 every 1 second |
Radiant Necklace
You will get the Radiant Necklace as a reward during the story of Chapter 8, specifically the quest Where the Winds Guides Us.
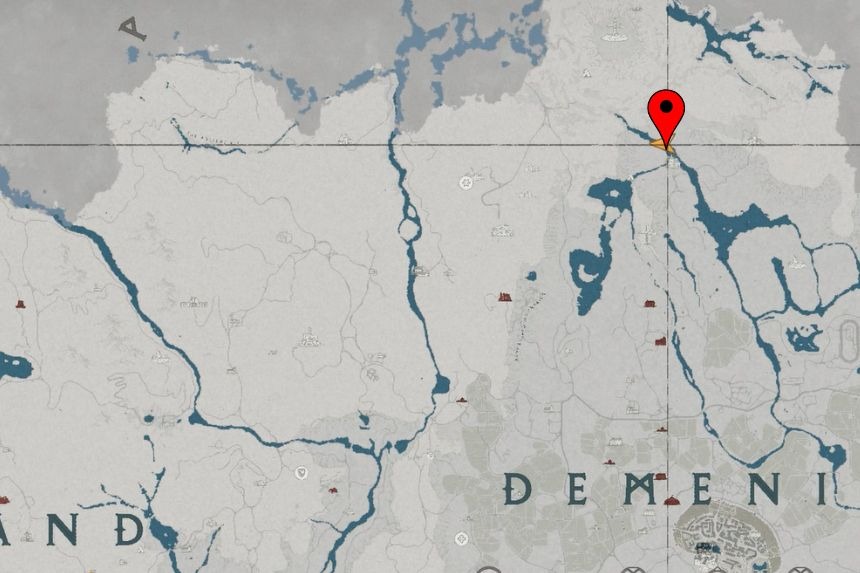
Mark of Darkness


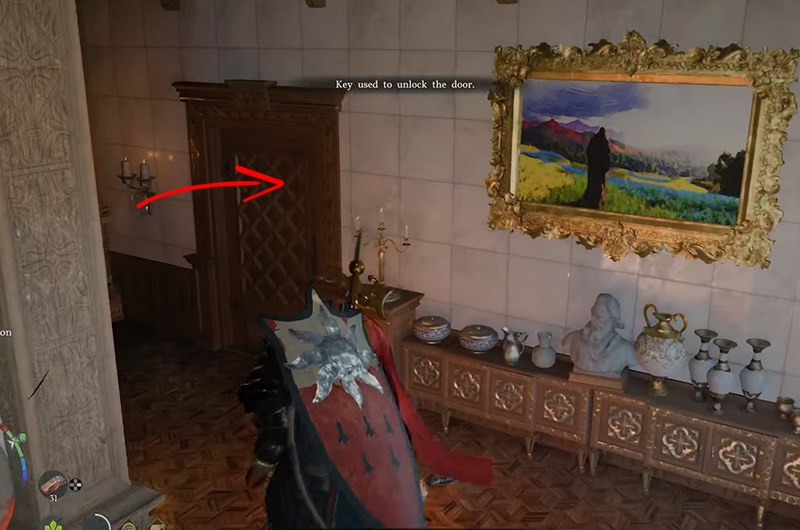
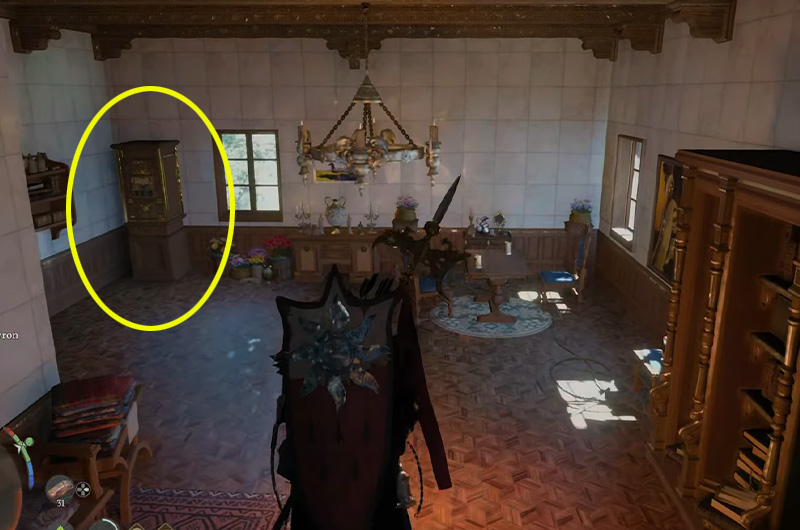
To get the Mark of Darkness, go to the Windmere Manor, North of Demeniss. You will arrive at this area in Chapter 8. Use one of the cracked windows to enter or use a key if you have. Inside the manor, get into the room that has the painting of a dark figure outside. Inside the room, you will find a strongbox with jigsaw puzzles.
To solve the puzzle, you need to assemble the jigsaw. The solution to the puzzle is explained below in detail.
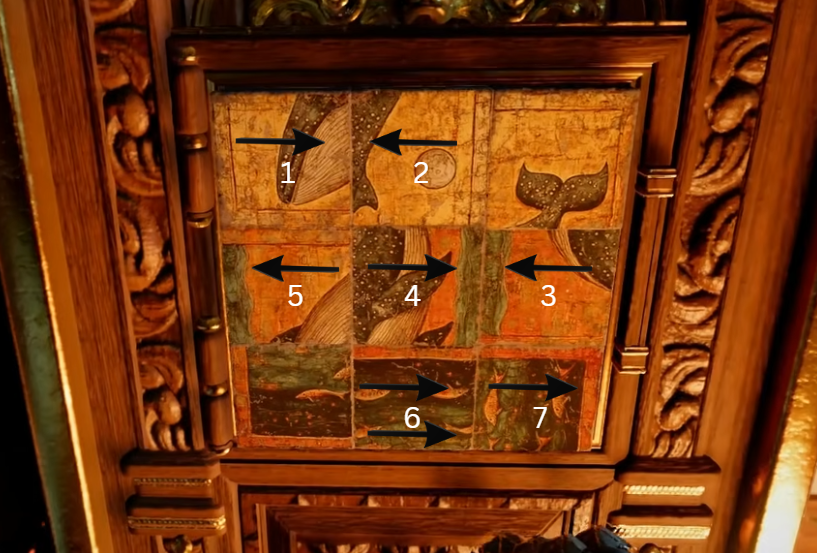
- 1 – turn right once
- 2 – turn left once
- 3 – turn left once
- 4 – turn right once
- 5 – turn left once
- 6 – turn right twice
- 7 – turn right once
Note: The numbers in the above image denotes the jigsaw pieces you need to move. The arrows represents the direction. The number of arrows denotes and the number of times you need to move the piece in the arrow’s direction.
| Attack | 1 |
|---|---|
| Attack Speed | Lv 1 |
| Refinement | 3/10 |
| Sells for | 7.87 |
| Stamina Regen | +2% |
The Shackle of Might
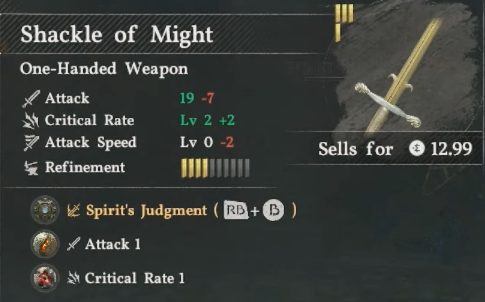
Shackle of Might is a quest reward item that you get during the Chapter 8 of the story. During the Cursed Knight quest, you need to defeat the Cursed Knight, who gives the item.
Gearmelt Confectionery Pack
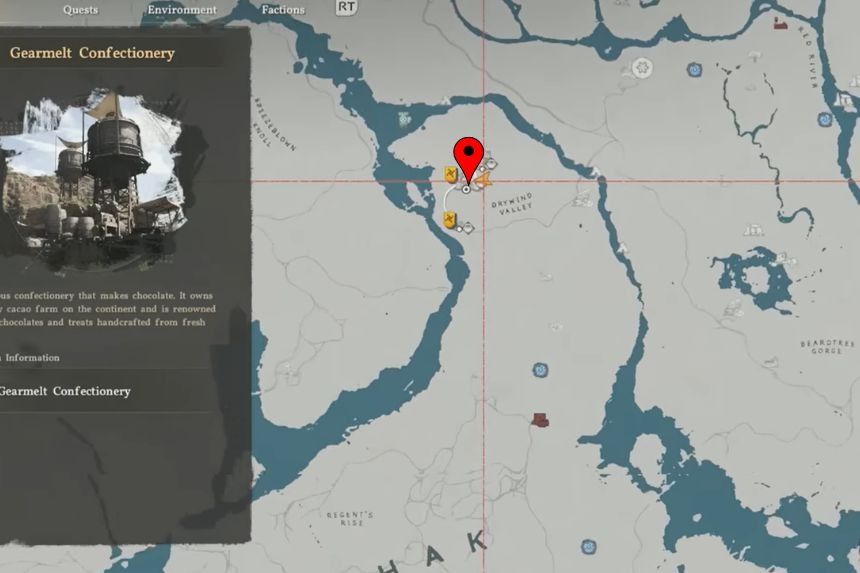
| Effect | Endless Happiness |
|---|---|
| Sells for | 32 |
| Additional | – |
Gearmelt Confectionery Pack, you’ll need to clear enemies in the Gearmelt Confectionery and help in restoring it. Once the confectionery starts to function, you’ll get the pack. It generates cocoa snacks every 2 minutes and each snack restores 120 health for you.