
The Bow in Monster Hunter Wilds provides a fluid and active playstyle, combining mobility with accurate, mid-range damage. Mastering the Bow demands a high level of positioning awareness, stamina control, and ideal skill selection. This guide explores in-depth how to craft the best Bow build, emphasizing synergistic armor, weapon, and decoration selection to optimize your hunting effectiveness. Whether you are an experienced archer or a greenhorn at the Bow, this analysis will prepare you with the insight to conquer the wilds, knowing that you’re firing on all cylinders against the deadly beasts ahead.
Best Bow Build in Monster Hunter Wilds
The Bow in Monster Hunter is a versatile mid-range weapon, built for steady, consistent damage with the added bonus of high-powered bursts from special attacks like the Dragon Piercer. What sets the Bow apart is its mobility, instead of standing still and charging arrows by holding down a button, optimal Bow play often revolves around strategic dodging to power up your shots.
The most important thing to master with the Bow is its effective range. Just like the Bowguns, the Bow works best when you’re positioned at just the right distance, not too far that your shots lose power, but not so close that you’re in danger of getting hit. Understanding and maintaining this sweet spot is key to maximizing your damage output and staying safe during a hunt.
Best Bows for the Build
The first bow you’ll start with in Monster Hunter Wilds comes from the Expedition Tree, the Hope Bow. Your main goal early on is to upgrade it to the Hope Bow II as soon as possible. This is important because it unlocks the Ballistics weapon skill, which extends your bow’s effective range. Essentially, this lets you keep a safer distance from monsters while still landing solid hits.
When using the Hope Bow, I recommend equipping Power and Poison coatings. Power coatings are great for dealing damage and creating wounds on monsters, while poison coatings are especially useful when a monster is about to flee, you can apply poison to chip away at its health while it runs.
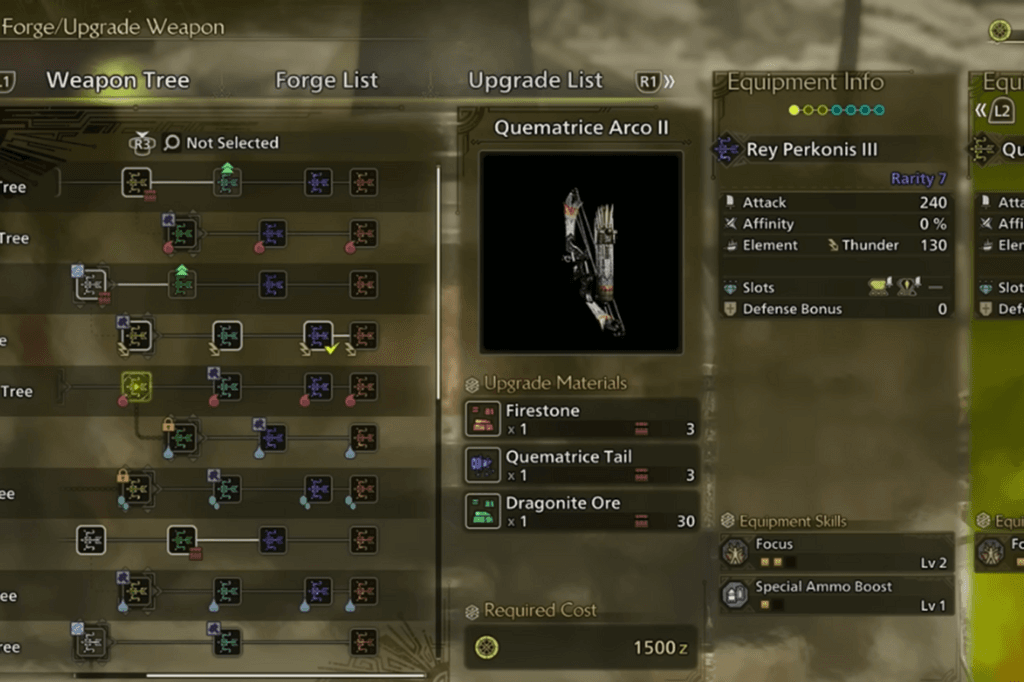
For your second bow, you’ll want to get the Quematrice Arco I from the Quematrice tree. This bow focuses on fire elemental damage, which is incredibly effective early on since none of the starting monsters have strong resistance to fire. It also comes with the Focus weapon skill. Focus boosts how quickly you fill your trick shot arrow gauge and reduces your charge times by 5% at level one. This means you can fire more shots faster, keeping the pressure on your target.
The Quematrice Arco I uses Close-Range and Exhaust coatings, a solid combo. You can start by using the exhaust coating to drain the monster’s stamina, then once it’s tired and less mobile, switch to the close-range coating for boosted damage when you’re up close.
As you progress through the story, you’ll unlock the Wild Power Bow I from the Congala tree. At this point, the Wild Power Bow I becomes your primary weapon, with the Quematrice Arco I as your backup.
The Wild Power Bow I comes with the Special Ammo Boost skill, which increases how many shots you can fire per coating application. At level one, it raises the default six shots per coating to ten, making it easier to apply status effects. It also buffs your combo finisher shots, giving your damage output a nice bump.
This bow supports four different coatings — Power, Poison, Paralysis, and Blast. The blast coating is especially useful for breaking specific monster parts, helping you gather the materials you need, while the others can be swapped in depending on the situation.
By using this setup — starting with the Hope Bow, transitioning to the Quematrice Arco I, and finally moving on to the Wild Power Bow I, you’ll have a strong balance of range, elemental damage, and status effect application.
Best Armor for the Build

When it comes to armor for this Monster Hunter Wilds Bow Build, the goal is to make managing your bow’s resources as smooth as possible. To do this, we’ll use a mix of the Bone Set and Quematrice Set.
For the Bone armor, we’ll equip three pieces, the Bone Helm, Bone Mail, and Bone Coil, which will give us the Marathon Runner skill. This skill reduces the stamina drain from both your shots and dodges, helping you stay mobile and keep up the pressure without running out of stamina too quickly during hunts.
For the other two armor pieces, the vambraces and greaves, we’ll start with Quematrice Braces and Quematrice Greaves. These give you the Flinch Free skill, which prevents you from getting knocked back or tripped, a lifesaver when you’re playing in a party and want to stay focused on your shots without being interrupted.
That said, these two pieces aren’t essential to the build, so you can swap them out depending on your playstyle. Here are a few options:
- If you like using adamant seeds and demon drugs to boost your defense and attack, you can go for two pieces from the Chatacabra Set for the Item Prolonger skill, which extends the duration of your buffs.
- If you prefer better health recovery, try two pieces from the LaLa Barina Set for the Recovery Up skill, which increases how much health you regain from healing items.
- Or, if you want to boost your mobility, the Balahara Set offers the Evade Extender skill, perfect for creating distance from monsters with longer, faster dodges.
Ultimately, the core of the build focuses on stamina management with the Bone Set, while the other pieces give you flexibility to tailor the build to your preferred hunting style.
Best Tailsman for the Build
For this Monster Hunter Wilds Bow Build, a talisman isn’t a core requirement, which means the talisman slot is wide open, giving you the flexibility to swap in whatever suits the hunt you’re heading into.
If you’re looking for a general quality of life boost, the Glutton’s Charm I is a solid choice since it increases your item consumption speed, letting you heal or buff yourself faster in the heat of battle.
Alternatively, if you want to maximize the Flinch Free skill, you can pair the Impact Charm I with the two pieces of Quematrice armor you’re already using. This combo will push Flinch Free to its max level, helping you stay steady and avoid annoying interruptions, especially when hunting in a party.
And if you’re struggling against monsters with elemental attacks, like those apex predators, you can swap in the Water Charm I or Thunder Charm I to boost your resistances as needed.
Ultimately, the talisman slot is all about adaptability. Whether it’s for extra survivability, better item management, or status resistance, you’ve got the freedom to tailor it to your current hunt.
Best Decorations for the Build
This Monster Hunter Wilds Bow Build makes full use of decoration slots, stacking skills that enhance both mobility and damage output.
For ranged power, a Precise Jewel III is slotted into Renowned Tristram to extend the effective range of projectile attacks, while a Trueshot Jewel II boosts the damage of stronger bow moves.
The Inspired Ywain bow is outfitted with an Expert Jewel III and Expert Jewel II to increase affinity, alongside a Razor Sharp Jewel to maintain sharpness, ensuring each shot hits hard and stays effective when swapped in.
Since bow users tend to be a bit fragile, the tier-one armor decoration slots are filled with Protection Jewels for the Divine Blessing skill, reducing incoming damage by half. To help with stamina management, Physique Jewels provide the Constitution skill, lessening stamina drain during dodges. This pairs well with a Jumping Jewel II for Evade Extender, allowing for quicker, longer dodges to maintain distance from monsters.
Finally, two Flayer Jewels capitalize on the Flayer skill that has already been provided by the armor, enhancing the capacity to wound monsters and increase damage even more. All in all, this build achieves a balance of remaining nimble, dealing the most damage possible, and gaining a measure of survivability, all of which are essential for becoming a master of the bow in Monster Hunter Wilds.
Best Skills for the Build
The greatest Bow skills in Monster Hunter Wilds find a balance between stamina control and attacking capability, taking advantage of the bow’s quickness and critical hit capability.
On the utility side, Stamina Surge is a must, increasing stamina recovery rate by as much as 30%, a lifesaver for maintaining continuous pressure with charged shots and dodges. Couple this with Constitution, which cuts stamina consumption for maneuvers such as Charged Sidesteps, enabling smoother and more effective evasions.
When it comes to offense, the focus is all about boosting affinity and critical damage. The core skills for maximizing damage include:
- Critical Eye — raises the affinity, making it more likely to score critical hits.
- Critical Boost — enhances the damage dealt by critical hits.
- Weakness Exploit — raises affinity when targeting a monster’s weak spots.
- Attack Up — provides a straightforward boost to raw attack power.
- Peak Performance — boosts attack when health is full, rewarding careful, skillful play.
- Focus — helps build up the bow’s special shot gauge faster, letting players unleash trick shots and charged attacks more efficiently.
For the strongest Bow build, the goal is to combine armor sets and decorations that stack these key skills, ensuring both fluid stamina usage and consistently high damage output.