
While exploring the Free Market Station in The Outer Worlds 2, you will come across a locked safe room belonging to Otto. To get inside, you will need to solve an electrical wall switch puzzle hidden in a side area of the station. With the right order, you can redirect the current, light up all the indicators, and open the door to Otto’s secret room. Inside, valuable loot and story clues are there. This guide explains where to find the puzzle, how to solve it step-by-step, what rewards you will get, and a note about a bug that currently affects this puzzle.
Solve Otto’s Saferoom Electrical Wall Switch Puzzle
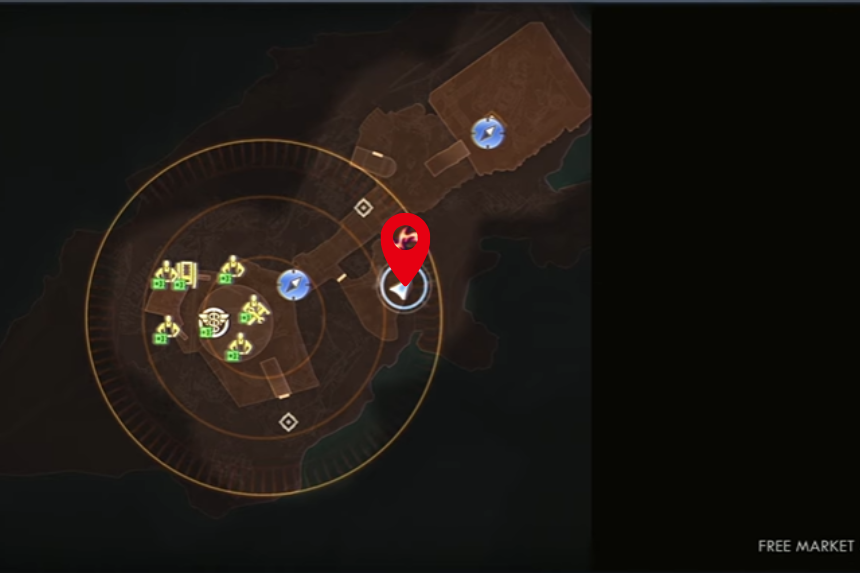
Head over to the Free Market Station to unlock Otto’s safe room. You can reach it by going through a hole in the wall near where the rift anomaly appears at the start. You will need the N-Ray Scanner to solve the puzzle. You can find the N-Ray Scanner in Golden Ridge. Once you enter and climb up the ladder, you will come across a wall switch puzzle that needs to be solved in a specific order. There’s a mission connected to this, but you don’t actually have to complete it; you can just flip the switches and open the room yourself.
After reading the note nearby, you will learn that Otto has hidden some valuables inside. Put on your mask to see the wires; they will show you the correct order to flip each switch so the current flows from right to left. Once all the green lights turn on, you will know you got it right.
How to Solve Electrical Wall Switch Puzzle
You will see three lights on the right side, that’s where the power starts, and three more lights on the left, which all need to turn green to solve the puzzle and open the door. The current can only travel through one power box at a time, and if it goes through the same box twice, the whole puzzle resets. You will only be able to see the lines connecting the boxes when using the N-Ray Scanner.
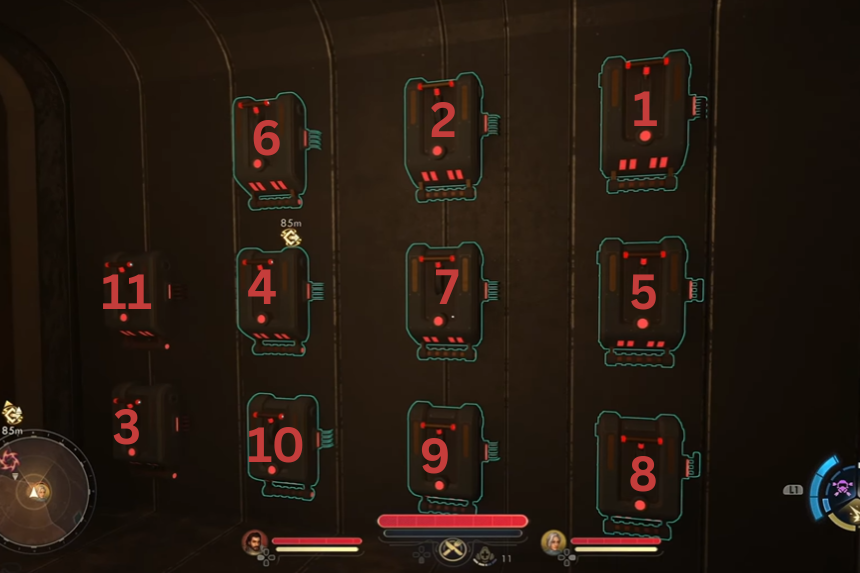
As you activate a light on the left, another one on the right will also light up. That means you will have three active power lines on the right that need to reach the left side. Just make sure none of them cross over another box, or it won’t work.
- Start by activating the power box on the top-right corner (first column). It connects to one box in the column just to the left. Activate that one next.
- From there, go diagonally down to the middle box in the next column to the left and activate it.
- Do the same again, activating the bottom box in the leftmost column. Now one light on the door will turn green, and a new power line will activate on the right.
- Next, activate the middle box in the rightmost column, then activate the box directly to its left in the middle column.
- From there, move diagonally up to the top box in the next column on the left. This will light up the second green light and activate the last power line on the right.
- Activate the bottom box in the rightmost column, then go directly left to the bottom box across from it.
- Move left again to the bottom box in the next column.
- Finally, move diagonally up-left to the last box.
Once you have done all that, every light will turn green, and Otto’s room will unlock. Inside, you will find several useful items, including an Advanced Decryption Key.
Rewards
When the safe room unlocks, head inside to collect your rewards. You will find a triple-barreled shotgun (which you can upgrade later), a small journal entry from Otto, and a handful of credits.
Bug in Otto’s Saferoom Electrical Wall Switch Puzzle
The Otto’s Saferoom Electrical Wall Switch Puzzle is bugged. You manage to connect the first line, but the second one won’t reach the centre column. Even after flipping the switch, the power doesn’t transfer. Obsidian has acknowledged that the puzzle is bugged, and with the upcoming patches, the puzzle will be resolved. After the patch, players will be able to solve the puzzle, so players should avoid the puzzle as of now.