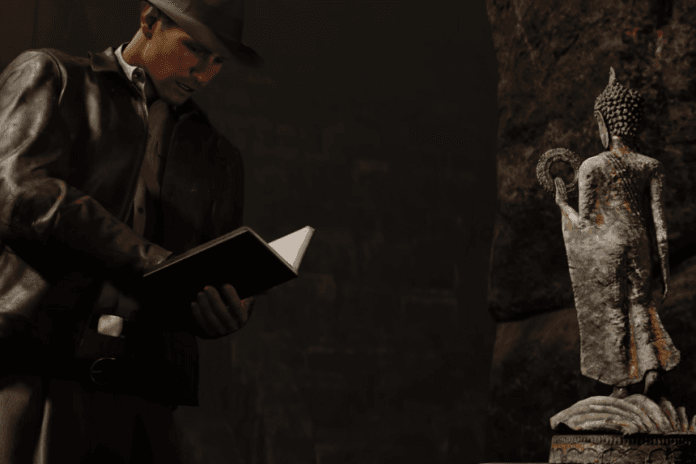
You stand in the heart of a forgotten South American jungle, facing the entrance to a long-lost temple where danger and mystery are intertwined. The silent wisdom of Indiana Jones guides every step as he brings new challenges: deadly traps, dangerous swings over deep chasms, and cryptic puzzles that have stood the test of time. With each solved puzzle, you uncover secrets more thrilling than the last. You have to race against time to escape the dangers within the temple. Your journey ranges from the Golden Idol of the jungle to the hidden corridors of Vatican City, holding ancient relics and long-forgotten mysteries. This article lists all the puzzles in Indiana Jones and the Great Circle, along with their solutions.
- Golden Idol Puzzle Solution
- The Exhibit Puzzle Solution
- Five Sacred Wounds Puzzle Solution
- Fountain of Confession Puzzle Solution
- Silver Path Trial Puzzle Solution
- Gold Path Trial Puzzle Solution
- Bulls of Blood Puzzle Solution
- Secret of Secrets Puzzle Solution
- House of God Puzzle Solution
- A Free Spirit Puzzle Solution
- A Snake in the Garden Puzzle Solution
- A Date to Remember Puzzle Solution
- Signs of Trouble Puzzle Solution
- Father and Son Puzzle Solution
- Belvedere Chest Puzzle Solution
- Nazi Vehicle Garage Chest Puzzle Solution
- Chamber of Resonance Puzzle Solution
- Three-Eyed Gate Puzzle Solution
- Cloud Atlas Puzzle Solution
- Seat of Eternity Puzzle Solution
- Nazi Compound Safe Puzzle Solution
- Kummetz Cipher Puzzle Solution
- Post Office Cellar Lockbox Puzzle
- Secret of the Queen Mother Mural Puzzle
- Gold Mask Mirror Puzzle
- Fortune's Reach Puzzle
- Wehrmacht Chest Puzzle
- Egyptian Numeral Chest Puzzle
- Nephilim Game Puzzle
- The Great Game Puzzle
- Khmer Pipeworks Puzzle
- Khmer Cogwheel Puzzles
- The Serpent's Chest Puzzle
- Path of Tigers Puzzle
- Monkey Business Puzzle
- Counting Letters Puzzle
- Timely Arrival Puzzle
- Elephant in the Room Puzzle
- Child's Play Puzzle
- The Captain’s Cipher Solution Puzzle
Golden Idol Puzzle Solution
The entrance to the Chachapoyan temple is just a short climb up the hill by the water. You’ll see stone steps leading into a dark, mysterious cave. With Satipo following close behind, enter the cave and follow the path. You’ll need to clear a massive spider web blocking your way.
You’re deep in a temple hidden in the South American jungle. You’ve reached the hall of the Golden Idol. You’ve made it inside the ancient temple, but danger lurks around every corner. Your first challenge is to avoid a deadly trap. Indiana warns you to stay out of the light, so crouch low and hug the wall to avoid getting impaled. Once you’ve navigated that, you’ll need to use your whip to swing across a gaping hole in the floor. Fall, and it’s inevitable death. If you survive, you’ll reach the hall of the Golden Idol. But beware, another trap awaits.
After lighting up a hexagonal tile on the floor with your torch, a deadly dart shoots out. To disarm the traps, you need to press specific safety tiles. Look for hexagonal tiles with a circle in the middle. Light these up with your torch to deactivate the row of traps ahead. Once the traps retract, carefully crouch forward to find the next safety tile. You’ll need to repeat this process after climbing the stairs.
You’ve reached the Golden Idol! Grab the necessary item from your bag and interact with the idol. Now, hurry back through the trap-filled hall. As you reach the gap, you’ll see Satipo has already crossed. Throw the idol to him and make a daring leap across the gap yourself. A giant, deadly ball starts rolling towards you. Run for your life and outrun the fatal trap! After that, you get up from your dream at Marshall College.
The Exhibit Puzzle Solution
After Indy wakes up at his desk, he starts exploring the college to figure out who broke in. He finds a big mess left behind by a giant creature. Indy needs to return all the artifacts in their display cases to find out what’s missing.
You don’t have to worry about putting the artifacts in the wrong place. If you do, Marcus or Indy will quickly point out the mistake. To make it easier, especially on the easy difficulty setting, one of the artifacts will already be in the right spot to help you get started.
- The Bastet Statue should be placed on one of the stands with the modern Egyptian flag (green with a moon and stars). Choose the stand on the left with a picture of the cat-headed god.
- The Terracotta Relief belongs on the stand with the Iraqi flag (black, white, and green stripes with a red section). Look for images of similar reliefs near the Bastet Statue.
- The Ivory Case is a Syrian artifact. Look for the flag with three red stars. The case has Ugarit letters on it. Check the far right side of the display for a picture showing these letters to help you place it correctly.
- The Funerary Mask is another Syrian artifact. It’s made of solid gold, so it fits best with the other valuable jewels in the middle of the display. Look to the left of the empty Egyptian display case.
After putting all the artifacts back, Indy realizes that the missing item is a Cat Mummy from a dig he participated in in Siwa, Egypt.
Five Sacred Wounds Puzzle Solution
After deciphering the strange symbols with Father Antonio, Indy learns he must go to the Tower of Pope Nicholas V in Vatican City. Once inside, pour wine into the basin in front of the altar. Then, turn the bas-relief to the left. This will reveal a hidden staircase leading underground.
At the bottom of this area, you’ll see three murals: one in the center and two on the sides.
- Left Mural: There’s a stone bust here. Pick it up and move it out of the way.
- Center Mural: This is the central puzzle wall.
- Right Mural: This mural is in a room to the right of the main chamber.
To access the room with the Longinus statue, you must break down a weakened wall in the left chamber.
Now, you need to pour wine into the basins in front of each mural and statue. Once you do, Roman numerals will appear:
- Christ with a chalice: II
- Christ with bread: II
- Standing Christ (left foot): III
- Sitting Christ (right foot): IV
- Longinus statue: III
To solve the puzzle, you must match the Roman numerals on the basins to the correct body parts on the central wall. Here’s how:
- Top Left: II (hands)
- Top Right: II (hands)
- Middle: III (torso/spear)
- Bottom Left: III (feet)
- Bottom Right: IV (feet)
The wall will move once you’ve correctly aligned the latches, revealing a secret passage.
Fountain of Confession Puzzle Solution
To find the Fountain of Confession, head west from the central plaza in Vatican City. You’ll pass a checkpoint where soldiers are inspecting troops. Avoid being seen by the captain and follow the garden path uphill. The Fountain of Confession will be ahead. Near the end of the Vatican quest, Indy must uncover a hidden entrance to a monastery concealed within the Fountain of Confession. First, check the lockbox on the left. Inside, you’ll find the Fountain Gate Key. Use this key to open the door to the left of the fountain.
Climb the crates and scaffolding near the fountain. You’ll find a dragon arm on one of the crates. Take it and place it on the dragon statue at the top. Turn the arm, then cross to the other side of the fountain and put the other arm. This will activate a lever at the front of the fountain. Pull the lever to rotate the fountain and reveal the hidden puzzle.
The Baptism Puzzle
- Move the Small Statue: Push the small statue in the left bowl to the right, aligning it with the nearby jutting section.
- Fill the Bucket: Use your whip to pull the lever above the right statue, filling its bucket with water.
- Tip the Water: Push the right statue to the left, causing the water to spill into the left statue’s bowl.
- Rotate the Fountain: The fountain will rotate, revealing three statues before a gate. One statue has already moved.
- Move the Second Statue: Move the second statue to open the gate.
- Rotate the Fountain Again: With Gina’s help, pull the main fountain lever back to the right to reveal the next puzzle.
The Ark Puzzle
1. Wooden Circle Puzzle:
- Arrange the wooden wheels to create a clear path for the statue.
- Ensure the wooden blocks with slits form a continuous path from left to right.
2. Move the Statue:
- Pull the lever above the stone statue using your whip.
- The statue will move along the path you created.
3. Reveal the Next Statue:
- Once the statue reaches the end, a new statue will appear on the lower gated side.
The main structure will automatically rotate. Once the gate opens, push the central statue back into the gate. This will reveal a hidden staircase leading underground.
Silver Path Trial Puzzle Solution
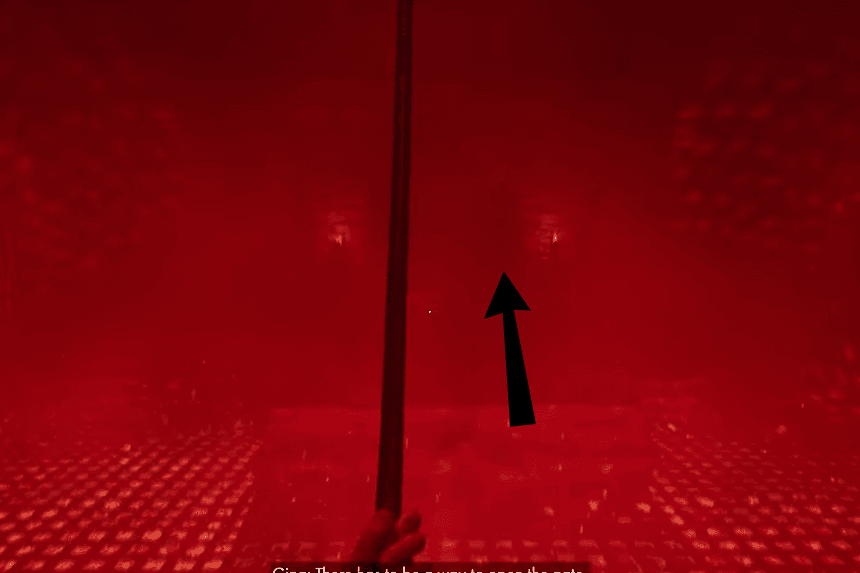
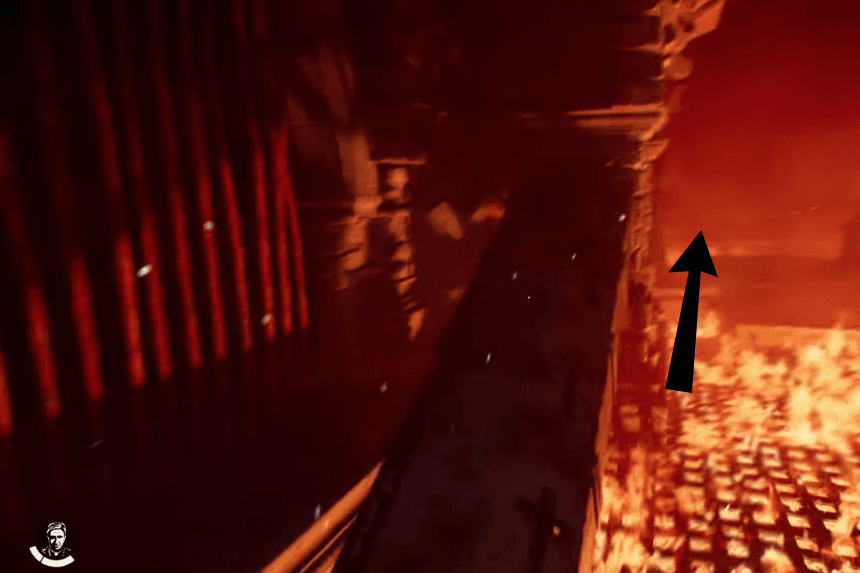
Before going to Giza in Indiana Jones and the Great Circle, you must complete two trials to open a massive door.
- Cross the Flames: Use your whip to swing across the flames to the other side of the room.
- Retrieve the Tablet: Grab the stone tablet from the skeleton on the floor.
- Activate the Pedestal: Place the tablet on the central pedestal.
- Cross the Flames Again: Swing across the flames and grab the tablet from the other pedestal.
- Give the Tablet to Gina: Give the tablet to Gina, who is behind the bars.
- Climb the Ruins: Climb the collapsed part of the room.
- Cross to Gina: Swing across to Gina and take the tablet from her.
- Place the Tablet: Place the tablet on the final pedestal.
- Rotate the Statues: Pull the chain to rotate the statues to their highest point.
- Solidify the Key: Use your whip to pull down water and solidify the key.
- Open the Door: Use the key to open the door, but you will also need the key from the Gold trail to exit the chamber.
Gold Path Trial Puzzle Solution
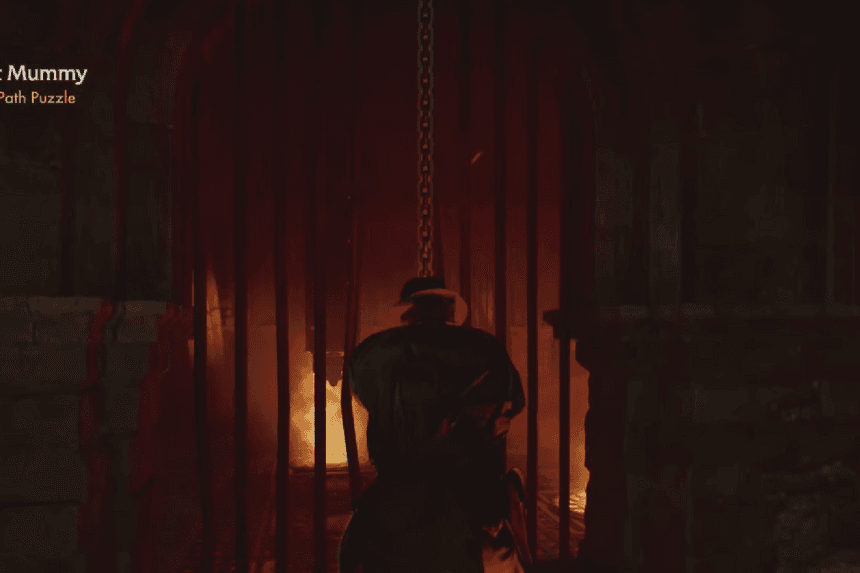
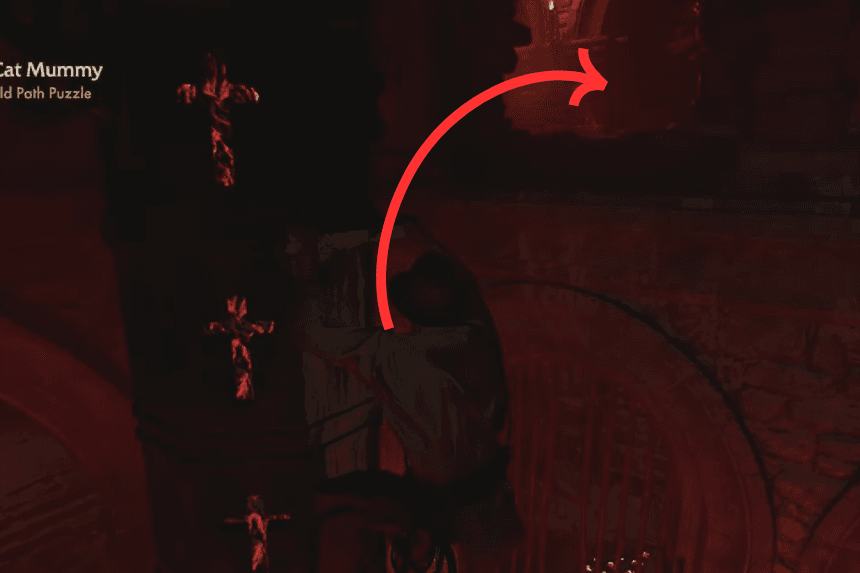
Once you enter the gold trial chamber, you’ll see a lever at the far end. However, pulling the lever will open the door once you solve the puzzle. You can move freely around the chamber, avoiding the fire. The steam and sparks won’t hurt you. Go to the left of the lever and pull the chains behind the bars. This will cause the towers in the main chamber to move over the fire sections, lighting them up.
1. Light Up the Towers: Pull the chains behind the bars to light up two towers.
2. Climb the Tower:
- Use your whip to climb onto one of the lit towers.
- With Gina’s help, move the tower to reach another grapple point.
- Whip onto the grapple point and climb into the broken entrance.
3. Light Up the Floor: Pull the chains behind the bars to light up the floor.
4. Open the Main Door: With all towers lit, pull the lever to open the main door.
5. Activate the Forge: Pull the chain in the next chamber to rotate the statues and activate the forge.
6. Solidify the Metal and Grab the Key: Use your whip to solidify the metal and grab the key to open the door with the help of the Silver Trial key.
Bulls of Blood Puzzle Solution
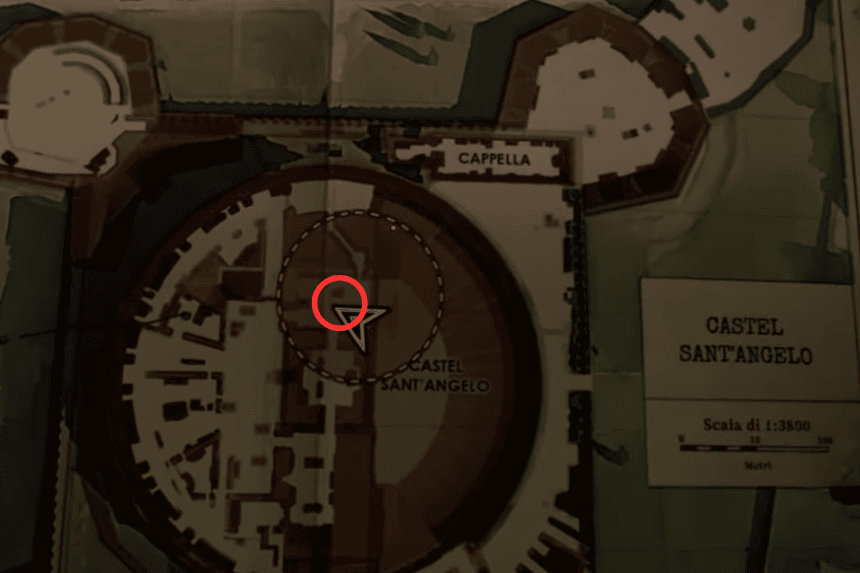
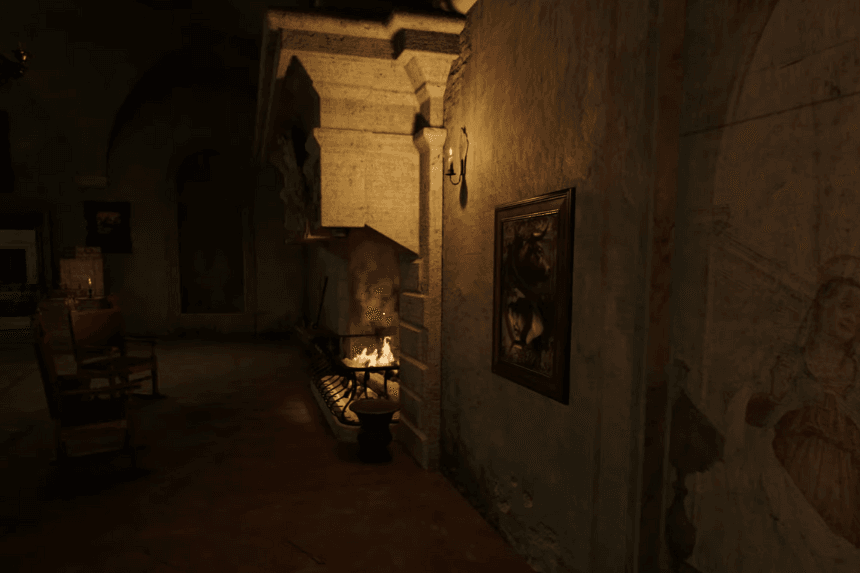
To find Russo’s Note, you’ll need to sneak past the guards in the Courtyard of the Angel. Slip into one of the rooms, avoiding the sleeping guards and the patrolling Blackshirt. You’ll find a note on a table in the room farthest from the locked gate. It mentions a passage next to a fireplace, but it’s outside the current room.
Head to the other large room near the locked gate. Look for a suspicious wall section with two bull paintings. Rotate the paintings so the dark-colored bulls face each other. A secret panel will open, revealing Russo’s Note and some money.
Secret of Secrets Puzzle Solution
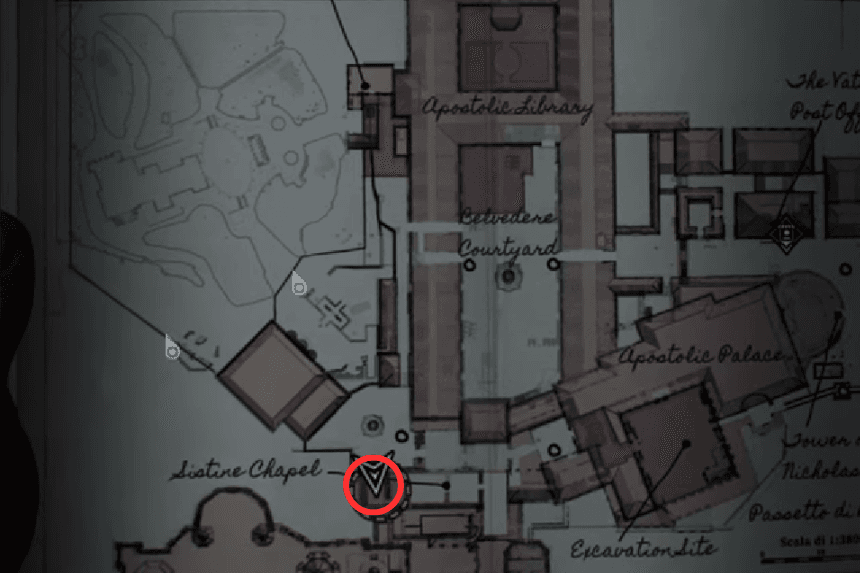
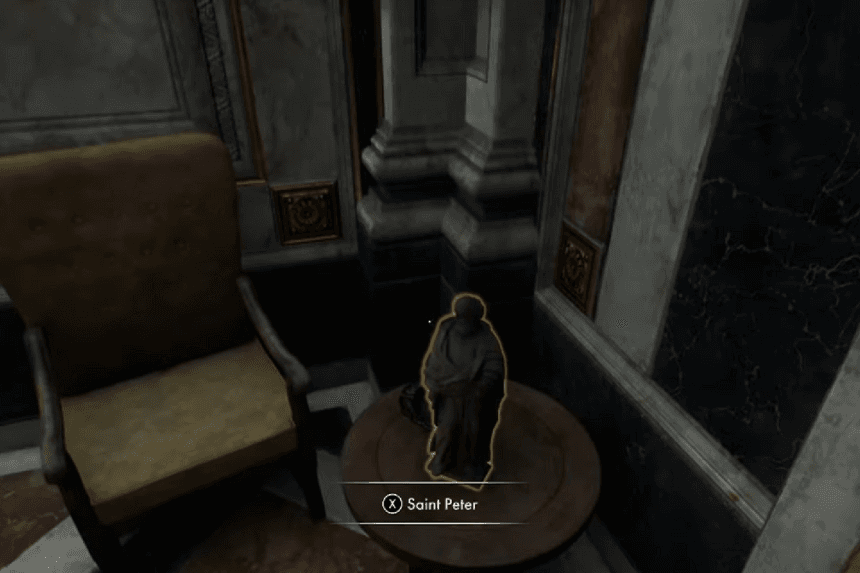
The Secret of Secrets can be found in the Sistine Chapel’s back room in Vatican City. You’ll find a safe on a desk and a note of Nicoletti’s Letter. The letter gives players clues to solve the puzzle, telling them to “look to the stars and the saints: Peter with the key, then Paul with the sword.”
- Inspect the Statues: Examine the Saint Peter statue to find the symbol for Mars (4,4). Then, examine the Saint Paul statue to find Uranus (7) and Mercury (1) symbols.
- Decode the Symbols: Translate the symbols into numbers using the Planetary Chart note.
- Open the Safe: Input the code 4471 into the safe.
- Claim the Rewards: Collect the rewards to complete the Secret of Secrets mystery.
House of God Puzzle Solution
Click on the images to enlarge
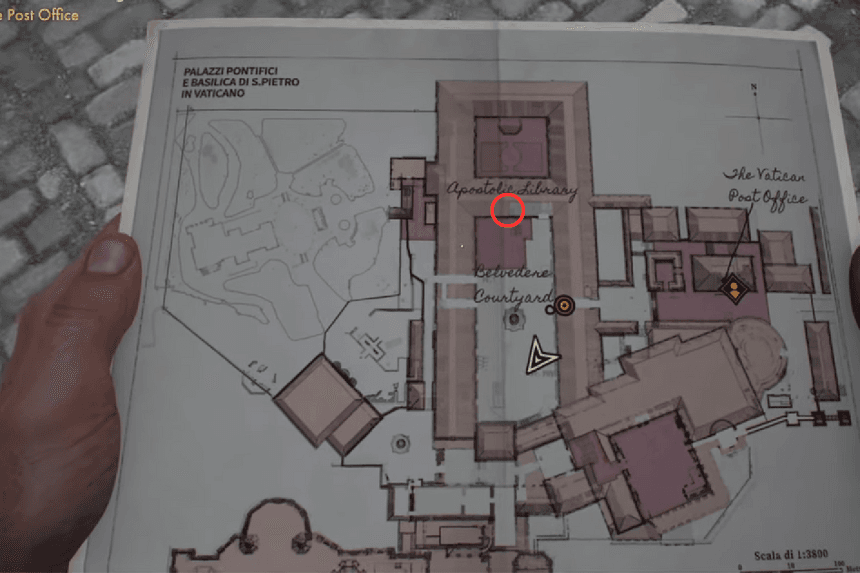
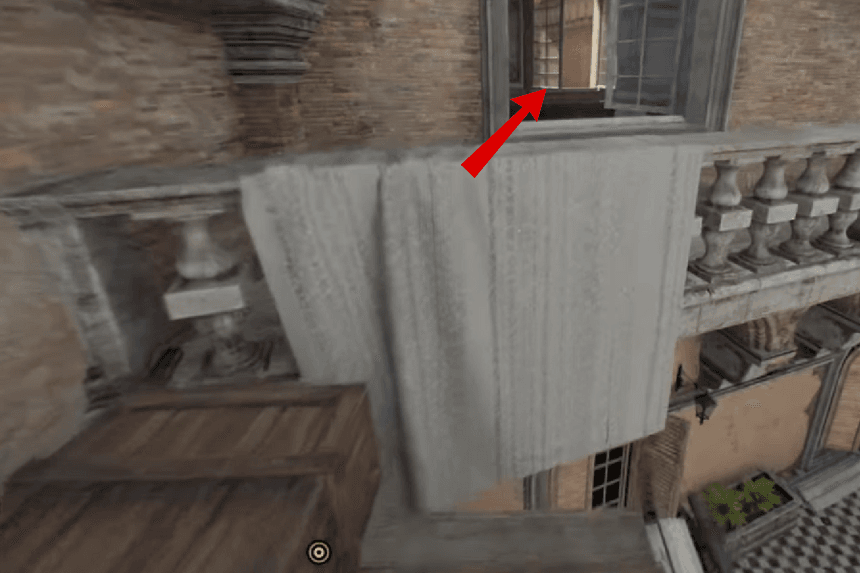
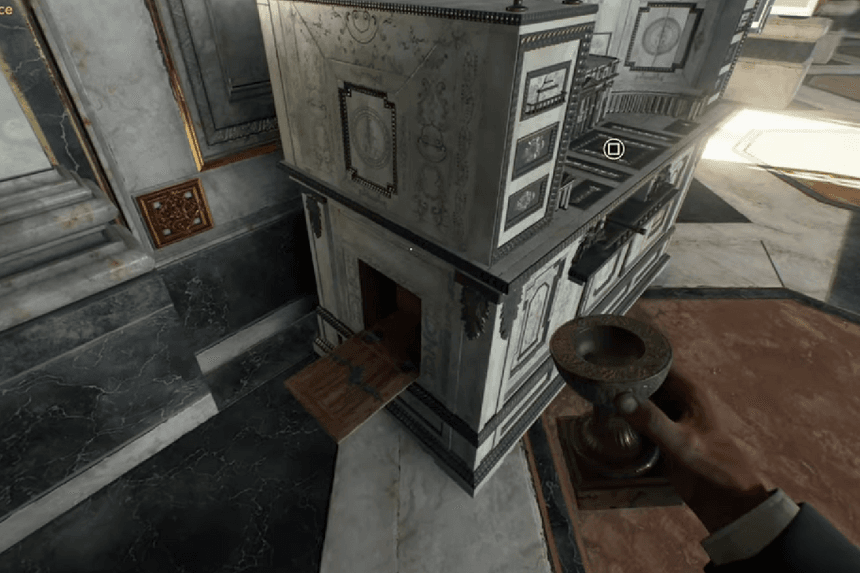
To find the “House of God” puzzle, go to the south end of the Belvedere Courtyard in the Vatican. Sneak past the Blackshirts building a stage and climb the scaffolding on the right side. Punch the fascist guard at the top and climb more scaffolding. Jump through the open window, and you’ll find the puzzle box in the hallway.
- Grab the Cleaning Note: Take the Cleaning Note from the top of the puzzle box.
- Open the Left Door: Slide the lever to the right to open the left door.
- Retrieve the Relief Medallion: Take the Relief Medallion from the left door.
- Open the Right Panel: Slide the lever to the left to open the right panel.
- Place the Medallion: Insert the Relief Medallion into the right panel.
- Open the Final Panel: A panel on the left side will open.
- Grab the Golden Chalice: Take the Golden Chalice from the left panel.
- Place the Chalice: Place the Golden Chalice on the square atop the puzzle box.
- Reveal the Secret: The final secret panel will open, revealing the Vatican Relics Exploration Book.
A Free Spirit Puzzle Solution
Click on the images to enlarge
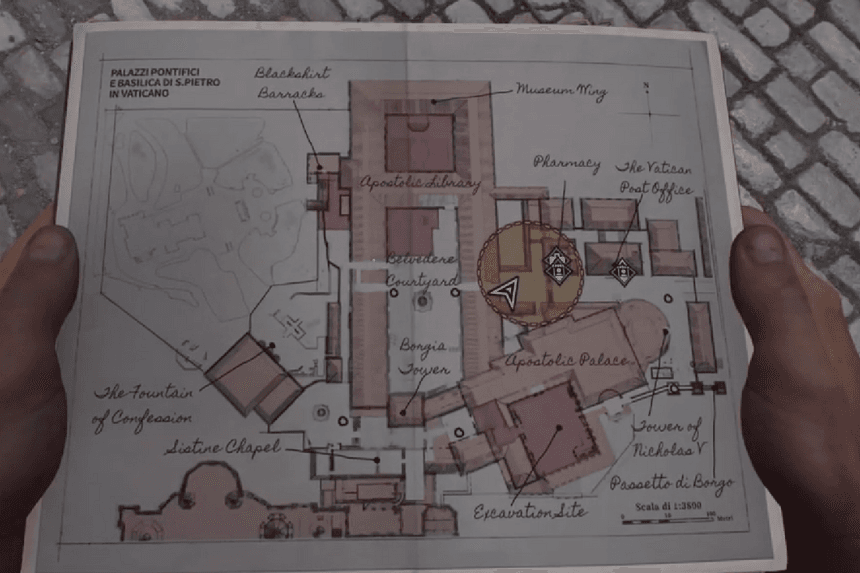
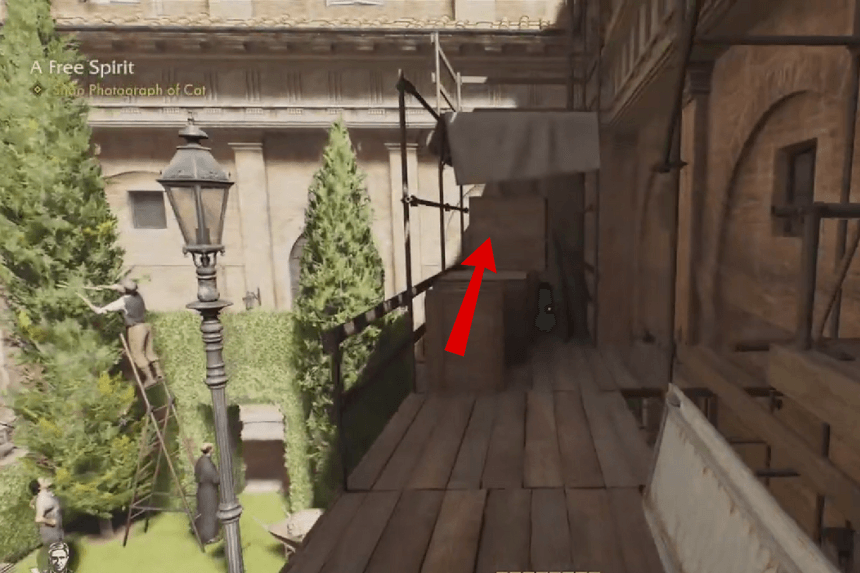
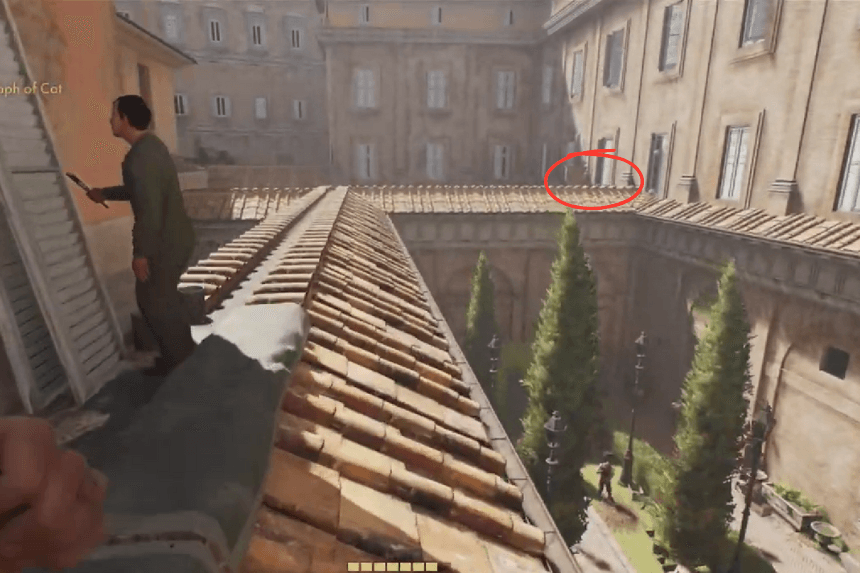
To find the Free Spirit mystery, go to the message board across the street from the Tower of Nicholas V. Grab the picture of the cat to start the mission. Walk up the main street through the wooden gates and enter the garden through the metal gate on the right. Climb the scaffolding past the brown cat to reach the roof. On the roof, you’ll find Signor Smushki sunbathing. Take a picture of him and return to the message board to hang the picture. This will inform Father Bianchi about Signor Smushki’s whereabouts.
A Snake in the Garden Puzzle Solution
You can activate this mystery by discovering a Mystery Note in Father Ventura’s office. To get to the Apostolic Palace, climb onto the rooftops above the Borgia Courtyards. Then, the chapel under renovation will be used to swing across the chandelier and scale the scaffolding. Outside, you will notice the rooftops extend to a high open window that leads into the palace. On the top floor, the main room has a long balcony, with several Blackshirts guarding the office entrance. Here, you will find one of the doors locked from the other side.
- Distract the guards or engage in a fight with some of them. Alternatively, find a window near the top of the stairs that leads to scaffolding above the Excavation Yard. The opposite side of the yard has matching scaffolding leading to another balcony of Ventura’s office. Use your whip to quietly swing over to the balcony without drawing attention.
- Once inside Ventura’s office, check the main desk for a suspicious bookcase note that triggers the mystery. The note mentions a bookcase being redesigned with books that “must be taken alphabetically. Each book title is linked to a symbol:
- Fraoncorum = Crown
- Logicae = Triangle
- QDC = Star
- Philosophiae = Wheel
- To solve the puzzle, locate the large bookcase in the corner (symbols are visible, but the titles are not). Pull the books in this order: Crown, Triangle, Wheel, Star. If done correctly, a compartment will open, revealing a stash of Lira and an incriminating letter from Mussolini to Ventura.
A Date to Remember Puzzle Solution
Head into the garden area, where you will find a tent with a sleeping guard and a shipment container that won’t open without the correct code. Inside the tent, there are three notes to help with the search: a Code Lookup Table, a Calendar Page, and a Secret Delivery Letter.
The first clue comes from the Calendar Page, which shows that the shipment arrived on Wednesday, October 20th. Now match the days of the week to numbers in the cipher:
- Dom (Sunday)
- Lun (Monday)
- Mar (Tuesday)
- Mer (Wednesday)
- Gio (Thursday
- Ven (Friday)
- Sab (Saturday)
The second clue is in the Secret Delivery Letter, which reveals the code key: DICE. However, the letter warns that the code is incorrect, and the shipment’s arrival on Wednesday does not mean the code is 4718.
- The letter also mentions October 15th, a Friday, on the Calendar Page, indicating players need to adjust the numbers to match Ven (Friday). Using the Code Lookup Table, players should shift the circled numbers in ‘C’, ‘D’, ‘E’, and ‘I’, two spaces to the right into the Ven column.
- Players need to find the numbers in the Ven column that correspond to DICE to get the correct code. The correct code for the shipment container in A Date to Remember is 6380.
- Once the code is entered, the container will open, rewarding players with a Vatican Medicine collectible, which helps complete A Remedy for All (Discovery) by detailing all the medicine bottles in the Vatican map. Giovanni’s Letter, a collectible that grants Adventure Points. 10 Lira, providing extra currency. Completing A Date to Remember also grants an additional 100 Adventure Points.
Signs of Trouble Puzzle Solution
The “Signs of Trouble Puzzle” can be found in the Sistine Chapel. It becomes accessible only after finishing the “A Nun in Trouble” fieldwork. Once that’s done, head back to the Sistine Chapel, and you’ll discover a note inside the Bible.
- Start by taking notes from the Bible on the Altar in the Sistine Chapel.
- Read the note to trigger the mystery.
- You’ll need to infiltrate the Excavation Site in the Apostolic Palace.
- To make things easier, grab a black shirt.
- Enter the site and head to the small tent at the far end.
- Find the safe and use the code from the note: 1891.
- Take the message from the safe, and don’t forget the cash.
- Return to the Sistine Chapel and place the information back into the Bible.
- Helping Gina free her friend Guiliana may have caused trouble for her.
- Complete Gina’s request to gather more information about her sister while things cool down.
Father and Son Puzzle Solution
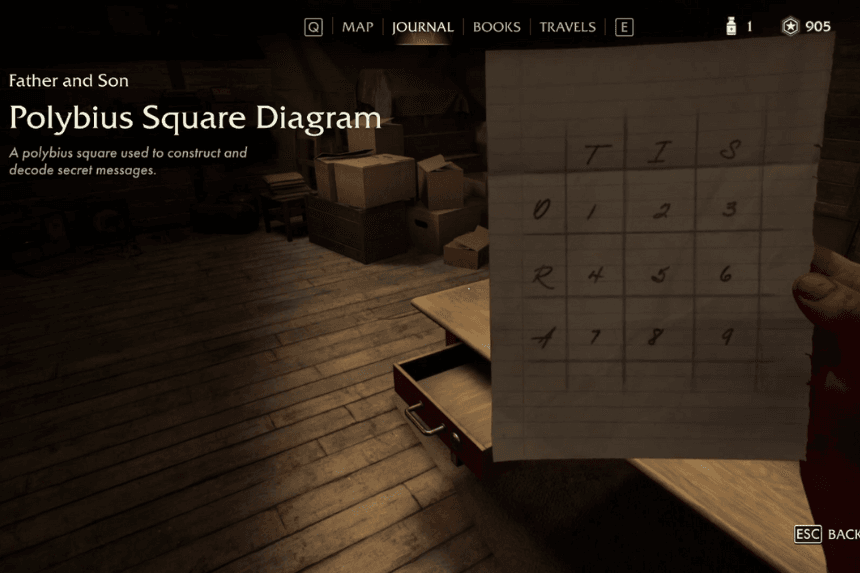
Click on the images to enlarge
After completing A Nun in Trouble, Gina will give you a key to open a door you passed during her rescue mission.
- This key leads to a balcony that opens into a room with a dog, a cat, and a safe.
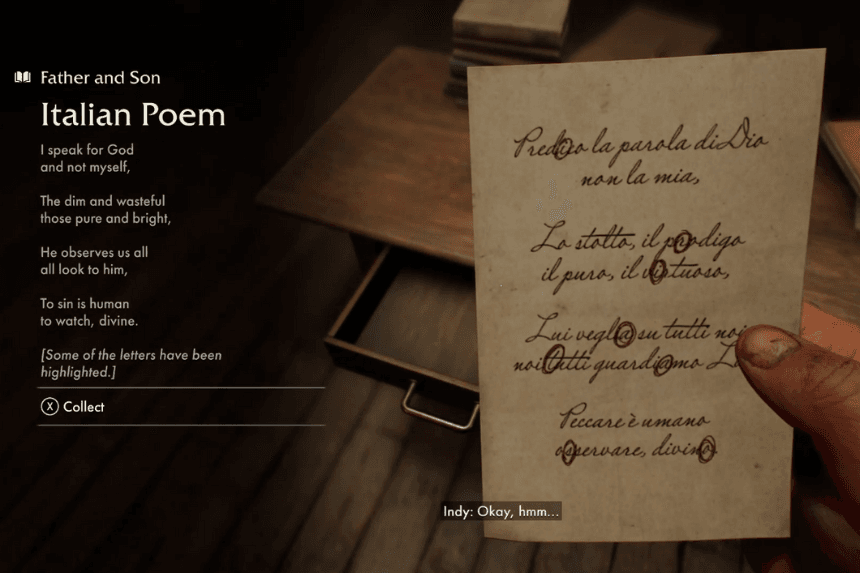
- In the room, you’ll find an Italian poem and a Polybius Square diagram.
- The ringed letters in the poem correspond to columns and rows in the Polybius Square, helping you decode the safe’s combination.
- A potential challenge is that the cursive writing makes the last letter look like an ‘a’, but it’s actually an ‘o’. Pairing the ringed letters in the order they appear gives you this code:
- i + r = 5
- i + a = 8
- t + a = 7
- s + o = 3
The correct safe code for the Father and Son safe in Indiana Jones is 5873. After opening the safe, you’ll find several pieces of information, including:
- A surveillance photo of Indy meeting Father Antonio at the Siwa dig, where he discovered the Cat Mummy.
- A note about the surveillance and a note referencing the Holy Grail. You will also earn 100 Adventure Points.
Belvedere Chest Puzzle Solution
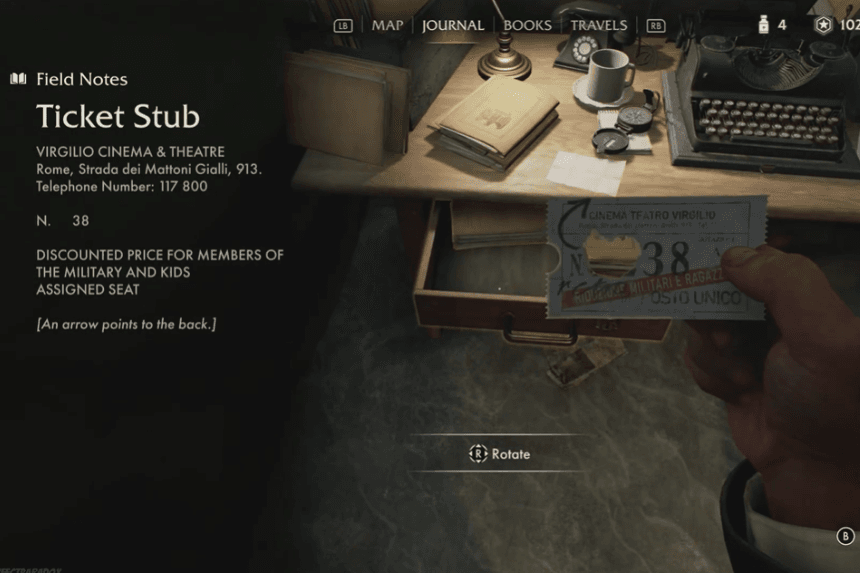
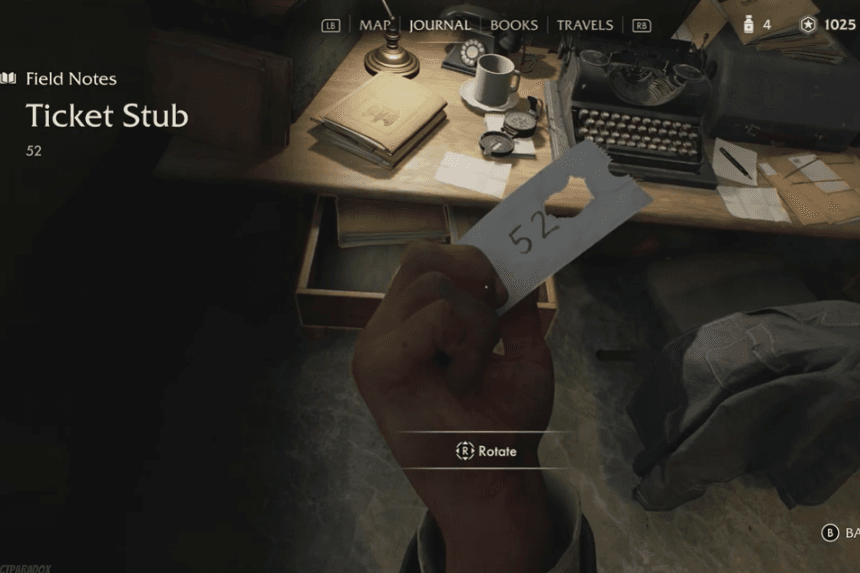
Click on the images to enlarge
You can find this locked military ration chest in the Belvedere Courtyard in Vatican City, right as you exit the Apostolic Library and see a tent ahead. Go through the tent and into the adjoining room to locate it.
- Check the nearby desk drawers to find a Ticket Stub with a hole punched next to two numbers and an arrow pointing to the back.
- Rotate the ticket stub to reveal the other two numbers. These numbers give you the combination: 5238.
- Carefully unlock the safe to find a lot of Lira (which will come in handy for buying that camera) and the Splinter Smash Adventure Book.
Nazi Vehicle Garage Chest Puzzle Solution
The quest begins with Pohl’s Letter, located in the Nazi Recreation Area, a restricted zone south of the Nazi Compound and west of the Great Sphinx. This area also contains the Harvest Stele in a lockbox on a truck bed.
- To start, sneak into the fenced area and enter the larger of two tents. Inside the room with radio equipment, you’ll find Pohl’s Letter on a table.
- The letter details a soldier caught smuggling stolen equipment to Khentkawes and directs you to check the soldier’s bunk for more information. Stay in the fenced area and head to the other large tent. Carefully cross the courtyard and examine the bunks along the wall.
- On a bottom bunk with a yellow helmet, you’ll find the Nazi Note. This note reveals the location of the stolen goods, which are halfway between “the cat” (the Sphinx) and “the queen” (the Khentkawes tomb), near the wagon. It also gives the code to unlock the box: 0926.
- Before leaving, open the container between two bunks to find the Brawling – Block Head Adventure Book. Open your map, and you’ll see a large search area for the stolen goods. The clues point to a location between the Sphinx and the Khentkawes tomb.
- Leave the Nazi Recreation Area and head south toward the Khentkawes dig site. Look for a truck with a barrier and a small hill with a red fabric-covered structure on top. The lock box is near the row of palm trees, not far from Omar.
- Approach the lockbox and enter the code 0926, but be ready to run! Opening the box triggers a dynamite explosion, revealing the trap. Pohl’s Letter mentioned the soldier was smuggling explosives, and opening the lockbox completes the Bright Future questline.
Chamber of Resonance Puzzle Solution
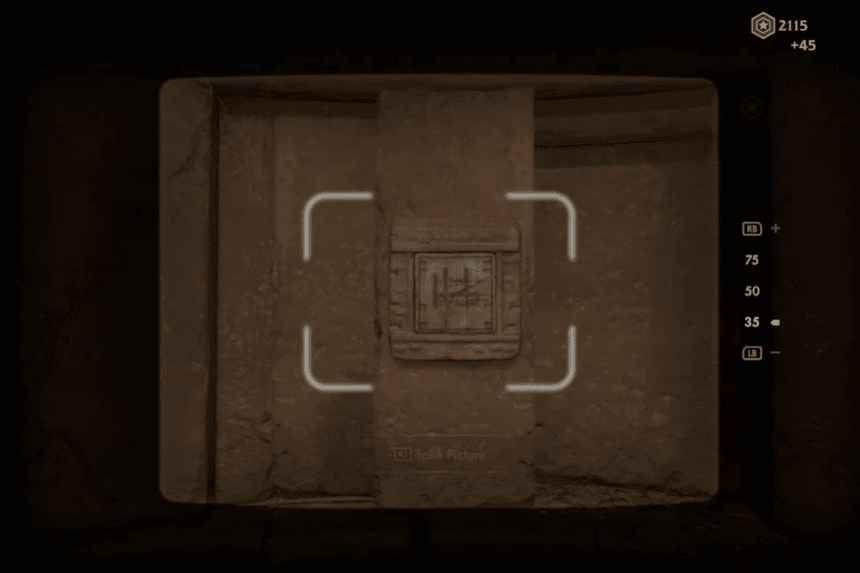
Click on the images to enlarge
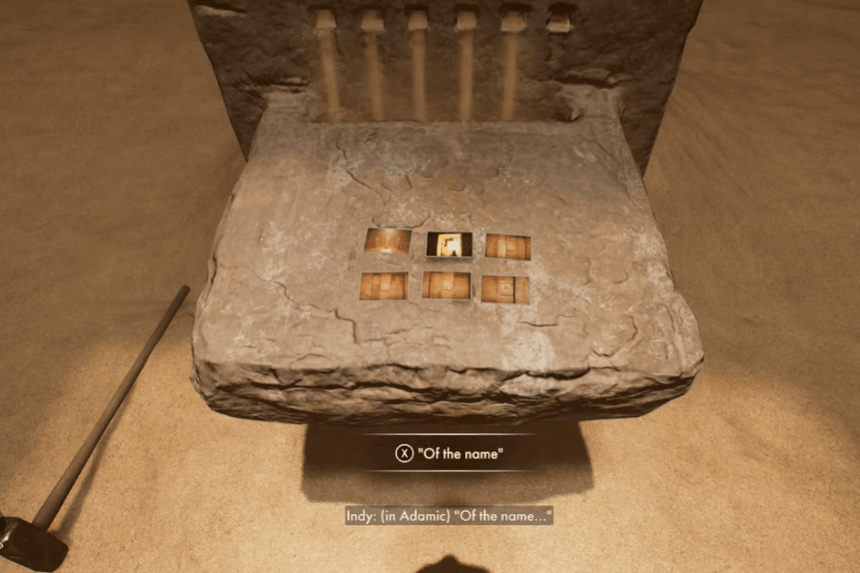
The Chamber of Resonance Puzzle is located near the Pyramid, hidden in a secret room you’ll uncover after decoding the inscriptions on the Dream Stele. To solve the puzzle, you need to recite the password using the Adamic tablets placed on the walls.
- First, Use your notes from the Dream Stele to find the entrance to the secret chamber. Grab a melee weapon from a nearby shed to break through the wall.
- Proceed down the hall to reach the Chamber of Resonance. Examine and take pictures of the tablets on the wall.
- Find the missing tablet piece and crawl through a small hole in the wall to retrieve it.
- Once inside, the room will be dark, and your lighter won’t work.
- Continue to the end of the room to find another melee weapon, which you’ll use to break down a wall, allowing light and air into the room.
- Take the missing tablet piece and place it on the wall.
- Return to the dark corridor where your lighter should now work.
- Light the oil lamps and examine the two tablets in the dark corridor.
- Take pictures of all six tablets and place them in front of the stone statue in the center.
- Select the pictures in the correct order to form the sentence: “Heed the Lord’s Oath. Protect the secret of the name.”
Three-Eyed Gate Puzzle Solution
The Three-Eyed Gate Puzzle is located in the underground cave system beneath the pyramid. It’s a locked door that you will encounter while exploring the caves. To form the pattern in the middle column, direct light onto the metal discs on both sides. You will need to find two additional light sources, as only one is available when you first enter the chamber.
- To open the first door, position the light to hit the top-right panel.
- Enter the newly opened room and find the mirror at the far end. Now, adjust the mirror so that the light hits the outside mirror.
- With two light rays, open the second door by aiming the light at the top-left and right-middle panels.
- Enter the next room and take the brass mirror. Go outside and find the room on the far right of the chamber. Now, place the brass mirror and align it to reflect light onto the third mirror.
- Solve the top lock by directing the light at the top-left, bottom-left, and middle-right panels.
- Solve the middle lock by directing the light at the middle-left, bottom-left, and top-right panels.
- Solve the bottom lock by directing the light at the middle-left, middle-right, and bottom-right panels.
Cloud Atlas Puzzle Solution
Click on the images to enlarge
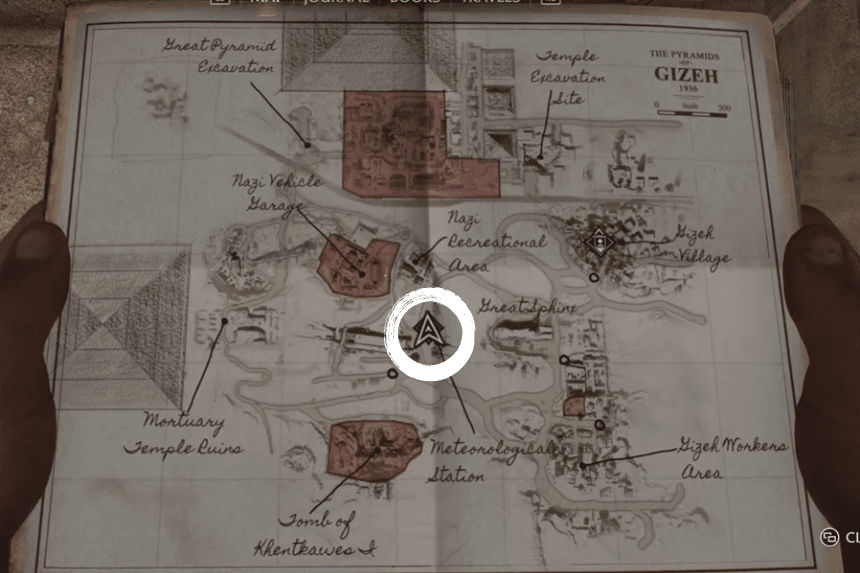
Head to the Weather Station, located south of the Recreation Area, about 100 meters from the rear of the Sphinx. Upon arrival, you will find at least three Nazis guarding the station. Deal with them first. Once the area is clear, search the tent to find the Cloud Atlas notes and the locker.
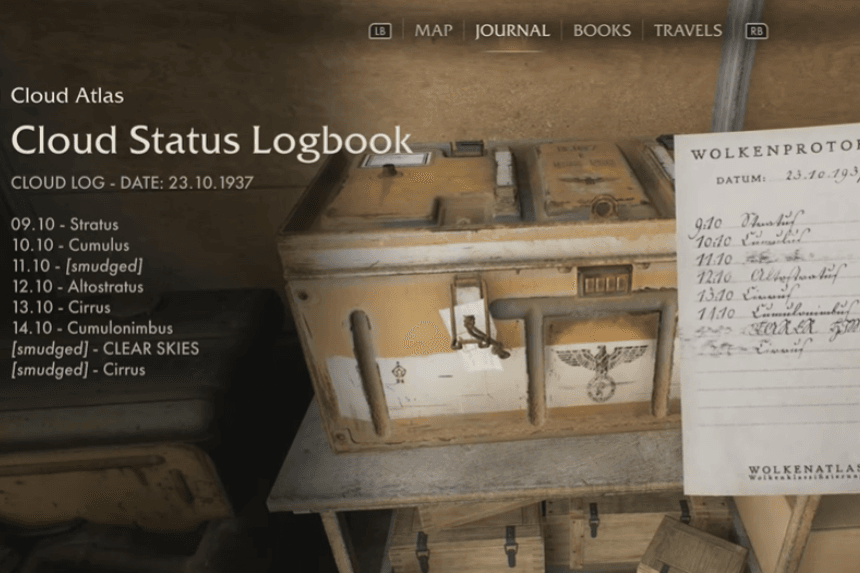
- To solve the Cloud Atlas puzzle, you’ll need the Cloud Status Logbook and the Cloud Atlas Page, which are in the room next to the locker.
- Everything you need to crack the code is in this area, so you don’t need to go anywhere else.
- To solve the code, match the cloud types with their corresponding dates.
- Two dates in the Cloud Status Logbook are smudged, but they are simply the next two consecutive days:
- 15:10 = CLEAR SKIES
- 16:10 = Cirrus
- On the Cloud Atlas Page, match the dates with their cloud types and numbers to get the code:
- 13:10 = 0
- 09:10 = 6
- 16:10 = 0
- 14:10 = 9
- The code is 0609. Completing the puzzle rewards you with 225 Adventure Points and a map called Gizeh Medicine.
Seat of Eternity Puzzle Solution
The Seat of Eternity Puzzle is located northwest of the Great Sphinx in Gizeh. This is an optional mystery puzzle, but you will need to solve it to complete the Riddles of the Ancients discovery and obtain an Ancient Relic. While exploring Gizeh, you’ll come across a small tomb with a sarcophagus containing the Ancient Relic. To open it, you’ll need to activate four pressure plates. First, Collect all four Canopic Jars and place them in the correct order in the Sarcophagus Room.
- Across from your entry point, use your whip to yank the lever and open the gate, where you will find the Jackal Canopic Jar.
- Return to the central hallway and lower yourself into the pit with your whip to find the Human Canopic Jar.
- Toss both the Human Canopic Jar and the rod to the other side, then climb up using your whip.
- Use the rod to break down the wall and get the Baboon Canopic Jar at the end of the hall.
Now, take all three jars to the Sarcophagus Room, where the Falcon Canopic Jar will already be inside. Arrange the jars in the correct order: Human – Falcon – Jackal – Baboon, starting from the left side of the room. Once placed correctly, claim the Relic from the sarcophagus.
Nazi Compound Safe Puzzle Solution
In the back corner of Voss’s Camp, close to where the Royal Army Uniform is located, you’ll find a large green tent that serves as the Nazis’ living quarters. To start this mystery, head up to the second floor via the staircase behind the tent. There, you will come across a table with a board game and two notes. Behind the table, you will find a safe. To solve this mystery, use the notes to crack the puzzle and enter a four-digit code into the safe. The puzzle’s goal is to capture all the red pieces by moving four blue pieces exactly once.
- According to the Mak-Yek Rules, move a piece in a straight line, either horizontally or vertically, until it hits another piece. To capture a red piece, surround it with two blue pieces. If multiple red pieces are in a row or column, you can capture them by moving blue pieces to both ends.
- According to Intervention Capture (found on the back of the rules), if a blue piece moves between two red pieces that are one square apart, it captures both. This is key to solving the puzzle. To open the safe, track the row each blue piece moves to. Write down the row number for each move and the final four digits from the code.
To solve:
- Move the blue piece from F1 to F3, capturing the red pieces on E3 and G3. The first digit is 3.
- Slide the blue piece from H1 to D1, capturing the red piece on C1. The second digit is 1.
- Move the blue piece from B1 to B8, capturing all red pieces on the top row. The third digit is 8.
- Finally, move the blue piece from F8 down to F6, capturing the red pieces on F5 and F4. The fourth digit is 6.
The four-digit code is 3186. Enter it into the safe to unlock it.
Kummetz Cipher Puzzle Solution
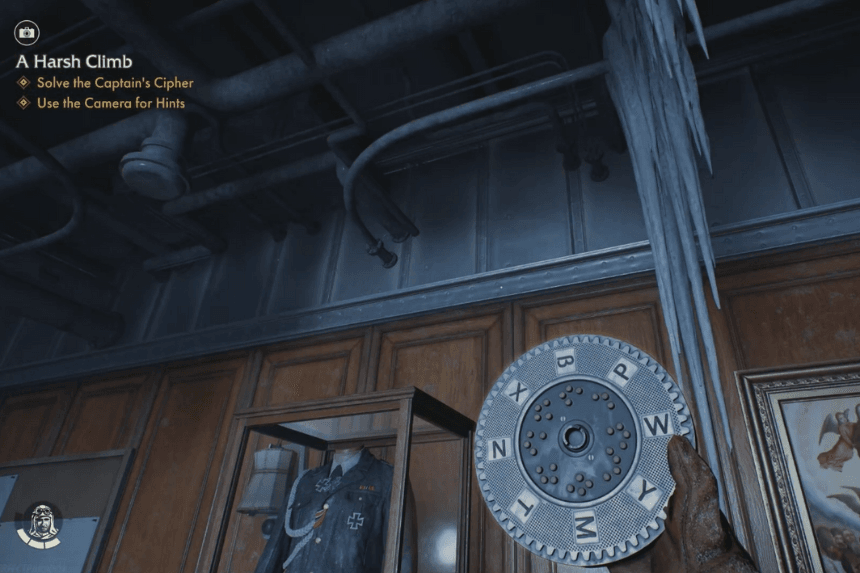
Click on the images to enlarge
The Kummetz Cipher Puzzle is in the Officer’s Lounge aboard the KMS Kummetz. You can find it on the upper deck of the ship.
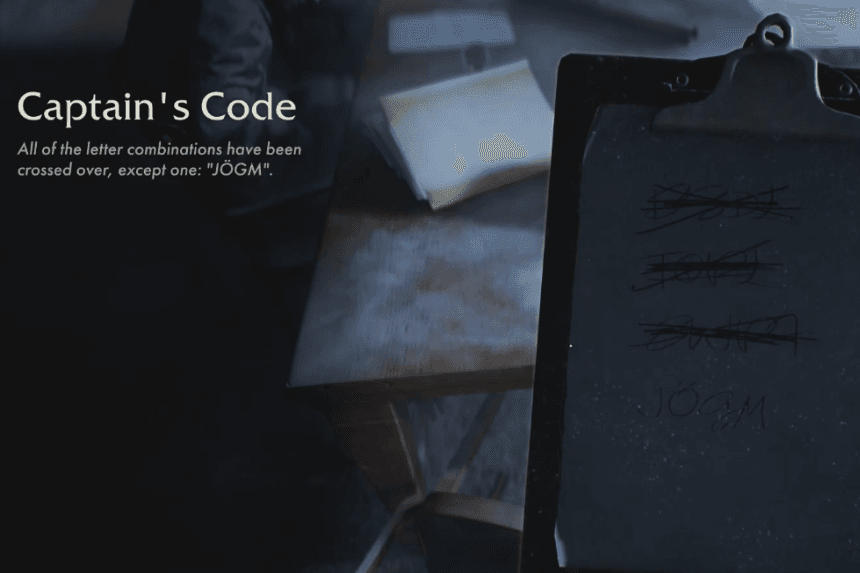
- To solve the Kummetz Cipher puzzle, start by taking the Captain’s Code (JÖGM) from the table.
- Go to the code machine and arrange the code wheels correctly.
- Observe each wheel to see when a letter from the Captain’s Code appears, which will determine the wheel order.
- Input the Captain’s Code (JÖGM) into the machine.
- Take note of the word “BLUT” that appears beneath the Captain’s Code.
- Use the code tables in the room to crosscheck “BLUT” and find the corresponding door code.
- Input the code 3666 on the door to unlock it and continue your progress.
Post Office Cellar Lockbox Puzzle
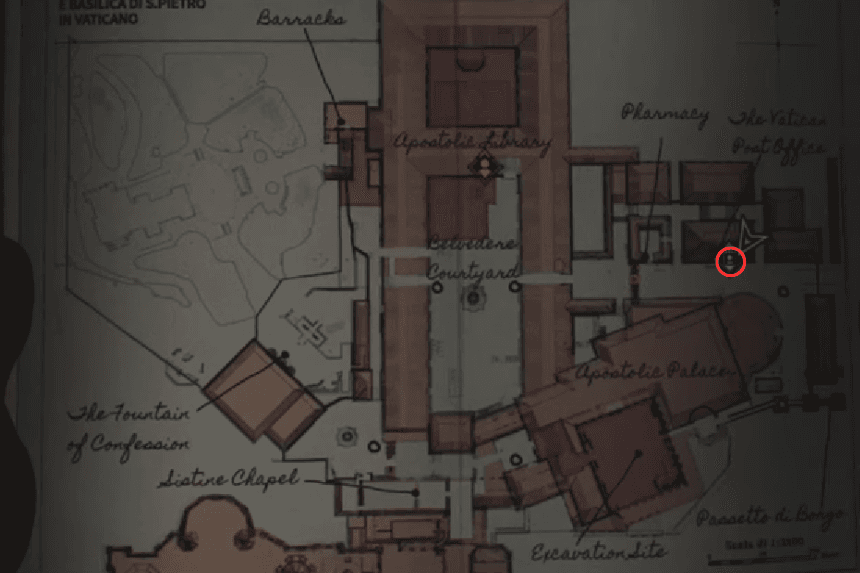
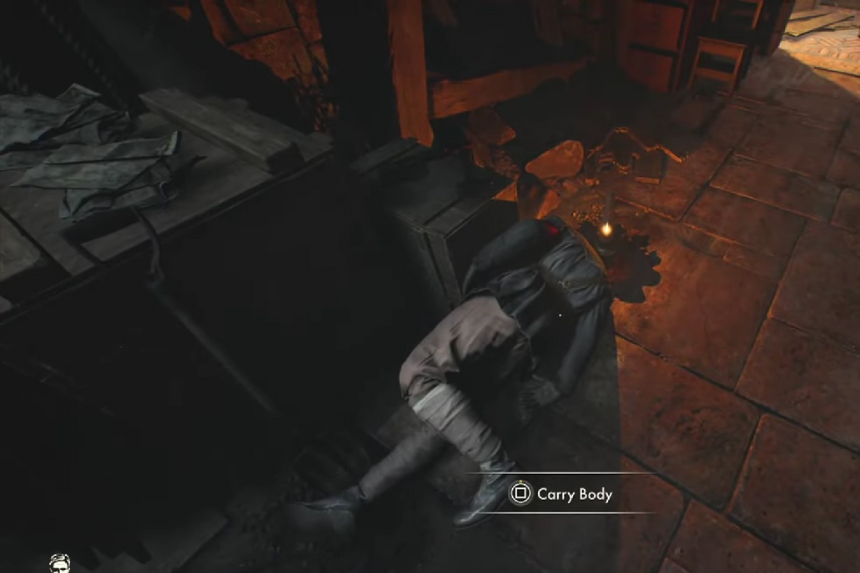
Click on the images to enlarge
During the ‘Savage Discovery’ quest, you’ll be searching for a stone tablet in a room near the Vatican post office. Look around the corner from the post office, down some stairs – you’ll find the Indiana Jones cellar lockbox hidden there. Inside, you’ll discover the cellar key. This key is essential for unlocking the basement door. Once inside the basement, you’ll locate a crate secured with a lock.
You won’t get the code until you find the missing tablet. Once you do, a dramatic scene will play out where Indiana Jones is attacked by a guard. After defeating the guard, you’ll find the code for the cellar box written on his body. You’ll also discover a note on the guard that says the code is ‘November last year’.
Since the game takes place in 1937, the code mentioned in the guard’s note – ‘November last year’ – refers to November 1936. To open the lockbox, use the code 1136. This code works to open the cellar chest. Inside the cellar chest, you’ll find the ‘Street Scrapper I’ Adventure Book. Once you read and learn this book, it will boost the damage you inflict when fighting with melee weapons.
Secret of the Queen Mother Mural Puzzle
This sidequest takes place near the pyramids in Giza, Egypt. You’ll meet a man named Omar near the excavation site. He’ll show you a piece of an ancient relic and ask for your help. The Nazis are also searching for this relic, which is hidden in the tomb of Queen Mother Khentkawes. If you can’t find Omar, look for him just outside the northwest corner of the red restricted area on your map. He’ll be near the Funerary Temple of Khentkawes I, almost directly south of the meteorological station.
To help you navigate the complex area around the tomb, grab the Khetkawes Dig Map. You’ll find it on the desk with three canopic jars under Omar’s tent. Once you reach the tomb, be prepared for a strong Nazi presence outside. Since this is a restricted area, you’ll need to progress through the main ‘Idol of Ra’ quest. Eventually, you’ll gain access to an Indiana Jones Wehrmacht key and uniform. These will allow you to disguise yourself as a Nazi soldier and freely enter the restricted area.
Here’s how to power up the elevator in the tomb of Queen Mother Khentkawes,
Find the Elevator: Locate the elevator in the middle of the dig site.
Follow the Red Cable:
- Traverse the large room with wooden scaffolding.
- Go up some steps, then walk around the upper level to rejoin the cable.
- Find and pull the switch on the landing area.
- Exit through the gate.
Follow the Blue Cable:
- Swim through the flooded room to reach the other side.
- Climb the scaffolding on the right side.
- Find and pull the switch.
- Exit through the gate in the far-left corner.
Activate the Generator: Once both cables are connected, throw the switch on the yellow generator to power the elevator. Descend into the Tomb: Select “-1” on the elevator to enter the tomb of Queen Mother Khentkawes. The main chamber of the tomb has three stone glyphs: a Fish, a Snake, and a Bird. To solve the puzzle, Indiana Jones must place each glyph in its correct position on the mural.
Bird Glyph: Place this on the top part of the mural, representing the sky. Found on the ground next to the mural.
Snake Glyph: Place this in the middle section of the mural, representing the land. Found on the table on left.
Fish Glyph: Place this on the bottom part of the mural, representing the sea. Found on the ground across the table.
Once you correctly position the three glyphs on the mural, a light will illuminate a cracked stone block opposite. Use a sledgehammer to break the block. This reveals a secret chamber containing the Light Stele. Be warned, two guards will appear as soon as you take the Stele. You can either defeat them or stealthily escape through the secret chamber and back to the elevator. Once you have the Stele, return to Omar to complete the “Secrets of the Queen Mother” sidequest.
Gold Mask Mirror Puzzle
To start this quest, talk to Gina in Nawal’s tent. She’s monitoring Nazi radio transmissions and has discovered information about the Sanctuary of the Guardians, located at the Sphinx dig site. Follow the marker on your map to the Sphinx. You’ll find a tunnel on its south side, but be careful – there are Nazis in the area who will spot you. Once inside the tunnel, you’ll encounter Gina. You’ll also find a disguise outfit suitable for the dig site. However, to proceed through the stone door blocking your path, you’ll need to find a special medallion.
How to Find the Gold Medallion Key
To obtain the gold medallion key, you’ll need to sneak into the Nazi Recreational Area, located west-northwest of the Great Sphinx. This is a restricted zone, so wear the Digsite Outfit to blend in with the other workers. Even in disguise, be cautious of Nazi Captains as they may still recognize you.
Head towards the large tent on the east side of the area. As you enter, you’ll see a group of Nazi officers playing cards at a table. One of the officers will ask you to fetch him a bottle. Find the bottle next to some shot glasses on a desk near the back of the tent. You’ll notice the gold medallion key lying close to the bottle.
Hand the bottle to the officer first. If you take too long, the officers will become agitated and attack you. Once you’ve given the officer the bottle, quickly grab the medallion and make your escape from the recreational area. Now, return to the Sphinx and use the medallion key to unlock the entrance to the Sanctuary of the Guardians.
How to Solve the Gold Mask Puzzle
Deep beneath the Sphinx, near the Weather Station in Gizeh, Gina and Indy discover a vaulted chamber. Inside, they find a ceremonial Gold Mask secured by a clasp made of solid rock. To unlock the mask, you must solve a light puzzle. This involves carefully positioning mirrors to reflect light onto a specific point and release the clasp.
Adjust the Mirrors Around the Stone Pillar:
- Move the mirror to the right of the pillar so it reflects light diagonally to the back-right mirror of the chamber.
- Adjust the mirror to the left of the pillar to reflect light diagonally to the back-left mirror of the chamber.
Position the Mirrors at the Back of the Chamber:
- Go to the back of the chamber and face the pillar.
- Adjust the mirror near the toppled column (left side) to reflect light onto the shield-like disc by the short stairs leading to the Gold Mask.
- Do the same with the mirror on the right, angling it to reflect light onto the metal disc on the left near the stairs.
Retrieve the Gold Mask:
- Once both beams hit the discs, the clasp mechanism on the Gold Mask will release, allowing you to pick it up.
Lower the Floor into the Scorpion Chamber:
- After grabbing the mask, Gina will sit on the throne, activating a mechanism that lowers the floor into a chamber filled with scorpions.
- Light Gina’s torch, then pull the chain to open the door.
Break the Weak Wall:
- Grab the torch in the next room and light it.
- Find Gina standing near a weak wall that needs to be broken.
- Go to the lever on the left of the throne to open a door to a secret room. Inside, grab a mace to smash the wall.
Follow the path ahead, using the torch to burn away any obstructions, until you reach another chamber with a new mirror puzzle.
How to Solve the Statute of Light Puzzle
The second mirror puzzle, called the “Statue of Light,” is simpler than the first one. Your objective is to direct a beam of light onto the two discs positioned on the statue in the center of the room.
Statue of Light Mirror Puzzle:
- You need to direct light onto the metal discs on the sides of the statue.
- Adjust the mirror in front of the statue to shine light on the disc above the right door. This will partially break the door.
- Help Gina reach the gap near the ceiling and she’ll slide a Brass Mirror under the door.
- Reposition the mirror to shine light on the disc above the left door.
- Take the Brass Mirror from Gina and place it on the pedestal. This will light up one of the statue’s metal discs.
- Gina will find another mirror and position herself near the statue.
- Adjust the mirror to shine light onto Gina’s mirror.
- This will bounce the light onto the second metal disc, opening a door at the back of the chamber.
Escape from the Chamber:
- The exit path is relatively straightforward.
- You’ll need to help Gina reach a ledge so she can shine her mirror to clear a path through a cluster of scorpions.
- Shimmy along the wall and use a whip grapple point to jump over a gap.
- Climb the stairs.
- Grab the steel in the final chamber and exit the Sphinx.
The quest concludes with a cutscene. You’ll successfully complete the “Sanctuary of the Guardians” Fieldwork achievement and a reward of 400 Adventure Points.
Fortune’s Reach Puzzle
When you meet Nawal in her large blue tent in Gizeh, look for a wanted poster on the noticeboard outside. This poster describes two grave robbers who have escaped with someone’s stolen possessions. Your task is to track down these grave robbers and find out where they’ve gone.
Find the Clue: After noticing the wanted poster, head towards the large wooden tower to the right of Nawal’s tent.
Investigate the Mess: You’ll find a smaller tent nearby with red paint spilled on the sand. Take a photo of this scene.
Follow the Footprints: Start following the footprints. They begin red and then transition to normal footprints.
Track the Thieves: Follow the footprints over the road and back towards your initial starting point in Gizeh.
Discover the Fate of the Thieves: The footprints lead to a tunnel where you’ll find the thieves crushed by falling rocks.
Find the Clues and Reward:
- The thieves’ plan is hidden within the fallen rocks.
- The “True Grit” book, which is located in the sand.
The “True Grit” ability is incredibly valuable. It significantly reduces the damage you take when your health is critically low. Make sure to acquire this ability when you have the chance. You’ll also be rewarded with Adventure Points for successfully completing the quest.
Wehrmacht Chest Puzzle
You’ll find a locked chest in a shed near the Nazi Vehicle Garage in Gizeh. This chest requires a special key, the “Wehrmacht Key.” The shed is located in an elevated area between the Vehicle Garage and the Great Pyramid Excavation Site. To unlock the shed and access the chest, you’ll need to have obtained the “Wehrmacht Uniform” disguise. This disguise is essential for acquiring the key.
- Access the Shed: Climb the wooden wall outside the Nazi Vehicle Garage using your whip to easily reach the shed.
- Find the Clues: All the clues you need to unlock the chest are within the same room.
- Read the Note: Pick up the note inside the room for a crucial clue to the code.
- Examine the Cards: Check the numbers on the cards displayed on the table. Use your camera to zoom in if you have difficulty reading them.
- Unlock the Chest: Enter the code derived from the note and the card numbers into the chest to open it.”
On the bench, you’ll find a note revealing that the chest code has been changed and that the person responsible is a card game enthusiast. Examine the winning hand of cards on the table near the chest. You can take a picture of it for extra Adventure Points. More importantly, the card numbers themselves are the chest code. While the last card is partially obscured, you can determine its value by counting the visible symbols and imagining the hidden ones. The last card is an 8. Enter the code 13218 into the chest to unlock it and discover some money inside.
Egyptian Numeral Chest Puzzle
The lockbox with the Egyptian Numeral Code is located in a building north of the Tomb of Khentkawes. This building is locked, so you’ll have to climb through a window to get inside. Once you’re inside, you’ll find two notes that contain the information you need to unlock the lockbox. This window is the only way to reach the lockbox.
Inside the room, you’ll find two important notes. The first one explains the basics of Egyptian numbers. Here’s what you need to know:
- A single stroke represents the number 1.
- A cattle hobble represents the number 10.
- A coil of rope represents the number 100.
- A water lily represents the number 1,000.
These four symbols represent the different digits you’ll need to use to unlock the lockbox.
After reading the “Egyptian Numeral Basics” note, grab the “Egyptian Numeral Code” clipboard that’s next to the lockbox. This clipboard shows you the code you need to enter, but it’s written in Egyptian numerals. You’ll need to use the information from the “Egyptian Numeral Basics” note to translate the code and unlock the lockbox. The code on the clipboard is written using Egyptian symbols:
- The first line has three water lilies.
- The second line has two coils of rope.
- The third line has six cattle hobbles.
- The fourth line has two single strokes.
To unlock the lockbox, you don’t need to know the exact value of each symbol. Instead, you just need to count how many of each symbol there are on each line. So, the code for the lockbox is 3262. Once you unlock the lockbox, you’ll find a pile of 100 of the local currency and an ancient relic inside. You can take both!
Nephilim Game Puzzle
When Indiana Jones and Gina reach the hidden temple deep within the jungle, they’ll encounter a challenging puzzle called the Nephilim Game, created by ancient giants.In the room, where they find the game, players first need to move to the left wall. Over there, they will find two significant pieces for the puzzle. Taking these pieces and bringing them close to the game board is important. Nephilim Game is that you have to use all of the available pieces, including the one that you just found, in order to open two doors. The first door is on the right wall, and the second door is on the north wall.
- Stand at the Nephilim Game facing the statue, with your back to the exit.
- Place the first Game Piece on the Second Column and Second Row of the board.
- Place the second Game Piece on the Third Column and Third Row.
- Place the third Game Piece on the Fourth Column and Fifth Row.
Once you’ve placed all three pieces, the door on the right wall should open. Inside, you’ll find three more Game Pieces.
- Take these new pieces and place them on the board.
Now, you’re ready for the final part of the puzzle! You now have six Game Pieces to work with. To open the door on the north wall (where the statue is located), you need to place the pieces in these specific spots:
- Place one piece on the Second Column and Second Row.
- Place another piece on the Second Column and Fourth Row.
- Place another piece on the Third Column and Third Row.
- Place another piece on the Third Column and Fourth Row.
- Place another piece on the Fourth Column and Second Row.
- Place the final piece on the Fifth Column and Fourth Row.
This should open the door on the north wall!
The Great Game Puzzle
Okay, so Indy and Gina have found themselves in another abandoned temple, this time in Sukhothai. They’ve stumbled on a puzzle this time known as “The Great Game.” This game features four distinctive characters (NPCs). One can play with these NPCs and steer them toward the pressure plate. The trick is that all four need to be on the plate, and the order makes no difference. However, before you can do that, you need to position these NPCs on specific spots on the game board. Once they are in the correct positions, the stone pillars within the temple will all align and face north, towards the entrance.
Here’s how to solve the puzzle:
- First NPC: We placed the first NPC on the Second Column and the First Row of the game board.
- Second NPC: We placed the second NPC on the First Column and the Second Row.
- Third NPC: We placed the third NPC on the Third Column and the Second Row.
- Fourth NPC: We placed the fourth NPC on the Fourth Column and the Fifth Row.
- Indiana Jones: Finally, we had Indiana Jones stand on the Fifth Column and the Fourth Row.
This specific arrangement of NPCs and Indiana Jones caused the stone pillars to all face north, successfully solving the puzzle! Once all five characters (the four NPCs and Indiana Jones) are standing on their designated pressure plates, the doors leading into the temple will finally open.
Khmer Pipeworks Puzzle
First, pick up the Kid Who Vanished quest and head to Wat Si Sawai to rescue Aran. Then locate the Puzzle Area. You must power up the hydraulic wheels near the large statue at the puzzle location by redirecting water to three drains on the floor.
Collect the Pipes
- Pipe A: Go to the room on the right and pick up the first pipe from the floor.
- Pipes B & C: Climb the stairs in the main area, jump across the stone platforms, and collect the two pipes on top of the pillars.
- Find a ladder in the puzzle area that leads to a water switch. Turn it on to open a locked door on the left. Inside, you will find the final pipe.
Arrange the Pipes for the Locked Door
- Name the pipes:
- Pipe A: Curved pipe from the right-side room.
- Pipe B: Curved pipe from the pillar.
- Pipe C: Three-way pipe from the pillar.
- Pipe D: The pipe was found in the left-side room after unlocking the door.
- Placement:
- Slot 2: Place Pipe C, facing north.
- Slot 4: Place Pipe A or B, facing east.
Rearrange the Pipes After Collecting Pipe D
- Slot 4: Place Pipe D, facing south.
- Slot 3: Place Pipe A or B, facing north.
- Slot 1: Place the remaining curved pipe, facing east.
Check Water Flow: Ensure water flows into all three drains. Once done, the puzzle will be complete.
Khmer Cogwheel Puzzles
The Khmer Cogwheel puzzles are part of the Discovery side quests in Sukhothai. Start by visiting the main camp and talking to Tongdang. Purchase the Sukhothai Cogwheels book to help you locate all the cogwheels. If the book isn’t available yet, buy the Rebreather from him first. Once you have the map, you can begin searching for all 10 cogwheels needed to complete the puzzle.
Cogwheel Locations & Puzzle Solutions
Cogwheels #1, #2, & #3
- Location: Near the stream in front of the Hidden Pyramid.
- Instructions:
- Reach the passage to the pyramid.
- Hop out of the boat, step onto the left platform, and collect the 3 cogwheels.
Cogwheels #4 & #5 | Puzzle #1
- Location: Southeast of Waterfall Ruins, near a totem on a small island.
- Instructions:
- Find the hole near the totem and pick up Cogwheel #4 from the ground.
- Place all collected cogwheels (5 total) in the wall puzzle.
- Puzzle Solution: Arrange the smaller and mid-sized cogs to connect with the largest cogs at the top and bottom.
- Pull the lever to unlock the gate, collect the Ancient Relic, and retrieve all 5 cogwheels.
Cogwheels #6 & #7 | Puzzle #2
- Location: Wat Mahathat, up the hill north of the stream.
- Instructions:
- Pick up a small cogwheel from the ground near the totem.
- Place it with the other 4 cogwheels in the puzzle area (5 total).
- Puzzle Solution: Refer to the guide for the arrangement.
- Unlock the gate, collect the Ancient Relic, and retrieve all cogwheels.
Cogwheel #8 | Puzzle #3
- Location: Wat Si Sawai, west of the stream.
- Instructions:
- Find a hole in the ground to access the puzzle.
- Place 6 cogwheels in the puzzle.
- Puzzle Solution: Arrange the cogs to unlock the gate, collect the Ancient Relic, and retrieve all cogwheels.
Cogwheel #9 | Puzzle #4
- Location: East of Jongdang’s Hut, behind a stone wall.
- Instructions:
- Dive underwater with your Rebreather to cross to the other side.
- Drop down the hole to reach the puzzle and place 9 cogwheels.
- Puzzle Solution: Unlock the gate, collect the Ancient Relic, and retrieve all cogwheels.
Cogwheel #10 | Puzzle #5
- Location: East of Wat Chana Songkhram, in a blocked water area.
- Instructions:
- Dive underwater and make your way through the wall hole.
- Jump down the final hole to access the puzzle.
- Puzzle Solution: Ensure no cogs touch the vine-covered cog in the middle. Arrange the rest to unlock the gate, collect the Ancient Relic, and gather all 10 cogwheels.
Final Cogwheel Puzzle
- Location: Northern section of Sukhothai.
- Instructions:
- Jump into the hole at the final puzzle location.
- Place the cogwheels as shown in the guide (ignore the vine-covered cog).
- Solve the puzzle to unlock the final gate, collect the Ancient Relic, and complete the quest.
Reward
- 6 Ancient Relics.
- Gear Head achievement for completing the Khmer Cogwheels Puzzle.
The Serpent’s Chest Puzzle
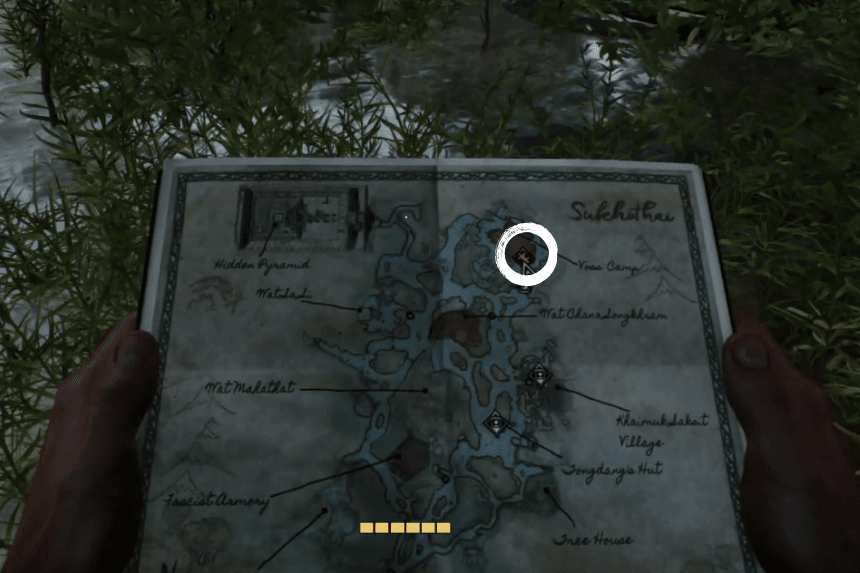
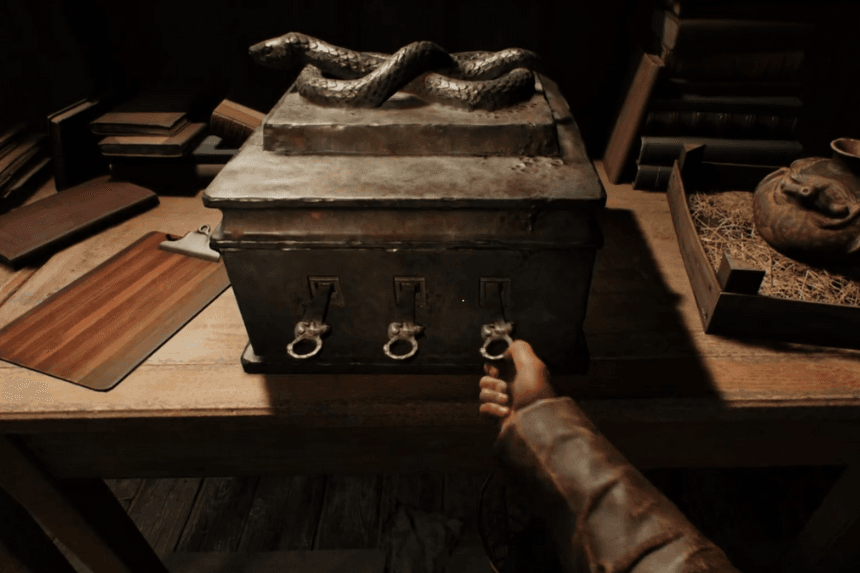
Click on the images to enlarge
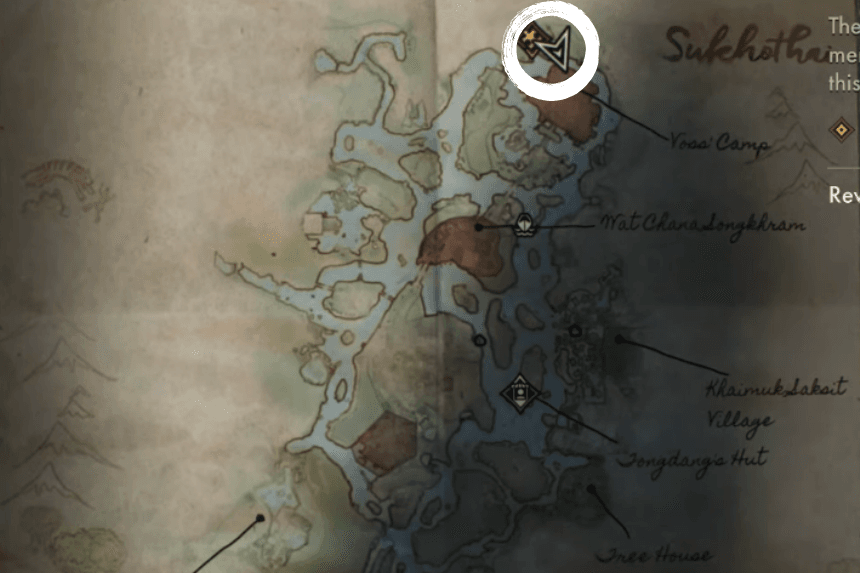
This mystery side quest takes place in the Sukhothai region, starting at Voss’ Camp in the northern part of the zone. To start the quest, head to the barracks just past the entrance to Voss’ Camp.
- Look for the ornate chest and read the note next to it. The note explains that the Nazis are searching for ancient keys hidden in the Vatican, Gizeh, and Shanghai – areas you have previously visited during the campaign.
- Rebreather Requirement:
- Before searching for the keys, purchase the Breathing Device/Rebreather from Tongdang, the booklet vendor in Sukhothai.
- It’s essential for surviving underwater sections where the keys are located.
Preparations at Voss’ Camp
- Royal Army Uniform:
- Found in the washing area; wearing it prevents most soldiers from becoming hostile.
- Voss’ Safe:
- Found in the main building. Use the code 5484 to unlock it and collect over 2,000 baht – enough to buy the Rebreather.
- Mini-Puzzles:
- Try the Mak-Yek Board Game in the main building.
- Solve the Elephant in the Room puzzle at the back of the camp.
Finding the Ancient Keys
1. Ancient Vatican Key
- Location: Necropolis area.
- How to Find It:
- From the Excavation Site, take the shortcut to the large chamber with the pool.
- Jump in, face the western wall, and use the Rebreather to swim through the passage and collect the key.
2. Ancient Gizeh Key
- Location: Tomb of Khentkawes I.
- How to Find It:
- In the elevator section, head to the corridor leading to the room where you electrocuted two Nazi guards.
- Swim through the partially submerged section, move the wooden board, and grab the key.
3. Ancient Shanghai Key
- Location: Canal and bridge area near the starting point in Shanghai.
- How to Find It:
- Backtrack from the rooftop where Gina flew the plane to the canal and bridge area.
- Search the area to retrieve the final key.
Unlocking the Serpent’s Chest
- Return to Voss’ Camp with all three Ancient Keys.
- Insert the keys into the ornate container to unlock it.
Reward
- Your reward is a single Ancient Sukhothai Relic. While it may seem underwhelming, it’s still a valuable addition to your collection.
Path of Tigers Puzzle
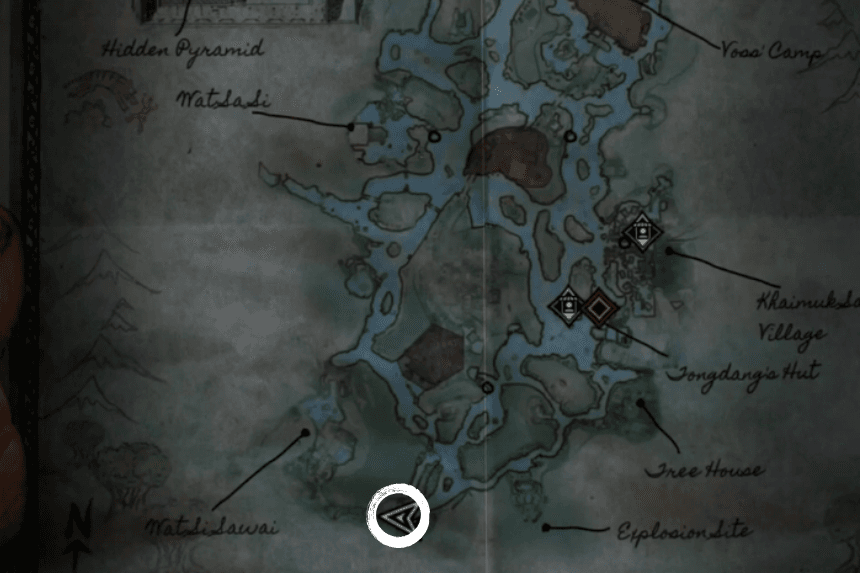
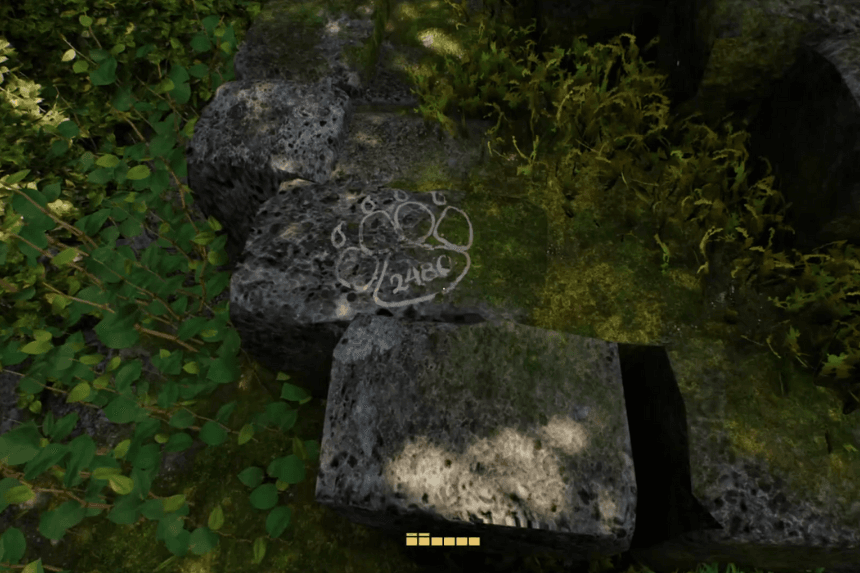
Click on the images to enlarge
Visit Tongdang’s Hut and purchase the breathing device for the main quest or side quests. Before leaving, go downstairs and follow the dirt path to a nearby house.
- Discover the Photograph
- Inside the house, pick up the photograph and notice the locked safe.
- Taking the photograph starts the Path of the Tiger’s mystery.
- Travel to Wat Si Sawai
- Get on the boat and head southwest to Wat Si Sawai.
- If you purchased the Sukhothai Mysteries from Tongdang.
- Explore Wat Si Sawai
- Wear the Royal Army outfit to move freely or sneak around.
- After docking, walk past the two guards and through the tree leaves.
- Climb the slope to the left, marked by a wooden sign with a tiger on it.
- Find the Tiger Statue
- At the top, locate the statue where the photograph was taken.
- Check the left side of the statue’s base to find a tiger paw drawing with the number 2480.
- Return to the Safe
- Travel back to Tongdang’s Hut by boat or fast-travel using signs.
- Revisit the flooded house and use the code 2480 to open the safe.
- Unlock Your Reward
- Inside the safe, find the Jumbo Grip skill book, which allows Indy to grab heavyweight enemies in hand-to-hand combat.
- Unlocking this skill requires 500 Adventure Points.
Monkey Business Puzzle
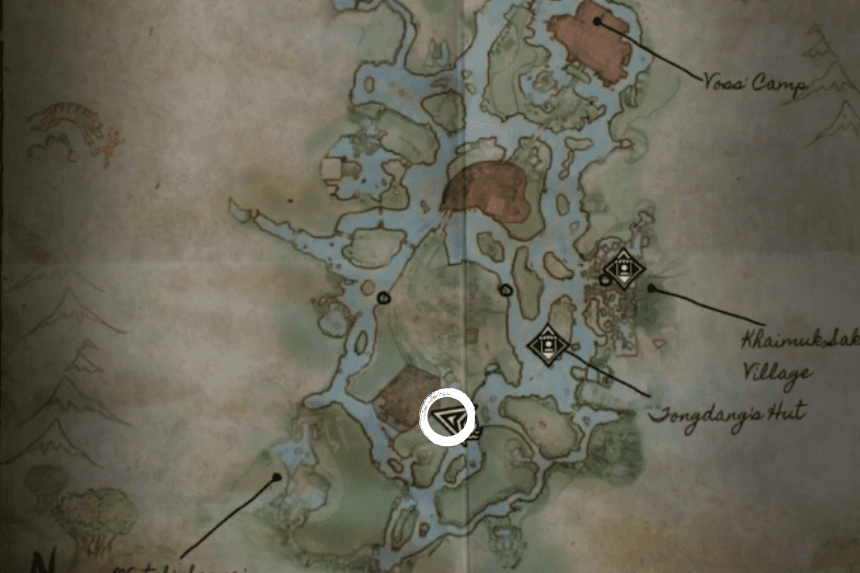
Click on the images to enlarge
To get the armoury, fast-travel to the Secret Armory Entrance if unlocked. Alternatively, sail south from the Wat Mahathat East entrance to the southeast dock on the largest island. Look for a large chain-link fence and crawl through the opening to enter.
- Enter the Armory stealthily to avoid being hunted by guards.
- Take the path on the left through the broken stone wall to approach from the side.
- If you have the Royal Army Outfit (found in Voss’s camp), you can walk through the camp without alarming soldiers.
Collect Notes on the Second Floor
- On the second floor of the tent, gather the following notes:
- Monkey Warning – Corkboard in the corner.
- Francesco’s Note – Desk next to the corkboard.
- Keyring Note – On the wall near the door.
- Take a picture of the Monkey Warning and examine all the notes to begin the mystery.
Find the Equipment Room Key
- Leave the two-story tent and head towards the distant guard tower.
- Descend the stairs next to the tower and locate a truck nearby.
- On the opposite side of the truck, find a narrow path through the bushes and follow it.
- Turn right toward a broken staircase, jump over the water to avoid the mud, and climb the brick foundation.
- Turn left and spot a monkey wearing a Royal Guard helmet. As you approach, the monkeys will scatter, leaving behind the Equipment Room Key on a rock.
Unlock the Equipment Room
- Return to the two-story tent and use the key to unlock the Equipment Room door.
- Inside, collect the Slugger II Adventure Book and search for Nazi cash and other valuable loot.
Rewards and Achievements
- Completing the Monkey Business mystery rewards you with the Slugger II Adventure Book.
- Progress towards the following achievements:
- Literary Bug
- Bookworm
- Bookman
Counting Letters Puzzle
Click on the images to enlarge
First, find the challenge note. Inside the tent with the lockbox, pick up Bartolomeo’s Challenge Note. The clue for the lockbox code is J-H-H-S.
- Decoding the Cipher
- The lock requires numbers, and players need to decode J-H-H-S using the cipher wheels.
- Note: Only 3 of the 4 cipher wheels include the letters needed.
- Setting Up the Cipher Wheels
- First Slot: Use the wheel with letters R-C-D-O-A-J-B-S (for J and S).
- Second Slot: Use the wheel with letters Q-A-H-I-G-U-V-Z (for the letter H).
- Third Slot: Use the wheel with letters L-U-F-H-E-K-T-O (for the other H).
- Decoding the Letters
- Interact with the cipher lid and use the left stick to align the letters J-H-H.
- Below these letters, you’ll see their decoded counterparts: B-I-E.
- Next, place the first wheel in the fourth slot and rotate it until S aligns.
- Below this, you’ll find the decoded letter R.
- The full decoded sequence is B-I-E-R.
- Finding the Code
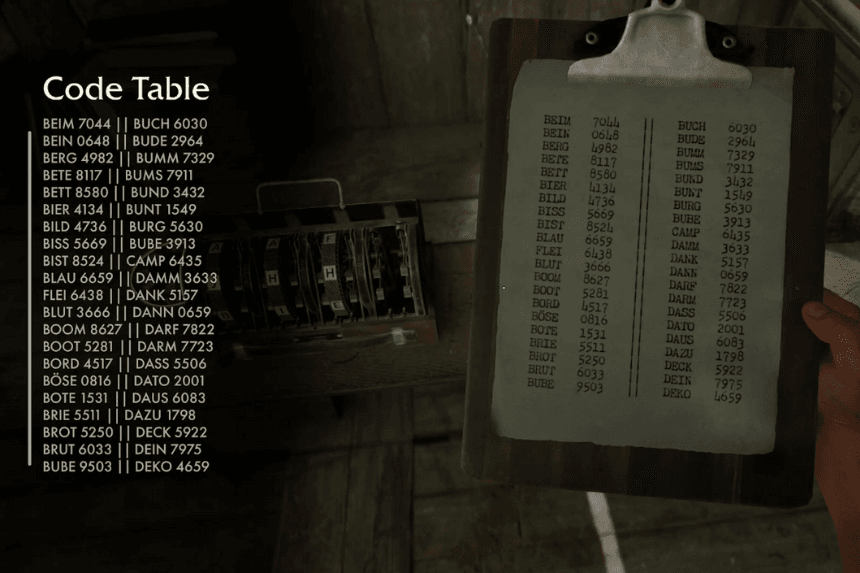
- Check the Code Table to the right of the cipher.
- In the left column, 6th row, locate B-I-E-R, which corresponds to the code 4134.
- Unlocking the Lockbox
- Use the code 4134 to open the lockbox and claim the rewards.
- Rewards
- Unlocking the lockbox grants you valuable currency.
- Obtain the Street Scrapper 3 Adventure Book, which enhances Indy’s combat abilities, making fights against enemies (fascists, Nazis, and others) smoother and more manageable.
Timely Arrival Puzzle
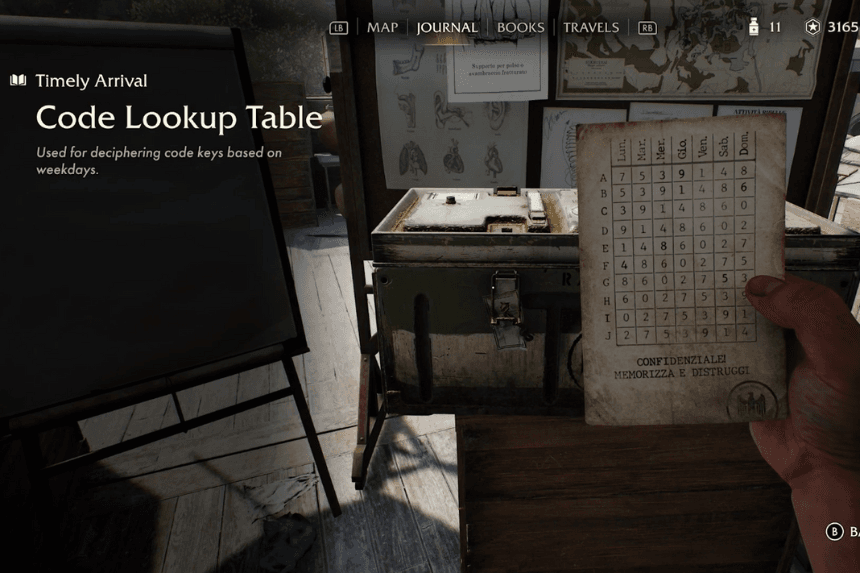
Click on the images to enlarge
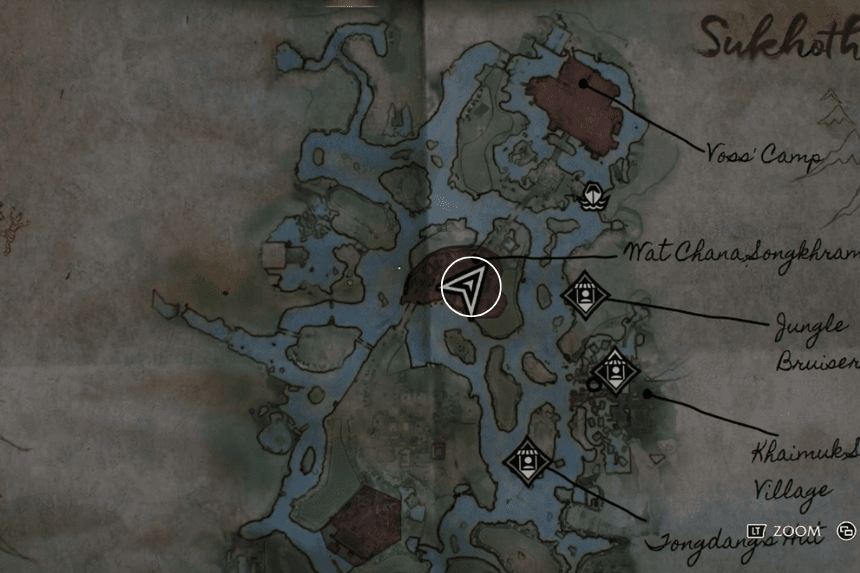
Head to the restricted area in the middle of the Sukhothai map. Sneak around to avoid detection and find the tents in the centre of the camp where radios are located.
- Starting the Quest
- Pick up one of the notes on the desk to start the quest.
- You’ll find Shipment Paper: Mentions the key “GAIDA” and the date Saturday, November 6, 1937 and Code Lookup Table: Contains numbers for letters and dates.
- Decoding the Key
- Use the Code Lookup Table to decode the key: Find Saturday (Sab.) on the top row, and in the Saturday column, use the numbers to spell out GAIDA.
- Timely Arrival Code Solution
- By spelling GAIDA, the code is 59404.
- Enter 59404 into the chest to unlock it.
- Stealth Tips
- Stay crouched while solving the puzzle since the tent is in an open area.
- Nazis may spot and attack you if you’re not careful.
- Rewards
- Unlocking the chest gives you: Money and adventure Points for completing the mystery
After collecting your rewards, leave the restricted area and continue exploring Sukhothai.
Elephant in the Room Puzzle
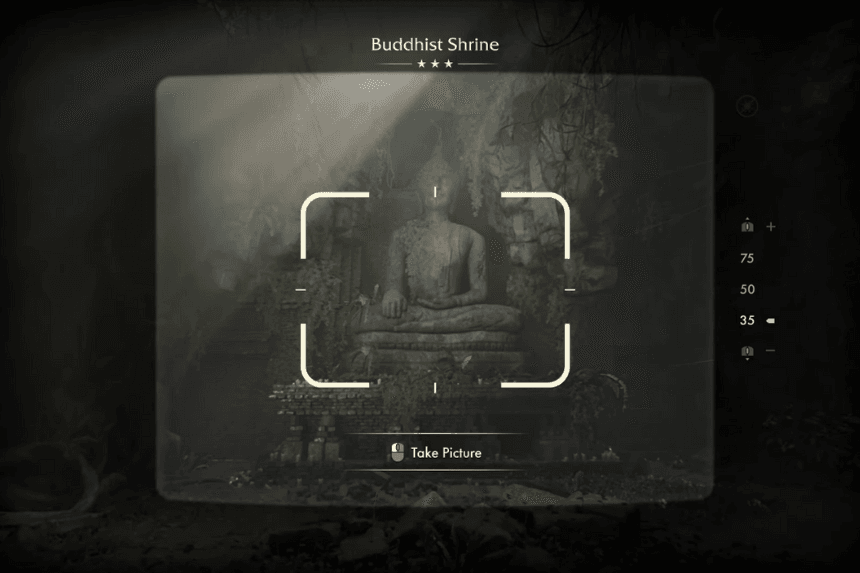
Click on the images to enlarge
The puzzle is in the northern part of the Sukhothai map. Follow the winding river north to Voss’ Camp.
Items Found at Voss’ Camp
- Voss’ Safe
- Unlock it using the code 5-4-8-4.
- Reward: Thousands of baht (regional currency).
- Mak-Yek Puzzle
- Solve this in the same building as the safe.
- Royal Army Uniform
- Found in the washing area outside.
- Small Temple
- Head to the back of the camp to find a temple with elephant carvings.
- Inside, a Buddhist Statue starts the Elephant in the Room puzzle.
Collect three Elephant Statuettes and place them on the three pressure plates on the altar in the main chamber.
Steps to Find the Statuettes
Elephant Statuette #1 and #2
- Statuette #1
- Look for dry straw on the left-hand side of the room.
- Use a lighter to burn it and reveal the statuette.
- Place it on the right pressure plate on the altar.
- The back-right wall will move, revealing a new pressure plate.
- Statuette #2
- Found on the right-hand side of the chamber.
- Place it on the new pressure plate revealed earlier.
- The back-left wall will now open.
Elephant Statuette #3
- Go into the newly revealed hidden room.
- Look for:
- A pressure plate near the entrance (next to a torch).
- A Rebel Journal document.
- The Sukhothai Relics Booklet on a desk (it marks relic locations on your map).
- Climbing Section:
- Use the ledges and your whip to grapple onto a beam.
- At the top, you’ll find Elephant Statuette #3.
Puzzle Solution
- Place Statuette #3
- Put it on the right altar plate to keep the back-right nook open.
- Move Statuette #2
- Place it on the hidden room plate.
- This reveals the centre altar plate.
- Reposition Statuettes
- Move Statuette #3 to the centre altar plate.
- Return Statuette #2 to the right altar plate.
- Final Unlock
- The last hidden room to your right will open.
- Inside, you will find an Elephant Skeleton.
- Take a picture to complete the puzzle.
Child’s Play Puzzle
Follow clues to find the treasure hidden in Indiana Jones and the Great Circle by collecting and breaking glass bottles. There are three clues in total, and each will lead you closer to the treasure.
Clue Location #1
- From Indy’s Hut, go right and descend the stairs towards the water.
- Look for the glass bottle and break it open to find the first note.
- The note points northeast and mentions that the next clue is hidden by a tree.
Clue Location #2
- Head northeast towards the bridge and cross it.
- You’ll arrive at an open hut near some rice farmers. Take a photo of the farmers to earn extra Adventure Points.
- Look for a tree near the house behind a fence.
- Use your whip to grab the bottle hanging on the tree. Break it open to find the second note, which points southeast.
Clue Location #3
- Head up the stairs and around the rice field to enter a deeper area of the village.
- Look for a rock with a glass bottle on top.
- Swim towards the rock, smash the bottle, and read the final note.
- The note points south.
Treasure Location
- Swim south as the note directs, and climb the platform near the bridge.
- Walk through the open space near the bridge stairs and look for a small patch of land with a large rock and yellow flags.
- Behind the rock, you will find the treasure chest containing:
- Jumbo Shove Skill Book (for 700 Adventure Points, unlocks the ability to push heavyweight enemies).
- Phra Ruang Statuette (no in-game use). This completes the Child’s Play treasure hunt.
The Captain’s Cipher Solution Puzzle
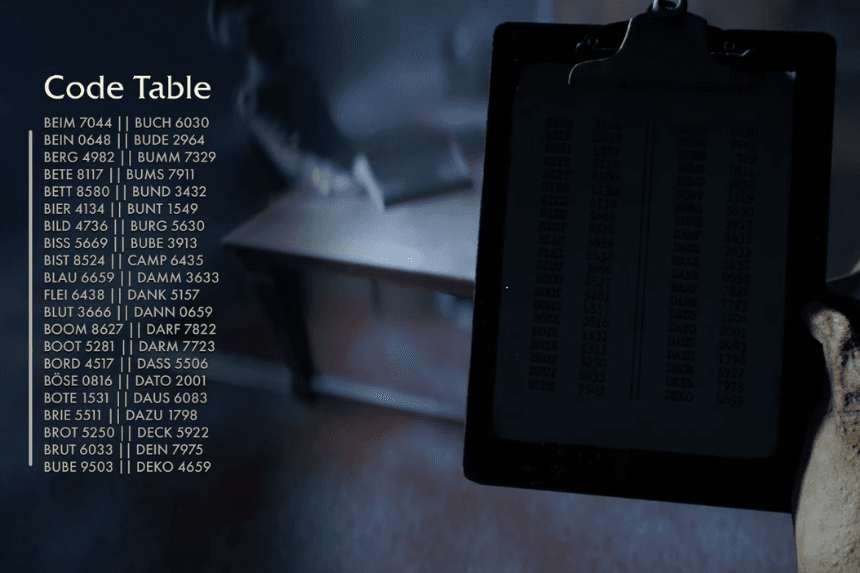
Click on the images to enlarge
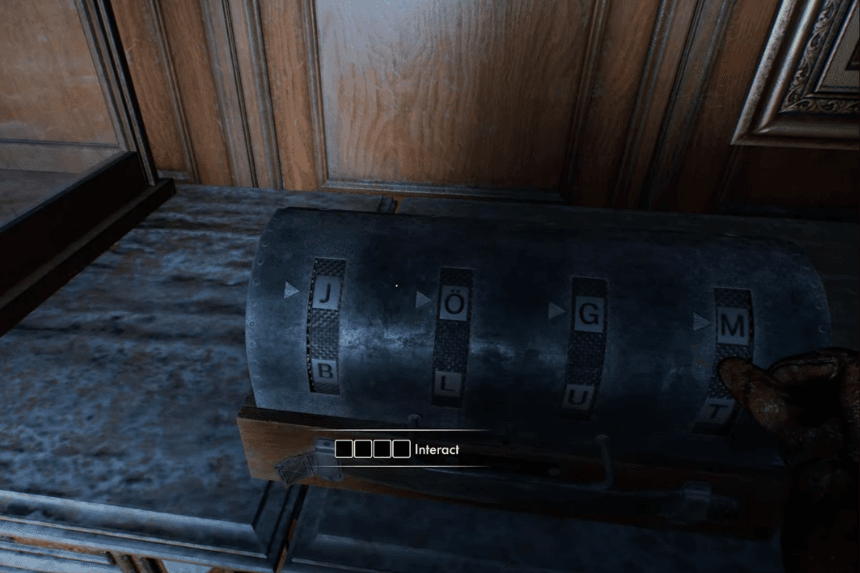
Enter the captain’s quarters. Upon entering, you will see a table with several dead Nazis. On the table, there’s a note containing the Captain’s Code, where the key letters to focus on are “JÖGM”. These are the letters to enter into the translator box.
Finding the Cipher Box
- Move past the table to the end of the room on the left to locate the cipher box.
- You need to place 4 cipher wheels in a specific order:
- 1st Slot: The wheel found on the floor by the cipher box.
Letters: R, C, D, O, A, J, B, S
- 2nd Slot: The top wheel on the shelf next to the cipher.
Letters: L, U, F, H, E, K, T, Ö
- 3rd Slot: The wheel on the shelf beside the note.
Letters: O, A, H, I, G, U, V, Z
- 4th Slot: The wheel on the floor beside the cipher box.
Letters: B, P, W, Y, M, T, N, X
The Code
- After placing the wheels, interact with the lid of the cipher box. Use the left stick to input “JÖGM”.
- The letters beneath “JÖGM” will reveal the keyword needed to decode the message: BLUT.
- Go back to the table with the dead Nazis and find the Code Table.
- In the left column, look for BLUT in the 12th row. The numbers associated with it are: 3666.
- The code for the Captain’s Cipher is 3666.
- While solving this puzzle doesn’t yield a direct reward, it’s crucial for progressing in the main storyline of Indiana Jones and the Great Circle.

