
If you’re playing Oblivion Remastered and wish to unlock some of the game’s most powerful and unique items, you’ve come to the right place. In this guide, we’ll take you through all 15 Daedric weapons and artifacts, demonstrate where to find them, and detail the steps you must follow to unlock their power.
All 15 Daedric Weapons/Artifacts & How To Get Them
To open the portal to Paradise Mankar, you’ll have to use Daedric artifacts. These high-potency magical artifacts are among the best you can obtain in Oblivion Remastered. Some assist you in exploration and the creation of unique equipment, and others are high-powered weapons with unique effects. 15 Daedric artifacts exist in total, and each of them is located in old Ruins. To find and unlock them, you’ll have to fulfill specific quests.
Azura Star Location
Quest: Azura Side Quest
Azura’s Shrine can be found in the northeastern mountains of Cyrodiil. Travel north from Cheydinhal, then northwest when you arrive at Lord Rugdumph’s Estate. In order to start Azura’s quest, you will need to take Glow Dust which is dropped by Will-o-the-Wisps and make your offering during dawn or dusk. After the quest starts, go to the Gutted Mine, which is southwest of the shrine, and kill the five vampires within. Once you’ve finished, go back to Azura’s Shrine to receive your reward: Azura’s Star, a strong reusable soul gem. You must be level 2 or higher to begin this quest.
Wabbajack Location
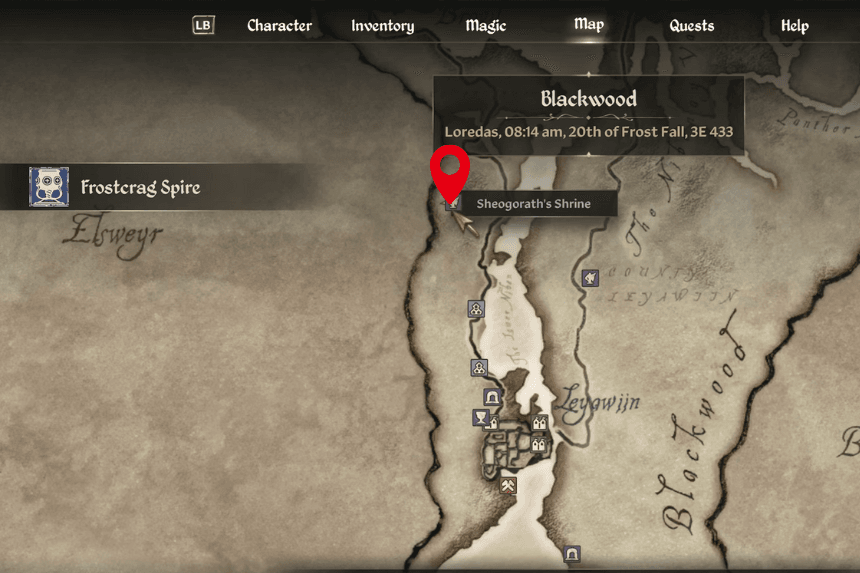
Quest: Sheogorath Shrine Side Quest
Sheogorath’s Shrine is located in the south side of the map, roughly half way between Leyawiin and Bravil. Look for it in the woods on the west side of the river, not too far from a nearby bridge. To start the quest, you’ll need to bring three offerings: yarn, lettuce, and a Lesser Soul Gem. Once you’ve made the offering, head south to the town of Borderwatch and talk to Ri’Bassa, the shaman dressed in dark robes.
Inquire of him about the K’sharra Prophecy, then proceed to the nearby inn, steal a chunk of Olroy Cheese, and boil it in the outdoor pot. After some commotion with some rats, take the rat poison and apply it to the sheep trough just south of the inn. When the quest instructs you to do so, return to the middle of the town, then return to the shrine to receive your reward Wabbajack, a strong and unpredictable staff. You must be level 2 or higher in order to initiate this quest.
Namira Ring Location
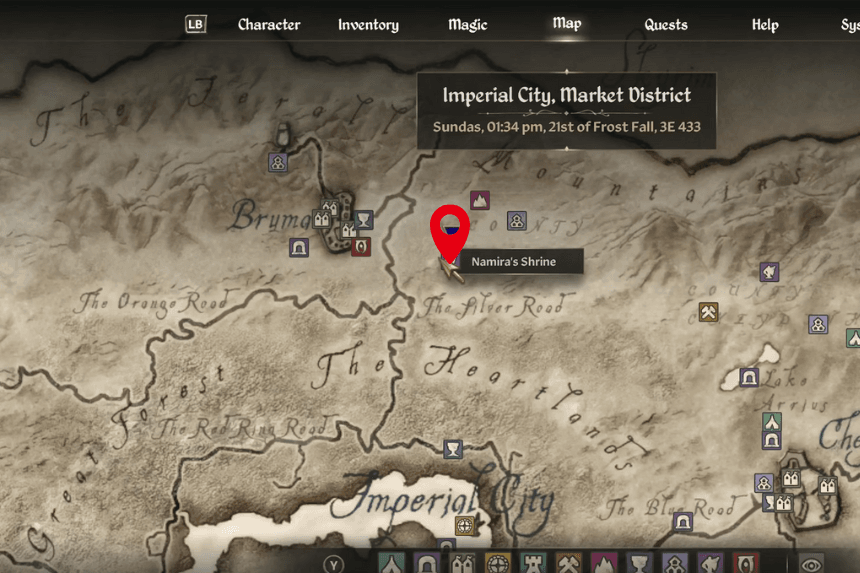
Quest: Narima Shrine Side Quest
Namira’s Shrine is located in the northern part of the map, just east of Bruma. Unlike most other shrines, you don’t need to bring an offering. Namira only accepts worship from those she finds “unattractive,” which means your Personality stat needs to be 20 or lower to start the quest.
Once you’re in, you’ll be sent to the Ayleid Ruin called Anga, which is directly south of the shrine. Inside, you’ll find four priests of Arkay. Don’t fight them instead, use the Alteration spell Namira gives you, called Namira’s Shroud, on each of them. Once you’ve cast the spell on all four, head back to the shrine to complete the quest. Your reward is the Ring of Namira, a unique ring with some dark but useful effects. Just make sure you’re at least level 5 before attempting this quest.
Skull of Corruption Location
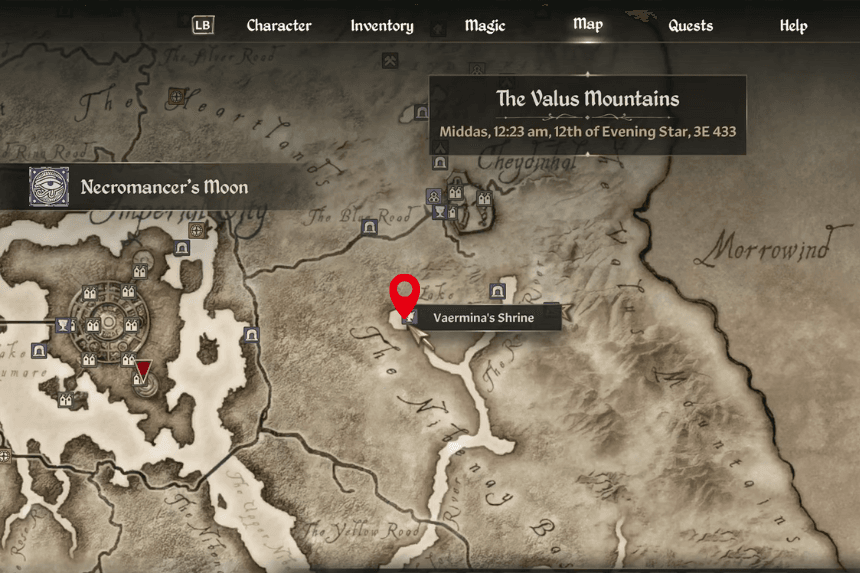
Quest: Vaermina Shrine Side Quest
Vaermina’s Shrine is located right next to Lake Poppad, just southwest of Cheydinhal. Finding the shrine is easy, but starting her quest can be hard because it requires a rare item, a Black Soul Gem. Once you have the gem, Vaermina will send you on a quest to Arkved’s Tower, which lies to the south. The tower is a large, challenging dungeon, so be prepared for a tough fight. Make your way through until you reach the Death Chamber, where you’ll find Vaermina’s Orb on a table. Pick it up and head back to the shrine. Completing the quest earns you a powerful reward: the Skull of Corruption. Just make sure you’re at least level 5 before starting.
Sanguine Rose Location
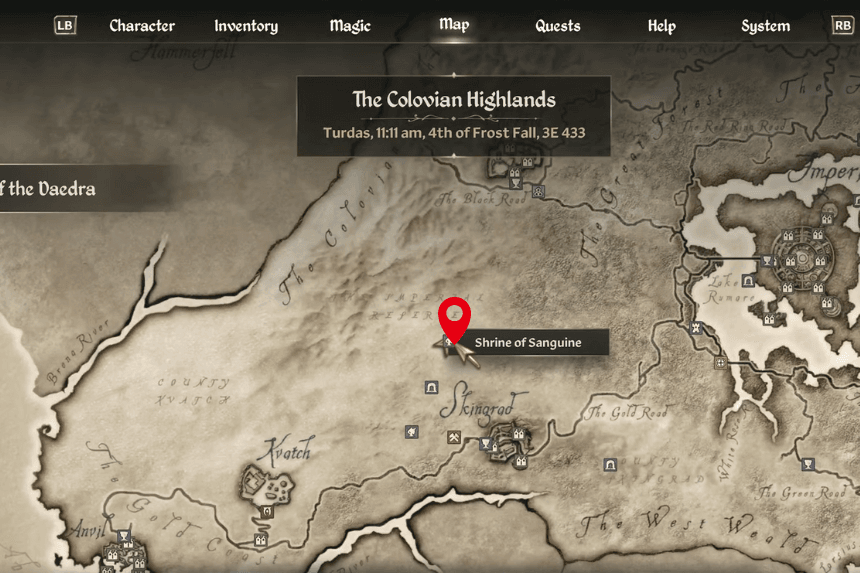
Quest: Sanguine Shrine Side Quest
Sanguine’s Shrine is located in the forest, far west of the Imperial City and just a bit north of Skingrad. You’ll find it southeast of Fort Dirich and southwest of Elenglynn. To start Sanguine’s quest, make sure to bring a bottle of Cyrodilic Brandy as an offering. The quest takes you to Castle Leyawiin, way down at the southern end of the map.
Head there in the evening during a dinner party. You’ll need to wear noble clothes so the guard lets you in or charm him a bit if needed. Once inside, walk toward the throne and then turn right. Wait until all five dinner guests are present, then use the Stark Reality spell that Sanguine gave you. After you cast the spell, you will be stripped of all your items and instantly make you a wanted criminal, so it’s a good idea to fast-travel back to the shrine afterward to get your gear back and claim your reward: the Sanguine Rose. You’ll need to be at least level 8 to take on this quest.
Spell Breaker Location
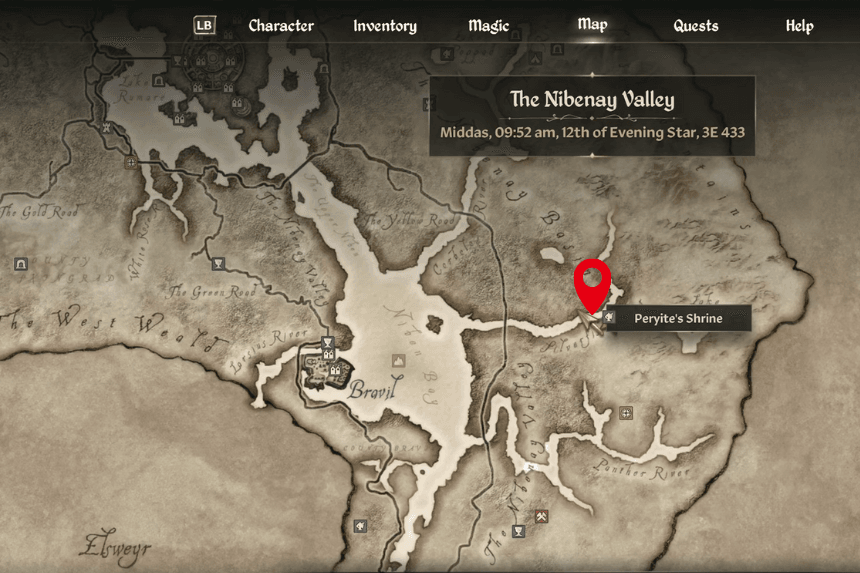
Quest: Peryite Shrine Side Quest
Peryite’s Shrine is located on the eastern side of the map, just northwest of Lake Canulus and right beside the Silverfish River. Unlike most other Daedric quests, you don’t need to bring any offering to begin just speak to the shrine to start.
For Peryite’s quest, you’ll be sent into a version of Oblivion to find five lost souls. The journey won’t be easy, as you’ll run into quite a few enemies along the way. Once you’ve found all five souls, Peryite will bring you back to the shrine and reward you with the Spellbreaker, a powerful shield. You’ll need to be at least level 10 to begin this quest.
Skeleton Key Location
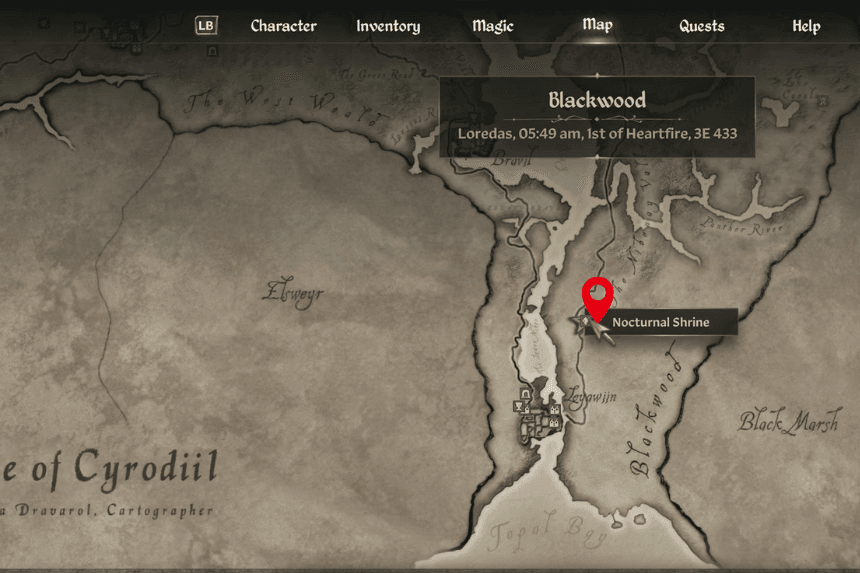
Quest: Nocturnal Daedri Side Quest
Nocturnal’s Daedric Shrine is located to the south, though not as far as Leyawiin, on the east side of the river, next to a small lake just east of Fort Redman. Like most other Daedric quests, you don’t need to bring any offering to start.
For Nocturnal’s quest, you’ll be tasked with going to Leyawiin to recover the Eye of Nocturnal. Talk to the locals, and they’ll point you to two Argonians, though they won’t admit to any wrongdoing when you ask them about it. You’ll need to sneak around and eavesdrop on their conversation to learn where the Eye is hidden. After that, head to Tidewater Cave, which is south of Leyawiin on the eastern riverbank. Once you’ve recovered the Eye, Nocturnal will reward you with the Skeleton Key. You’ll need to be at least level 10 to start this quest.
Volendrung Location
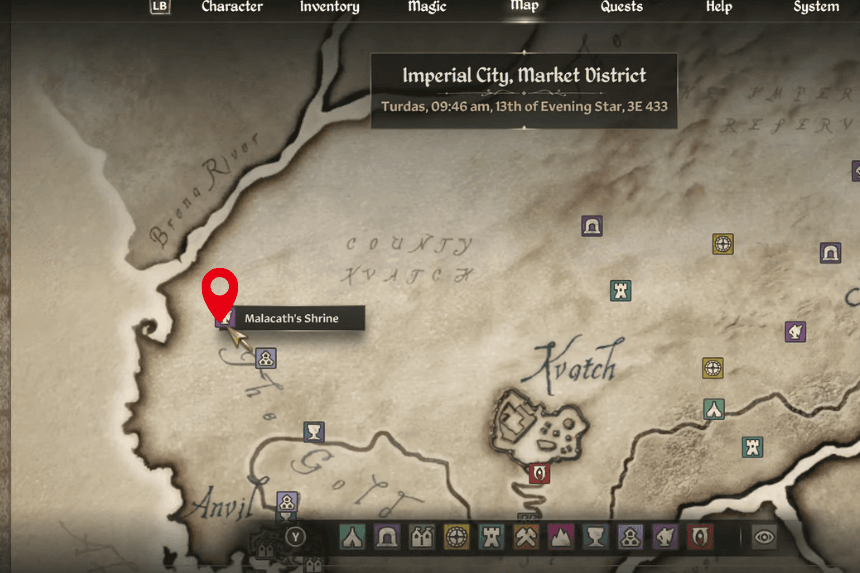
Quest: Malacath Shrine Side Quest
Malacath’s Shrine is located in the far west of the map, north of Anvil and just northwest of Lord Drad’s Estate. To start the quest, you’ll need to offer troll fat, which can be dropped by trolls when you defeat them or purchased from alchemy vendors.
Malacath wants you to free some ogre slaves, so head southeast to Lord Drad’s Estate and speak to him or his wife to get the location of the slaves, which is the nearby Bleak Mine. Once you’re there, enter the mine and unlock two of the ogres’ cells. After that, return to Malacath’s Shrine. Be careful, though—this quest can fail if the guards kill the ogres, and once the ogres start fighting, it might be tricky to get past them. It’s best to move quickly and leave before things get too messy. Completing the quest rewards you with Volendrung, a powerful hammer. You’ll need to be at least level 10 to take on this quest.
Ring of Khajiiti Location
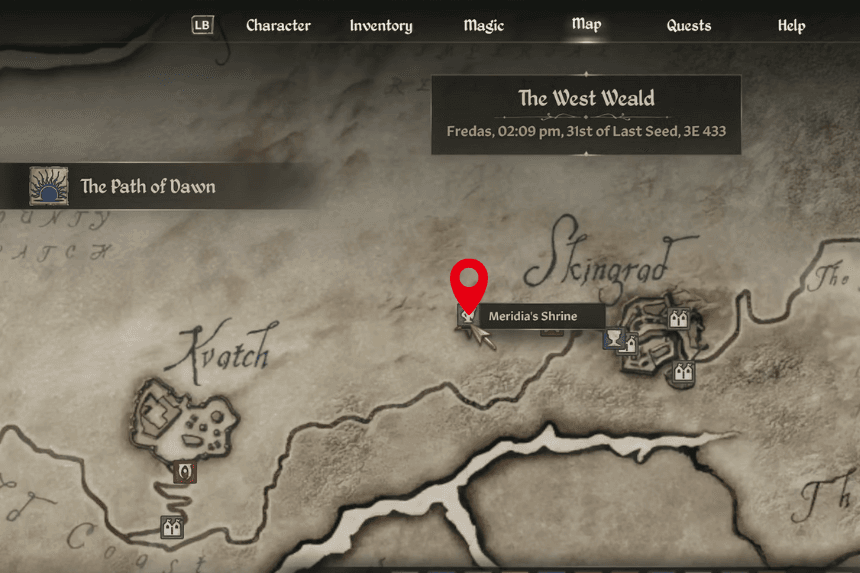
Quest: Meridia Shrine Side Quest
Meridia’s Shrine is located far west of the Imperial City, north of the road that runs between Skingrad and Kvatch. To begin her quest, you’ll need to offer “the remains of her enemies” to the shrine. This means collecting drops from undead creatures, such as bonemeal, ectoplasm, and mort flesh.
The quest itself is simple. Head to the Howling Cave, which is in the woods east of Skingrad, and defeat the necromancers inside. Once you’ve taken care of them, return to Meridia’s Shrine to receive your reward: the Ring of Khajiiti. You’ll need to be at least level 10 to start this quest.
Ebony Blade Location
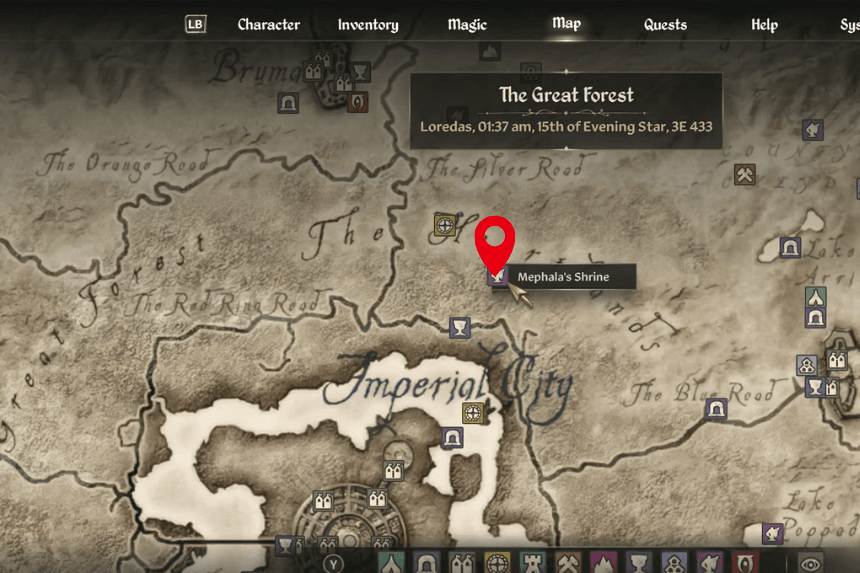
Quest: Mephala Shrine Side Quest
Mephala’s Shrine is located northeast of the Imperial City, in a forest not far north of the main road. To start the quest, bring a nightshade plant as an offering.
For the quest, travel west to the small town of Bleaker’s Way, which is just across the road, and ask the locals about the town. You’ll need to break into the homes of Nivan Dalvilu and Hrol Ulfgar to steal two items: the Dalvilu Ceremonial Dagger (found on a table to the right) and the Ulfgar Family Ring (on a table upstairs). Be careful, though if you get caught, the quest will fail, so it’s a good idea to save your game before you sneak in. Once you have the items, your next task is to murder both Nivan and Hrol and plant the stolen items on their bodies: the Ulfgar Family Ring on Nivan and the Ceremonial Dagger on Ulfgar. Afterward, talk to any local about the two men, then return to the shrine to claim your reward, the Ebony Blade. You’ll need to be at least level 15 to start this quest.
Saviour’s Hide Location
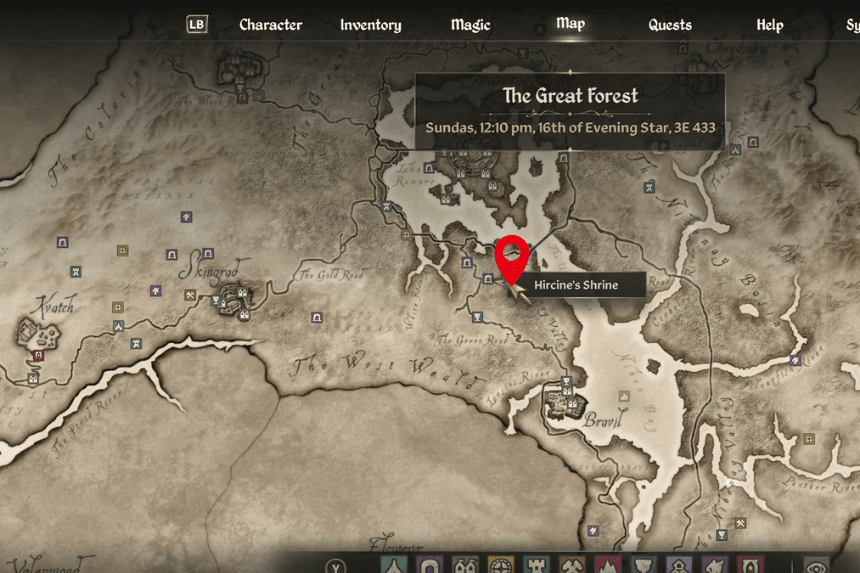
Quest: Hircine Shrine Side Quest
Hircine’s Shrine is located just south of the Imperial City, in the woods west of the river, north of Bravil. To start the quest, you’ll need to offer a wolf or bear pelt at the shrine.
For the quest, head south to Harcane Grove to hunt down a unicorn. However, the unicorn is guarded by three tough minotaurs, so it’s a good idea to deal with them first preferably one by one, if you can. Alternatively, you can try to “kidnap” the unicorn by mounting it like a horse and riding it away to a secluded spot, far from the minotaurs. If you want to skip the fight entirely, you can ride the unicorn off a cliff and let it die from the fall. Once you have the unicorn’s horn, return to Hircine’s Shrine to claim your reward: Saviour’s Hide, a light armor set. You’ll need to be at least level 17 to take on this quest.
Mace of Molag Bal Location
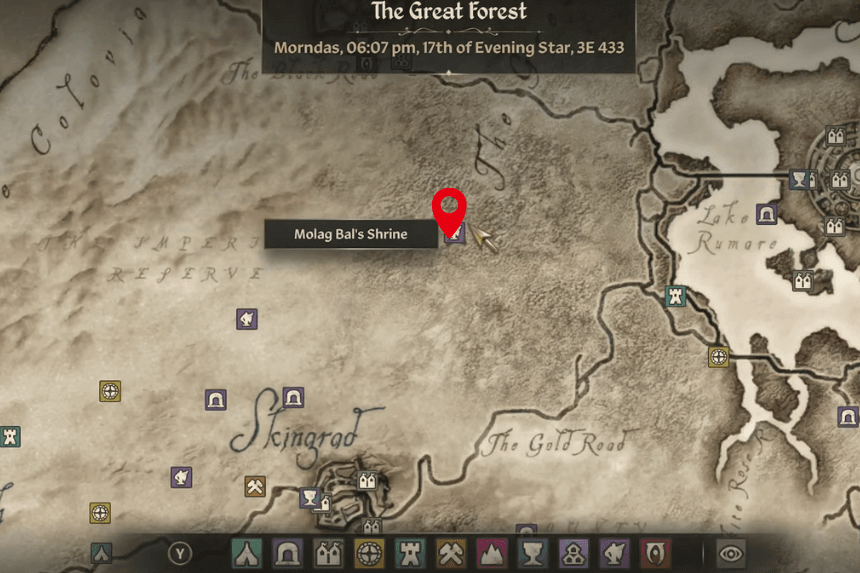
Quest: Molag Bal Shrine Side Quest
Molag Bal’s Shrine is located in a dense forest to the west of the Imperial City, about halfway between Chorrol and Skingrad. To start his quest, you’ll need to offer a lion pelt at the shrine.
For the quest, head to Brindle Home, which is southwest of the shrine, where you’ll need to bait a man named Melus Petilius into killing you. The locals will tell you that Melus visits his wife’s grave at 10 AM, so that’s when you’ll want to act. Drop the Cursed Mace (given to you by Molag Bal) on the grave, attack Melus, and then let him kill you with the mace. Be careful not to wear reflective armor or bring any followers, as you must not kill Melus before he kills you. Once you die, you’ll respawn at Molag Bal’s Shrine, and the Daedric Prince will reward you with the powerful Mace of Molag Bal. You’ll need to be at least level 17 to take on this quest.
Masque of Clavicus Vile or Umbra Sword Location
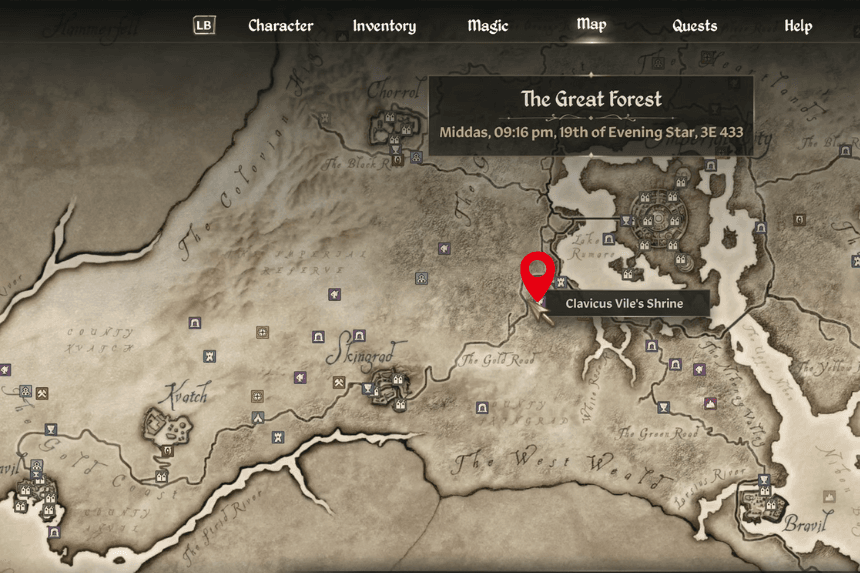
Quest: Clavicus Vile Shrine Side Quest
Clavicus Vile’s Shrine is located southwest of the Imperial City, not far from Lake Rumare. To start his quest, you’ll need to offer 500 gold at the shrine.
For the quest, head east to Pell’s Gate, where Clavicus Vile has asked you to retrieve a sword containing the soul of Umbra. However, his companion will warn you against doing so. You can choose to ignore this warning and ask the locals in Pell’s Gate for more information. An NPC named Irroke the Wide will direct you to the Ayleid Ruin of Vindasel, which is west of Pell’s Gate, across two bridges. At the ruin, you’ll face a choice: you can either fight Umbra or leave her alone. Even if you defeat her, you’ll still need to decide whether to give her sword to Clavicus Vile or keep it for yourself. If you hand over the sword, you’ll receive the Masque of Clavicus Vile (a heavy headgear). If you keep the sword, you’ll get to keep Umbra’s powerful weapon. You’ll need to be at least level 20 to begin this quest.
Goldbrand Location
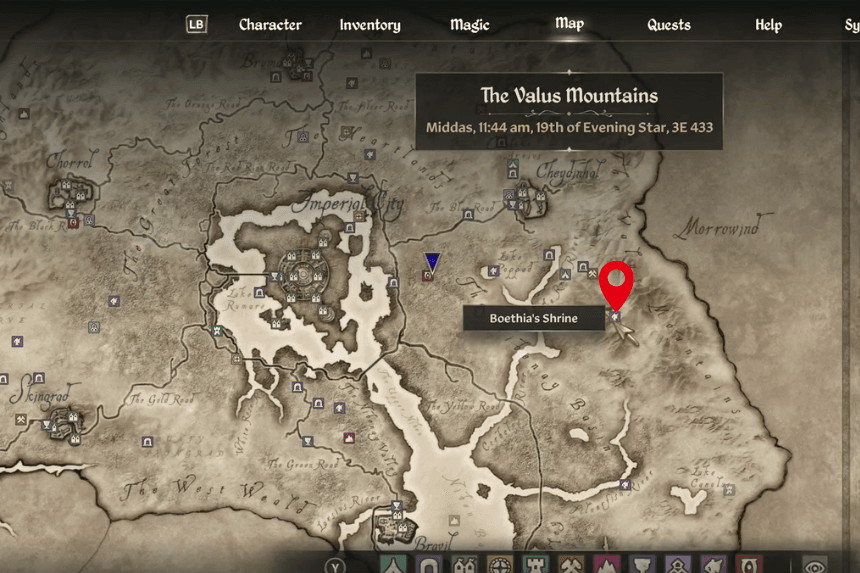
Quest: Boethiah Shrine Side Quest
Boethiah’s Shrine is located far to the east of the Imperial City, at the edge of the map between Fort Naso and Fort Facian, roughly in line with the Arcane University. It’s perched high up on a mountain, though not all the way at the top. To start the quest, you’ll need to offer a Daedra Heart at the shrine.
For Boethiah’s quest, step through the blue portal to enter the Tournament of the Ten Bloods. You’ll need to defeat nine opponents one from each race in Oblivion, except your own. Once you’ve triumphed over all of them, you’ll complete the quest and be rewarded with Goldbrand, an enchanted sword. You’ll need to be at least level 20 to take on this challenge.
Oghma Infinium Location

Quest: Hermaeus Mora Shrine Side Quest
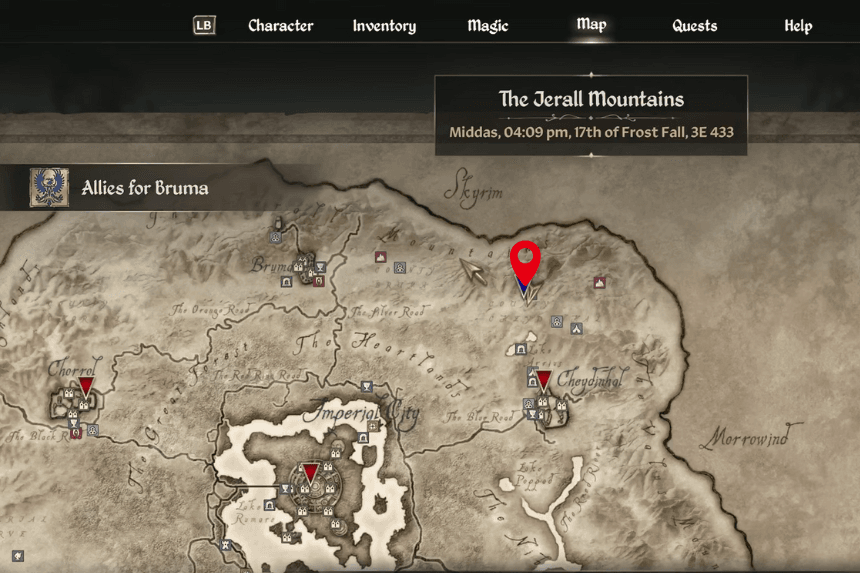
Hermaeus Mora’s Shrine is located in the far northwest mountains, beyond Bruma, making it one of the hardest Daedric shrines to find. It’s perched atop snowy peaks, so you’ll need to head west from Bruma and cross some wooden hanging bridges to reach it.
To start Hermaeus Mora’s final Daedric quest, you’ll need to have completed all 14 other Daedric quests in Oblivion. Once you’ve met this requirement, head to the shrine to receive the quest: you must capture a soul from each of the 10 races in Oblivion. Hermaeus Mora will give you a special Soul Gem and a Soul Trap spell that’s unique to this quest. Be sure to use this special spell on your victims before you kill them regular Soul Trap won’t work! You can soul-trap any NPC, including innocent ones, or target “evil” members of each race like vampires and bandits. After capturing 10 souls, return to the shrine to claim your reward: the Oghma Infinium, a book that will permanently boost your stats. You’ll need to be at least level 20 to take on this quest.