
In Grounded 2, gathering resources is a big part of surviving and crafting better gear. These resources are scattered all around the backyard some are easy to grab, while others need the right tool or a bit of a fight. You’ll find things like plants, bug parts, food, and crafting materials. The more you collect and analyze, the more recipes and upgrades you unlock. This guide breaks down every resource, where to find it, and what it’s used for.
How to Get All Resources
Resources are all the different items you’ll collect around the yard, mostly used for crafting new gear and structures. Most of them need a tool to harvest, like a hammer or axe. Each resource also has a rarity level, and if you analyze them, you can unlock new crafting recipes so it’s always worth checking them out.
Acid Gland

You can get Acid Glands by defeating certain bugs like Larvae, Infected Larvae, Ladybird Larvae, Red Soldier Ants, and Termite Workers. Once you’ve taken them down, just loot their bodies to collect the glands.
Bug Rubber is crafted using Sap and an Acid Gland, and you’ll need the same simple ingredients each time. If you’re looking to make something stronger, like Astonishing Acid, you’ll need more materials five Acid Glands, two Sap, and two Larva Spikes.
Acid Glands are also a key part of crafting gear. For example, Red Ant Arm Guards require five Red Ant Parts, two Acid Glands, and two Mite Fuzz. Later on, when you’re ready to make tougher armor like the Snail Shell Plastron, you’ll need five Garden Snail Fragments, five Acid Glands, and four pieces of Lingonberry Leather. So, gathering Acid Glands becomes really important as you progress through crafting.
Acorn Bits

You can find Acorn Bits by breaking open acorns, which are mostly found around the base of the Oak Tree. Just explore the ground near the tree, and you’ll spot plenty of acorns lying around. Use your Omni-Tool Hammer to smash them open and collect different parts like Acorn Tops, Shells, and Bits. The Acorn Bits are the edible part you can eat them raw, cook them with other ingredients, or even use them to make juice.
Acorn Shell
You can find Acorn shells by breaking open acorns, which are mostly found around the base of the Oak Tree. Just explore the ground near the tree, and you’ll spot plenty of acorns lying around. Use your Omni-Tool Hammer to smash them open and collect different parts like Acorn Tops, Shells, and Bits. The Acorn Shells are the tough, outer part of an acorn. You’ll mainly use them for crafting armor and building strong structures around your base.
To craft the Sturdy Shell, you’ll need 1 Acorn Shell, 2 Sap, and 3 Grub Hides. It’s a simple early-game piece you can make once you’ve gathered materials from the area around the Oak Tree. The Acorn Face Mask is another basic gear item. To make it, collect 1 Acorn Shell, 1 Acorn Top, and 5 Mite Fuzz.
If you’re building more protective gear, the Acorn Plate is a solid choice. It takes 4 Acorn Shells, 5 Clover Leaves, and 4 Crude Ropes. For leg armor, you can go with Acorn Greaves. You’ll need 2 Acorn Shells, 4 Sap, and 2 Crude Ropes.
Acorn Top
You can find Acorn Top by breaking open acorns, which are mostly found around the base of the Oak Tree. Just explore the ground near the tree, and you’ll spot plenty of acorns lying around. Use your Omni-Tool Hammer to smash them open and collect different parts like Acorn Tops, Shells, and Bits. The Acorn Tops are the cap-like part of an acorn. You’ll mostly use them when building structures around your base.
The Acorn Face Mask is another basic gear item. To make it, collect 1 Acorn Shell, 1 Acorn Top, and 5 Mite Fuzz.
Aphid Honeydew
You can find Aphid Honeydew on the ground after an Aphid drops it just look around as you explore. Once an Aphid leaves one behind, it takes about 5 minutes before it can drop another. You can also get some by looting a dead Aphid, so keep an eye out. We’ll update this guide soon with more details on what you can craft using them.
Aphid Roast
To get an Aphid Roast, just cook some Raw Aphid Meat at a Roasting Spit. It’s a simple way to turn it into a tasty meal that fills you up more than eating it raw. We’ll update this guide soon with more details on what you can craft using them.
Brittle Marble Shard

Brittle Marble Shards are an important crafting material you’ll mostly find in caves or other dangerous spots. One of the best places to collect a bunch of them is the Toxic Anthill, which is just north of your starting area. You’ll need these shards to craft Brittle Plates, so keep an eye out while exploring. Brittle Plating is a crafting material you can make using Brittle Marble Shards.
Brittle Plating
Brittle Plating is a crafting material you can make using Brittle Marble Shards. Brittle Marble Shards are an important crafting material you’ll mostly find in caves or other dangerous spots. One of the best places to collect a bunch of them is the Toxic Anthill, which is just north of your starting area. You’ll need these shards to craft Brittle Plates, so keep an eye out while exploring.
To upgrade a piece of Tier 2 armor from level 0 to level 1, you’ll need two Brittle Platings. Each level after that requires two more than the last. You can upgrade it up to three levels total. Upgrading your armor boosts its defense and makes it last longer in fights.
Brittle Quartzite Shard
Brittle Quartzite Shards are a valuable resource you’ll often find in caves or other dangerous spots. Just look for Quartzite nodes break them open to collect the shards. Brittle Quartzite Shards are an important crafting material you’ll mostly find in caves or other dangerous spots. One of the best places to collect a bunch of them is the Toxic Anthill, which is just north of your starting area. You’ll need these shards to craft Brittle Whetstone, so keep an eye out while exploring.
Brittle Whetstone
Brittle Whetstone is a crafting item made from Brittle Quartzite Shards. Brittle Quartzite Shards are a valuable resource you’ll often find in caves or other dangerous spots. Just look for Quartzite nodes break them open to collect the shards. One of the best places to collect a bunch of them is the Toxic Anthill, which is just north of your starting area.
To upgrade a Tier 2 weapon from level 0 to level 1, you’ll need five Brittle Whetstones. Each level after that takes five more than the one before. You can upgrade weapons up to level 3. Each upgrade gives your weapon extra damage and makes it more durable.
Bug Rubber

Bug Rubber is a material you can craft using Acid Glands and Sap. You can get Acid Glands by defeating certain bugs like Larvae, Infected Larvae, Ladybird Larvae, Red Soldier Ants, and Termite Workers. Once you’ve taken them down, just loot their bodies to collect the glands. Sap is an orange, sticky substance you’ll often see on roots and branches, and you can collect it by hand no tools needed. For bigger chunks, called Sap Clumps, you’ll need to break them open with your Omni-Hammer to gather the sap inside.
Bug Rubber is a handy crafting material you’ll need for making a variety of gear and gadgets. For example, it’s used to build the Basketball, which also needs Blueberry Leather and Web Fiber. It’s also part of the Volatile Capacitor recipe, combined with O.R.C. Receivers and Unstable Goo.
When it comes to armor, Bug Rubber plays a key role in crafting several pieces. The Roach Chestplate, for instance, needs Roach Chunks, Boiling Glands, and Bug Rubber. The Roach Greaves also use it, along with Blue Butterfly Scales and more Roach Chunks.
You’ll even need Bug Rubber for lighter gear like the Fuzzy Mukluks, which combine Bee Fuzz, Lingonberry Leather, Silk Rope, and Bug Rubber.
Clay

You can get Clay by digging up Clay deposits with your Omni-Shovel. These deposits are usually found in wet or damp spots, like near ponds or in underground caves around Brookhollow Park. A good place to look is behind the Ranger Station: Snackbar just check under the tree roots to the left of the broken window and you should find some Clay there. To craft the Omni-Wrench, just head over to any Ranger Station. You’ll need 1,000 Raw Science, along with two chunks of Clay and a couple of Red Ant Parts. Once you’ve got everything, you’ll be able to build it right there.
Clover Leaf

You can get Clover Leaves by chopping down clover plants. They’re pretty common and easy to find, especially around Ranger Stations. Just look for the small, leafy plants and use your tool to gather the leaves.
To make Ladybug Bait, you’ll need 1 piece of Raw Aphid Meat, 1 Clover Leaf, and 1 Crude Rope. It’s great for luring ladybugs where you want them. The Clover Hood is an easy starter helmet just combine 4 Clover Leaves with 1 Crude Rope. If you’re looking to add a chest piece, the Clover Poncho takes 6 Clover Leaves and 3 Crude Ropes. The Acorn Plate offers more protection, requiring 4 Acorn Shells, 5 Clover Leaves, and 4 Crude Ropes. And for leg armor, Clover Shin Guards can be made using 3 Clover Leaves, 2 Crude Ropes, and 2 Sprigs. It’s a lightweight set perfect for early exploration.
Crude Rope
To make Crude Rope, you’ll need to collect 3 Plant Fibers. Before you can craft it, make sure to scan a Plant Fiber in your inventory to unlock the recipe. Plant Fiber is super common you’ll find small green sprouts all over the ground, especially in the starting area. Just gather a few and you’ll be good to go.
Crude Rope is one of the most useful early-game materials, and you’ll end up using it in all kinds of crafting recipes. Whether you’re making weapons, armor, or bait, chances are Crude Rope is part of the formula.
For example, if you want to craft a Canteen to carry water, you’ll need some Grub Hide and a bit of Crude Rope. Each bait type uses different raw meats and items but they all rely on Crude Rope to tie it together.
It’s also essential for weapons. From the basic Pebblet Spear to the Larvalance or Red Ant Club, Crude Rope holds everything in place. Even ranged weapons like the Sprig Bow need it, along with materials like Gnat Fuzz and Sprigs.
Armor and tools also depend heavily on Crude Rope. The Clover Armor Set, the Acorn Greaves, and more advanced gear like the Ladyguard or Red Ant Knee Guards all need it. Even protective gear like the Gas Mask and simple accessories like the Eyepatch wouldn’t be possible without some Crude Rope.
Dandelion Tuft

You can find Dandelions all over Brookhollow Park, but the easiest spot to get them is near the Snackbar Front. It’s one of the first places you’ll come across when you start exploring the park, so it’s a great place to stock up early on.
To use a dandelion tuft, just hold down the jump button spacebar on a keyboard or the A button on a controller while you’re in the air. Your character will automatically pull out the tuft and float down slowly, which helps you avoid taking fall damage. Just keep in mind that each tuft only works once, so use it wisely.
Dew Drop

Dew Drops are small drops of fresh water that hang from grass blades, usually in the morning. You’ll spot them glistening on the tips of grass around Brookhollow Park. Just knock one down and drink it to quickly quench your thirst.
Dry Grass Chunk

Finding Dry Grass Chunks is pretty easy. Just look for the yellowish, dried-up grass blades these are called Dry Grass. Some parts of the park have more than others. The starting area is mostly green, so you might need to wander a bit to find good patches of Dry Grass.
Dry Grass Chunks are one of those essential materials you’ll find yourself using constantly, especially in the early and mid-game. You can gather them by chopping down dry, brittle grass with a basic axe and once you have a few in your backpack, they open the door to all kinds of useful gear.
For starters, you’ll need Dry Grass Chunks to craft a Torch a must-have item if you’re venturing into dark areas like caves or tunnels. Without it, you won’t be able to see much at all. Later on, when you unlock the EverChar Flare, which burns even brighter and longer, you’ll still need those trusty Dry Grass Chunks along with some coal and ant parts.
For the Ant Bait recipe you will need Raw Weevil Meat, Crude Rope, and Dry Grass Chunk. Even more explosive tools like the Bratburst, a spicy ant egg bomb, use this material to help create the fiery blast.
On the armor side of things, Dry Grass Chunks help you craft survival sets like the Grub Vest and Grub Leggings, both of which improve your defenses while exploring.
Flower Petal

To get Flower Petals, attack Hosta Plants to knock them off. A great place to find lots of Hosta Plants and even some loose petals on the ground is the Picnic Table area, just a bit north of the center of the map. It’s a perfect spot to gather plenty of petals for crafting.
To make the Shin Guards, you’ll need to gather 5 Ladybug Parts, which drop after taking down one of those tough ladybugs roaming the yard. You’ll also need 4 pieces of Blueberry Leather, which you can craft from Blueberry Chunks, and 4 Flower Petals, usually found near colorful blooms like the ones around the Picnic Table.
For the Chestplate, the recipe is a bit lighter you’ll just need 4 Ladybug Parts, 4 Blueberry Leather, and only 2 Flower Petals. Once you have all the pieces, you’ll have a much easier time surviving heavier hits during combat. The Ladybug armor is known for being tanky, so it’s well worth the effort if you’re tired of getting knocked out by tougher bugs.
Gnat Fuzz

Gnat Fuzz comes from Gnats small black flying bugs with red eyes and bits of white fur. You’ll find them floating around near the first Ranger Outpost. A good spot is just above the outpost, before you reach the cave that leads to the back entrance. You can also find more Gnats northeast of the outpost, up a small hill.
In Grounded 2, Gnat Fuzz is used in all kinds of handy recipes, especially when you’re working on crafting early gear and tools. For example, if you want to craft the Grub Leggings, you’ll need 3 Grub Hides, 4 Dry Grass Chunks, and 2 pieces of Gnat Fuzz. These leggings give you a bit more protection when you’re just starting to explore the yard.
If you’re trying to craft a Sprig Bow your first real ranged weapon you’ll need 3 Sprigs, 4 Gnat Fuzz, and 2 Crude Rope. It’s perfect for taking out flying bugs or knocking down hard-to-reach items like berries or spider webs.
For the Nifty Needle, a small but useful weapon, you just need 1 Thistle Needle, 2 Sap, and 3 Gnat Fuzz to put it together.
When it comes to defensive gear, the Gas Mask is a lifesaver, especially around areas with stinkbugs or toxic zones. To make one, you’ll need a Weevil Nose, 4 Gnat Fuzz, 2 Crude Rope, and a Stinkbug Part. It takes some effort to gather, but it’s absolutely worth it for venturing into harsher zones.
And if you’re going for style and stats, the Fuzzy Hat offers both. It requires 3 Bee Fuzz, 2 Gnat Fuzz, 2 Lingonberry Leather, and 2 Silk Rope.
Gnat Roast
To make a Gnat Roast, just cook some Raw Gnat Meat at a Roasting Spit. Gnat Fuzz comes from Gnats small black flying bugs with red eyes and bits of white fur. You’ll find them floating around near the first Ranger Outpost. A good spot is just above the outpost, before you reach the cave that leads to the back entrance. You can also find more Gnats northeast of the outpost, up a small hill. Eating a Gnat Roast gives you a big boost to both your hunger and health. Since it’s a cooked meal, it also slowly heals you over time and stops your hunger from going down for the next five minutes.
Grass Plank

Grass Planks are made by chopping down regular Grass with an axe. They’re super common, especially around the starting area of the park and near the Snackbar. You’ll use them a lot for building early structures. We’ll update this guide soon with more details on what you can craft using them.
Grub Hide

You can get Grub Hides by digging up and defeating Grubs that are buried underground. To find them, watch for spots where the soil looks like it’s moving and kicking up a bit of dust that’s a sign a Grub is burrowing there. A good place to look is near the Ceremony Pamphlet and the Snackbar Anthill. Just keep an eye on the ground as you explore.
In Grounded 2, Grub Hide is one of those core materials you’ll find yourself using a lot once you start crafting gear and basic survival tools. You get it by digging up and defeating grubs underground, and it’s especially useful in the early to mid-game.
If you want to carry water on the go, you’ll need 3 Grub Hide and 2 Crude Rope to craft a Canteen. It’s super handy for staying hydrated during long adventures. Grub Hide also helps you reinforce your armor with Brittle Plating, which requires just one piece of hide and a bit of sap.
When you’re ready to make better weapons and shields, Grub Hide is still a go-to. The Crimson Saber, for example, needs 2 Red Ant Mandibles, 3 Red Ant Parts, and 2 Grub Hides. Or if you’re going for defense, the Weevil Shield needs 2 Raw Weevil Meats, 2 Grub Hides, and a bit of Crude Rope.
The Crimson Bucklet, another shield option, uses 4 Red Ant Parts, 4 Mite Fangs, and 2 Grub Hides, making it a good upgrade from the Weevil Shield. And for heavier defense, you can put together a Sturdy Shell using an Acorn Shell, 2 Sap, and 3 Grub Hides.
When it comes to armor, Grub Hide really shines. For the Mitey Muffs, you’ll need 5 Mite Fuzz and 5 Grub Hide a great early-game helmet. If you want better vision and a slight boost to your style, the Grub Goggles require 3 Grub Hides, 2 Raw Gnat Meats, and 2 Gnat Fuzz.
For full body protection, the Grub Vest takes 4 Grub Hides, 2 Grub Sludge, and 4 Dry Grass Chunks, and the Grub Leggings are built using 3 Grub Hides, 4 Dry Grass Chunks, and 2 Gnat Fuzz.
Grub Roast
Grub Roast is made by cooking Raw Grub Meat on a Roasting Spit. To find them, watch for spots where the soil looks like it’s moving and kicking up a bit of dust that’s a sign a Grub is burrowing there. A good place to look is near the Ceremony Pamphlet and the Snackbar Anthill. Just keep an eye on the ground as you explore. Eating a Grub Roast will fill up your hunger and heal you a good amount. Since it counts as a proper meal, it also gives you slow health regeneration and keeps your hunger from dropping for five minutes.
Grub Sludge
Grub Sludge is a resource you get by harvesting what’s left after taking down a Grub. To find them, watch for spots where the soil looks like it’s moving and kicking up a bit of dust that’s a sign a Grub is burrowing there. A good place to look is near the Ceremony Pamphlet and the Snackbar Anthill. Just keep an eye on the ground as you explore.
If you’re looking to lure out spiders in Grounded 2, you’ll want to craft Spider Bait. All you need is some Raw Gnat Meat, a bit of Grub Sludge, and a piece of Crude Rope. Once it’s ready, just toss it out to draw a spider right to you perfect if you’re hunting one down or trying to lure it away.
As for the Grub Vest, it’s a solid piece of early armor that gives you decent protection without weighing you down. To make one, you’ll need 4 pieces of Grub Hide, 2 Grub Sludge, and 4 Dry Grass Chunks. It’s great for exploring without sacrificing too much mobility.
Larva Spike
Larva Spikes are dropped when you defeat Larvae. After taking one down, just loot its body to collect the spikes they’re useful for crafting, so grab them whenever you can.
If you’re working with Larva Spikes, you’ll be able to craft a few handy items in Grounded 2. To sharpen your weapons early on, you can make a Brittle Whetstone using just one Larva Spike and a bit of Sap. It’s an essential upgrade material that helps boost your damage.
Want a decent melee weapon? The Larvalance is a solid choice. It takes 2 Larva Spikes, 4 Red Ant Parts, and 2 Crude Ropes to craft. It’s fast and useful for aggressive combat styles.
And if you need Astonishing Acid a key resource for higher-tier gear you’ll need 5 Acid Glands, 2 Larva Spikes, and 2 Sap to make it.
Mint Shard

Mint Shards come from those big mints you’ll see scattered around the world. To break them and collect the shards, you’ll need to upgrade your Omni-Hammer to level 2. Once you have the right tool, smash them open to grab the minty pieces inside.
If you’ve collected some Mint Shards, you’re in for a few frosty upgrades in Grounded 2. You can start by crafting a batch of Mint Arrows. Just take 10 regular Feather Arrows and combine them with a single Mint Shard to give your shots a refreshing boost perfect for enemies that don’t like the cold.
Later on, if you’ve taken down a Northern Scorpion, you can make the Glacial Sting a powerful weapon that hits hard and slows enemies. It needs 4 Mint Shards, 1 Northern Scorpion Stinger, and 2 Pine Needles. And if you’re going for a cool look with good stats, the Butterfly Circlet is a stylish and useful headgear. You’ll need 4 Blue Butterfly Scales, 4 Blue Butterfly Chunks, and 5 Mint Shards to put it together.
Mite Fang

You can get Mite Fangs by killing Lawn Mites. There are a few reliable spots to find them early in the game. One good place is behind the Ranger Station: Snackbar there’s a tunnel there that leads to a pond, and inside it, you’ll usually run into seven or eight Lawn Mites. Another spot is just east of the Ranger Outpost: Snackbar, where you’ll find a dirt path with a few more mites crawling around.
If you head north of that same outpost, you’ll come across another group. And east of the northern part of the Snackbar area, you’ll find yet another gathering of Lawn Mites. So keep your eyes open while exploring these little pests are scattered around, and they drop useful Mite Fangs when defeated.
If you’ve been collecting Mite Fangs, Mite Fuzz, and other bug parts, there are a few useful items you can craft in Grounded 2. Start with the Mitey Claws these are solid melee weapons made using Mite Fangs, Mite Fuzz, and some Red Ant Parts. They’re great for getting in close and dealing quick hits.
Next up is the Bratburst, an explosive that can deal serious damage. You’ll need a Red Ant Egg, Spicy Shards, Mite Fangs, and some Dry Grass Chunks to make one. It’s especially handy for clearing out groups of enemies or breaking tough objects.
You can also build the Crimson Bucklet, a basic shield crafted with Red Ant Parts, Mite Fangs, and Grub Hide. It’s useful for blocking incoming attacks while keeping your defenses light and mobile.
Mite Fuzz
You can get Mite Fuzz by killing Lawn Mites. There are a few reliable spots to find them early in the game. One good place is behind the Ranger Station: Snackbar there’s a tunnel there that leads to a pond, and inside it, you’ll usually run into seven or eight Lawn Mites. Another spot is just east of the Ranger Outpost: Snackbar, where you’ll find a dirt path with a few more mites crawling around.
If you head north of that same outpost, you’ll come across another group. And east of the northern part of the Snackbar area, you’ll find yet another gathering of Lawn Mites. So keep your eyes open while exploring these little pests are scattered around, and they drop useful Mite Fangs when defeated.
If you’ve been gathering Mite Fuzz in Grounded 2, you’ll find it’s a key ingredient for crafting a variety of useful gear and weapons. To start, Mitey Claws are a pair of fast-hitting weapons made using Mite Fangs, Mite Fuzz, and Red Ant Parts. They’re great for aggressive close-range combat.
If you want to make regular Arrows, all you need is a bit of Mite Fuzz and some Thistle Needles easy to craft in bulk and useful for any ranged build. The Mitey Muffs offer a simple armor piece crafted with Mite Fuzz and Grub Hide, giving you light defense and style. Or you can go with the Acorn Face Mask, which combines Acorn Shell, Acorn Top, and Mite Fuzz to provide better durability.
If you’re building a Red Ant gear set, Mite Fuzz is used in both the Red Ant Helmet and the Red Ant Knee Guards. The helmet uses a Red Ant Head, some Red Ant Parts, and Mite Fuzz to give you solid head armor, while the knee guards combine Red Ant Parts, Crude Rope, and Mite Fuzz for lower-body protection. For your arms, the Red Ant Arm Guards take a bit more: Red Ant Parts, Acid Glands, and of course, Mite Fuzz.
Lastly, if you’re in the mood for speed, the Aphid Slippers give you a sprint boost and require Raw Aphid Meat and a decent amount of Mite Fuzz to craft. These are great if you want to zip around the yard a little faster.
Mushroom

Mushrooms are a basic food item and resource you can easily find while exploring. They usually grow near larger mushrooms and are often scattered on the ground. They’re a quick and easy way to fill up your hunger when you’re out in the wild. We’ll update this guide soon with more details on what you can craft using them.
Nectar
Nectar is a sweet food item you can find growing around flowers. Look for it on the stems of big yellow and blue flowers, and on the vines of rose plants in the Flower Bed and Rose Bed areas. We’ll update this guide soon with more details on what you can craft using them.
Pebblet
Very common on the ground. Pebblets are super handy early-game materials in Grounded 2, and you’ll find plenty of ways to put them to use.
If you’re just getting started, the Pebblet Spear is one of the first weapons you can craft. It only takes a couple of Sprigs, a bit of Crude Rope, and a Pebblet to make. It’s lightweight, quick to stab, and easy to replace if it breaks.
For something with a bit more punch, try crafting the Warhammerlet. This basic hammer-like weapon is made using Sprigs, Sap, and a few Pebblets. It’s great for smashing and delivering heavier hits than the spear.
And if you’re planning on using ranged weapons like slingshots, you’ll need plenty of Rocky Rounds. You can craft a batch of 25 using 25 Pebblets and a few Acid Glands perfect for keeping your ammo stocked when you’re out exploring or fighting. We’ll update this guide soon with more details on what you can craft using them.
Plant Fiber
Plant Fiber is super common you’ll find small green sprouts all over the ground, especially in the starting area. Just gather a few and you’ll be good to go.
Plant Fiber is one of the most common and useful materials you’ll come across in Grounded 2, and it plays a key role in crafting early-game essentials.
With just three pieces of Plant Fiber, you can craft Crude Rope. This is a basic but super important crafting ingredient used in all sorts of tools, gear, and bait. You’ll be making lots of it as you build up your equipment.
You can also use Plant Fiber along with Sap to make a Fiber Bandage. This handy item helps you heal up when you’re injured, making it great to keep on hand during tougher battles or long exploration runs.
Red Soldier Ant Egg

In Grounded 2, you can find Red Soldier Ant Eggs inside the Hatchery Anthill. This anthill has a couple of different ways to get in one entrance is up north near the Snackbar Front area, and the other is down south in the Entrance area. Head inside and explore carefully to find the eggs. We’ll update this guide soon with more details on what you can craft using them.
Red Ant Parts (Head, Mandibles, Body)
To collect Red Ant Parts, you’ll need to defeat Red Ants and then loot their bodies for the materials. One of the best places to find a lot of them is the Snackbar Anthill. It’s usually crawling with ants, so you shouldn’t have trouble gathering what you need.
You can craft EverChar Flares using EverChar Coal Chunks, Dry Grass Chunks, and Red Ant Parts. These are great for lighting up dark tunnels or caves. If you want a reliable melee weapon, the Crimson Saber is a sleek and fast blade made with Red Ant Mandibles, Red Ant Parts, and Grub Hide. The Larvalance a spear crafted using Larva Spikes, Red Ant Parts, and Crude Rope.
The Red Ant Club hits hard and is built with Red Ant Mandibles, more Red Ant Parts, Sap, and some Crude Rope. For defense, you’ve got a full set of Red Ant Armor. The Red Ant Helmet uses a Red Ant Head, more Parts, and Mite Fuzz. The Arm Guards need Red Ant Parts, Acid Glands, and a bit more Fuzz. Lastly, the Knee Guards are made with even more Red Ant Parts, plus Crude Rope and Mite Fuzz to tie it all together.
Don’t forget the Crimson Bucklet, a tough little shield crafted from Red Ant Parts, Mite Fangs, and Grub Hide. If you’re crafting red ant gear, be ready to take on a few ant hills but the results are well worth the effort.
Rotten Food / Spoiled Meat

Rotten Food is a resource you can get from old, decayed food chunks found around the yard, especially in places like the Trash Heap biome. You can also end up with Rotten Food when cooked meals spoil over time, so don’t wait too long to eat them. We’ll update this guide soon with more details on what you can craft using them.
Slime Mold Stalk

Slime Mold Stalks are glowing green plants you’ll find growing in caves. They usually appear in big clusters and give off a faint green light, making them easy to spot in dark areas.
If you find yourself exploring dark tunnels or caves in Grounded 2, you can light the way using glowing materials from slime molds. The Slime Mold Torch is the easiest to make all you need are two Slime Mold Stalks. It’s a basic light source but super handy when you’re in a pinch.
For a bit more brightness and portability, you can craft Slime Glow Sticks. These require Slime Mold Stalks, along with a couple of Sprigs and some Sap. They glow nicely and can be tossed to light up an area from a distance, which is great when you don’t want to walk blindly into danger.
Sprig
Sprigs are one of the most common resources you’ll come across in the backyard. You can find them lying around on the ground in almost every biome, so they’re easy to gather wherever you go.
If you’re gathering early-game gear in Grounded 2, Sprigs are going to be one of your best friends they’re used in tons of handy items. For basic lighting, the Torch is super simple to make. You just need a couple of Sprigs, some Sap, and a few Dry Grass Chunks. It gives off enough light to get you through nighttime or darker areas safely.
You can craft Slime Glow Sticks. They only need Slime Mold Stalks, Sprigs, and some Sap. They glow when thrown, lighting up whatever’s ahead without you having to walk into it first. If you want to arm yourself quickly, try the Pebblet Spear. It’s lightweight and easy to make with just Sprigs, Crude Rope, and a Pebblet. For something heavier that hits harder, build the Warhammerlet. It takes a few more Sprigs and some Sap, but it’s worth it when you’re smashing tougher enemies or breaking sturdy stuff.
Ranged players can craft the Sprig Bow early on using Sprigs, Gnat Fuzz, and Crude Rope. It gives you some distance between you and the bugs while hunting or fighting. Lastly, if you want a bit of armor early on, throw together the Clover Shin Guards using Clover Leaves, Crude Rope, and Sprigs. They won’t make you invincible, but they’re better than running around barefoot.
Thistle Needle

Thistle Needles come from Thistle plants, which are tall flowers with purple tops and spiky leaves at the base. You can find them pretty early on in the game, especially around the Snackbar Front area. Just look for those big, prickly plants and harvest the needles from them.
If you’re planning to use a bow in Grounded 2, you’ll want a steady supply of arrows and luckily, they’re pretty easy to craft. To make a basic batch of Arrows, all you need is some Mite Fuzz and Thistle Needles. Each craft gives you 10 arrows, which is great for stocking up before a hunt or a fight.
Later on, you can upgrade to Pointy Rounds, which are a bit stronger and crafted in batches of 25. These require a bunch of Thistle Needles and a single Crow Feather Piece. They’re a nice step up in power when you’re ready for tougher enemies.
If you’re looking for a quick little stabbing weapon, the Nifty Needle is a great early choice. It’s super easy to make just combine a Thistle Needle with some Sap and Gnat Fuzz, and you’ve got yourself a fast, lightweight melee weapon that’s perfect for quick jabs and bug battles.
Weed Stem

Weed Stems come from chopping down Dandelions. You can find plenty of them in the Entrance and Cemetery areas, which are both close to the starting spot near the Snackbar. Just cut down a Dandelion to collect the stems for building and crafting. We’ll update this guide soon with more details on what you can craft using them.
Weevil Nose

The Weevil Nose is sometimes dropped when you kill a Weevil. These little guys are harmless and easy to spot, and you’ll find them wandering all over the park. Since they don’t fight back, they’re one of the easier creatures to farm for parts.
To craft a Gas Mask in Grounded 2, you’ll need to gather a few key bug parts. Start by hunting down a Weevil for its nose, then collect Gnat Fuzz from those tiny flying pests. You’ll also need some Crude Rope, which you can make from plant fiber, and one Stinkbug Part which means you’ll have to take down a stinkbug. Once you have all of that, you can put together the gas mask, which will let you safely explore toxic areas without taking damage from the fumes.
Weevil Roast
Weevil Roast is made by cooking Raw Weevil Meat on a Roasting Spit. You get the raw meat by taking down Weevils, which are harmless little bugs that roam all over the park. Since they don’t fight back, they’re an easy source of food and materials. Just cook the meat for a more filling and useful meal. We’ll update this guide soon with more details on what you can craft using them.
Apple Bits

Apple Bits are a food item you get by harvesting Apples. They’re a handy source of energy and can be eaten as-is or used in cooking recipes. Just find an Apple and break it apart to collect the bits. We’ll update this guide soon with more details on what you can craft using them.
Bee Fuzz

Bee Fuzz is a material you get by collecting it from Bees after you defeat them. It’s used in a few crafting recipes, so make sure to loot it whenever you take down a Bee.
The Stinger Spear is a fast, poking weapon crafted from a Bee Stinger, plenty of Bee Fuzz, and some Silk Rope. It’s great for players who like to fight at a bit of a distance with quick jabs. For armor, the Bee Face Mask gives you protection and style, made from Bee Fuzz, a Bee Stinger, and a bit of Blueberry Leather. It’s a nice balance of defense and mobility.
The Fuzzy Hat is a warmer version made with Bee Fuzz, Gnat Fuzz, Lingonberry Leather, and Silk Rope ideal if you’re heading into chillier areas. Next, the Bee Shoulder Pads offer good defense and are put together using Bee Fuzz, Silk Rope, and Blueberry Leather. They’re part of a full bee armor set.
The Fuzzy Parka is another warm gear option crafted from Bee Fuzz, Milkweed Tufts, Lingonberry Leather, and Silk Rope. It’s meant to keep you cozy in colder zones. For leg protection, the Bee Shin Guards use Bee Fuzz, Silk Rope, and Blueberry Leather, rounding out your bee armor with some extra toughness.
Finally, the Fuzzy Mukluks are comfy boots made from Bee Fuzz, Bug Rubber, Lingonberry Leather, and Silk Rope perfect for keeping your feet warm while adventuring.
Bee Stinger
Bee Stinger is a material you get by collecting it from Bees after you defeat them. It’s used in a few crafting recipes, so make sure to loot it whenever you take down a Bee.
If you want to craft the Stinger Spear, you’ll need a Bee Stinger, some Bee Fuzz, and a bit of Silk Rope. It’s a fast and sharp weapon, great for jabbing enemies from a short distance. To go along with it, the Bee Face Mask gives you decent protection and pairs well with other bee armor pieces. You’ll need more Bee Fuzz, another Bee Stinger, and some Blueberry Leather to put it together.
Billy Hog Bite

Billy Hog Bites are a food item you can get by harvesting Billy Hogs. They’re a handy snack and can also be used as a resource for crafting or cooking. Just find a Billy Hog and break it apart to collect the bites. We’ll update this guide soon with more details on what you can craft using them.
Blue Butterfly Parts (Chunk / Scales / Wing)

Blue Butterflies might look pretty, but don’t let that fool you they’re tougher than they seem and can hit you with powerful freeze attacks. They’re resistant to club-type smash attacks and cold (Fresh) damage. However, they have a weakness to slashing weapons and anything with a spicy, burning effect, so come prepared.
To make the Flashfurter, you’ll need one O.R.C. Receiver, a Blue Butterfly Chunk, some Unstable Goo, and a bit of Silk Rope. It’s a unique gadget, likely crafted later in the game once you’ve dealt with some tougher enemies.
Start with the Butterfly Circlet it’s a beautiful and lightweight helmet crafted using Blue Butterfly Scales, Chunks, and a few Mint Shards. Next, for the Butterfly Robes, you’ll need Blue Butterfly Wings and Scales, along with Blueberry Leather. To finish the set, the Butterfly Boots require more Blue Butterfly Chunks, some Silk Rope, and more Blueberry Leather.
Roach Greaves are a sturdier option. These greaves are built using Roach Chunks, Blue Butterfly Scales, and Bug Rubber, offering a more rugged and durable lower-body armor alternative.
Blueberry Chunk

You will find lot of blueberries at the blueberry farm near the Ice Cream Truck. It’s a great spot to visit early in the game since there isn’t much danger around. Some berries hang low enough for you to jump up and knock them down by hand. For the ones that are higher up, you’ll need to shoot them down with a bow and arrow.
Blueberry Leather

To craft Blueberry Leather in Grounded 2, you’ll first need to collect some Blueberry Chunks. Make sure to analyze one when you find it this will unlock the recipe for Blueberry Leather. Once you’ve done that, just head to a workbench and use three chunks to make one piece of leather.
Boiling Gland
In Grounded 2, you can get Boiling Glands by taking down Bombardier Beetles. These medium-sized bugs have green backs and aren’t too hard to deal with, but watch out they spit acid that causes a sizzling effect. A good place to find a couple of them is near the Ranger Outpost: Snackbar.
To craft the Scorching Orb, you’ll need to gather four Spicy Shards, a few Bombardier Parts, and one Boiling Gland. This fiery tool or weapon definitely lives up to its name, packing heat for tougher battles. For armor, the Roach Chestplate is a solid mid-tier piece. You’ll need five Roach Chunks, four Boiling Glands, and three Bug Rubber. It’s bulky and durable perfect if you’re planning to tank some hits.
The Sizzling Circlet, a heat-resistant helmet crafted from Bombardier Parts, a single Boiling Gland, and some Lingonberry Leather. It pairs well with the Roach Chestplate if you’re going for a fire-themed or defensive build.
Spine Nub

In Grounded 2, you can get Spine Nubs by taking down caterpillars and collecting their remains. These large bugs usually hang out on big leafy plants, so you’ll need to find a way to climb up and reach them before you can take them on.
The Bombuckler is a sturdy shield built from four Bombardier Parts, two Silk Ropes, and three Spine Nubs. It’s a great defensive option if you want something that can take a hit and keep you safe in close combat.
The Northern Shredders are scissor-like weapons made from four Northern Scorpion Chunks, two doses of Scorpion Venom, three Spine Nubs, and two Silk Ropes. They’re quick and deadly, perfect for slicing through enemies with ease.
The Orb Weaver armor set, you’ll need quite a few spider parts and some crafting materials. The Weaver Hood uses three Orb Weaver Chunks, two Fangs, and two Spine Nubs ideal for that creepy crawly look and some nice stat bonuses. The Weaver Spaulders require five Orb Weaver Chunks, four Silk Ropes, and two Spine Nubs, giving you solid protection for your upper body while maintaining mobility.
Finally, the Weaver Leggings are crafted with four more Orb Weaver Chunks, three Silk Ropes, and two Spine Nubs. Complete the set and you’ll be well-armored for taking on the more dangerous creatures lurking around the yard.
Stinkbug Parts (Gas Sack / Chunk)

Stinkbugs in Grounded 2 are usually found near old or stale food, and you can spot quite a few near the starting area around ten or so. One common spot is near the Garbage Can in the Entrance region. You’ll find one just southeast of the bin and another close to the large tree nearby. There’s also a pile of bricks directly east of the Snackbar with more stinkbugs, and a few more can be found in the grassy area northeast of that.
Another good place to check is near the rope fence south of the Picnic Table. Look for one hiding in the grass near some pink flowers, and you’ll find two more a bit further southeast along the brick path.
To craft the EverChar Torch, you’ll need a chunk of EverChar Coal along with two Stinkbug Parts, two Bombardier Parts, and a couple of Silk Ropes. This torch burns hotter and longer than your average light source, perfect for exploring dark areas without constantly replacing it.
The Gas Arrow is a great way to turn your bow into a portable gas bomb. Just combine five regular arrows with a Stinkbug Gas Sack and you’ve got five Gas Arrows ready to launch some stinky chaos at your enemies.
If you want to survive in areas filled with deadly gas, you’ll need the Gas Mask. It’s crafted from a Weevil Nose, four pieces of Gnat Fuzz, two Crude Ropes, and a single Stinkbug Part. Once you’ve got it on, you’ll be able to walk through toxic clouds without taking damage.
Lastly, the Roach Helmet is a bulky but reliable piece of gear that uses one Roach Head, a Stinkbug Gas Sack, and two Roach Chunks. It’s a solid helmet if you want to mix durability with resistance to chemical hazards.
Unstable Goo

Dropped from O.R.C. Weevils. Glows and might explode. Probably used in advanced tech or traps.
If you’re looking to play with some high-tech or glowing gadgets in Grounded 2, here’s how you can get them made:
The Flashfurter is a strange but powerful device that mixes tech and bug parts. To craft it, you’ll need an O.R.C. Receiver, a Blue Butterfly Chunk, a bit of Unstable Goo, and some Silk Rope.
For some glowing fun, try making the Gooey Glow Stick. You’ll need one Unstable Goo, a Mosquito Beak, and two pieces of Sap. Once crafted, these give off an eerie light, perfect for dark caves or spooky areas at night.
The Volatile Capacitor is a more advanced gadget, but also a dangerous one. To make it, you’ll need three O.R.C. Receivers, four pieces of Unstable Goo, three Bug Rubbers, and the head of a Praying Mantis.
Web Fiber
Web Fiber is a resource you get by collecting it from spiders like Diving Bell Spiders, Orb Weavers, Orb Weaver Jrs, Spiderlings, Black Widowlings, and even the Hedge Broodmother. You can also gather it by breaking open Web Sacs or cutting through Spider Webs. It’s a handy material for crafting, so keep an eye out for spider activity.
To make a batch of Groundy Rounds fifteen of them, in fact you’ll need five strands of Web Fiber and a couple of Pollen. These are great for ranged attacks and bug battles. Craft a Splatburst by combining a Bratburst with five Web Fibers and five pieces of Sap. It’s sticky, splashy, and explosive perfect for clearing out bug nests or causing chaos. And if you’re just looking to have some fun in the backyard, you can make a Basketball using two pieces of Blueberry Leather, one Bug Rubber, and a bit of Web Fiber.
Northern Scorpion Parts (Chunk / Stinger / Venom)
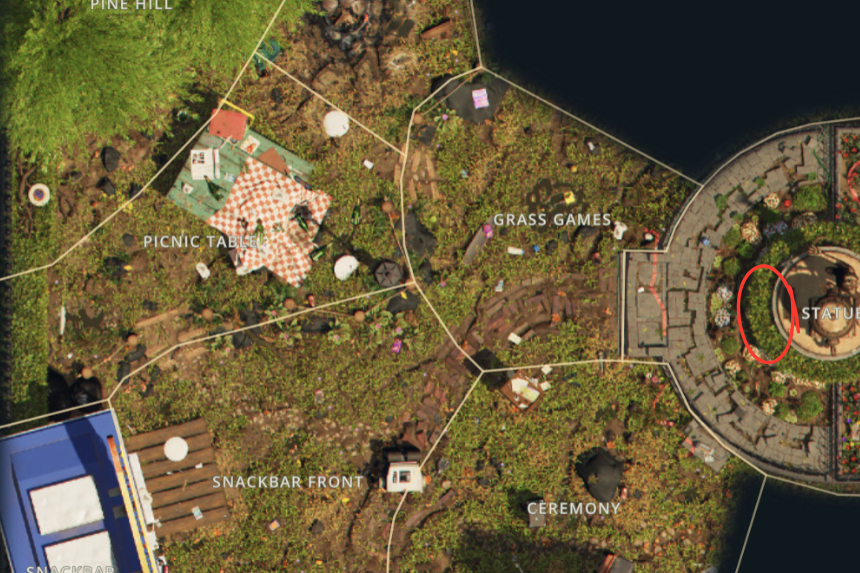
You can find Northern Scorpions in the Statue Gardens, just outside the Ranger Outpost: Flower Beds. They also show up in a few other spots across the map. One place to check is northeast of the Picnic Table, near the border with the Fire Pit.
You might also spot them in the Grass Games area, which is east of the Picnic Table, right along the border between regions. Another location is near the toppled robot in the eastern part of Snackbar Front. Finally, you can sometimes find them near the O.R.C. transmitter sitting on the folder in the northern part of Ceremony. Keep your eyes open they like to hang out in hidden or tucked-away spots.
To craft the Northern Shredders, you’ll need to gather four Northern Scorpion Chunks, two doses of Scorpion Venom, three Spine Nubs, and two Silk Ropes. These dual daggers are fast and venomous, making them perfect for slicing through enemies with speed and poison.
For the icy Ice Sickles, look out for two Mint Globs, two Northern Scorpion Pincers, and six Northern Scorpion Chunks. These sickles deal frosty damage and are great for slowing enemies down during battle.
The Glacial Sting is a chilling spear that packs a punch. You’ll need four Mint Shards, one Northern Scorpion Stinger, and two Pine Needles to craft it. It hits hard and adds a freezing effect that can really turn the tide in your favor.
If you’re building the Northern Armor Set, you’ll start with the Northern Mask. This requires three Scorpion Venoms, two Northern Scorpion Chunks, and two pieces of Blueberry Leather. It offers solid protection while giving you a fearsome look.
Next are the Northern Spaulders crafted from two Northern Scorpion Stingers, five Northern Scorpion Chunks, and four Blueberry Leather. These shoulder guards add extra defense and boost your resistance to cold.
Finally, you’ll need three Silk Ropes, four Northern Scorpion Chunks, and three Blueberry Leather to make the Northern Breeches. They round out the set and offer balanced mobility and protection for your lower body.
O.R.C. Receiver

The O.R.C. Receiver is a rare resource you can get by defeating O.R.C. Fire Worker Ants or O.R.C. Bombardier Beetles. It doesn’t drop often, so you might need to take down a few of them before you get one.
If you’re looking to craft the Flashfurter, you’ll need an O.R.C. Receiver, a Blue Butterfly Chunk, some Unstable Goo, and a bit of Silk Rope. This gadget is a high-tech throwable that stuns enemies and looks cool doing it.
To upgrade your arrows into something more disruptive, go for Disruptor Arrows. Just take five regular Feather Arrows and combine them with an O.R.C. Receiver. These arrows interfere with O.R.C. enemies and make short work of their circuits.
For something even more powerful, try building the O.R.C. Nullifier. You’ll need two O.R.C. Receivers, one piece of Lingonberry Leather, two Gum Nuggets, and a Roach Head. This tool is great for disabling robotic enemies and cutting through their defenses.
And if you’re after something truly explosive, check out the Volatile Capacitor. You’ll need three O.R.C. Receivers, four Unstable Goo, three Bug Rubber, and the head of a Praying Mantis. This charged device unleashes a devastating burst of energy perfect for when you need a serious edge in battle.
Orb Weaver Parts (Chunk / Fang)

The Orb Weaver Fang is a resource you get by defeating Orb Weavers, and using piercing weapons makes the fight easier. You can usually find these spiders hanging around near the Oak Tree, which is pretty close to the starting area. It’s a good spot to scout out if you’re looking to hunt a few and collect their fangs.
The Weaver Daggers are a fast and deadly choice. To craft them, you’ll need a couple of Orb Weaver Fangs, some Orb Weaver Chunks, and a bit of Silk Rope. They’re perfect for quick strikes and poison damage.
The Spider Stringer is another slick weapon you can put together with Orb Weaver Fangs, Orb Weaver Chunks, and Silk Rope. It’s great for ranged attacks and keeps that creepy spider vibe going strong.
The Weaver Hood helmet requires Orb Weaver Chunks, Orb Weaver Fangs, and some Spine Nubs. It gives you that extra protection while staying true to the theme. Next, the Weaver Spaulders are your go-to chest armor. You’ll need more Orb Weaver Chunks, some Silk Rope, and a couple of Spine Nubs. These offer solid defense without weighing you down.
The Weaver Leggings, made using Orb Weaver Chunks, Silk Rope, and more Spine Nubs. Once you’re suited up in the full Weaver set, you’ll feel as agile and dangerous as the spiders themselves.
Pine Needle

You can find these inside Needle Bundles scattered across the ground, but you’ll need a level 2 Omnitool Axe to harvest them. They’re most commonly found in the pine area at the top left of the map, or along the dry bricks path that runs through the park. Keep an eye out while exploring those spots!
To craft the Glacial Sting, you’ll need four Mint Shards, a Northern Scorpion Stinger, and a couple of Pine Needles. It’s a chilling weapon that delivers icy damage perfect for freezing your enemies in their tracks while packing a serious sting.
Raw Snail Meat

Snails can be a bit tricky to find when you actually need one. They can show up almost anywhere, but there are never many around. One way to spot them is by watching for tall grass slowly moving that could be a Snail passing through. Try climbing up to get a better view of the area and keep an eye out for those slow-moving blades.
Roach Parts (Chunk / Head)

Grounded 2 now includes smaller Cockroach Nymphs along with the regular ones. You can find both types in different areas across the map, but they’re especially common around the Trash Can point of interest and a few other nearby spots.
To make the Roach Club, gather two Roach Heads, three Roach Chunks, and two pieces of Blueberry Leather. This heavy-hitting weapon is great for smashing through tougher bugs.
The O.R.C. Nullifier is a powerful gadget that calls for two O.R.C. Receivers, one Lingonberry Leather, two Gum Nuggets, and a Roach Head. It’s especially handy for dealing with robotic enemies. For the Roach Helmet, combine a Roach Head with a Stinkbug Gas Sack and a couple of Roach Chunks. It’s a solid piece for head protection.
The Roach Chestplate needs five Roach Chunks, four Boiling Glands, and three Bug Rubber. It offers great defense for your upper body and helps you take more hits. Finally, the Roach Greaves are crafted from four Roach Chunks, two Blue Butterfly Scales, and two Bug Rubber. They give you sturdy leg protection while still keeping you mobile.
Scorpion Venom
You can find Northern Scorpions in the Statue Gardens, just outside the Ranger Outpost: Flower Beds. They also show up in a few other spots across the map. One place to check is northeast of the Picnic Table, near the border with the Fire Pit.
You might also spot them in the Grass Games area, which is east of the Picnic Table, right along the border between regions. Another location is near the toppled robot in the eastern part of Snackbar Front. Finally, you can sometimes find them near the O.R.C. transmitter sitting on the folder in the northern part of Ceremony. Keep your eyes open they like to hang out in hidden or tucked-away spots.
To make the Northern Shredders, you’ll have to collect four Northern Scorpion Chunks, a couple of Scorpion Venom, three Spine Nubs, and two Silk Ropes. These weapons pack a punch and are great for slicing through tougher enemies.
For the Northern Mask, gather three doses of Scorpion Venom, two Northern Scorpion Chunks, and two pieces of Blueberry Leather. This helmet offers solid protection and ties in well with other Northern Scorpion gear.
Spicy Shard

Spicy Shards are a resource you get by breaking apart Spicy Candy. You can also sometimes find them as loot when digging up Buried Treasure, so keep an eye out while exploring.
Start with the Bratburst, a spicy little explosive made by combining a Red Ant Egg, a couple of Spicy Shards, four Mite Fangs, and three Dry Grass Chunks. It’s a great tool for crowd control or dealing damage from a distance.
You can turn ten regular Feather Arrows into Spicy Arrows by adding just one Spicy Shard. These arrows deal extra burn damage and are perfect for lighting up tougher enemies. If you’re more into weapons, the Scorching Orb is a strong choice. To make it, you’ll need three Bombardier Parts, one Boiling Gland, and four Spicy Shards. It’s a powerful melee weapon with a spicy kick.
And if you’re going full fire mage, craft the Sizzling Robes. These robes require four Bombardier Parts, five Spicy Shards, and five pieces of Lingonberry Leather. They’re perfect if you want to boost your spicy damage and look cool while doing it.
Bombardier Part

In Grounded 2, you can get Boiling Parts by taking down Bombardier Beetles. These medium-sized bugs have green backs and aren’t too hard to deal with, but watch out they spit acid that causes a sizzling effect. A good place to find a couple of them is near the Ranger Outpost: Snackbar.
To make the Sizzling Boots, you’ll need to gather four Bombardier Parts, a few Silk Ropes, and four pieces of Lingonberry Leather. They’re great for heat resistance and pair nicely with other sizzling gear. The EverChar Torch is a stronger and longer-lasting torch. You’ll need one chunk of EverChar Coal, along with parts from a Stinkbug and a Bombardier, plus some Silk Rope to hold it all together.
If you’re after a solid shield, the Bombuckler is your go-to. It’s built using four Bombardier Parts, some Silk Rope, and three Spine Nubs. It’ll help you block attacks while staying mobile. The Scorching Orb is a powerful weapon made with Spicy Shards, Bombardier Parts, and a Boiling Gland. It deals serious burn damage and fits well with fire-themed gear.
For head protection, the Sizzling Circlet is a fiery-looking helmet crafted with Bombardier Parts, a Boiling Gland, and Lingonberry Leather. It offers decent defense and complements the rest of the sizzling set.
And finally, the Sizzling Robes are made with more Bombardier Parts, a handful of Spicy Shards, and five pieces of Lingonberry Leather. These robes give you solid resistance to heat-based hazards while keeping you stylish in battle.
Crow Feather Piece

Crow Feather Pieces are collected by harvesting Crow Feathers, which are dropped by the giant Crow you’ll see around the yard. Just find a feather and break it apart to gather the pieces they’re useful for crafting.
To craft a batch of Feather Arrows, you’ll need a Crow Feather Piece and some Silk Rope. If you’re looking to load up on ammo, Pointy Rounds are a great option. You can make a set of 25 using a bunch of Thistle Needles and just one Crow Feather Piece. They’re perfect for keeping your ranged weapons well-stocked.
Donut Chunk

Donut Chunks are a food item you get by chopping up Donuts using a tier 3 chopping tool. Once you’ve got the right tool, just break the donut apart to collect the chunks for food or crafting. We’ll update this guide soon with more details on what you can craft using them.
Garden Snail Slime

Snails can be a bit tricky to find when you actually need one. They can show up almost anywhere, but there are never many around. One way to spot them is by watching for tall grass slowly moving that could be a Snail passing through. Try climbing up to get a better view of the area and keep an eye out for those slow-moving blades.
To make a Lingonberry Bandage, you’ll need some Lingonberry Leather and a bit of Garden Snail Slime. It’s a high-tier healing item, perfect for tougher fights when you need a stronger boost to your health.
Gum Nugget

Gum Nuggets are collected by breaking apart Chewed Gum. You can find these sticky gum spots in several areas around the map. Just harvest them to get the nuggets for crafting and other uses.
To craft the O.R.C. Nullifier, you’ll need two O.R.C. Receivers, one piece of Lingonberry Leather, a couple of Gum Nuggets, and a Roach Head. It’s a handy item if you’re dealing with O.R.C. enemies and want a bit of an edge in battle.
Ice Splinter
To make Scorpion Bait, you’ll just need a piece of Raw Grub Meat, one Ice Splinter, and some Crude Rope. Put it together and you’ve got bait perfect for luring out a scorpion when you’re ready to face it. We’ll update this guide soon with more details on where you can find them.
Ladybug Parts (Head / Body)

Ladybug Parts are collected by harvesting the remains of Ladybugs and Ladybirds after you defeat them. They’re useful for crafting, so make sure to grab the parts whenever you take one down.
To craft the Ladyguard, you’ll need four Ladybug Parts, some Crude Rope, and a bit of Sap. It’s a solid defensive shield to help you hold your ground in a fight. For the Ladybug Faceplate, gather a Ladybug Head, two more Ladybug Parts, and three pieces of Blueberry Leather. This helmet gives you both protection and style.
If you’re going for the Ladybug Chestplate, you’ll want to collect a couple of Flower Petals, four Ladybug Parts, and four Blueberry Leather. It’s a sturdy torso piece built for tougher battles. Finally, the Ladybug Shin Guards require five Ladybug Parts, four Blueberry Leather, and four Flower Petals. These greaves are great for full-body defense when you’re heading into danger.
Lingonberry Chunk

In Grounded 2, you can reliably find Lingonberries at the northern edge of the map in an area called Pine Hill. To get to them, head into the hedge along the border of the park they’re tucked away in there. We’ll update this guide soon with more details on what you can craft using them.
Lingonberry Leather
To craft Lingonberry Leather in Grounded 2, you’ll first need to break open Lingonberries to collect Lingonberry Chunks. Once you have one, scan it to unlock the recipe for Lingonberry Leather. After that, you’ll be able to craft it using the chunks you collect.
To craft the Lingonberry Bandage, you’ll need a strip of Lingonberry Leather and some Garden Snail Slime. It’s a high-level healing item, ideal for tougher situations. If you’re aiming for the deadly Mantis Blade, gather two Praying Mantis Claws, four Praying Mantis Chunks, and three Lingonberry Leather. It’s a sleek, high-damage weapon perfect for agile fighters.
The OR.C. Nullifier is a powerful tool that takes two O.R.C. Receivers, one Lingonberry Leather, two Gum Nuggets, and a Roach Head. It’s great for countering robotic threats. The Fuzzy Hat gives you decent protection and warmth. You’ll need three Bee Fuzz, two Gnat Fuzz, two Lingonberry Leather, and some Silk Rope to put it together.
For the Sizzling Circlet, all you need are three Bombardier Parts, a Boiling Gland, and one piece of Lingonberry Leather. It’s ideal for exploring hot zones without frying your scalp. The Snail Shell Casque requires three Garden Snail Fragments, two Eyestalks, and two Lingonberry Leather. This helmet is built for serious defense.
The Sizzling Robes are a fiery armor set made with four Bombardier Parts, five Spicy Shards, and five Lingonberry Leather. Perfect for players who want to mix defense with heat resistance. The Snail Shell Plastron is a bulky chest piece made from five Snail Fragments, five Acid Glands, and four Lingonberry Leather. It’s all about tanking damage.
Fuzzy Mukluks are crafted from Bee Fuzz, Bug Rubber, Lingonberry Leather, and Silk Rope. They’re a solid pick for staying warm and nimble. For the Sizzling Boots, grab four Bombardier Parts, three Silk Rope, and four Lingonberry Leather. These boots complete the Sizzling set and help with heat protection. Finally, the Snail Shell Greaves round out the snail armor. You’ll need four Snail Fragments, two Silk Rope, and three Lingonberry Leather to make them. Heavy but reliable leg protection.
Milkweed Tuft
To craft the Fuzzy Parka in Grounded 2, you’ll need to gather four pieces of Bee Fuzz, three Milkweed Tufts, four strips of Lingonberry Leather, and three Silk Ropes. We’ll update this guide soon with more details on where you can find them.
Mosquito Parts (Beak / Blood Sack)

Mosquitoes are flying insects that will attack you as soon as they spot you. They’re often found near the pond, and once they lock onto you, they don’t give up easily so be ready for a fight if you get their attention.
To make Healbasa, you’ll need one Mosquito Blood Sack and two Silk Ropes. It’s a handy throwable that heals you and nearby allies when it explodes great for keeping your team alive in tough fights. If you want to craft some Gooey Glow Sticks, collect one Unstable Goo, one Mosquito Beak, and two Sap.
As for the Mosquito Needle, this fast-hitting weapon requires two Mosquito Beaks, two Silk Ropes, and two Mosquito Blood Sacks. It’s great for aggressive combat and even heals you a bit with each hit.