
Do you want to discover one of the scariest secret dungeons in Tainted Grail: The Fall of Avalon? The Blood Lake Dungeon! Full of horrific visuals, deadly enemies and nifty loot. This guide will show you how to navigate your way to the secret entrance, defeat powerhouse bosses like Mallory, and the horrifying Blood Abomination, as well as acquire rare items – while tying it to the main quest!
How to Get to the Secret Blood Lake Dungeon
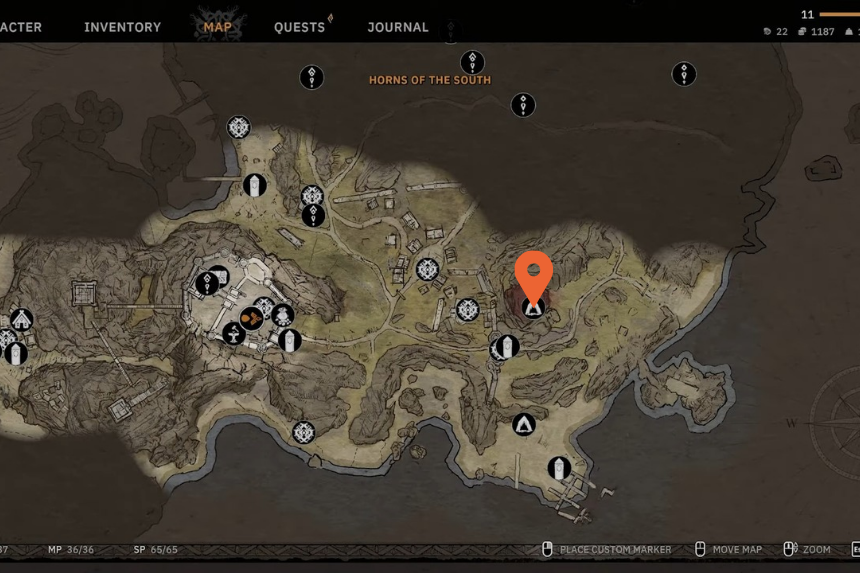
To discover the hidden Blood Lake Dungeon entrance, you will have to start from the beach area, and head towards the path a little towards the left. Don’t make the mistake and go right, or you will hit the Mineral’s Tunnels which is a magical dungeon and in which you are not interested for the time being. Instead, head west, and look out for a lake, with a huge statue standing in the middle.
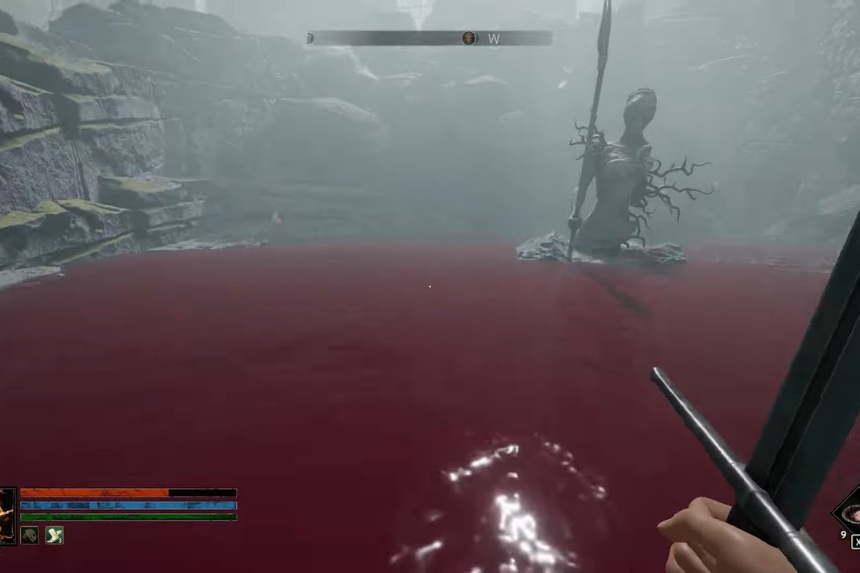
Upon seeing the giant statue, you can head to the small beach in the vicinity. This part gets creepy fast as there will be a rather gruesome scene here, with corpses, and undead crawling around. Eliminate the enemies first, if you have a shovel, look for the chest that is buried in the area and you will have some items. You can then swim to the giant statue, and interact with it which will get you the Blood Transfusion spell
Now for the real challenge – get behind the statue and swim through the dark, red water. Stay at the very bottom and swim towards the ruins. You will find a hidden door there and if you swim through it – congratulations, you have officially entered the dungeon. It will also start a new quest called “Blood Stains the Circle”.
Before you go in, make sure that your character is at the right level. If you are on Normal difficulty, it would be best to aim for a level 10-12, if you are on Easy, then try for at least level 8. If you are playing on a higher difficulty, like Hardcore or Survival, it could be a good test of your skills.
Mini-Boss: Mallory

The initial challenge is Mallory, the unusual mini-boss concealed in the cave. You should perhaps talk to him first; you may use your Strength or Spirituality checks to get more information about the horrific things happening on the other side of the gate he is guarding. Eventually, he will lure you into a fight as part of some dark ritual.
Combat-wise, stay shadowed by the walls in the vicinity of the room. Use chunks of debris and candlesticks for cover. Bait him around in circles. Ranged players can whittle him down safely with this tactic. Melee fighters should wait patiently till his triple attack combo is done, then counterattack.
Defeating Mallory rewards you with some solid early-game gear:
- Sword of Parrying +1
- Chestplate of the Last Man
- Cracked Shield +2
- Face of the Last Man
The Tree Room & Loot
After Mallory falls, head into the next chamber—a room with a giant tree in the center. Don’t rush. There’s valuable loot here, so take your time:
Check the Alchemy Table upstairs for a Soulstone and Druid’s Wishgem—two amulets with great utility.
Walk the circular path around the tree to collect alchemy ingredients and a potion recipe book, including Druid’s Friend and Bloodsucker Potion.
Back on the ground floor, mine the glowing ore to grab Wyrdstone, a rare material you’ll need for crafting powerful gear later.
When you’re done looting, look around the tree roots for a passage leading into the next area—the Hall of Trials.
Hall of Trials

This maze-like section is thick with Wyrdness and home to undead druids and monstrous creatures. The undead druids won’t attack unless provoked, so focus on the real threats—especially the Marrowghast, which is nasty in both melee and ranged combat, and the elusive Wyrdspirits that are hard to hit.
Be sure to equip the Soulstone and start charging it by killing enemies here. A fully charged Soulstone can save you from death once, which is critical for the upcoming boss.
Keep exploring until you find Prydwen, the druid leader, in the northwest section. To the right, there’s a treasure chest guarded by a Marrowghast and Wyrdspirit—loot it for the Hexbounce Wand, a unique weapon that reflects projectiles.
Speak to Prydwen when you’re ready. He’ll reveal that the druids created an abomination, and hand over a seal to open a gemstone-locked door deeper in the dungeon.
Final Boss: Blood Abomination

Open the sealed door and dive into another blood pool. After a cutscene, you’ll face the Blood Abomination—a grotesque final boss.
Pro tips for the fight:
- Rush the Abomination immediately and ignore the summon it spawns.
- Use the King’s Soul ability to slow time, then burn through its stamina bar for a finishing move.
- Ranged players should keep their distance but be ready to reposition once King’s Soul wears off.
- Use high-damage spells like Burning Embers.
- If your Soulstone is fully charged, it’ll save you from a lethal hit—basically giving you a second chance.
Defeating the Abomination nets you the Cursed Bloodblade, a one-handed sword that grants 2% lifesteal. In the next room, you’ll also find a chest with potions and crafting supplies. Don’t jump down—it just leads back to the dungeon entrance.
Wrapping Up the Quest
Head back to Prydwen to complete the Blood Stains the Circle quest. You’ll get some closure on the druid cult’s twisted experiment, and he’ll reward you with the Winged Spear—a weapon that doubles damage when your mana drops below 50%, making it perfect for summoner builds that use a lot of magic early in combat.
After handing over the spear, Prydwen will peacefully pass away, and the remaining undead druids won’t bother you anymore. The events here tie directly into the game’s main story and will impact a major decision later on—so it’s definitely worth exploring.
