
In Borderlands 4 you will find many legendary weapons as Enhancements all over the map. Since most of the weapons are dropped from bosses a few are also dropped randomly. As for the enhancements you will get them as you get more weapons. In this guide we have located all the legendary weapons that we have found till now, tips on how to defeat the bosses and all the legendary weapons that we have found till now.
All Legendary Weapons and Items Locations & Effects
Legendary weapons can increase your build stats and make the game easier. It’s super helpful to know where to find them. Most of the Legendary Weapons are tied to certain bosses, and each time you defeat them, there is a small chance they will drop that exact item.
Below are all legendary weapons and Items along with their Locations & Effects, we have found so far. We will update all the remaining information as soon as we get to know about it.
Splashzone
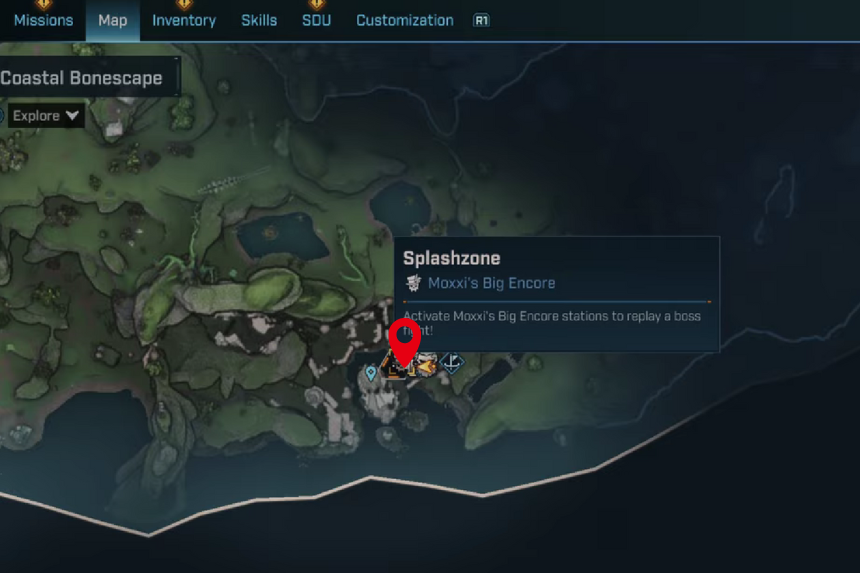
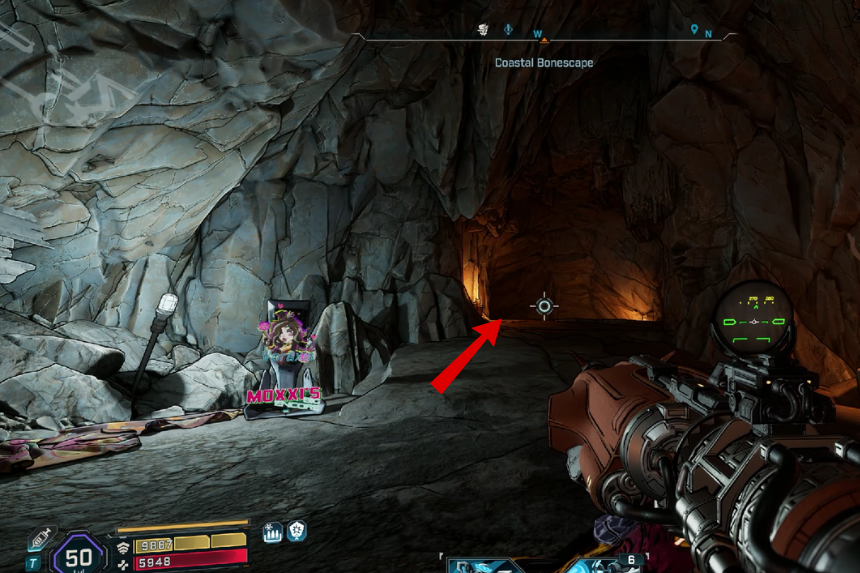
You will run into Splashzone during the Recruitment Drive main mission, where he shows up as a boss fight in Riptide Grotto, found in the Coastal Bonescape area of The Fadefields. Once you’ve finished that mission, you can go back and farm him as many times as you want for his drops.
How to Defeat the Splashzone
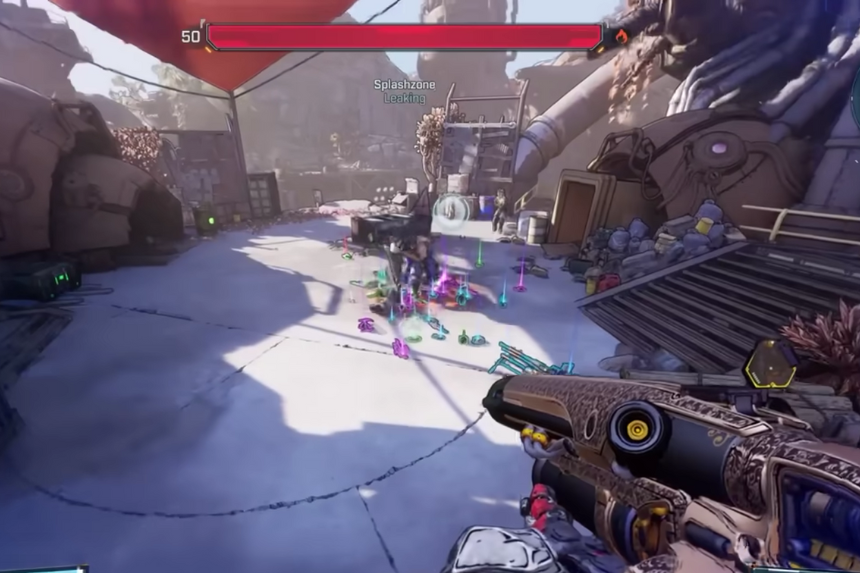
Splashzone has a flesh health bar, so Incendiary weapons work best. If you don’t have them, Kinetic, Cryo, or Radiation weapons will also be useful. Avoid Shock and Corrosive weapons, they do not deal much damage to flesh. Splashzone likes to charge at you and hit you with melee attacks.
The best way to stay safe is to run around the arena. Watch out for other enemies and make sure you don’t fall off the edges. Shoot the explosive barrels in the arena to deal extra damage. They’re great for taking out smaller enemies quickly or giving Splashzone damage.
Splashzone Rewards
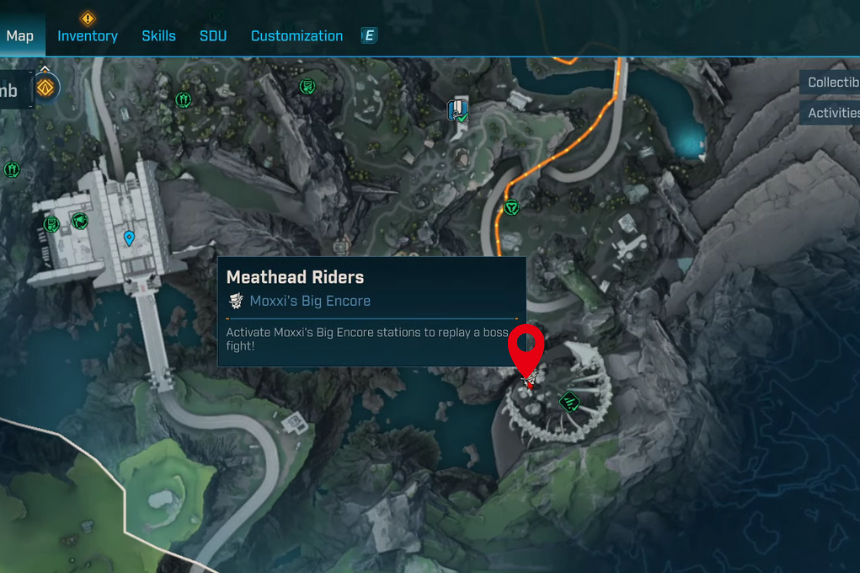
When you take down Splashzone, you’ve got a chance at some great loot. The main prize is the Lead Balloon, a powerful legendary shotgun. On top of that, Splashzone can also drop the Firewerks legendary shield and the Jelly Jelly legendary grenade, so it’s always worth the fight if you’re hunting for rare gear.
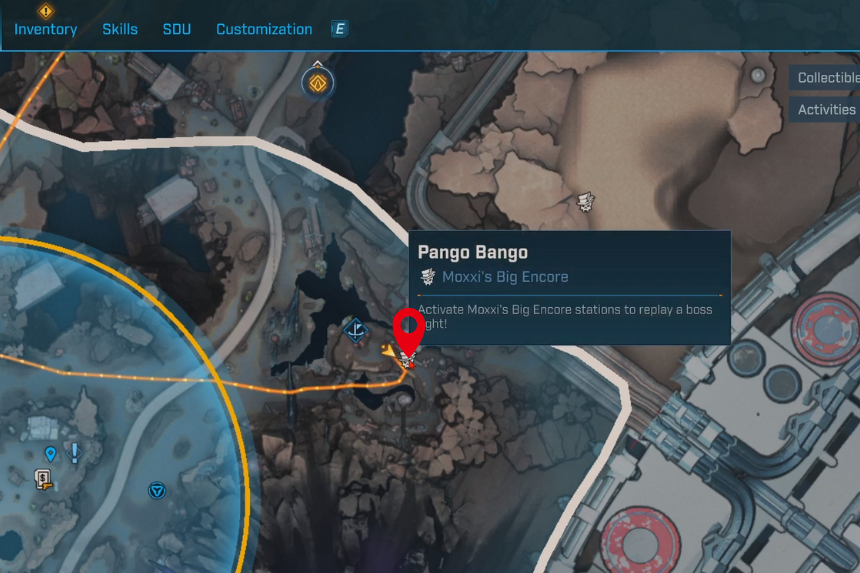
If it doesn’t drop the first time, don’t worry, you can use Moxxi’s Big Encore just outside the boss arena to make Splashzone appear again. Keep in mind, the Encore costs cash, and the price goes up as you level.
| Weapon | Type | Manufacturer | Effect |
| Lead Balloon | Shotgun | Torgue | Projectiles float upward and spawn child projectiles upon exploding |
| Fireworks | Shield | Torgue | Bundled: On kill, spawns Missiles that home in on nearby enemies and deal 237-281 Damage each. |
| Jelly | Grenade | Ripper | Self-Replicating |
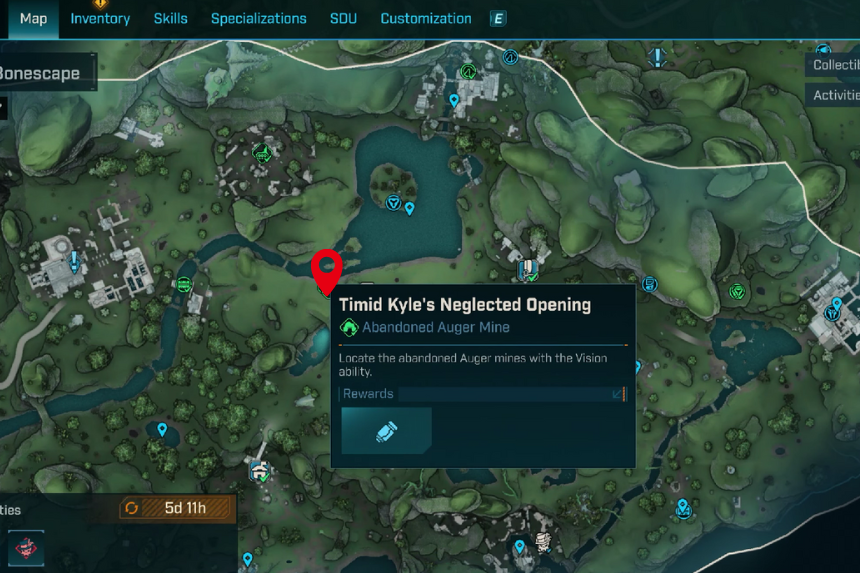
Voraxis
Voraxis is an optional boss you can fight inside Timid Kyle’s Neglected Opening, found in the Abandoned Auger Mine over in the Coastal Bonescape area of the Fadefields. You will only be able to access this mine after finishing the Shadow of the Mountain main mission.
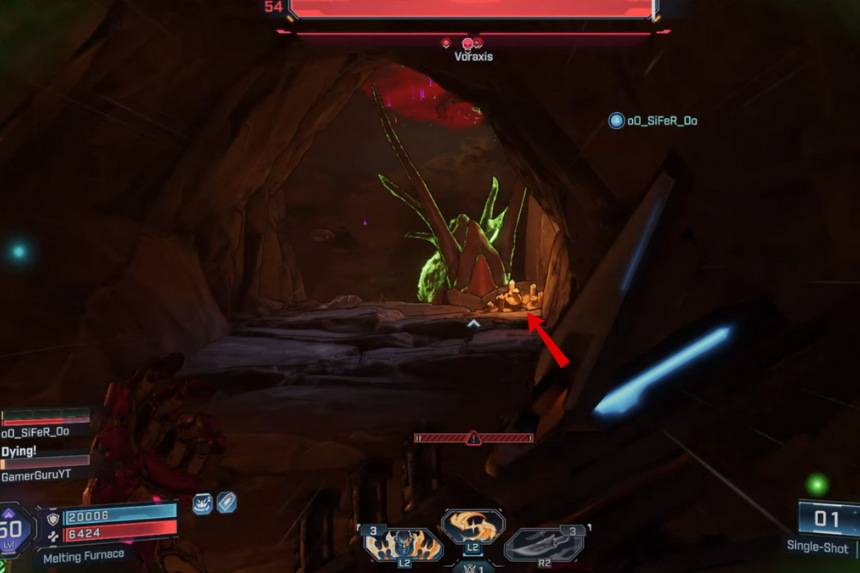
Once you’ve beaten Voraxis, you’re free to farm it again whenever you like. Just head back to the same spot and use Moxxi’s Big Encore Machine near the arena entrance to spend some cash and trigger the fight again.
How to Defeat the Voraxis
When you’re fighting Voraxis, try to aim for its eyes; that is its weak spot, and hitting them will drain its health much faster. Watch out for its charging attack too. Voraxis winds up before it bolts straight ahead, so be ready to dash to the side at the right moment.
On PS4, that’s the left stick plus Circle, on Xbox it’s the left stick plus B, and on PC you will want to hit Shift while moving. It also likes to throw molten boulders that explode on impact. These hit hard, so keep your distance and stay on the move to avoid getting caught in the blast.
Voraxis Rewards
Beating Voraxis is worth the effort because it can drop some really strong gear. You might get the Darkbeast legendary SMG, the Potato Thrower IV legendary assault rifle, or even the Buoy legendary grenade. Each drop feels like a solid reward for taking down this tough boss.
| Weapon | Type | Manufacturer | Effect |
| Parley | Submachine Gun | Daedalus | Bullets pierce enemies, and have a 5% Chance when hitting an enemy to cause an explosion that deals 153 Damage |
| Potato Thrower IV | Assault Rifle | Torgue | Spud Gun – Fires explosive potato projectiles that deal splash damage; fires full auto. |
| Jelly | Grenade | Ripper | Replicating – Spawns duplicates on bounce. |
| Buoy | Grenade | Ripper | Nuke – Grenade damage is increased +31%, Grenade damage radius is increased by + 62%, and grenade cooldown damage is increased by +25%. Ripper – Grenade teleports to its destination. |
| Darkbeast | SMG | Daedalus | Its special perk, Parley, makes every bullet able to pierce through enemies, and on top of that, there’s a small 5% chance that each hit will trigger an explosion dealing about 2,632 damage. Instead of a normal clip, it uses a CoV-style magazine. The gun also has a secondary fire mode that switches over to using assault rifle ammo. |
The Oppressor
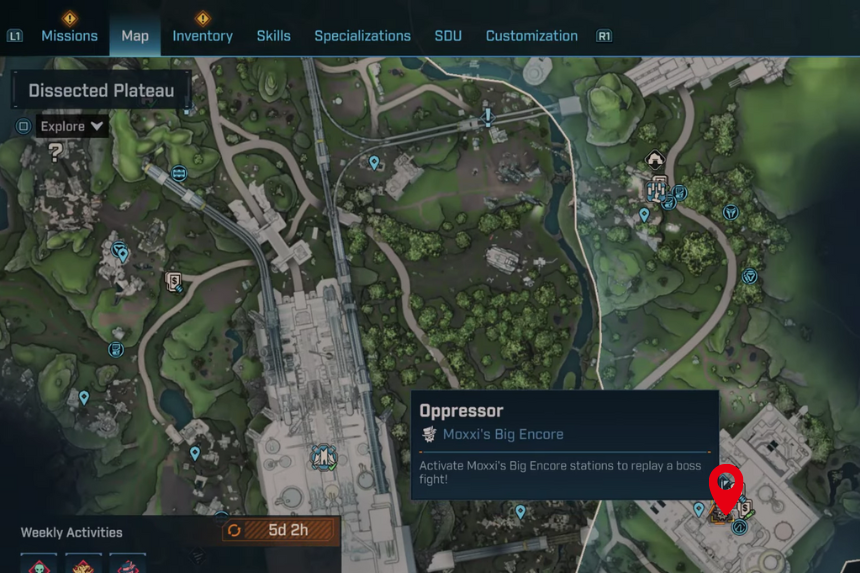
You will face The Oppressor during the main mission A Lot to Process, where it shows up as the boss fight in The Killing Floors, found in the Dissected Plateau area of the Fadefields.
After you finish that mission, you can go back and farm The Oppressor whenever you want. Just return to the arena and use Moxxi’s Big Encore Machine near the entrance to spend some cash and trigger the fight again.
How to Defeat the Oppressor
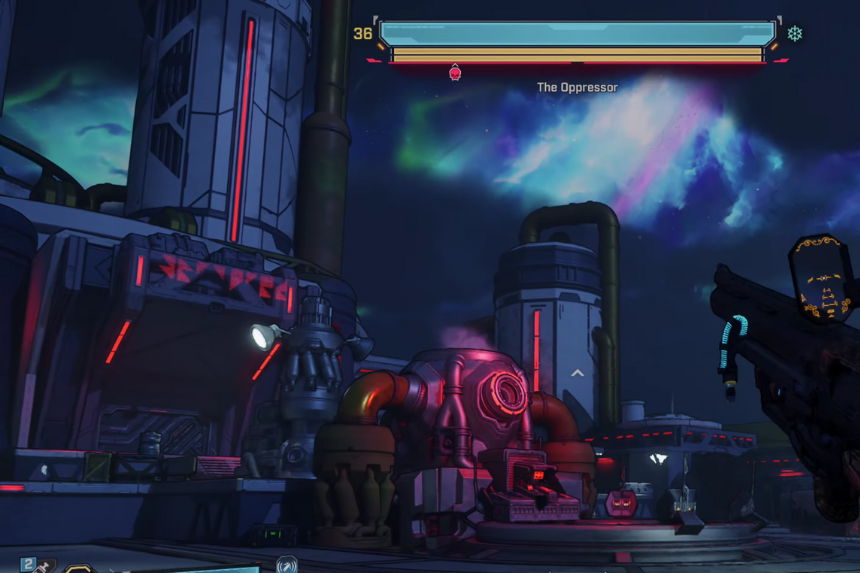
Since The Oppressor is almost always airborne, you will want to bring along scoped weapons like sniper rifles or certain assault rifles. That way, you can reliably hit its weak spot from a distance without wasting shots.
Another thing to watch out for is its cluster missiles. These can quickly overwhelm you if you ignore them, so try to shoot them down as soon as they’re launched. Taking them out early will save you from getting caught in a storm of explosions.
The Oppressor Rewards
Taking down The Oppressor can really pay off, since it has a chance to drop some excellent legendary gear. You might walk away with the Asher’s Rise sniper rifle, the Onslaught SMG, the Blood Analyzer repkit, or even the Streamer heavy weapon. Each one is a powerful reward that makes the fight worth farming.
| Weapon | Type | Manufacturer | Effect |
| Asher’s Rise | Sniper Rifle | Maliwan | Slow Burn: Critical Hits apply Status effects instead of increased impact Damage. |
| Onslaught | Submachine Gun | Vladof | Keep It Coming: There’s a 30% Chance for every bullet fired to deal extra Damage and not consume Ammo |
| Blood Analyzer | Repkit | Maliwan | Immunity Shot: On use, grants Immunity to the last Elemental Damage Taken for 7s. |
| Streamer | Heavy Weapon | Ripper | Delegation: Launches stationary projectiles that each fire a Beam forward. |
Bio-Bulkhead
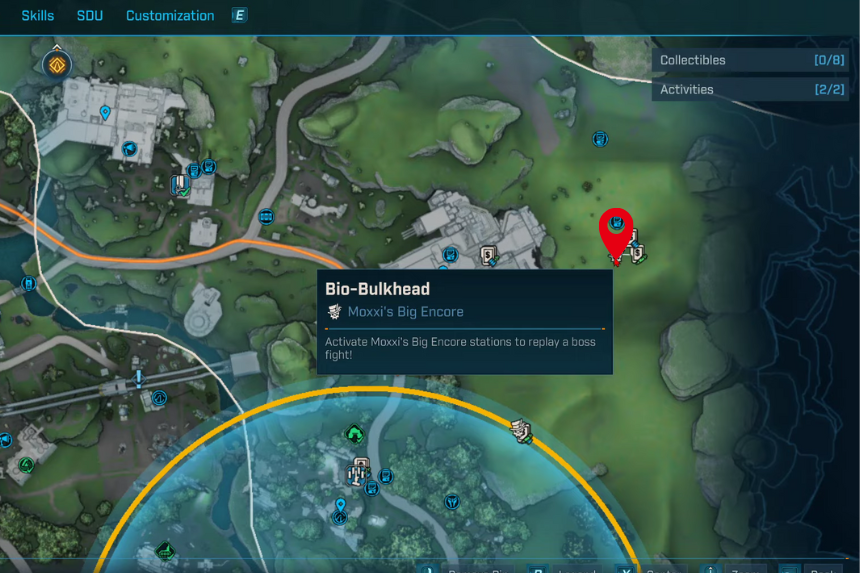
You will come across Bio-Bulkhead as the boss fight in the One Fell Swoop main mission, set in the Synthetic Nave within the Dissected Plateau area of the Fadefields.
Once that mission’s done, you can go back and farm Bio-Bulkhead whenever you like. Just head back to the arena and use Moxxi’s Big Encore Machine near the entrance to spend some cash and start the fight again.
How to Defeat the Bio-Bulkhead
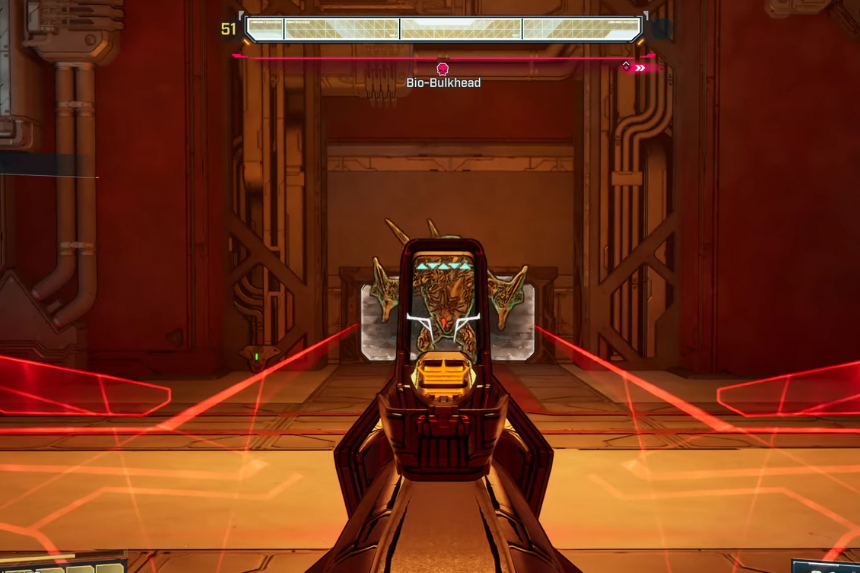
At the start of the fight and whenever Bio-Bulkhead begins a new health segment, it becomes immune to all damage. During these moments, grab a Locust Sample from around the arena and throw it at the boss. This will temporarily break its immunity and let you start dealing damage again.
When its armor is exposed, your best bet is to use Corrosive or Cryo weapons, as they deal extra damage to armored enemies. Weapons that do Shock, Radiation, or Incendiary damage won’t be very effective, though Kinetic weapons can serve as a backup if you run out of Corrosive options. Be careful of its AOE ground slams, which send out powerful shockwaves. Keep moving and jump at the right moments to avoid getting hit.
Bio-Bulkhead Rewards
Defeating Bio-Bulkhead can net you some really valuable loot. You might get the Budget Deity legendary pistol, the Sho Kunai legendary grenade, or the Waterfall legendary grenade all solid rewards that make taking down this boss worth your time.
| Weapon | Type | Manufacturer | Effect |
| Budget Deity | Pistol | Tediore | D.O.P.E. Buoys: Throws 2 Combo Orbs, which place the Atlas Target Lock on enemies damaged by the Combo Orbs |
| Sho Kunai | Grenade | Jakobs | Ninja Speed: Grants +10% Movement Speed for a short Duration with each consecutive hit, for a Maximum of 7 stacks. |
| Waterfall | Grenade | Vladof | Waterfall: Causes additional explosions when damaging targets. |
Primordial Guardian Inceptus

You will face Primordial Guardian Inceptus in the Arch of Inceptus, located in the Dissected Plateau area of the Fadefields. This boss guards the Vault of Inceptus, which you can access after collecting and placing all the Fadefields Vault Key Fragments.
After you defeat Inceptus, you can farm it again as many times as you like. Just return to the arena and use Moxxi’s Big Encore Machine near the entrance to spend some cash and start the fight again.
Primordial Guardian Inceptus Rewards
Defeating Primordial Guardian Inceptus can reward you with some impressive legendary loot. You might walk away with the Lucky Clover pistol, the Husky Friend shotgun, the Extra Medium shield, or the Ravenfire heavy weapon. On top of that, there’s a chance to get powerful class mods like the Firey Elementalist, Rewarding Filantropo, Reactor or the Electric Avatar, making this boss fight well worth the effort.
| Weapon | Type | Manufacturer | Effect |
| Lucky Clover | Pistol | Order | Kismet: On Reload, fires 2 Homing Rockets that deal up to 393 Damage each |
| Husky Friend | Shotgun | Tediore | Alt Fire – Husky Auto Turret |
| Waterfall | Shield | Maliwan | Nucleosynthesis: When Energy Shield breaks or fills, it triggers a Nove that deals 1,332-1880 Damage |
| Electric Avatar | Class Mod | – | +Dmg for each active Attunement. Gain attuned elemental resistance |
| Elementalist | Class Mod | – | All Affinity Skills gain a stack when one does. +Movement speed for each stack |
| Extra Medium | Energy | – | Explodes on fill & depletion, dealing [amount] dmg |
| Filantropo | Class Mod | – | Spawns a free grenade when action skill is retriggered |
| Ravenfire | Torgue | Heavy | Explosions radiate outward from the point of impact |
| Reactor | Class Mod | – | Entangle use adds Reactor Stack. At x10, +20% dmg, fire rate, rld speed, status… |
Backhive

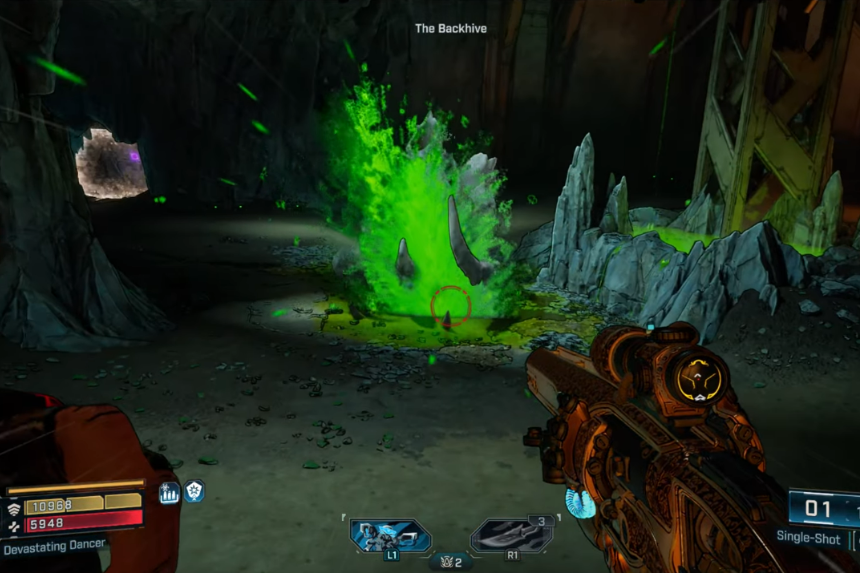
Backhive is an optional boss you can find in The Claim: Abandoned Auger Mine, located in the Dissected Plateau area of the Fadefields. This area becomes available after you finish the Shadow of the Mountain main mission.
Once you beat Backhive, you can come back and farm it as many times as you want. Just head back to the same spot after the mission and use Moxxi’s Big Encore Machine near the arena entrance, spend some cash, and you can fight Backhive again for more loot.
How to Defeat the Backhive
During the fight, Backhive will keep summoning Nitro Kratches, take them out as soon as they show up because they explode and can do a lot of damage fast. Backhive also uses AOE (area-of-effect) attacks like ground slams and shockwaves. When you see it winding up, time your jump to dodge the damage.
If you try to keep your distance, it will charge straight at you. This can hurt a lot, so be ready to dash to the side to avoid it. But don’t let your guard down; if the charge misses, Backhive will immediately follow up with a ground slam, so be prepared to dodge again right after.
Backhive Rewards
Defeating Backhive will reward you with Cindershelly (Legendary Shield).
| Weapon | Type | Manufacturer | Effect |
| Mega Triple Bypass | Repkit | – | Has 3 charges. 30% chance to replenish a charge on kill |
| Stop Gap | Shield | Vladof | It makes you completely immune to all damage for five seconds, giving you a chance to recover or finish off enemies. |
| Cindershelly | Shield | Order | Its perk gives you a stacking bonus: every stack of Resolve boosts your damage resistance by 2% and increases your nova damage by 20%, stacking up to 25 times. |
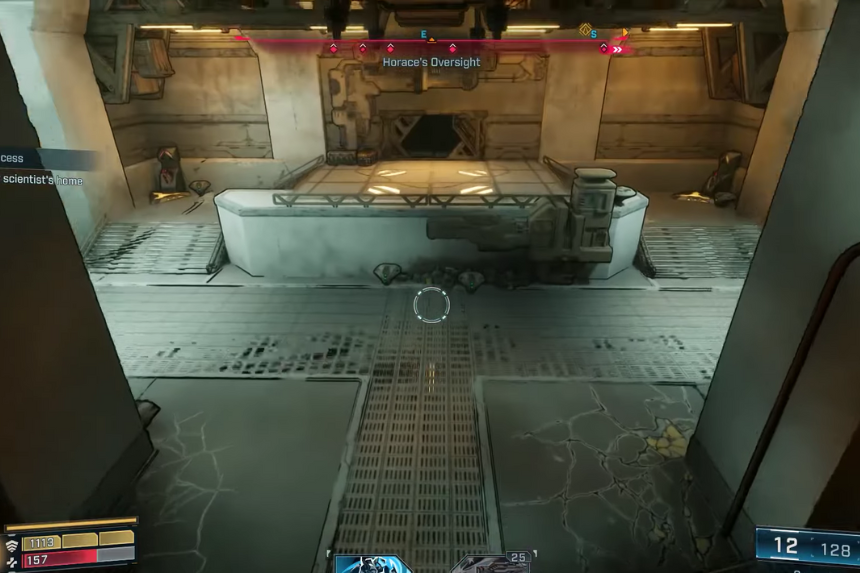
Horace
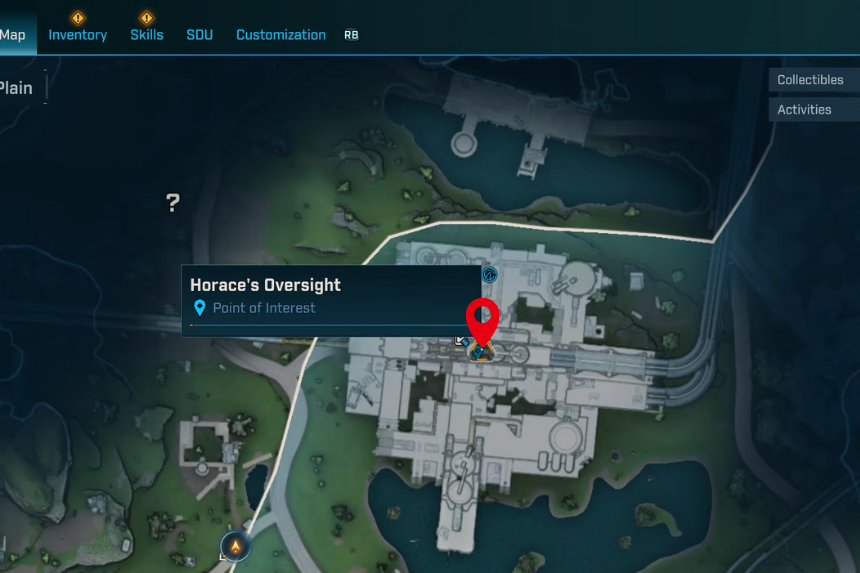
You will find Horace in Horace’s Oversight, located in the Hungering Plain area of the Fadefields. He shows up as a boss during the main mission, Down and Outbound.
After you finish the mission, you can go back and farm Horace for loot. Just return to the same spot and use Moxxi’s Big Encore Machine near the arena entrance, spend some cash, and you can fight him again whenever you want.
How to Defeat the Horace
During the fight, Horace will summon either a flying Witness or a homing mechanical projectile. Take these out as soon as possible; they can sneak up on you and deal a lot of damage if you ignore them. Try to leave a few ground enemies alive; they can actually help you. If you get knocked down, you can kill one to trigger Second Wind and get back into the fight.
In phase two, Horace starts using his Scythe. When he swings it, quickly dash left or right to dodge. You can even dash in midair, which helps avoid combo attacks or shockwaves on the ground. Horace will also shoot waves of projectiles at you often. Use the pillars in the arena for cover to block these and stay safe.
Horace Rewards
Defeating Horace will reward you with Aegon’s Dream (Legendary Assault Rifle), Lucky Clover (Legendary Pistol), Whiskey Foxtrot (Legendary Assault Rifle), Pacemaker (Legendary Repkit), and Sho Kunai (Legendary Grenade).
| Weapon | Type | Manufacturer | Effect |
| Aegon’s Dream | Assault rifle | Vladof | Its special perk, Prophetic, makes every shot alternate between cryo and fire damage. If you switch it into underbarrel mode, the left barrel fires cryo rounds while the right one spits out fire, giving you precise control over which element you want to unleash. |
| Pacemaker | Repkit | Daedalus | Passively gain HP over time, increasing in rate when HP is low |
| Lucky Clover | Pistol | Order | Kismet, makes it fire two homing rockets every time you reload, and each rocket can deal up to 2,580 damage. It also comes with a Torgue-licensed impact magazine, which changes the ammo into gyrojets. On top of that, there’s an Order part built in, which lets you charge your shots. By holding the trigger, you can fire multiple rounds at once instead of just one. |
| Whiskey Foxtrot | Assault rifle | Vladof | Its Overdrive perk lets you switch to a secondary magazine that fires in full auto, giving you a rapid-fire option when you need it. |
| Sho Kunai | Grenade | Jakobs | Its special perk, Ninja Speed, gives you a 10% boost to movement speed every time you land a hit. The effect stacks up to seven times, so with consecutive hits, you can get really fast for a short burst |
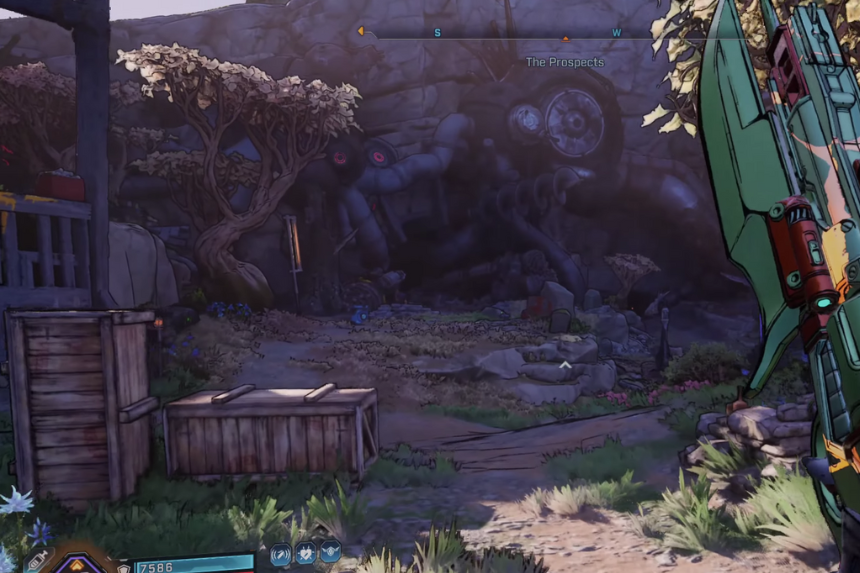
Sydney Pointylegs
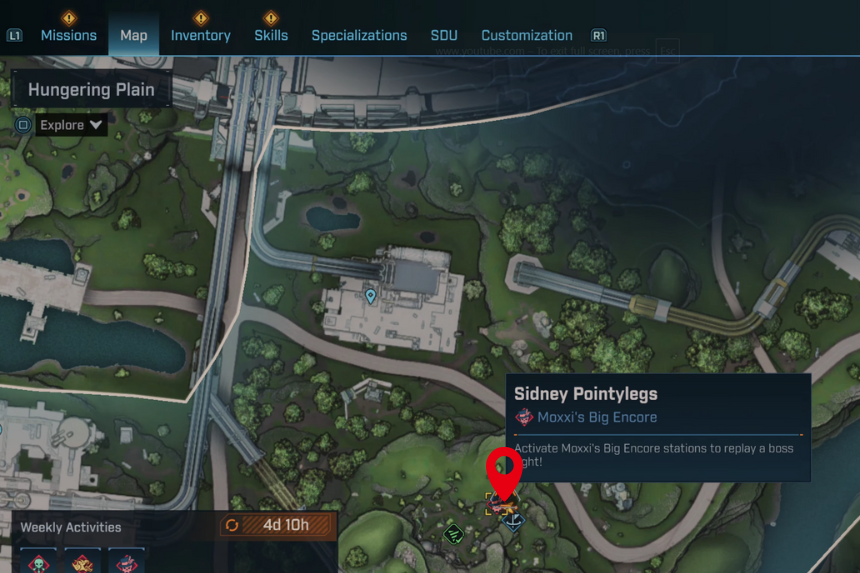
Sidney Pointylegs is an optional boss you can find at The Prospects Ripper Drill Site in the Hungering Plain area of the Fadefields. You can access Ripper Drill Sites as soon as you discover them on your map, with no mission requirements.
After you beat Sidney, you can farm the boss for loot anytime. Just come back later and use Moxxi’s Big Encore Machine near the arena entrance. Spend a bit of cash, and you will be able to fight Sidney again.
How to Defeat the Sydney Pointylegs
When Sidney Pointylegs starts spinning, it summons two types of smaller enemies, Skitter Balms (mini versions of itself) and Sploders (explosive ones that chase you).
Take out the Skitter Balms first, because if you leave them alone, Sidney will absorb them to heal herself. Also, make sure to destroy the Sploders before they get too close; they explode and can deal a lot of damage.
Sidney’s legs are her weak spots, so aim for them whenever you can. Hitting the legs deals extra damage and can stagger her, making the fight a lot easier and faster. Keep your shots low to get the best results.
Sydney Pointylegs Rewards
Defeating Sydney Pointylegs will reward you with Noisy Cricket (Legendary Pistol), Swarm (Legendary Grenade), and Disc Jockey (Legendary Heavy Weapon).
| Weapon | Type | Manufacturer | Effect |
| Noisy Cricket | Pistol | Order | Silence |
| Disc Jockey | Heavy Ordnance | Ripper | It fires more than just regular shots. Its special perk, Bouncing Biscuits, launches energy discs that can bounce off surfaces up to five times. With each bounce, the discs get stronger, stacking an extra 20% damage every time they ricochet, which makes them deadlier the longer they stay in play. |
| Swarm | Grenade | Order | Its Parley effect lets your bullets pierce through enemies, and there’s a 5% chance on hit to trigger a small explosion that deals 2,632 damage. Thanks to the CoV-Licensed Magazine, the gun has an unlimited magazine, though it can overheat and eventually break if overused. On top of that, its secondary fire uses assault rifle ammo, giving you some versatility in combat. |
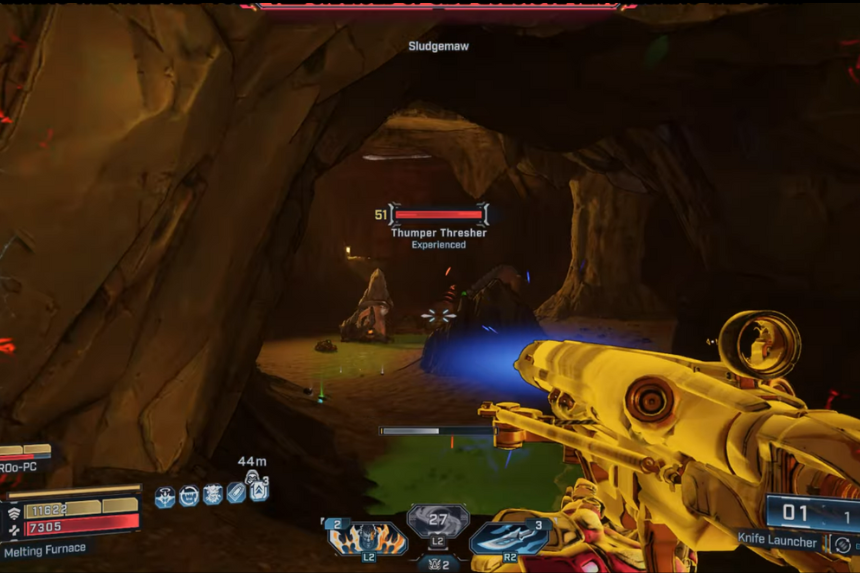
Sludgemaw

You will find Sludgemaw at Watershed Gate in the Idolator’s Noose area of the Fadefields. This boss shows up during the side mission All Charged Up, but you will need to finish another side mission called Null and Void first to unlock it.
Once you’ve completed All Charged Up, you can come back and farm Sludgemaw for more loot. Just head to the same spot and use Moxxi’s Big Encore Machine near the arena entrance, pay some cash, and you can fight Sludgemaw again.
How to Defeat the Sludgemaw
Climbing onto the nearby cargo container is a smart move during the fight with Sludgemaw. It gives you a clear view to keep shooting and deal steady damage, while also helping you stay out of range of most of its melee attacks.
Sludgemaw Rewards
Defeating Sludgemaw will reward you with Birt’s Bees (Legendary Submachine Gun), Kickballer (Legendary Shotgun), and Onion (Legendary Shield).
| Weapon | Type | Manufacturer | Effect |
| Onion | Shield | Jakobs | On armour segment break, grant immunity for damage for 2s. Grants up to +10% movement speed, scaling with broken armour segments. Grants up to +35% damage reduction scaling with broken armour segments. |
| Birt’s Bees | Submachine Gun | Vladof | Fires a zip rocket that deals 2,629 damage. Critical hits will ricochet projectiles to nearby enemies. |
| Kickballer | Shortgun | Maliwan | Critical hits will ricochet projectiles to nearby enemies. |
Idolator Sol
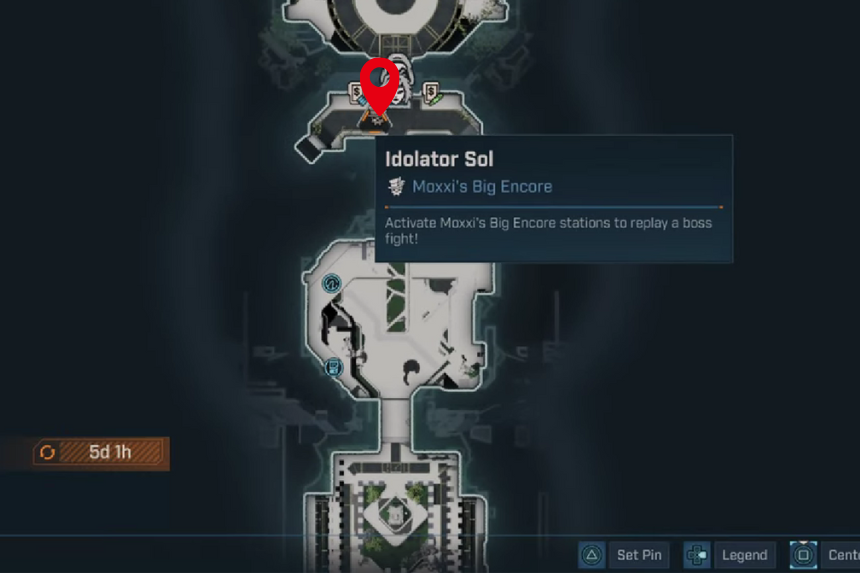
You can find Idolator Sol in Fortress Indomita, located in the Idolator’s Noose area of the Fadefields. This boss shows up during the main mission Rush the Gate.
After you finish the mission, you can come back and farm Idolator Sol for loot. Just return to the same spot and use Moxxi’s Big Encore Machine near the entrance of the arena. Spend some cash, and you will be able to fight him again.
How to Defeat the Idolator Sol
When Idolator Sol becomes immune to damage, don’t panic, just wait for it to throw a bunch of rods around the arena. One of them will glow green. Find it, pick it up, and throw it back at Sol to break the shield and make it vulnerable again.
During the fight, Sol will also reveal green, blob-like weak spots on its body. When you see them, focus your attacks there to deal extra damage and finish the fight faster.
Idolator Sol Rewards
Defeating Idolator Sol will reward you with Onslaught (Legendary Submachine Gun), Goremaster (Legendary Shotgun), Golden God (Legendary Shotgun), Ultimate Bio-Robot (Gravitar Class Mod), Perpetual Dancer (Exo-Soldier Class Mod), Excitable Technomancer (Siren Class Mod), and Melting Furnace (Forgeknight Class Mod).
| Weapon | Type | Manufacturer | Effect |
| Goremaster | Shortgun | Ripper | The Chief Execution Officer ability boosts your damage by 30% against enemies below 30% health, making finishing them off much easier. The Jakobs-Licensed Accessory causes your critical hits to fire ricochet projectiles that can hit nearby enemies. On top of that, the Ripper feature makes the gun charge up before it goes into full-auto mode, letting you unleash a controlled but devastating spray. |
| Onslaught | Submachine Gun | Vladof | There is a 30% chance for every bullet fired to deal extra damage and not consume ammo. |
| Golden God | Shortgun | Ripper | When overheating, the bullet forge does not break, but instead continually consumes greater amounts of ammo. Also, the gun charges before full firing. |
| Dancer (Rafa) | Class Mod | – | +100% Overdrive Bonus. Overdrive ends on Action Skill end |
| Bio-Robot (Harlowe) | Class mod | – | When you use it, the weapon creates alternating hazards first Cryo, then Radiation, making the battlefield extra dangerous for your enemies. It has 39% hazard damage and 39% sniper rifle damage. |
| Furnace (Amon) | Class Mod | – | Damage from Fellfrost, Hoarcleave, Fulminating Fist, and Stormcutter is converted to incendiary damage. |
| Technomancer (Vex) | Class Mod | – | Eldritch Blast deals Ordnance Damage in addition to other types. Killing an enemy, triggering Kill Skills, or using a Grenade will reset Eldritch Blast’s Cooldown. |
Foundry Freaks
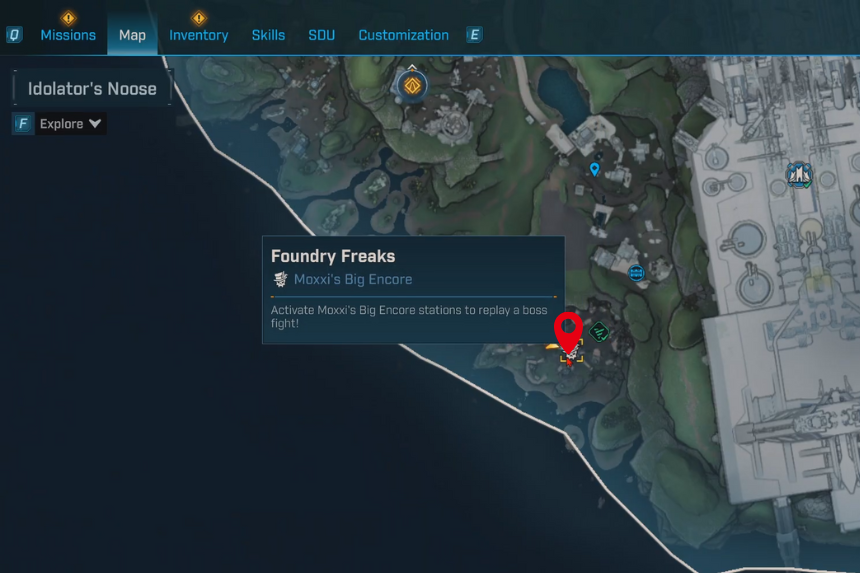
You can fight Foundry Freaks in The Pitter Stain Ripper Drill Site in the Fadefields. The drill site makes the battle intense, with narrow spaces, industrial hazards, and very little room to make mistakes. To get there, just move through Idolator’s Noose until you reach the drill site arena—this is where the fight starts.
How to Defeat the Foundry Freaks
Head to the Foundry Freaks and use Moxxi’s Big Encore Machine to start the fight with all three bosses. Make sure your loadout is good for quickly clearing mobs and hitting bosses from a distance; long-range and AoE attacks work best.
During the fight, take out waves of smaller enemies whenever the bosses aren’t attacking, and focus on the bosses’ weak points when they’re exposed. Keep moving between bosses so you don’t get trapped, and use cover and movement abilities to stay safe.
Once all three are defeated, grab your loot quickly and leave the arena. Respawn timers are short, and more mobs can appear if you want to farm them again.
Foundry Freaks Rewards
Defeating Foundry Freaks will reward you with Chuck, Bloody Lumberjack, and Chaumurky.
| Weapon | Type | Manufacturer | Effect |
| Chaumurky | Grenade (Ordnance) | Order | Incessant – Continuously homes in on a target. |
| Chuck | Assault Rifle | Tediore | Pitcher – |
| Bloody Lumberjack | Assault Rifle | Daedlus | Impacted bullets deal damage again |
Mimicron
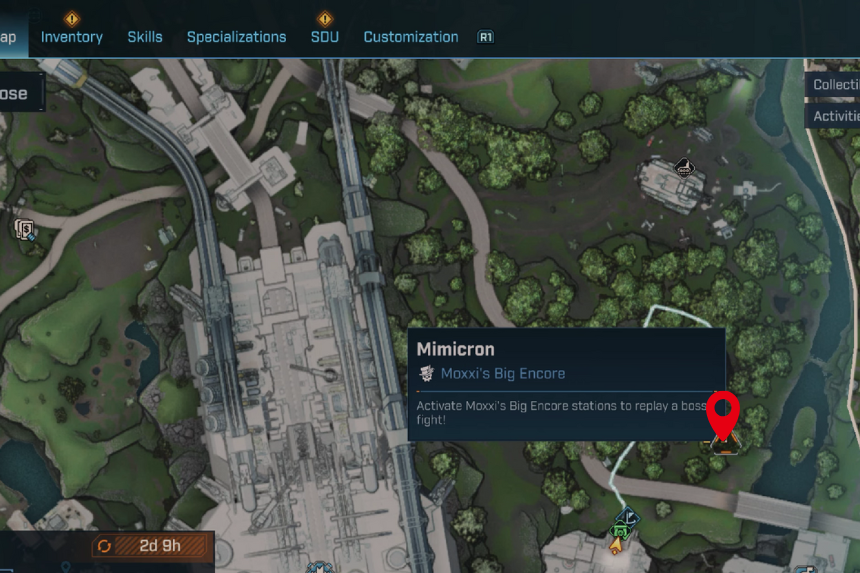
You will find Mimicron in the Tipping Point Order Bunker in Idolator’s Noose. The Tipping Point bunker in Idolator’s Noose, Fadefields, can be a bit confusing at first, but opening the door is actually straightforward. Stand with your back to the door and go right to find a giant fan.
Go inside the fan, take another right, and climb the ladder to reach a Locust station. Drop down through the hole in the floor and throw the Locust at the door to unlock it. Inside the bunker, you will need to open a few more doors by finding buttons and batteries, which are all in the same room. At the end, you face the boss Mimicron.
How to Defeat the Mimicron
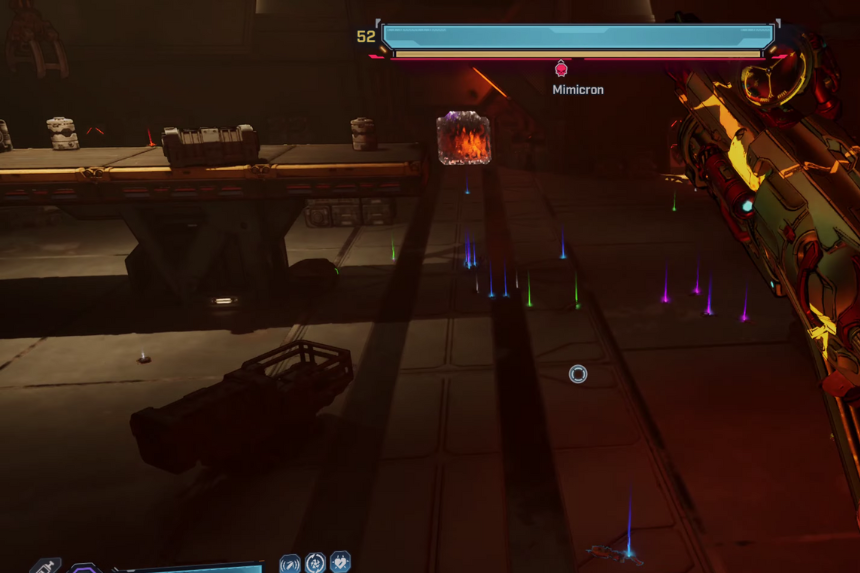
Mimicron is unique because it creates shielded copies of itself. The main boss has both a shield and armor, so using Shock and Corrosive or Cryo weapons is highly recommended.
Mimicron Rewards
Defeating Mimicron will reward you with Complex Root, Luty Madlad, and UAV.
| Weapon | Type | Manufacturer | Effect |
| Complex Root | Sniper Rifle | Maliwan | Sierpinksi – Spawns additional diverging projectiles along its path. |
| UAV | Grenade (Ordnance) | Tediore | Death From Above |
| Luty Madlad | Submachine Gun | Daedalus | Homemade Ingenuity – Overheats quickly, but also cools down quickly.Guaranteed to have a CoV-licensed magazine. |
Core Observer
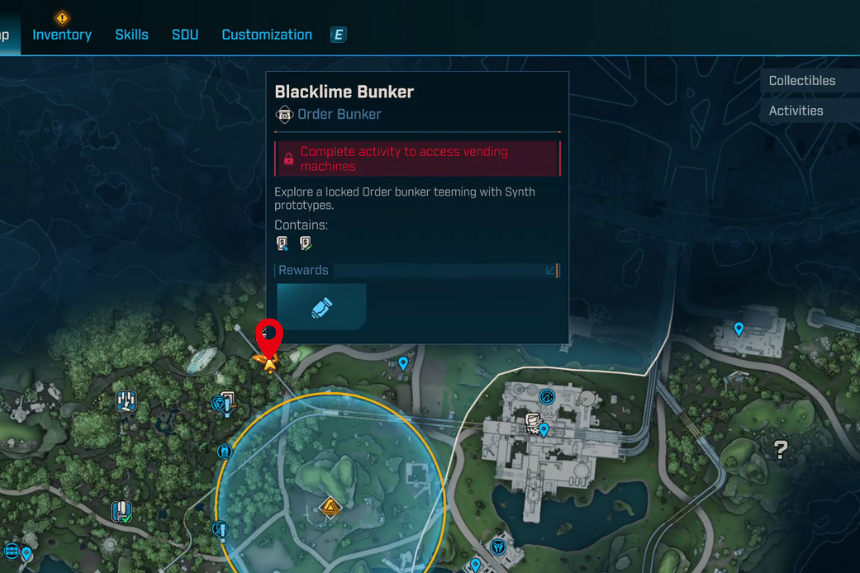
You can find the Core Observer hidden in the Blacklime Bunker, a heavily fortified area in The Howl region of the Fadefields. This bunker becomes accessible as you progress through the story and offers a side challenge separate from the main bosses. To get there, head to the rocky outcrops near the bunker entrance on your map. You will need to navigate some natural platforms and gaps, so be ready for a bit of platforming.
Getting into the Blacklime Bunker requires careful movement and use of your abilities, so make sure you’re ready before the boss fight. First, you need to complete the main mission One Fell Swoop to unlock access to Order Bunkers across Kairos, including Blacklime.
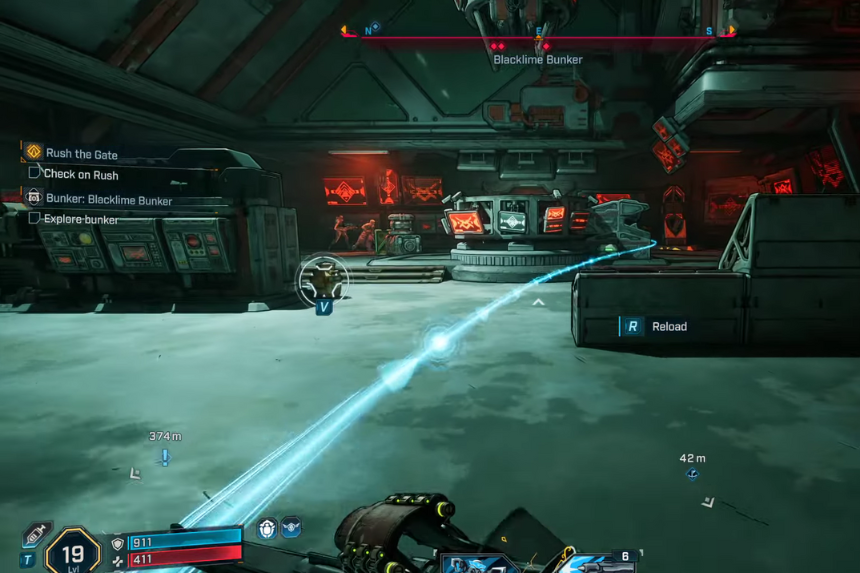
To reach the bunker in The Howl, follow your map to a rocky platform near a unique rock with a tree growing from it. Jump across to a lower platform, then use your double jump and mantle to climb to a higher ledge where a Locust station is waiting. Grab the Locust and throw it at the bunker door to unlock it, then glide over and enter the passage.
Inside the bunker, crouch under a low pipe, cross a flooded room by gliding or swimming, and press the button to open the next door. Head up the stairs to a room with vending machines to restock ammo or health, then proceed to trigger the Core Observer’s appearance in the arena.
The boss has multiple phases, so choosing the right weapons is key. Its first and last phases have shields that are weak to Shock damage, while the middle armor phase is best handled with Corrosive or Cryo attacks. Before the fight, stock up on shock pistols or SMGs to strip shields quickly, and switch to corrosive rifles or cryo shotguns for the armor phase.
Bring high-mobility gear to dodge attacks and consider mods that boost elemental damage or health regeneration to make the fight easier and faster.
How to Defeat the Core Observer
Fighting the Core Observer is all about staying mobile and using cover while targeting its weak spots for big damage.
When you enter the arena, start circling left and right to avoid the boss’s initial attacks. Focus on its central eye with sniper shots or precise attacks while dodging thrown mines, hide behind cover if needed. Use Shock weapons to break the first shield bar, gliding sideways to make yourself a harder target, especially at long range.
When it enters the armor phase, switch to Corrosive or Cryo weapons and focus on the exposed core. Deal with small enemies that spawn so they don’t distract you. Watch out for the tractor beam attack, strafe or glide to escape its pull while continuing to chip away at the armor.
Once the armor is down, switch back to Shock weapons for the final shield phase. Keep moving, hit the eye whenever it’s exposed, and take the boss down to claim your rewards.
After defeating Core Observer, you can reset the fight quickly to farm for legendary loot. Teleport to the south exit of the bunker, fast travel back to the entrance, clear nearby enemies, and repeat the fight. Higher difficulty levels like Ultimate Vault Hunter give better drops.
With practice, the Core Observer becomes a reliable source of top-tier gear, making your adventures across Kairos much easier. This fight is a perfect mix of movement, strategy, and loot hunting in Borderlands 4.
Core Observer Rewards
Defeating Core Observer will reward you with a Defibrillator, Bully, and Divided Focus.
| Weapon | Type | Manufacturer | Effect |
| Defibrillator | Repkit | Jakobs | Cardiac Shot – When Health goes below 20%, there is a 50% chance to replenish a Repkit Charge. |
| Divided Focus | Assault | Tediore | Conquerer – Fires bouncing projectiles that pierce enemies. |
| Bully | Pistol | Order | When Gun Shields are activated, launches an Attack Drone every 14s |
Skyspanner Kratch

Skyspanner Kratch is a huge bat-dragon boss you face during the Shadow of the Mountain mission. The fight mostly revolves around managing its constant movement and dealing with the minions it keeps sending at you.
How to Defeat the Skyspanner Kratch
The Skyspanner Kratch fight in Borderlands 4 isn’t too complicated, but its attacks can be really annoying. The boss has two health bars, but the second phase doesn’t add anything new, which makes things a bit easier. Playing as Vex helps a lot since your Specters can shoot and deal different elemental damage. The boss is fleshy, so its biggest weakness is Ignite.
Most of the fight is about dodging its attacks and minions. It launches a sonic blast repeatedly, trying to knock you into the poisonous water below. It spawns mini-Kratch enemies, which damage you on contact. Sometimes it flies in circles, releasing balloon-tied mini-Kratches that explode with different elements.
Its most dangerous attack is when it curls up its tail and spits out a bunch of tiny Kratch “missiles.” When you see this, double jump and glide away to avoid taking heavy damage. Another tough attack is when it floats around and releases balloons with mini-Kratches, they slowly drift toward you and explode for elemental damage.
Throughout the fight, stay mobile: jump between platforms, keep moving, and hit Skyspanner Kratch whenever you can. Watch out for the poisonous water, if the boss falls in it, loot can sometimes disappear, so keep that in mind. The key to this fight is dodging, mobility, and hitting its weak spots as often as possible while avoiding the mini-Kratches.
Skyspanner Kratch Rewards
Defeating Skyspanner Kratch will reward you with Hellfire, Hoarder, and Linebacker
| Weapon | Type | Manufacturer | Effect |
| Linebacker | Shotgun | Torgue | Full Coverage – Bouncing Projectiles increase Critical Damage by +25% and Damage by +35% per bounce. |
| Hellfire | Submachine Gun | Ripper | Burning Desire |
| Hoarder | Armor Shield | Vladof | Refreshments – 50% chance on Kill to spawn an Ammo Booster that instantly refills your gun. |
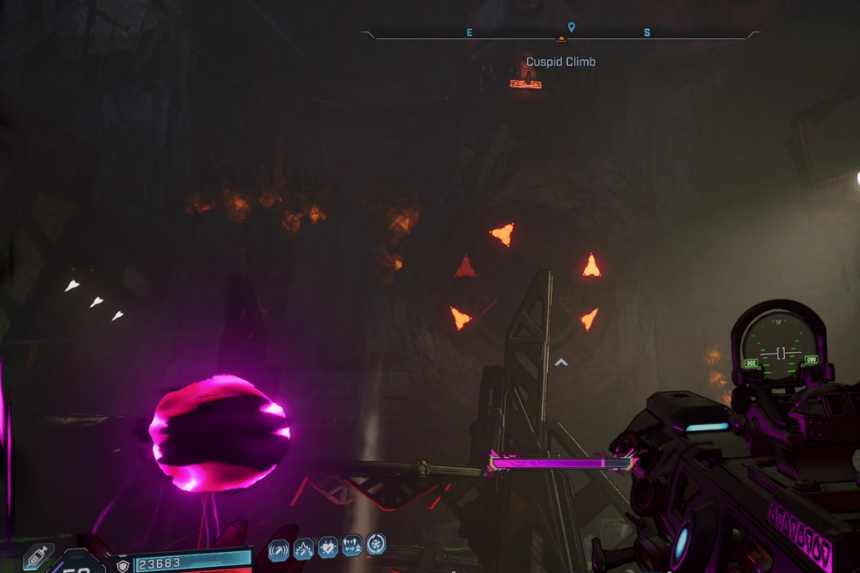
Saddleback and Immortal Boneface
When you enter the Terminus Range, you will arrive at Cuspid Climb. To the east, you will spot a large Ripper hideout. If you explore deeper into this area, you will come across the Ripper Drill Site called the Old Scrape, marked by a metal drawbridge and the bones of a giant creature.
As with other Ripper Drill Sites, you will need to provoke the boss by defeating the waves of Rippers in the area. Once you do, the bosses Saddleback and Immortal Boneface will appear, ready for battle.
How to Defeat the Saddleback and Immortal Boneface
When facing these bosses, your main focus should be on Saddleback, the large Meathead carrying Immortal Boneface. Saddleback has an Armor bar and a Flesh bar, so using Corrosive or Cryo for armor and Incendiary for flesh works best.
Once you take down Saddleback, Immortal Boneface loses his immortality buff and becomes vulnerable. At this point, use Shock weapons for his shield and Incendiary for his flesh to deal the most damage.
Saddleback and Immortal Boneface Rewards
You will get Lucian’s Flank, Hellwalker, and War Paint after defeating both the bosses.
| Weapon | Type | Manufacturer | Effect |
| Lucian’s Flank | Assault Rifle | Vladof | Trample – Critical Hits refill ammo in the gun’s magazine. |
| Hellwalker | Shotgun | Jakobs | Soothslayer |
| War Paint | Repkit | Torgue | Chrome – On use, grants +30% Fire Rate and +30% Movement Speed for 15s, and reduces Repkit Cooldown by 2s each time Damage is taken. |
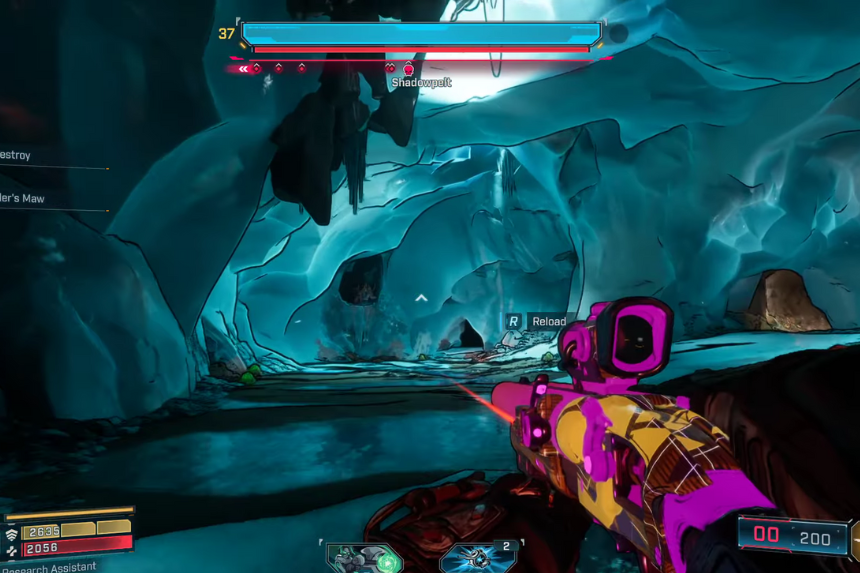
Shadowpelt
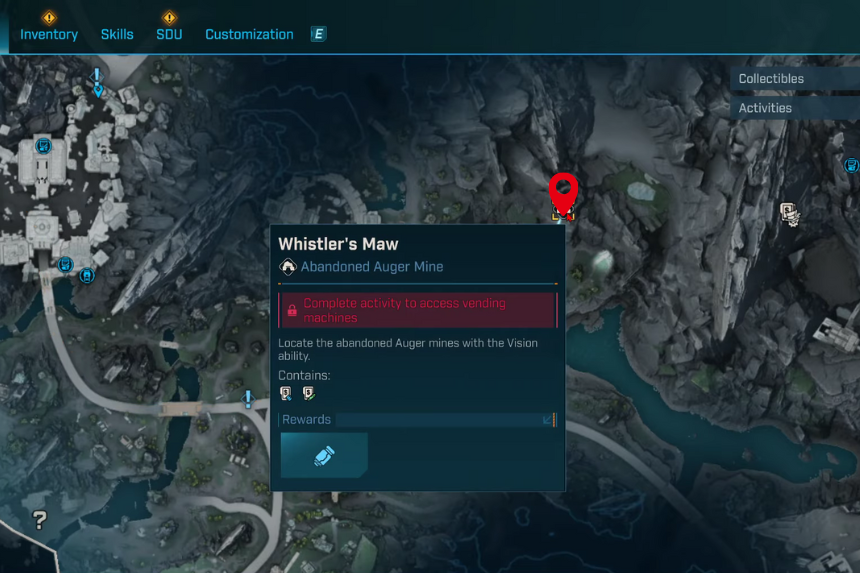
Shadowpelt is an optional boss you can find in the Whistler’s Maw Abandoned Auger Mine, located in Cuspid Climb within the Terminus Range. You will be able to access this area after completing the Shadow of the Mountain main mission.
Once you’ve defeated Shadowpelt, you can farm it again anytime. Just return to the arena and use Moxxi’s Big Encore Machine near the entrance to spend some cash and start the fight over.
How to Defeat the Shadowpelt
When fighting Shadowpelt, its shield makes it invisible, so your first priority is to take down the shield quickly using Shock damage. Once you hit it, Shadowpelt will turn visible and take damage, but the shield will reactivate soon after, so be ready to destroy it multiple times fighting it while invisible is much harder.
Shadowpelt also fires projectiles that explode on impact. These AOE blasts deal heavy damage if you stay too close, so keep moving and maintain a safe distance to avoid getting hit.
Shadowpelt Rewards
Defeating Shadowpelt can reward you with some valuable legendary loot, including the Vamoose sniper rifle, the Sparky Shield, and the Slippy legendary grenade, making the fight worth taking on.
| Weapon | Type | Manufacturer | Effect |
| Sparky Shield | Energy Shield | Ripper | Short Circuit – While Energy Shield is not full, it periodically shocks nearby enemies. |
| Vamoose | Sniper Rifle | Ripper | Scarce – Fires an entire magazine when shot while zoomed in. |
| Slippy | Grenade (Ordnance) | Torgue | Swordfish – Deals Melee Damage |
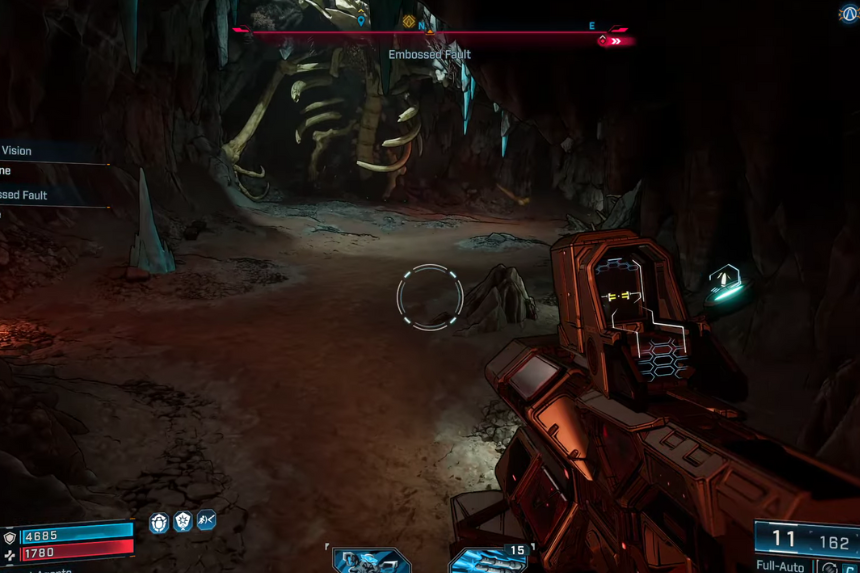
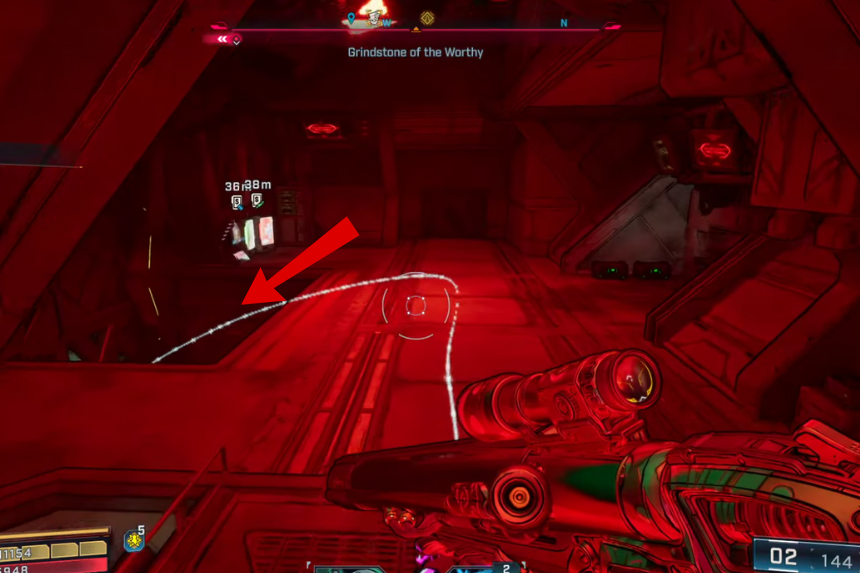
Skull Orchid

You can find Skull Orchid in the Grindstone of the Worthy, a cave located deep within Embossed Faults. To reach its lair, you will need to progress through the main story missions up to at least A Lot to Process. The fight takes place in the heart of an Abandoned Auger Mine called The Pigeonhole, right inside the cave.
How to Defeat the Skull Orchid
To make things even trickier, Skull Orchid is a Creep, meaning it can randomly change its elemental type to counter the damage you’re dealing. It has a Flesh health bar, which is most easily damaged with Incendiary weapons.
For its weak spot, aim for the tendrils hanging from its mouth its large eyes and bulbous head are protected by a hard shell, so attacking them won’t do much.
Skull Orchid Rewards
You will get Faulty Detonator, Spied Dextrous Oak-Aged Cask and Roach after defeating the boss.
| Weapon | Type | Manufacturer | Effect |
| Roach | Pistol | Torgue | Flash Eaters – Shoots eggs that hatch flying roaches when attached to flesh, living or dead. |
| Oak-Aged Cask | Armor Shield | Jakobs | Vintage – Always one armor segment; heavily boosted capacity with very slow armor recharge rate |
| Faulty Detonator | Grenade | – | Detonating the Grenade spawns Combo Orbs |
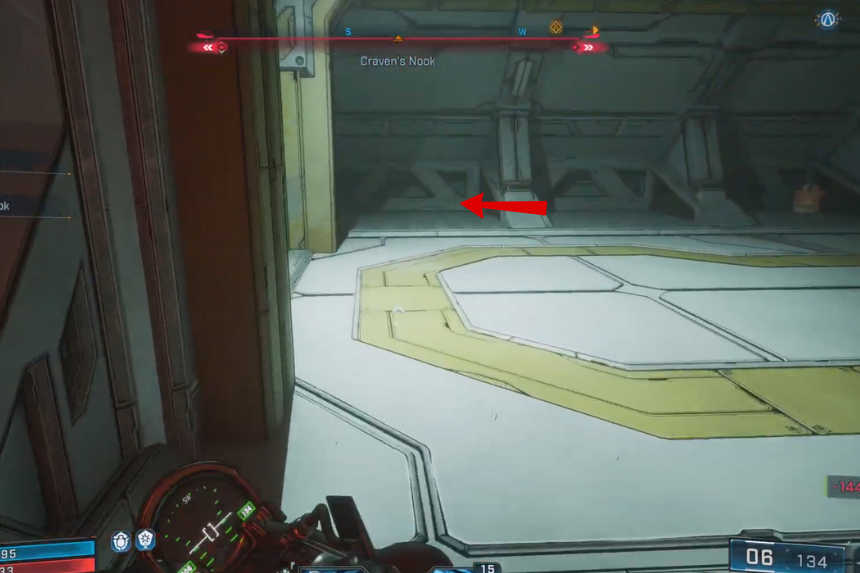
Callous Harbringer
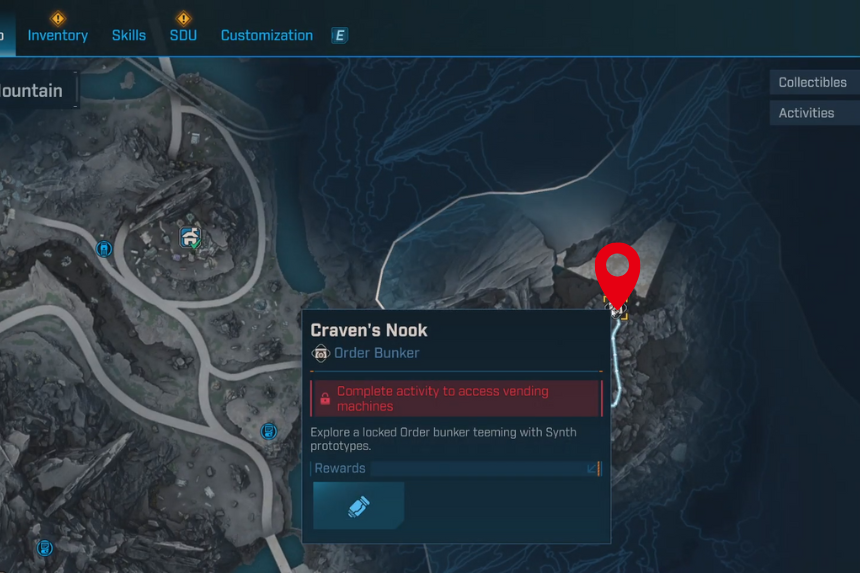
Callous, Harbringer of Annihilating Death is an optional boss you can find in the Craven’s Nook Order Bunker, located in the Heart of the Mountain within the Terminus Range. You will gain access to this bunker after completing the One Fell Swoop main mission.
Once you’ve defeated Callous, you can farm it again anytime. Just return to the arena and use Moxxi’s Big Encore Machine near the entrance to spend some cash and start the fight over.
How to Defeat the Callous Harbinger
When fighting Callous, watch out for his ground slams, which send out damaging shockwaves across the arena. Time your jumps carefully to clear the waves and avoid taking damage. He also fires barrages of projectiles. When this happens, quickly move behind the elevated platform for cover this keeps you safe while giving you a chance to peek out and fire back.
Once his shield is gone, Callous becomes more aggressive and will occasionally charge at you. Keep moving and dash to the side at the right moment to avoid taking heavy damage. On PS4, dash with the left stick plus Circle, on Xbox it’s left stick plus B, and on PC it’s Shift plus movement keys.
Callous Harbinger Rewards
Defeating Callous, Harbringer of Annihilating Death can reward you with some impressive legendary weapons, including the Hot Slugger shotgun, the Kaleidosplode shotgun, and the Atling Gun heavy weapon, making the fight well worth your effort.
| Weapon | Type | Manufacturer | Effect |
| Hot Slugger | Shotgun | Jakobs | Magazine size is fixed to 1. Fires a single, moderately slow-moving slug instead of buckshot. Deals high critical damage.Blazing Barrel – On kill, deal +30% Damage for 10s for a maximum of 3 stacks. |
| Atling Gun | Heavy Weapon (Ordnance) | Vladof | Whistler – Bullets track targets; Boosted rev up time and fire rate |
| Kaleidosplode | Shotgun | Maliwan | – |
Battle Wagon
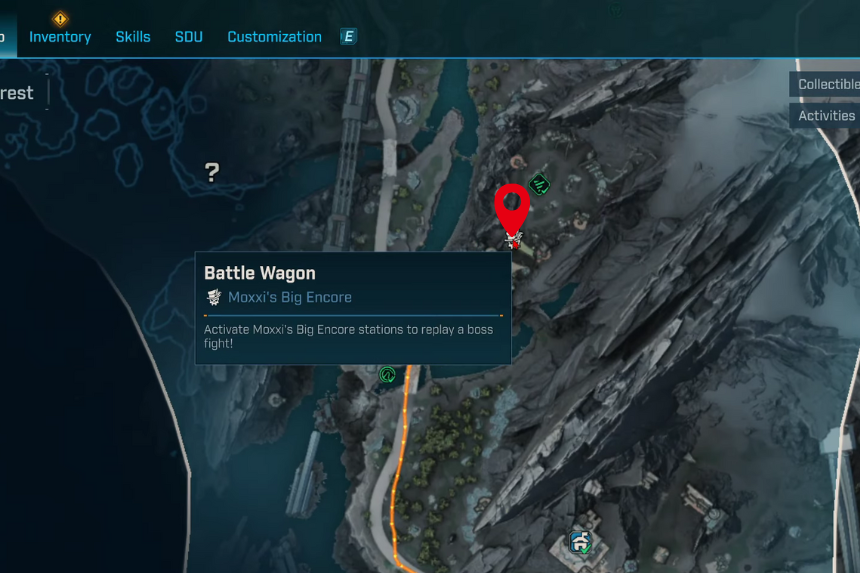
This enemy appears in the middle part of Stoneblood Forest in the Terminus Range. They spawn immediately after you defeat the bandits at The Lowering March Ripper Drill Site, which is just above the Snowy Wells Safehouse.
How to Defeat the Battle Wagon
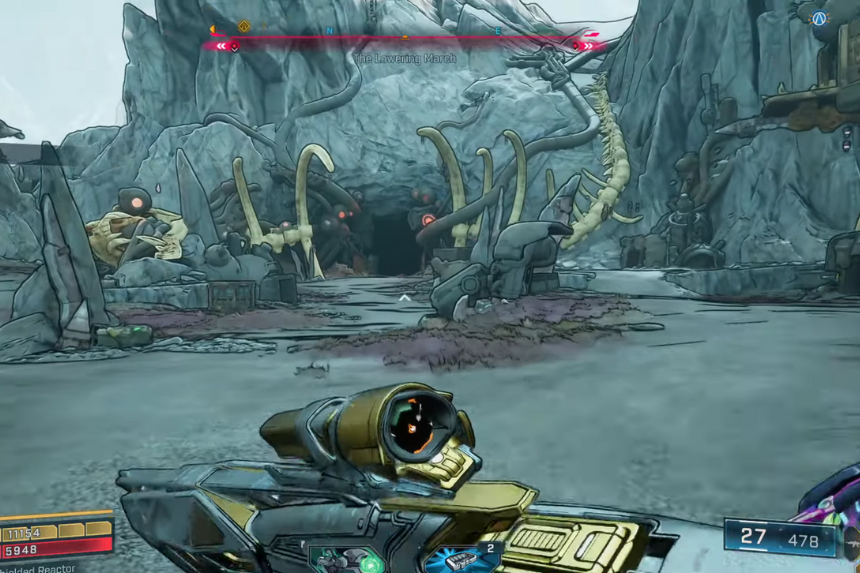
The Battle Wagon is a massive elephant-like creature covered with Ripper riders, turrets, and rocket launchers. It has a thick Flesh health bar, so using Incendiary weapons is your best bet for dealing damage. While attacking the boss, don’t forget to target the enemies on its back, as they can cause trouble. The Battle Wagon takes quite a few bullets to bring down, and even after it’s defeated, you will need to eliminate the riders to claim its loot.
Battle Wagon Rewards
You will get Finnity XXX-L and Compleation after defeating the boss.
| Weapon | Type | Manufacturer | Effect |
| Finnity XXX-L | Sniper Rifle | Vladof | Pipin’ Hot Barrels – Does not consume Ammo while Overheating.Always generates with a COV-licensed magazine. |
| Compleation | Armor Shield | Torgue | Sisyphusian – When Armor Shield is full, it instantly loses an Armor Segment. |
Primordial Guardian Origo

You will need to collect all Terminus Range Vault Key Fragments first. Find Origo at The Low Leys, Arch of Origo.
How to Defeat the Primordial Guardian Origo
Origo has two Shield health bars and a wide range of attacks, which it can use in any order. During the fight, it will spawn Kratches, which you can kill to trigger a Second Wind if you get downed.
Origo cycles its elemental damage between Cryo and Incendiary. Its moves stay mostly the same, except for Ice Spikes, which become Fire Bursts when it switches to Incendiary form. The arena has grapple points some can save you if you’re knocked off the map, while others on the ground can launch you into the air.
Primordial Guardian Origo Rewards
You will get the Kaoson, Watts 4 Dinner, Bottled Lightning, Buster, Shatterweight, Driver, and the Kindred Spirits after defeating the Origo.
| Weapon | Type | Manufacturer | Effect |
| Bottled Lightning | Heavy Weapon (Ordnance) | Maliwan | Strike Twice – Always Shock; Fires a slow moving electric orb that deals shock damage to enemies in close proximity. |
| Kaoson | Submachine Gun | Vladof | Granted |
| Watts 4 Dinner | Energy Shield | Ripper | Overshield Eater – When energy shield is active, melee has an increased Chance to drop an Overshield when hit. When Overshield is also active, grants +25% Shock Damage |
| Shatterwight (Amon) | Class Mod | – | Forgewaves now deal Melee Damage in addition to their other types. Melee Attacks while Scourge is active gain increased Cryo Effeciency and Radius. |
| Kindread Spirits (Vex) | Class Mod | – | Using a Command Skill grants Vex Bonus Kinetic Minion Damage with Guns for a Duration. Command Skills deal Gun Damage in addition to its other types. |
| Buster (Rafa) | Class Mod | – | APOPHIS Lance gains a 25% Chance to not consume Charges. The more Charges used at once, the greater the chance. |
| Atomic Driver (Harlowe) | Class Mod | – | Chroma Accelerator drains HP to 1 for amped version & gains 20% lifesteal |
The Divisioner
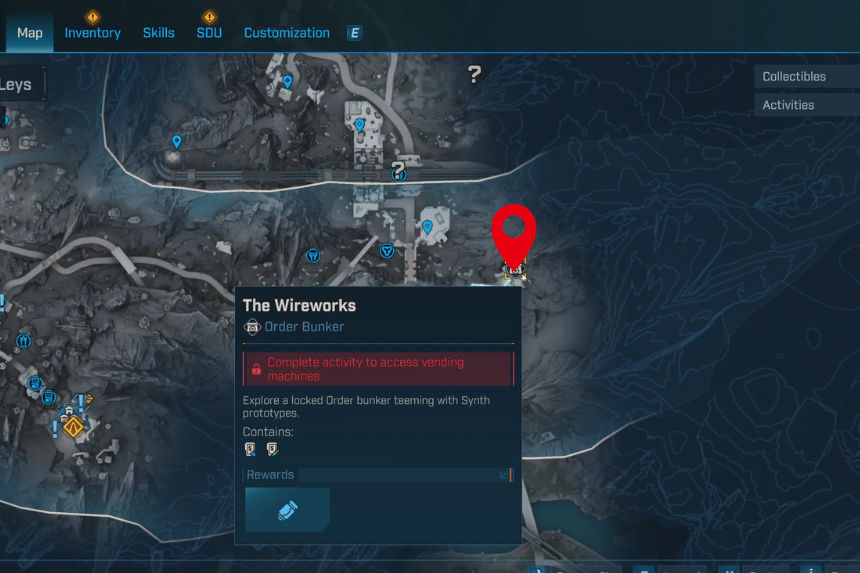
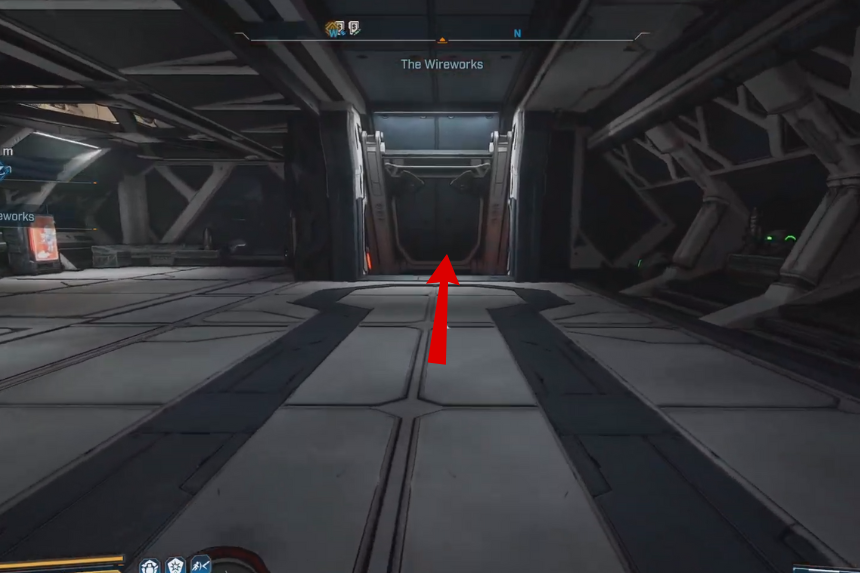
The Divisioner, no story needed. Fight at The Low Leys, “The Wireworks” Order Bunker.
Divisioner Rewards
You will get the Principal, Sideshow, and the Inkling as a reward after defeating it.
| Weapon | Type | Manufacturer | Effect |
| Sideshow | Pistol | Tediore | Juggler – Let’s play a game. Shoot as many targets as possible before they hit the ground, and refill up to 2 Ammo per target hit. |
| Inkling | Heavy Weapon (Ordnance) | Vladof | Inkling – Fires bouncing Projectiles that leave an Elemental Splat on bounce. |
| Principal | Armor | – | Spawns a Shield Boi upon last Armor Segment break, can draw aggro |
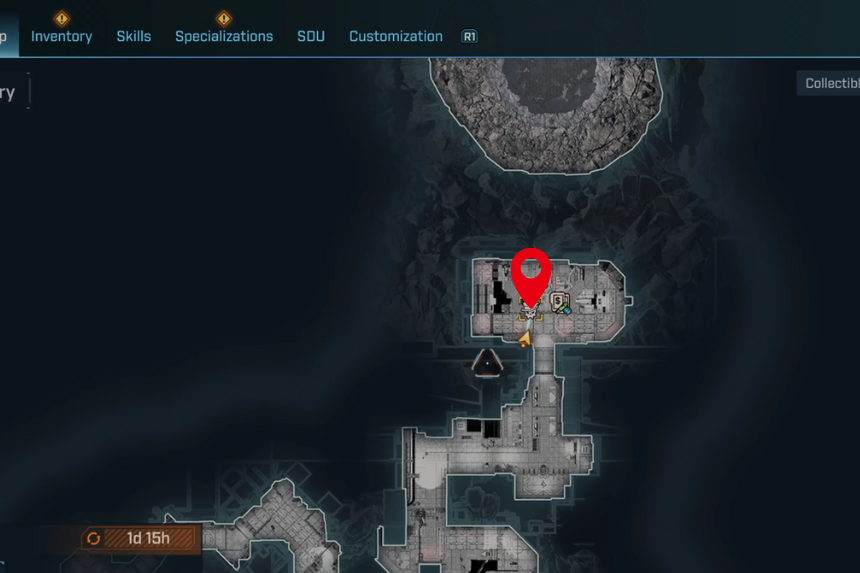
Vile Prototype
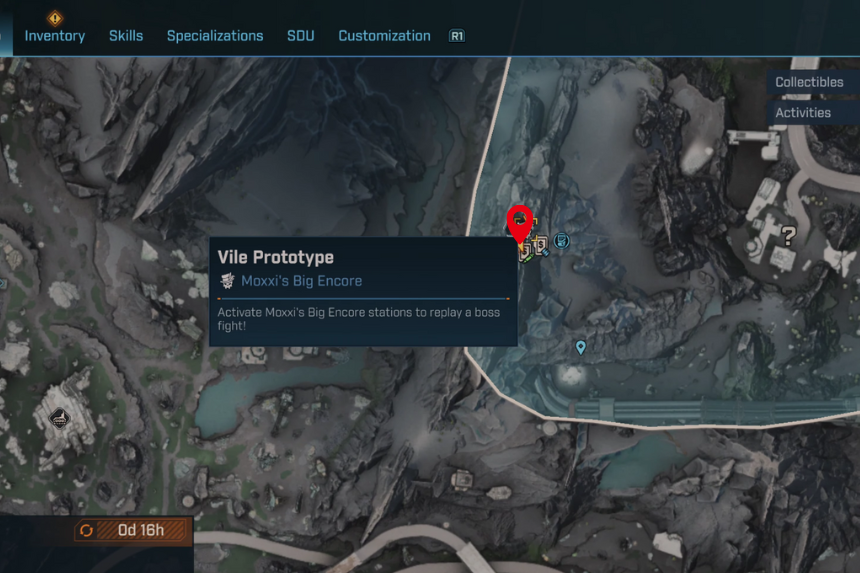
You will encounter Vile Prototype in Lictor’s Black Site, Windspear in the Terminus Range during the main mission Dark Subject.
After completing the mission, you can farm Vile Prototype as many times as you like. Just return to the arena and use Moxxi’s Big Encore Machine near the entrance to spend some cash and trigger the fight again.
How to Defeat the Vile Prototype
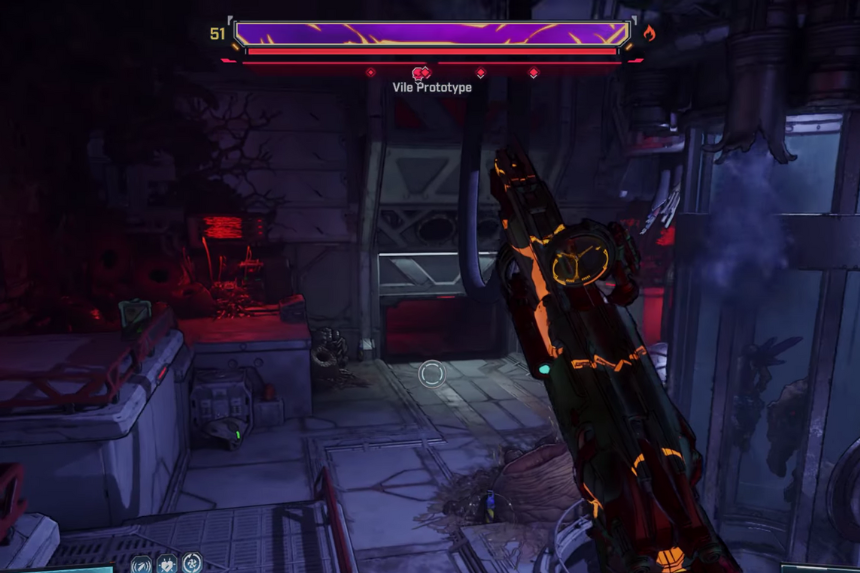
At the start of the fight, Vile Prototype is invulnerable because of the Eridium crystals covering his body. Take out these crystals first to make him vulnerable to your attacks.
After destroying a crystal, a Vile Ordonite will appear. Be sure to eliminate it quickly, or it will restore the crystal and make him invincible again.
When attacking, aim for his head. This is his weak spot, and hitting it will deal extra damage, helping you bring down his health faster.
Vile Prototype Rewards
Defeating Vile Prototype can earn you some top-tier legendary loot, including the Rangefinder pistol, the King’s Gambit pistol, and the Heavyweight shield. These powerful rewards make the fight well worth your effort.
| Weapon | Type | Manufacturer | Effect |
| Rangefinder | Pistol | Daedalus | Precision |
| Heavyweight | Armor Shield | Vladof | Bareknuckle – On Melee Hit, consumes an Armor Segment to grant +100% Melee Damage. When Armor Shield is empty, grants +50% Melee Damage. |
| King’s Gambit | Pistol | Jakobs | Holy Hell – when shot, thrown Weapon Ricochets Projectiles to nearby enemies. |
Vile Lictor
You will face Vile Lictor in the Umbral Foundry, Windspear in the Terminus Range during the main mission His Vile Sanctum.
After completing the mission, you can farm Vile Lictor as many times as you like. Just head back to the arena and use Moxxi’s Big Encore Machine near the entrance to spend some cash and start the fight again.
How to Defeat the Vile Lictor
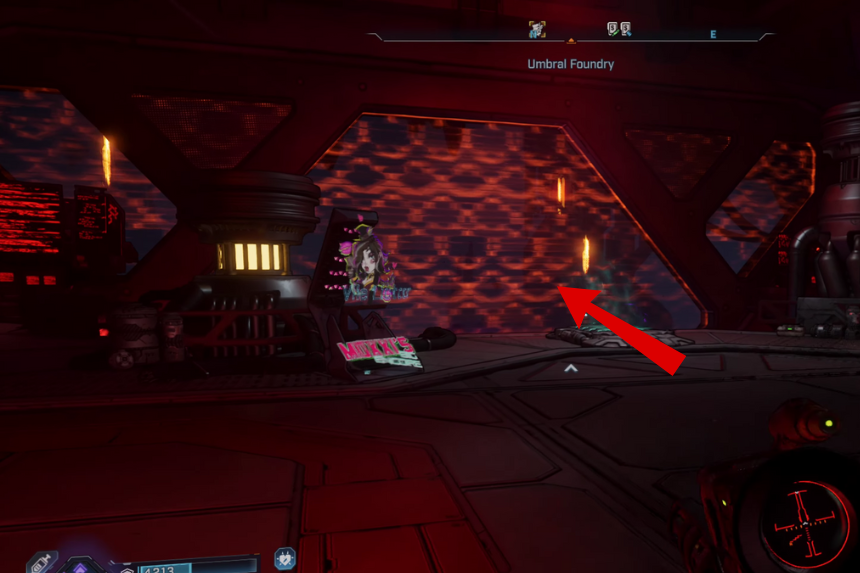
During the first phase of the fight with Vile Lictor, aim for his hands hitting them will reveal a glowing weak spot in his chest that takes much more damage.
In the second phase, he will sometimes trigger a huge explosion in the center of the arena that can deal serious damage. To stay safe, quickly grab onto one of the floating rock platforms until the blast passes.
Vile Lictor Rewards
Defeating Vile Lictor can reward you with some excellent legendary gear. You might get the Ruby’s Grasp pistol, the Super Soldier shield, or the Blockbuster grenade. There’s also a chance to score powerful class mods like Injected Undead Eye, Precise Instigator, Universal Generator, or Ember Blacksmith, making this boss fight well worth the effort.
| Weapon | Type | Manufacturer | Effect |
| Super Soldier | Energy Shield | Daedalus | Power Play – When Energy Shield fills, grants an Overshield. When Energy Shield is full, grants 25% Fire Rate, 25% Movement Speed, and regenerates Ammo. |
| Blockbuster | Grenade (Ordnance) | Vladof | Got You Covered – |
| Ruby’s Grasp | Tediore | Pistol | Reload fires 4 homing copies |
| Generator (Harlowe) | Class Mod | – | Whenever Harlowe activates her Flux Generator, she decreases her remaing Action Skill Duration by 50% and gains 200% Action Skill Power. |
| Blacksmith (Amon) | Class Mod | – | Kill Skill. Partially restores Forgedrone’s Duration. For each active Forgedrone, Amon deals increased Gun Damage. |
| Instigator (Rafa) | Class Mod | – | Whenever Peacebreaker Cannons fire at an enemy, gain a stack of Instigator and lose all stacks when Peacebreaker Cannons fire at a new enemy. Rafa gains +2% Gun Damage for every stack of Instigator. |
| Undead Eye (Vex) | Class Mod | – | Killing an enemy with an Sniper Rifle will trigger Blood Shot. Critically Hitting an enemy with a Sniper Rule has a 33% chance to trigger Blood Shot. |
Moon-Maddened Callis
You will run into Moon-Maddened Callis at the very end of the Elpis Orbital Shatterfield. This spot becomes available as a fast travel station in the upper-left part of Carcadia Burn once you’ve completed the main mission “Another Day, Another Universe.”
How to Defeat the Moon-Maddened Callis
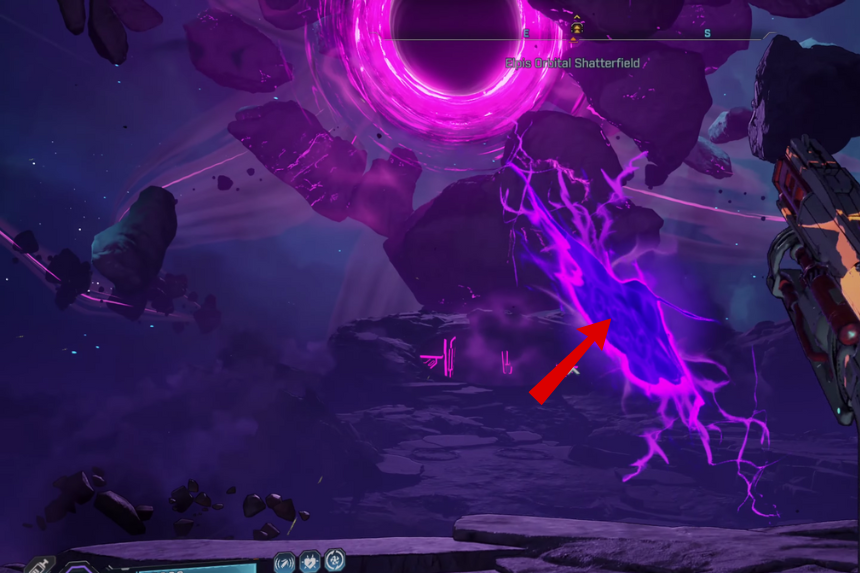
When you fight Moon-Maddened Callis, you will notice she comes with two Armor bars followed by two Flesh bars. This makes Corrosive or Cryo weapons perfect for the first phase, and then you will want to switch over to Incendiary to finish her off.
Callis fights like a jumpy scorpion, keeping her distance while striking out with her tail and covering the arena in a dangerous red web that damages you if you touch it. As for loot, don’t expect much consistency she doesn’t seem to have a set legendary pool and instead drops random legendaries, and even then, the drop rate feels pretty low.
Moon-Maddened Callis Rewards
You will get the Ohm I Got and the Gamma Void as a reward after defeating her.
| Weapon | Type | Manufacturer | Effect |
| Gamma Void | Heavy Weapon (Ordnance) | Maliwan | Radiation Exposure – Creates a Singularity for 10s, in which enemies take 40% radiation Damage over time. |
| Ohm I Got | Submachine Gun | Maliwan | Energy Transfer – When energy shield is active, grants +50% Damage by consuming the Shield’s energy instead of Ammo. When Overshield is also active, Shield energy will not deplete. |
Queen Callis
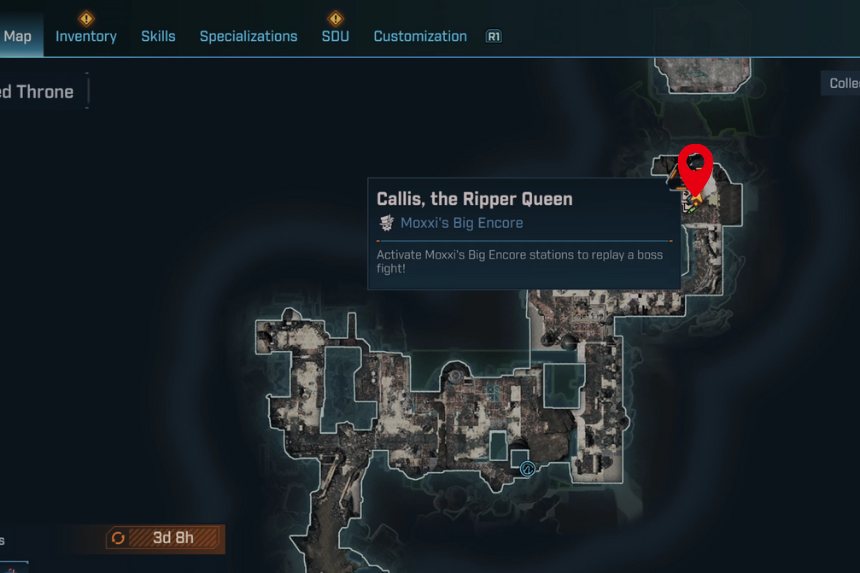
You will encounter Callis, the Ripper Queen in Moon-Called Throne, Fallen Crown in Carcadia Burn during the main mission Her Flaming Vision.
Once you’ve completed the mission, you can farm Callis again anytime. Just return to the arena and use Moxxi’s Big Encore Machine near the entrance to spend some cash and trigger the fight again.
How to Defeat the Queen Callis
When fighting Callis, the Ripper Queen, she will summon a flying support drone that drops bombs across the arena. Take it out quickly, or the arena will become a hazardous mess.
After her shield is broken, Callis will leap out and become immune, summoning red constructs that slow and damage you if you touch them. During this time, focus on defeating the other enemies. Once most of them are gone, Callis will return to the arena and become vulnerable again.
She also has a leaping tail slam attack her tail glows red just before she jumps and spins, so use that as a cue to dash out of the way. On PS4, dash with the left stick plus Circle, on Xbox it’s left stick plus B, and on PC it’s Shift plus movement keys. Timing your dodge will help you avoid heavy damage.
Queen Callis Rewards
Defeating Callis, the Ripper Queen can reward you with some fantastic legendary loot. You might get the Queen’s Rest pistol, the Pandoran Memento shield, or powerful class mods like Agile Esgrimidor, Professional Skeptic, Prismatic Illusionist, or Resounding Viking. These rewards make taking on this tough boss well worth your effort.
| Weapon | Type | Manufacturer | Effect |
| Pandoran Memento | Energy Shields | Jakobs | Psychosis – When Damaged, grants 15% Elemental Resistance and 50% Resistance to the last Damage Type received for five seconds. |
| Skeptic (Harlowe) | Class Mod | – | Whenever Harlowe Slams an enemy in Stasis, she automatically fires Radiation Darts and Cryo Darts that home in on enemies. Shooting enemies with an active Status Effect restores 5% of Action Skill Cooldown. |
| Illusionist (Vex) | Class Mod | – | Spectres and Reapers have a chance to be Badasses, gaining increased Maximum Health and Damage Dealth. This chance increases the longer it hasn’t occurred and will occur at least once every 90 seconds. |
| Queen’s Rest | Pistol | Torgue | Royal Armoury – Fires high-speed rounds. Damaging enemies has a chance to spawn a Homing Sticky Projectile. |
| Esgrimidor (Rafa) | Class Mod | – | Rafa’s Melee Attacks gain a +10% Critical Hit Chance. Critical Hits with Melee Attacks restore +5% of Action Skill Duration. |
| Viking (Amon) | Class Mod | – | Crucible gains +2 Charges, increased Duration, and grants Amon increased Damage Reduction while active. |
Primordial Guardian Radix
You need to collect the Carcadia Burn Vault Key Fragments first. Find Radix at Grindstone of the Worthy, Arch of Radix.
How to Defeat the Primordial Guardian Radix
When you take on Radix, you will have to work through three health bars first a Shield, followed by two layers of Armor. The fight can get hectic since Radix mixes up its attacks and doesn’t follow any set pattern, so you always need to be ready for anything it throws at you. To make things a little easier, Radix will spawn Pangolins during the battle. If you get knocked down, you can use them for a quick Second Wind to stay in the fight.
Primordial Guardian Radix Rewards
You will get the Adrenaline Pump, Anarchy, Forge Master, Grenazerker, Scientist, and the Witch as a reward after defeating it.
| Weapon | Type | Manufacturer | Effect |
| Adrenaline Pump | Repkit | Vladof | Blood Rush – Automatically Restores health on second wind. |
| Teen Witch (Vex) | Class Mod | – | When Vex has Maximum Health, her Lifesteal partially applies to shields. When Vex has Maximum Shield, her lifesteal partially grants Overshield. |
| Forge Master (Amon) | Class Mod | – | Forgeskills can now be used once while on Cooldown. |
| Grenazerker (Rafa) | Class Mod | – | Whenever Rafa throws a grenade or Tediore gun, he throws an additional one. |
| Scientist (Harlowe) | Class Mod | – | Shock auto Entangles and Irradiates enemy & arcs Shock to nearby enemies |
| Anarchy | Shotgun | Tediore | Mutualism – On Auto-Reload or Kill, grants +15% damage and -15% Accuracy for a Maximum of 20 Stacks, which reset on manual reload or swapping weapons. |
Leader Willem
Leader Willem is a boss you will run into in the Grindstone of the Worthy over in Carcadia Burn. To get to him, though, you will first need to finish a long side quest chain for Levaine in the Carcadia hub. It’s not a quick job either you have to clear five separate side quests before the fight with Willem becomes available.
How to Defeat the Leader Willem
Leader Willem isn’t the toughest boss you will face. He darts around the arena pretty quickly, but overall the fight is fairly easy and shouldn’t give you too much trouble.
Leader Willem Rewards
You will get the Zipper, Firepot and the Rainbow vomit after defeating him.
| Weapon | Type | Manufacturer | Effect |
| Zipper | Pistol | Daedalus | Prison Rules – Gain +75% Critical Damage and +75 Damage when hitting a target in the back. |
| Firepot | Grenade (Ordnance) | Torgue | Spicy – Spawns homing Torgue stickies over time. |
| Rainbow Vomit | Shotgun | Jakobs | Color Spray – Shoots droplets of 3 random elements that vary each generation. |
Fractis
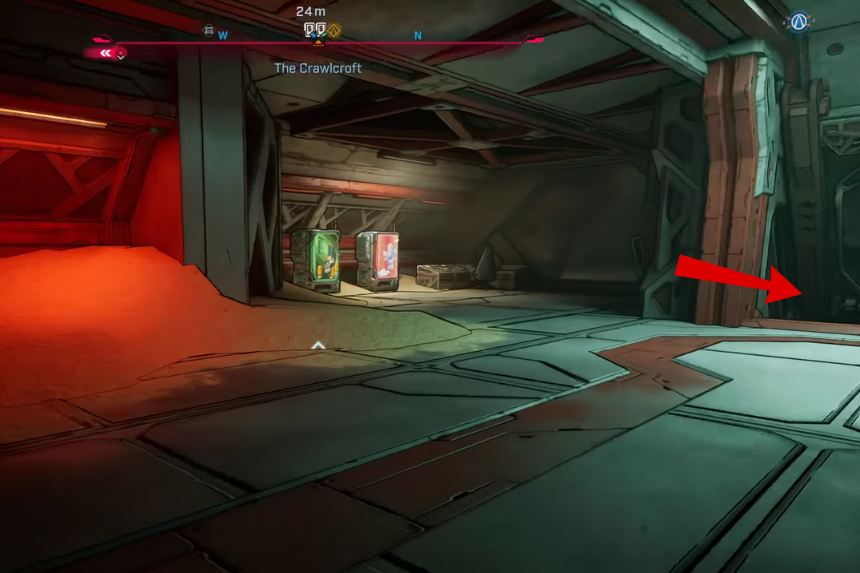
The Crawlcroft is hidden in Carcadia Burn, inside the Grindstone of the Worthy. To get there, head into the Order base shown on the map and look for a cave that leads deeper inside. This cave will eventually take you to the Crawlcroft Bunker.
To open the bunker door, go to the opposite side of the main entrance and check beneath the grapple platform you will find a Locust station under some metal bars. Grab the Locust and toss it at the door to unlock the way forward. From there, it’s a straightforward path. Just push through the half-open doors, crouch through the gaps in the walls, and stick to the left side until you reach the boss, Fractis.
How to Defeat the Fractis
Fractis can be a bit trickier than he first appears. Partway through the fight, he will summon a golden copy of himself that comes with a Shield. Use Shock damage to burn through that shield quickly, then focus on his main health bar. Since it’s Flesh, Incendiary weapons will tear through him and make the fight much easier.
Fractis Rewards
You will find the Chuck, Protean Cell and the UAV as a reward after defeating it.
| Weapon | Type | Manufacturer | Effect |
| UAV | Grenade (Ordnance) | Tediore | Death From Above |
| Chuck | Assault Rifle | Tediore | Pitcher – |
| Protean Cell | Energy Shield | Order | Direct Current – Ground Slam to toggle this effect. When enabled, drains Shield over time to grant 40% bonus Shock Damage, and Damage received passes through the Shield. |
Genone
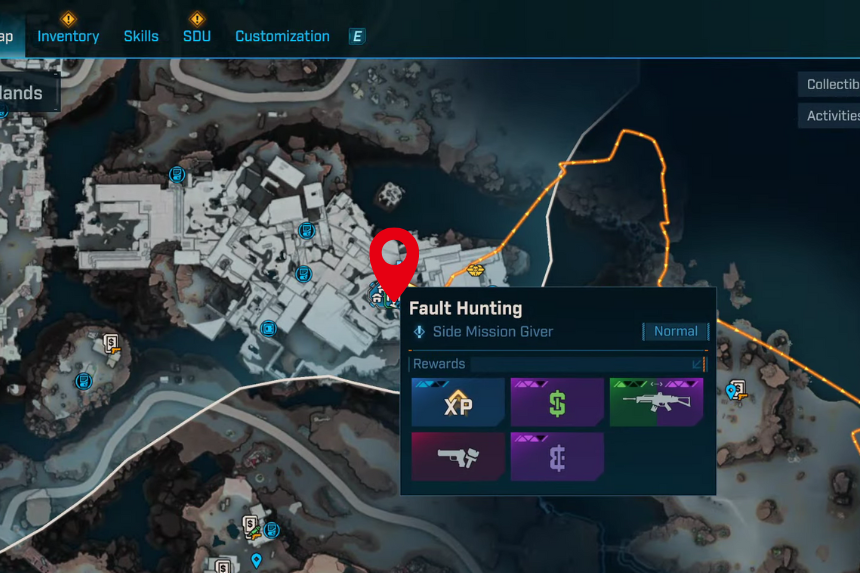
You will face Genone in The Yawning Yard, Lopside in Carcadia Burn during the side mission Fault Hunting.
After completing the mission, you can farm Genone as many times as you like. Just return to the arena and use Moxxi’s Big Encore Machine near the entrance to spend some cash and start the fight again.
How to Defeat the Genone
When fighting Genone, stay on the move he fires ranged projectiles that can quickly overwhelm you if you stay in one spot. Keep strafing and circling the arena to dodge his attacks.
For weapons, Shock attacks work best for quickly taking down his shields. Once those are down, switch to Corrosive weapons to chew through his armor and deal steady damage.
Genone Rewards
Defeating Genone can net you some strong loot, including the Oscar Mike legendary assault rifle and the Recursive legendary grenade, making the fight well worth your time.
| Weapon | Type | Manufacturer | Effect |
| Recursive | Grenade (Ordnance) | Daedalus | Recursive – Hovers above enemies, firing a beam downward. |
| Oscar Mike | Assault Rifle | Daedalus | Fragcendiary Grenades – Alt-Fire launches Grenades that deal incendiary damage and spawn a Fire Hazard. |
Pango & Bango
You will come across these two enemies in the upper part of the Lopside region in Carcadia Burn. They appear right after you clear out the Bandits at the Tendercage Ripper Drill Site, which sits on the border between Lopside and Grindstone of the Worthy.
How to Defeat the Pango & Bango
Bango and Pango might look tough with their turrets and rocket launchers strapped onto them, but underneath all that firepower they’re still just Flesh enemies. A good Incendiary weapon will burn through their health in no time.
Pango & Bango Rewards
You will get the Phantom Flame, Stray, and the Prince Harming as a reward after defeating it.
| Weapon | Type | Manufacturer | Effect |
| Phantom Flame | Pistol | Jakobs | Midday – Zoning in acquires Lock on targets over time, and firing while zoomed in shoots the entire Mag. |
| Stray | Sniper Rifle | Ripper | Stray – Fires secondary bullets that home in on nearby target(s). |
| Prince Harming | Submachine Gun | Ripper | Pamplemousse – Hitting enemies deals damage to you and grants a stack of Cruelty. On kill, Overshield is restored for each stack of Cruelty. |
Gruntubulous Vork, Baby Grunt, and Lil Grunt
If you head to the southern part of the Ruined Sumplands in Carcadia Burn, you will come across a big pit called Saw’s Clench. Once you drop in, you will first have to deal with waves of Rippers, and after that, a trio of bosses shows up: Baby Grunt, Gruntabulous Vork, and Lil’ Grunt.
How to Defeat the Gruntubulous Vork, Baby Grunt, and Lil Grunt
All three of these bosses fight the same way. They stay airborne, start with Shields that are best taken down with Shock weapons, and then have a Flesh bar that melts under Incendiary damage. While flying around, they will try to scorch you, so keep your defenses up and deal as much damage as you can while staying on the move.
Gruntubulous Vork, Baby Grunt, and Lil Grunt Rewards
You will get the Potato Thrower IV, Spinning Blade and the Wombo Combo as a reward after defeating them.
| Weapon | Type | Manufacturer | Effect |
| Wombo Combo | Assault Rifle | Vladof | Rip Rockets – Rockets automatically fire from the Underbarrel. |
| Spinning Blade | Grenade (Ordnance) | Jakobs | Juggler – Catch the rebound to refund a grenade charge. |
Rocken Roller
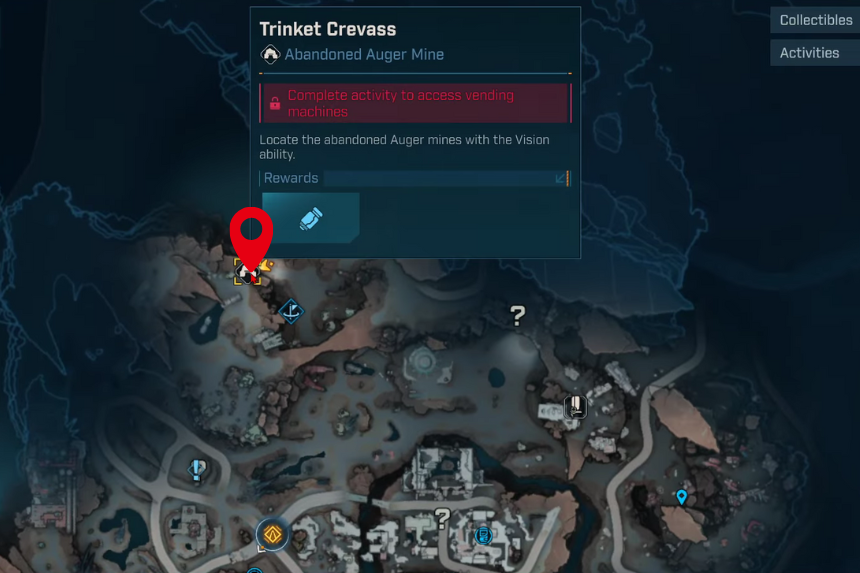
Rocken Roller is an optional boss you can find in the Trinket Crevass Abandoned Auger Mine, located in the Ruined Sumplands of Carcadia Burn. You will gain access to this area after completing the Crystal Brawl Quest from the Shadow of the Mountain main mission.
Once you’ve defeated Rocken Roller, you can farm it again anytime. Just return to the arena and use Moxxi’s Big Encore Machine near the entrance to spend some cash and start the fight over.
How to Defeat the Rocken Roller
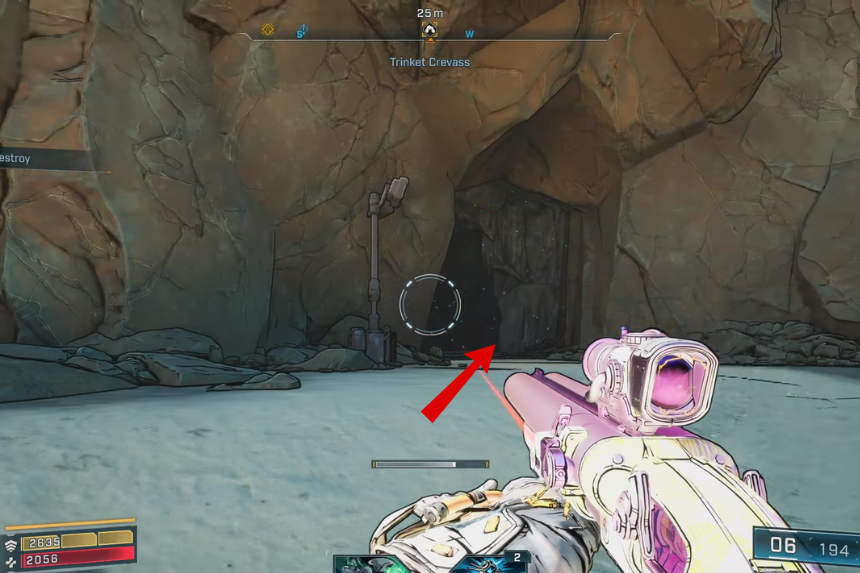
When fighting Rocken Roller, watch out for its rolling spin attacks, which sweep across the arena. Staying on higher rocks keeps you safe while letting you keep firing.
To actually damage Rocken Roller, target the glowing Eridium Crystals on its back these crystals make it immune to attacks, so you need to destroy them first. Once a crystal is broken, three Vile Ordonites will spawn. Be sure to destroy these too, or they will fly back and restore Rocken Roller’s shield. The boss also throws large rocks at a distance, so keep moving and time your jumps or sidesteps carefully to avoid taking damage.
Rocken Roller Rewards
Defeating Rocken Roller can reward you with the San Saba Songbird legendary pistol, a powerful weapon that makes taking on this optional boss worth your while.
| Weapon | Type | Manufacturer | Effect |
| San Saba Songbird | Pistol | Jakobs | Dueling Pistol – Deals +100% Damage for 5s after swapping guns. |
| AF1000 | Repkit | +100% Duration. -50% Cooldown | |
| T.K’s Wave | Shotgun | Jakobs | Heirloom comes with a really strong alternate fire mode. Instead of normal shots, it launches a spread of grenades, and each one deals a huge chunk of damage about 16,921 damage per grenade, with five grenades firing at once. On top of that, since it’s a Jakobs gun, any critical hit you land will make the bullets ricochet and hit other nearby enemies, letting you shred groups quickly. |
Driller Hole
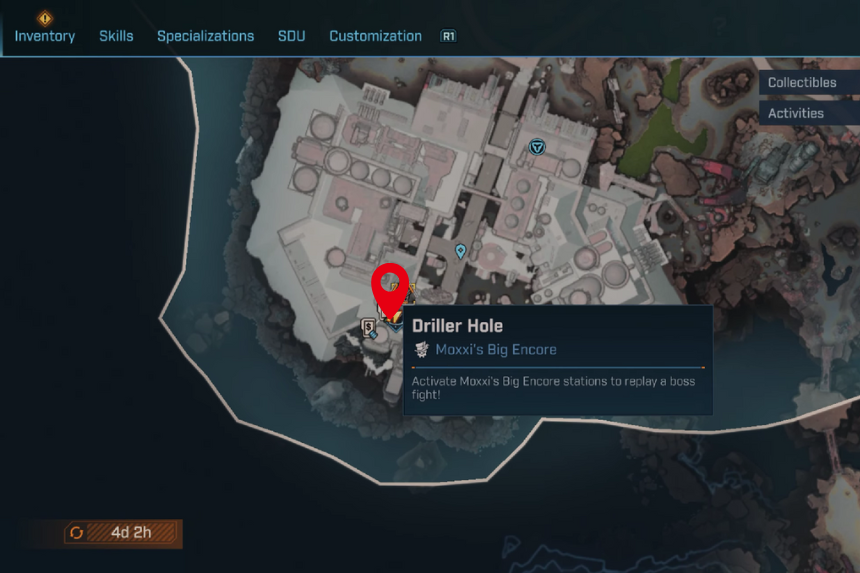
You will face Driller Hole during the main mission Unpaid Tab, located in Queen’s Cradle, Tonnage Peel in Carcadia Burn.
After finishing the mission, you can farm Driller Hole as many times as you like. Just go back to the arena and use Moxxi’s Big Encore Machine near the entrance to spend some cash and start the fight again.
How to Defeat the Driller Hole
When fighting Driller Hole, watch out for the missiles it launches from underground. These track your position and explode when they surface, so stay on the move jump, glide, or climb onto crates, and use enemies or objects around the arena as cover to avoid taking damage.
It also fires a barrage of missiles from above. Keep strafing and use the ripper machine in the center of the arena as a shield to block them.
Finally, Driller Hole will sometimes charge at you if you’re far away. Pay attention to its wind-up animation and dash to the side at the right moment to avoid getting hit. On PS4, dash with the left stick plus Circle, on Xbox it’s left stick plus B, and on PC it’s Shift plus movement keys.
Driller Hole Rewards
Defeating Driller Hole can earn you some powerful loot. You might get the Katagawa’s Revenge legendary sniper rifle, the GMR legendary assault rifle, or the Fuse Fuse legendary grenade, making the fight well worth your time.
| Weapon | Type | Manufacturer | Effect |
| Fuse | Grenade (Ordnance) | Daedalus | Fortified Position – |
| Katagawa’s Revenge | Sniper Rifle | Maliwan | Stormcloud – |
| G.M.R | Assault Rifle | Order | Big Name Hunter – When Zoomed In, Damage increases by 100%, Shot Cost increases by 100%, and Fire Rate decreases by 50%. |
Axemaul
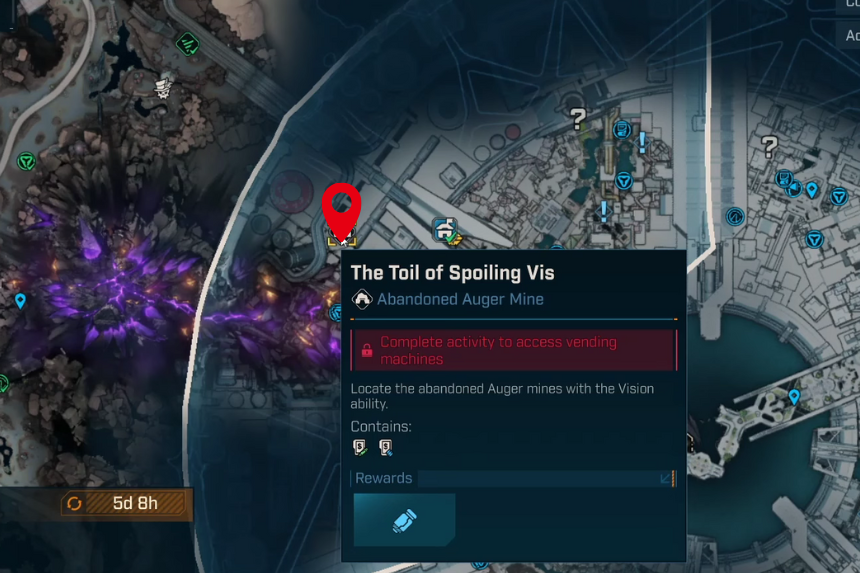
Inside the Toil of Spoiling Vis Auger Mine, you will encounter Axemaul. From the entrance, head straight and drop down the elevator shaft to reach the lowest level. Step out of the passage into a large, hall-like cave, then take a right to find a tunnel leading to another chamber.
In this new hall, look for a purple orb you can interact with it will teleport you to a different part of the cave. Use the platform in the center to cross to the other side, then follow the path ahead, which will lead you straight to Axemaul’s spawn area.
How to Defeat the Axemaul
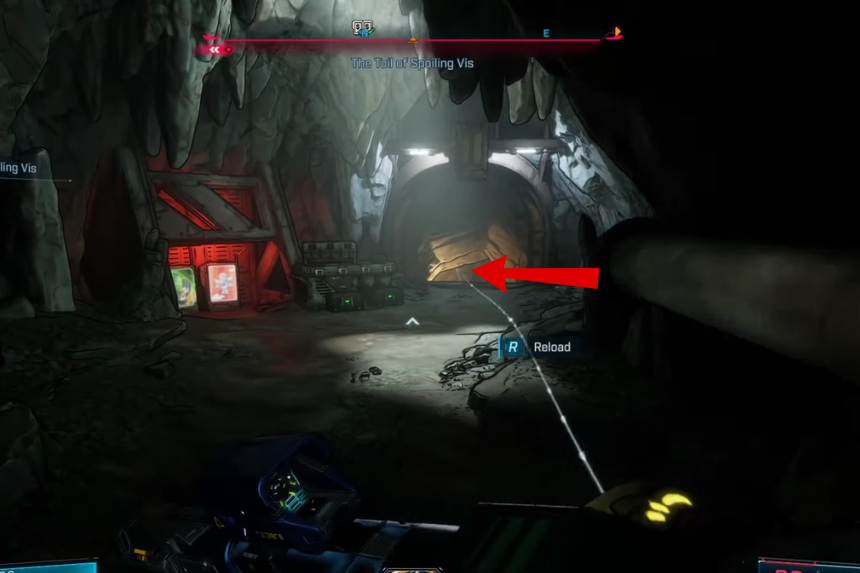
When you face Axemaul in the Toil of Spoiling Vis, keep in mind that the fight has two phases. The second phase kicks in as soon as you reduce Axemaul’s health bar to zero the first time. Don’t be fooled Axemaul survives the first phase because you’re mainly tearing through its armor, not its true health.
Axemaul Rewards
You will get the Kill Spring, Buzz Axe and the Bod as a reward afyer defeating it.
| Weapon | Type | Manufacturer | Effect |
| Kill Spring | Repkit | Tediore | Blood Siphon – On kill, converts 100% of any excess Damage into Healing Orbs that seek out nearby allies. |
| Buzz Axe | Grenade (Ordnance) | Daedalus | Makeshift |
| Bod | Shotgun | Daedalus | All-Arounder – Count as a Shotgun, an Assault Rifle, a Sniper Rifle, a Pistol, and a Submachine Gun. |
Bio-Thresher Omega
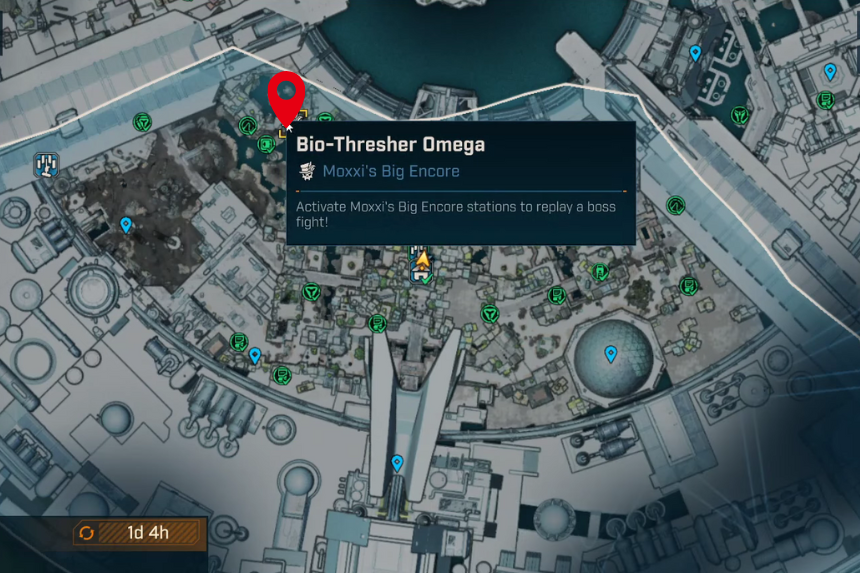
You will find the Thresher in a marked search area about 175 meters to the northwest. To reach it, use the grappling point on the side of the wall to swing or jump into the area.
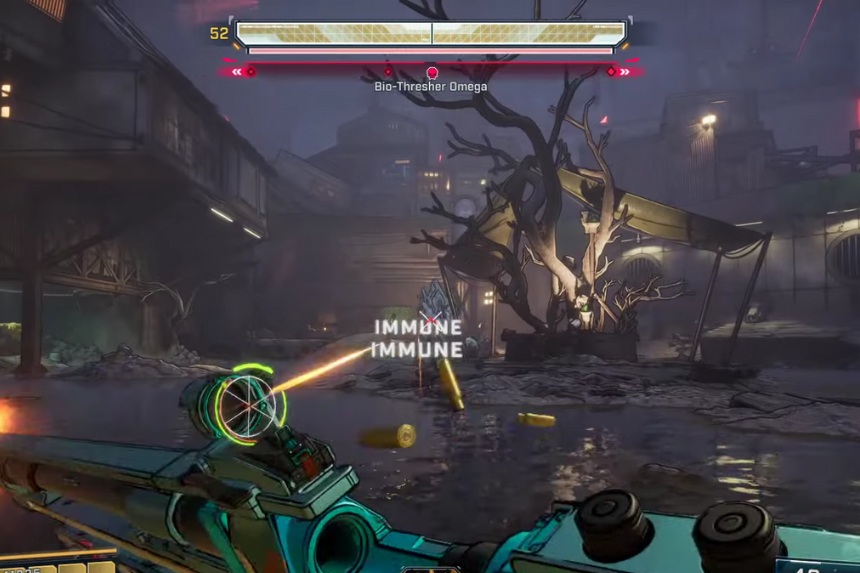
How to Defeat the Bio-Thresher Omega
Bio-Thresher Omega is a bigger, glowing version of its kind. It’s heavily armored, so you will need to throw gas canisters at it before you can deal any real damage. The fight is a cycle: the boss will repeatedly pop in and out of the ground, becoming immune each time. As soon as it surfaces, throw a gas canister and then start shooting to chip away at its health. Keep repeating this process until it’s defeated.
Bio-Thresher Omega Rewards
You will get the Bug Bear and the Truck after defeating it.
| Weapon | Type | Manufacturer | Effect |
| Truck | Sniper Rifle | Jakobs | Fixer-Upper |
| Bugbear | Assault Rifle | Torgue | Rotary Gun |
CorrupTed, Experiment 42, and Experiment
This boss appears during the side mission “Below the Surface” in Terminus District.
CorrupTed, Experiment 42, and Experiment Rewards
You will get the Goalkeeper, and the Seventh Sense after defeating it.
| Weapon | Type | Manufacturer | Effect |
| Seventh Sense | Pistol | Jakobs | Propioception – Hitting enemies spawns Orbs that float upward and home in on targets on Reload. |
| Goalkeeper | Assault Rifle | Order | Amper Camper – When Gun Shield is depleted, grants +50% Damage for 15 seconds |
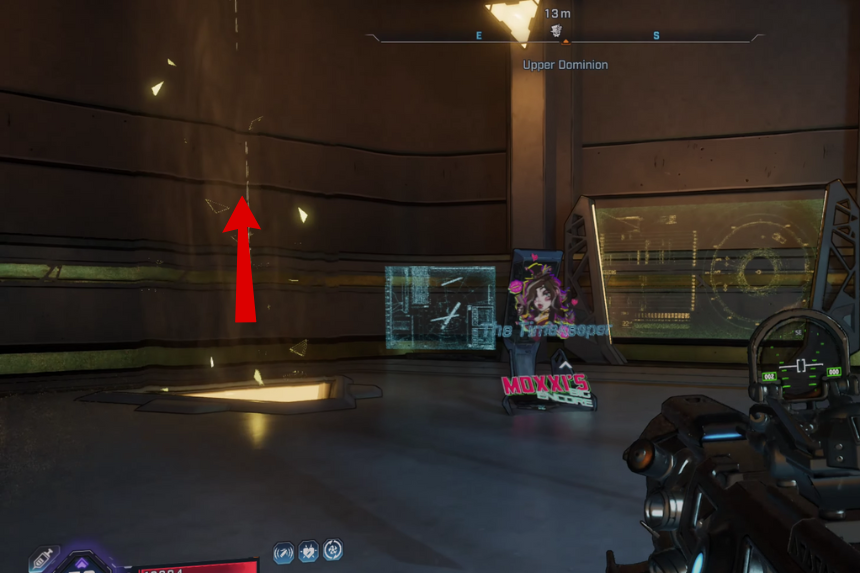
Primordial Guardian Timekeeper
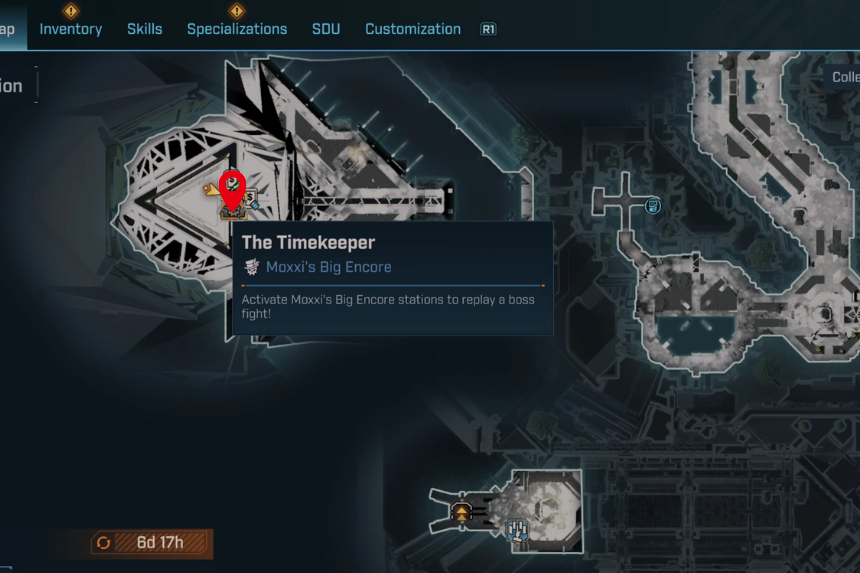
You will find The Timekeeper in the Tower’s Control Room, the farthest area from Upper Dominion in the Terminus District of Dominion. Once you reach this spot, you can take the elevator up to face the final fight, which is actually a battle against two bosses at once.
How to Defeat the Timekeeper
First, you will face The Timekeeper, who mixes things up with teleportation, blinding attacks, and energy beams to try and take you down. During this fight, he has three types of health: Shield (weak to Shock), Armor (weak to Corrosive or Cryo), and Flesh (weak to Incendiary).
Once you take him down, he moves into his second phase as the Primordial Guardian Timekeeper. He still has the same three health bars, but now he stomps around the arena, making it even trickier for Vault Hunters trying to farm his loot.
Timekeeper Rewards
You will get the Timekeeper’s New Shield, Borstel Ballista, Symmetry, Plasma Coil and the Star Helix as a reward for defeating it.
| Weapon | Type | Manufacturer | Effect |
| Star Helix | Assault Rifle | Dahl | +50% weapon damage, fires 2 additional projectiles |
| Plasma Coil | Submachine Gun | Maliwan | +1900% weapon damage, +150% fire rate, -30% reload time, -75% spread and recoil. Always shock and radiation. Will either spawn with 24-round magazine with 48 magazine size (75% chance), or 44-round magazine with 64 magazine size (25% chance).Charges up to fire in full-automatic, but has a short delay after firing every 16 rounds. Fires high speed elemental orbs.Damage dealt by this weapon are counted as splash damage. |
| Borstel Ballista | Sniper | Jakobs | Shots spiral and split into many bullets after a certain distance |
| Symmetry | Sniper | Order | Fires from reserve Ammo while charging |
Directive-O
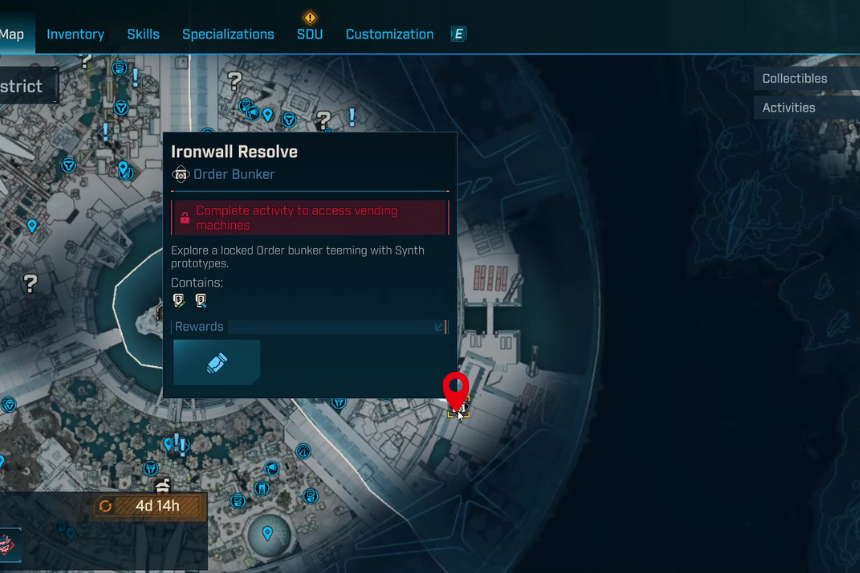
To access Ironwall Resolve, you first need to have Dominion unlocked. Start by heading to Beth at Lakeside Properties in the Fades District and complete her side mission, One Gassy Issue. After that, make your way to the Terminus District to find Ironwall Resolve in the Praetor’s Lecture.
Before going up the stairs to the door, check to the left for a Locust station hidden in a pile of trash. Grab it, carry it upstairs, and throw it at the door to progress. The bunker itself is a bit tricky, but just move through the open rooms, use platforms to deactivate the forcefields, and repeat in the other room. Once that’s done, the path to the Directive-O boss fight will be open.
How to Defeat the Directive-O
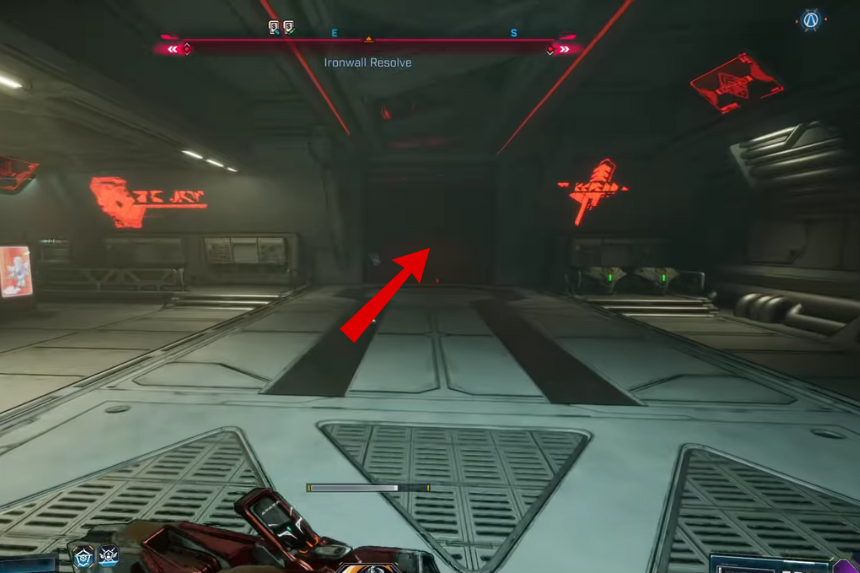
This boss isn’t too dangerous. Focus on breaking its Shield bar with Shock weapons first, then switch to Corrosive or Cryo to melt through its Armor.
Directive-O Rewards
You will get the Bonnie and Clyde, Whiskey Foxtrot, and the Rowan’s Charge as a reward after defeating it.
| Weapon | Type | Manufacturer | Effect |
| Rowan’s Charge | Assault Rifle | Jakobs | Stalker: 20% chance for shots to be Critical Hit, and refunds 2 Ammo on Critical Hit |
| Bonnie & Clyde | Assault Rifle | Jakobs | Pair of Thieves: grants 100% Damage for the Gun’s other Mode |
| Whiskey Foxtrot | Assault Rifle | Jakobs | Overdrive: Try to use a secondary Magazine for firing on Full Auto. |
Bramblesong
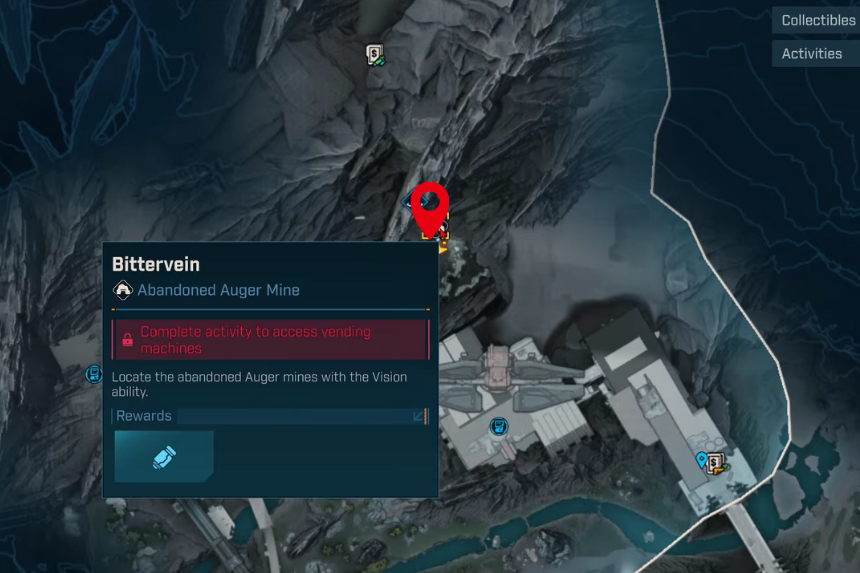
Bramblesong is an optional boss you can find in the Bittervein Abandoned Auger Mine, located in Stoneblood Forest within the Terminus Range. You will be able to access this mine once you’ve completed the Shadow of the Mountain main mission.
After defeating Bramblesong, you can farm it again anytime. Just head back to the arena and use Moxxi’s Big Encore Machine near the entrance to spend some cash and start the fight over.
How to Defeat the Bramblesong
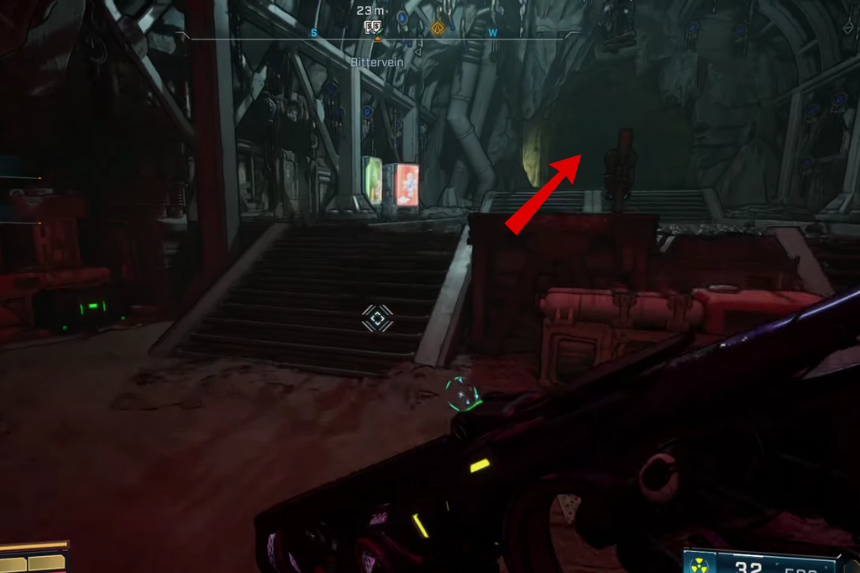
When fighting Bramblesong, watch out for its sweeping melee attacks if you get too close, it can deal a lot of damage. Luckily, there’s a boulder in the arena you can use as cover, giving you a safe moment to heal or fire back. Bramblesong also launches volleys of projectiles that explode on impact.
Make sure to keep moving and avoid the blast zones, or you will take heavy damage. It’s also smart to leave a few enemies alive around the arena. If you get downed during the fight, killing one of them can trigger Second Wind, letting you get back on your feet and continue the battle.
Bramble Song Rewards
Defeating Bramblesong can reward you with some solid loot, including the Convergence legendary shotgun and the Disco legendary grenade. Both are powerful drops that make taking on this optional boss worthwhile.
| Weapon | Type | Manufacturer | Effect |
| Convergence | Shotgun | Ripper | Asymptomatic |
| Disco | Grenade | – | Slow spinning disc that deals high status dmg in its beam |
| Boomslang | Sniper | Jakobs | After Reload, first crit ricochets a sticky projectile to up to 3 nearby enemies |
Other Weapons
Following are the weapons that you will be able to get other than the bosses.
| Weapon | From | Type | Manufacturer | Effect |
| Acey May | World Drop | Shotgun | Daedalus | Fires in a Heart-shaped spread pattern |
| Cold Shoulder | Moxxi’s Tip Jar | Assault Rifle | Torgue | Iced Out – Always cryo. Deals area effect damage. Bullets travel unpredictably and have a chance to home in on targets. |
| Firebreak | JS63J-JSCWJ-CFTBW-3TJ3J-WJS5R (Redeem at SHiFT account) | Energy | – | On break, triggers nova on 3 enemies |
| First Impression | Pre-order Only | Assault Rifle | Daedalus | Chance to Crit based on target’s HP% |
| Fisheye | To be updated… | Sniper | Order | Fires wide, penetrating triple railgun shots with +40% Crit dmg |
| Forsaken Chaos | Twitch Drop | Shotgun | Teoiore | Wide Net – |
| Frangible | To be updated… | SMG | Daedalus | To be updated… |
| Guardian Angel | To be updated… | Energy | – | Faster revival time. Expiring FFYL grants 1 free Second Wind every 300s |
| Impact Grenade | To be updated… | Grenade (Ordnance) | Vladof | To be updated… |
| Matador’s Match | Pre-order Only | Submachine Gun | Maliwan | It Fires Elemental rounds in the shape of fireworks. |
| Midnight Defiance | Twitch Drop | Sniper Rifle | Vladof | Crowd Sourced – On hit, additional Projectiles spawn from nearby enemies. |
| Sidewinder | Pre-order Only | Heavy Weapon (Ordnance) | Torgue | Sidewinder – |
| Sprezzatura | World Drop | Heavy Weapon (Ordnance) | Torgue | Gungir – This weapons payload will fire aggressively towards the sky before following a laser guided sight. |
| Sweet Embrace | Moxxi’s Tip Jar | Shotgun | Maliwan | Adoration – Switches between two elements unique to each generated weapon.Greatly increased damage.Fires four slow moving rounds in a square pattern that explode on contact. |
| Transmitter | World Drop | Grenade (Ordnance) | Ripper | Grenade continuously fires projectiles at nearby enemies. |
All Legendary Enhancements & Effects
In Borderlands 4, Enhancements work like the new version of Artifacts. Think of them as special mods that give you extra stat boosts and make your weapons even stronger especially if you meet the right conditions while using them.
Accumulator
The Accumulator is a legendary enhancement in Borderlands 4 manufactured by Daedalus. Guns with Daedalus-licensed parts gain two fixed bonuses: Backup Plan, which slowly regenerates reserve ammo while equipped, and Accelerator, which increases fire rate by 1% per bullet fired up to a maximum of 50 stacks, resetting on reload.
Autocannibal
The Autocannibal is a legendary enhancement in Borderlands 4 manufactured by Ripper. Guns with Ripper-licensed parts gain two fixed bonuses: Freeloader, giving a 30% chance to instantly refill the magazine when empty, and Short Circuit, which gives a 30% chance after reloading an empty magazine to increase the next magazine’s fire rate by 100%.
Besieger
The Besieger is a legendary enhancement in Borderlands 4 manufactured by Hyperion. Guns with Hyperion-licensed parts gain two fixed bonuses: Stabilizer, which increases accuracy by 40%, and Bulwark, which grants 100% gun shield capacity.
Big Banger
The Big Banger is a legendary enhancement in Borderlands 4 manufactured by Torgue. Weapons with Torgue-licensed parts gain two fixed bonuses: Boompuppy, giving a 50% chance on kill to call down a missile barrage on a nearby enemy, and Head Ringer, which grants +25% damage and +100% damage radius.
Binger
The Binger is a legendary enhancement in Borderlands 4 manufactured by Ripper. Guns with Ripper-licensed parts gain two fixed bonuses: High Roller, which increases gun damage by 2% for each consecutive shot fired up to a maximum of 25 stacks, and Short Circuit, which gives a 30% chance after reloading an empty magazine to increase the next magazine’s fire rate by 100%.
Blind Box
The Blind Box is a legendary enhancement in Borderlands 4 manufactured by Jakobs. Guns with Jakobs-licensed parts gain two fixed bonuses: Leaper, which gives a 40% chance for non-critical hits to ricochet, and Bounce Pass, which increases the number of possible ricochets by 1.
Body Counter
The Body Counter is a legendary enhancement in Borderlands 4 manufactured by Torgue. Guns with Torgue-licensed parts gain two fixed bonuses: Boompuppy, giving a 50% chance on kill to call down a missile barrage on a nearby enemy, and Explosi-ception, which increases gun damage by 50% on impact when using sticky magazines.
Champion
The Champion is a legendary enhancement in Borderlands 4 manufactured by Hyperion. Weapons with Hyperion-licensed parts gain two fixed bonuses: Bulwark, which provides 100% gun shield capacity, and Stim Converter, which regenerates up to 10% health when the Sun Shield is hit.
Collector
The Collector is a legendary enhancement in Borderlands 4 manufactured by Daedalus. Guns with Daedalus-licensed parts gain two fixed bonuses: Backup Plan, which slowly regenerates reserve ammo while equipped, and Stockpiler, which increases damage by up to 25% on reload based on the amount of spare ammo for the currently equipped gun.
Director
The Director is a legendary enhancement in Borderlands 4 manufactured by Hyperion. Weapons with Hyperion-licensed parts gain two fixed bonuses: Shock Guard, which triggers a shock nova when deployed with an 8-second cooldown, and Stabilizer, which increases accuracy by 40%.
Disruptor
The Disruptor is a legendary enhancement in Borderlands 4 manufactured by Ripper. Weapons with Ripper-licensed parts have two fixed bonuses: Freeloader, giving a 30% chance to instantly refill the magazine when empty, and High Roller, which increases gun damage by 2% for each consecutive shot fired, up to a maximum of 25 stacks.
Dog Movement
The Dog Movement is a legendary enhancement in Borderlands 4 manufactured by Vladof. Guns with Vladof-licensed parts have two fixed bonuses: Underdog, which increases underbarrel damage by 50%, and Bottom Feeder, which reduces underbarrel cooldown duration by 40%.
Entangler
The Entangler is a legendary enhancement in Borderlands 4 manufactured by Order. Weapons with Order-licensed parts have two fixed bonuses: Free Charger, which gives a 30% chance to make the next shot’s charge time and ammo cost zero when firing from maximum charge, and Muzzle Break, which increases accuracy and burst fire speed by 50% when firing from maximum charge.
Entropic
The Entropic is a legendary enhancement in Borderlands 4 manufactured by Ripper. Guns with Ripper-licensed parts have two fixed bonuses: Hard Charger, which increases damage by 25% but also raises charge time by 30%, and Freeloader, which gives a 30% chance to instantly refill the magazine when empty.
Evolver
The Evolver is a legendary enhancement in Borderlands 4 manufactured by Order. Weapons with Order-licensed parts have two fixed bonuses: Muzzle Break, which increases accuracy and burst fire speed by 50% when firing from maximum charge, and Power Shot, which boosts damage by 30% when firing from maximum charge.
Extension
The Extension is a legendary enhancement in Borderlands 4 manufactured by Tediore. Guns with Tediore-licensed parts have two fixed bonuses: Extend-A-Friend, which increases the lifetime of thrown turrets by 50%, and Digi-Divider, which gives a 50% chance to spawn an additional projectile on reload.
Fashionista
The Fashionista is a legendary enhancement in Borderlands 4 manufactured by Maliwan. Weapons with Maliwan-licensed parts have two fixed bonuses: Synthesizer, which increases status effect damage by 25%, and Transfuser, which spreads the active status effect to up to three nearby targets on kill.
Flashpan
The Flashpan is a legendary enhancement in Borderlands 4 manufactured by Torgue. Guns with Torgue-licensed parts have two fixed bonuses: Air Burst, which causes projectiles to explode on proximity, and Boompuppy, which gives a 50% chance on kill to call down a missile barrage on a nearby enemy.
Gatherer
The Gatherer is a legendary enhancement in Borderlands 4 manufactured by Daedalus. Guns with Daedalus-licensed parts have two fixed bonuses: Accelerator, which increases fire rate by 1% per bullet fired up to 50 stacks that reset on reload, and Stockpiler, which boosts damage by up to 25% on reload based on the spare ammo of the currently equipped gun.
Glacier
The Glacier is a legendary enhancement in Borderlands 4 manufactured by COV. Weapons with COV-licensed magazines have two fixed bonuses: Cold Open, which increases damage by 20% when below 50% heat, and Ventilator, which gives a 25% chance to fire without consuming heat.
Hat Trick
The Hat Trick is a legendary enhancement in Borderlands 4 manufactured by Jakobs. Weapons with Jakobs-licensed parts have two fixed bonuses: Bounce Pass, which increases the number of possible ricochets by 1, and Sequencer, which grants consecutive critical hits a 5% stacking bonus damage, up to 8 stacks.
Hephaestian
The Hephaestian is a legendary enhancement in Borderlands 4 manufactured by Daedalus. Weapons with Daedalus-licensed parts have two fixed bonuses: Bullet Fabricator, which gives a 40% chance to refill magazines on kill, and Stockpiler, which increases damage by up to 25% on reload based on the spare ammo of the currently equipped gun.
Hero of Bullet
The Hero of Bullet is a legendary enhancement in Borderlands 4 manufactured by Vladof. Weapons with Vladof-licensed parts have two fixed bonuses: Box Magazine, which increases fire rate and magazine size by 20%, and Bullet Hose, which gives a 30% chance to fire an extra projectile per shot.
Hydrator
The Hydrator is a legendary enhancement in Borderlands 4 manufactured by Tediore. Weapons with Tediore-licensed parts have two fixed bonuses: Banger, which increases thrown damage by 50% based on maximum loaded ammo, and Digi-Divider, which gives a 50% chance to spawn an additional projectile on reload.
Jackhammer
The Jackhammer is a legendary enhancement in Borderlands 4 manufactured by Torgue. Weapons with Torgue-licensed parts have two fixed bonuses: Air Burst, which makes projectiles explode on proximity, and Explosi-ception, which increases gun damage by 50% on impact when using sticky magazines.
Ladykiller
The Ladykiller is a legendary enhancement in Borderlands 4 manufactured by Jakobs. Weapons with Jakobs-licensed parts have two fixed bonuses: Leaper, which gives a 40% chance for non-critical hits to ricochet, and Piercer, which provides a 20% chance to trigger a critical hit.
Lamé
The Lamé is a legendary enhancement in Borderlands 4 manufactured by Maliwan. Guns with Maliwan-licensed parts have two fixed bonuses: Synthesizer, which increases status effect damage by 25%, and Mixologist, which adds 10% bonus damage from the inactive mode’s element.
Maestro
The Maestro is a legendary enhancement in Borderlands 4 manufactured by Maliwan. Guns with Maliwan-licensed parts have two fixed bonuses: Primed Potency, which grants 100% status effect chance on the first bullet after reload, and Synthesizer, which increases status effect damage by 25%.
Multistrike
The Multistrike is a legendary enhancement in Borderlands 4 manufactured by Jakobs. Weapons with Jakobs-licensed parts have two fixed bonuses: Piercer, which gives a 20% chance to trigger a critical hit, and Sequencer, which grants consecutive critical hits a 5% stacking bonus damage, up to a maximum of 8 stacks.
Ouroboros
The Ouroboros is a legendary enhancement in Borderlands 4 manufactured by Order. Guns with Order-licensed parts have two fixed bonuses: Ammo Generator, which slowly refills ammo from reserves while held, and Power Shot, which increases damage by 30% when firing from maximum charge.
Parallaxis
The Parallaxis is a legendary enhancement in Borderlands 4 manufactured by Order. Weapons with Order-licensed parts have two fixed bonuses: Ammo Generator, which slowly refills ammo from reserves while held, and Muzzle Break, which increases accuracy and burst fire speed by 50% when firing from maximum charge.
Primadiem
The Primadiem is a legendary enhancement in Borderlands 4 manufactured by Order. Guns with Order-licensed parts have two fixed bonuses: Power Shot, which increases damage by 30% when firing from maximum charge, and Free Charger, which gives a 30% chance to make the next shot’s charge time and ammo cost zero when firing from maximum charge.
Principal
The Principal is a legendary enhancement in Borderlands 4 manufactured by Hyperion. Weapons with Hyperion-licensed parts have two fixed bonuses: Shock Guard, which triggers a shock nova when deployed with an 8-second cooldown, and Stim Converter, which regenerates up to 10% health when the Sun Shield is hit.
Pumper
The Pumper is a legendary enhancement in Borderlands 4 manufactured by Torgue. Guns with Torgue-licensed parts have two fixed bonuses: Air Burst, which makes projectiles explode on proximity, and Head Ringer, which increases damage by 25% and damage radius by 100%.
Quencher
The Quencher is a legendary enhancement in Borderlands 4 manufactured by Tediore. Guns with Tediore-licensed parts have two fixed bonuses: Banger, which increases thrown damage by 50% based on maximum loaded ammo, and Recycler, which retains 50% of a magazine’s ammo on reload.
Quicksilver
The Quicksilver is a legendary enhancement in Borderlands 4 manufactured by COV. Guns with COV-licensed magazines have two fixed bonuses: Duct Tape, which guarantees critical damage while overheating, and Smelter, which increases fire rate by 35% when above 50% heat.
Quintain
The Quintain is a legendary enhancement in Borderlands 4 manufactured by Jakobs.
Scion
The Scion is a legendary enhancement in Borderlands 4 manufactured by Daedalus. Weapons with Daedalus-licensed parts have two fixed bonuses: Accelerator, which increases fire rate by 1% per bullet fired up to 50 stacks that reset on reload, and Bullet Fabricator, which gives a 40% chance to refill magazines on kill.
Steward
The Steward is a legendary enhancement in Borderlands 4 manufactured by Daedalus.
Studfinder
The Studfinder is a legendary enhancement in Borderlands 4 manufactured by Torgue. Guns with Torgue-licensed parts have two fixed bonuses: Head Ringer, which increases damage by 25% and damage radius by 100%, and Explosi-ception, which boosts gun damage by 50% on impact when using sticky magazines.
Toile
The Toile is a legendary enhancement in Borderlands 4 manufactured by Maliwan. Weapons with Maliwan-licensed parts have two fixed bonuses: Mixologist, which adds 10% bonus damage from the inactive mode’s element, and Transfuser, which spreads the active status effect to up to three nearby targets on kill.
Trooper
The Trooper is a common class mod for Rafa in Borderlands 4.
Value-Add
The Value-Add is a legendary enhancement in Borderlands 4 manufactured by Tediore. Guns with Tediore-licensed parts have two fixed bonuses: Extend-A-Friend, which increases the lifetime of thrown turrets by 50%, and Recycler, which retains 50% of a magazine’s ammo on reload.
Valuepalooza
The Valuepalooza is a legendary enhancement in Borderlands 4 manufactured by Tediore. Guns with Tediore-licensed parts have two fixed bonuses: Digi-Divider, which gives a 50% chance to spawn an additional projectile on reload, and Recycler, which retains 50% of a magazine’s ammo on reload.
Combo
The X-Y Combo is a legendary enhancement in Borderlands 4 manufactured by Atlas. Weapons with Atlas-licensed parts have two fixed bonuses: Protractor, which gives a 50% chance to not consume ammo while Target Lock is active, and Trauma Bond, which increases damage by 30% while Target Lock is active.
X-Initiator
The X-Initiator is a legendary enhancement in Borderlands 4 manufactured by Atlas. Weapons with Atlas-licensed parts have two fixed bonuses: Sure Shot, which automatically fires a Tracker Dart projectile every 25 seconds, and Trauma Bond, which increases damage by 30% while Target Lock is active.
Y-Initiator
The Y-Initiator is a legendary enhancement in Borderlands 4 manufactured by Atlas. Weapons with Atlas-licensed parts have two fixed bonuses: Protractor, which gives a 50% chance to not consume ammo while Target Lock is active, and Sure Shot, which automatically fires a Tracker Dart projectile every 25 seconds.
Nexus
The Y-Z Nexus is a legendary enhancement in Borderlands 4 manufactured by Atlas. Weapons with Atlas-licensed parts have two fixed bonuses: Protractor, which gives a 50% chance to not consume ammo while Target Lock is active, and Tracker Antenna, which increases fire rate by 40% while Target Lock is active.
Z-Initiator
The Z-Initiator is a legendary enhancement in Borderlands 4 manufactured by Atlas. Weapons with Atlas-licensed parts have two fixed bonuses: Sure Shot, which automatically fires a Tracker Dart projectile every 25 seconds, and Tracker Antenna, which increases fire rate by 40% while Target Lock is active.
Junction
The Z-X Junction is a legendary enhancement in Borderlands 4 manufactured by Atlas. Weapons with Atlas-licensed parts have two fixed bonuses: Tracker Antenna, which increases fire rate by 40% while Target Lock is active, and Trauma Bond, which boosts damage by 30% while Target Lock is active.
Assuit
The Assuit Enhancement is perfect if you’re running guns with Maliwan parts. It gives you two handy perks: first, your weapons deal 10% bonus damage from the element you’re not currently using, and second, after every reload, the first shot has double the chance to inflict a status effect.
Devourer
The Devourer Enhancement is all about Ripper parts. It gives your guns a big 25% damage boost, but the trade-off is that your charge time gets 30% longer. On top of that, if you reload after emptying a magazine, there’s a 30% chance your next magazine will fire twice as fast.
Gummy
The Gummy Enhancement is perfect for Tediore fans. When you throw your gun, the damage scales off 50% more of your max loaded ammo, so those explosions hit harder. Plus, if your Tediore turns into a turret, its lifetime lasts 50% longer, giving you more time to rain down fire.
Icon
The Icon Enhancement makes Maliwan guns even nastier. When you kill an enemy, it spreads whatever status effect they had to up to three nearby targets, letting you chain damage across groups. On top of that, your first shot after reloading always has a 100% chance to apply a status effect, making it super easy to keep enemies burning, freezing, or melting.
Looper
The Looper Enhancement is perfect if you’re running Order weapons. While you’re holding one, your ammo slowly refills straight from your reserves, so you don’t run dry as quickly. Plus, when you fire at full charge, there’s a 30% chance your next shot won’t cost any ammo or take time to charge, giving you some free damage bursts.
Scattershot
The Scattershot Enhancement gives Jakobs weapons some extra kick. With it, even your non-critical shots have a 40% chance to ricochet and hit another target. On top of that, if you’re landing consecutive critical hits, each one stacks an extra +5% bonus damage, up to 8 stacks so the more precise you are, the deadlier your shots become.